I’m going to let you in on a secret: chili used to terrify me. Seriously! I thought making a rich, deep-flavored pot meant simmering bones all day or following some complicated, 15-step process I’d mess up by step three. Then I finally cracked the code, and now I have this Zero-Mistake Chili Recipe that is seriously foolproof. I’m talking deep flavor, hearty texture, and it’s on the table in under an hour. This is the recipe I give everyone who says they can’t cook!
When I first started cooking for myself after college, I burned meat more often than I browned it properly. That’s why I built this guide around making sure you get that crucial, deep flavor base right every single time. We’re focusing on technique—the little things that chefs know—but explaining them so clearly you won’t have to guess. Forget watery, bland chili; we are achieving true weeknight perfection here. Trust me, once you master the browning and the spice bloom, you’ll never look back!

Gather Your Components for the Zero-Mistake Chili Recipe
Okay, before we even think about turning on the stove, we need to organize our station. This is my biggest organizing tip for any quick meal: Mise en place! It means getting everything chopped, measured, and ready to go before you start cooking. Since this chili comes together fast, you don’t want to be frantically chopping an onion while your garlic burns.
Take a few minutes now to dice those peppers, mince that garlic, and measure out all those beautiful spices. Having everything lined up makes following the Zero-Mistake Chili Recipe feel like assembly, not cooking. You’ll be amazed how much smoother the process runs!
Essential Ingredients List for Perfect Chili
- 2 tablespoons olive oil
- 1\u00bd pounds ground beef (85% lean is my sweet spot!)
- 1 large yellow onion, diced
- 1 red bell pepper, diced
- 1 green bell pepper, diced
- 4 cloves garlic, minced
- 3 tablespoons chili powder
- 1 tablespoon ground cumin
- 2 teaspoons smoked paprika
- 1\u00bd teaspoons dried oregano
- 1 teaspoon salt
- \u00bd teaspoon black pepper
- \u00bc teaspoon cayenne pepper
- 3 tablespoons tomato paste
- 1 (28-ounce) can crushed tomatoes
- 1 (15-ounce) can diced tomatoes
- 1 (15-ounce) can kidney beans, drained and rinsed well
- 1 (15-ounce) can pinto beans, drained and rinsed well
- 2 cups beef broth
- 1 tablespoon brown sugar
- Optional Toppings: Shredded cheddar cheese, Sour cream, Diced green onions, Tortilla chips, Fresh cilantro
Necessary Equipment for Your Zero-Mistake Chili Recipe
- Large Dutch oven or heavy-bottomed pot (this holds heat perfectly!)
- Measuring cups and spoons (don’t guess on the spices!)
- Sharp knife and cutting board
- Wooden spoon or sturdy spatula for stirring
- Can opener (always have one handy!)
- Colander for rinsing beans
Step-by-Step Guide: Making Your Zero-Mistake Chili Recipe
This is where the magic happens! Since we’ve prepped everything, this part moves quickly. Remember, the key to a great chili isn’t about adding fancy ingredients; it’s about how you treat the basic ones. We’re building layers of flavor, so don’t rush the early stages. That deep, rich color you want comes from proper browning, not from adding artificial coloring!
Step 1: Browning the Beef and Vegetables
First things first, get your Dutch oven on medium-high heat and add that olive oil. You want it shimmering—that means it’s ready. Toss in the ground beef. Now, here’s the crucial part: don’t poke it constantly! Let it sit and develop a deep brown crust on the bottom of the pot. We need that crust—that’s pure flavor! This takes a good 8 to 10 minutes. Once it’s deeply browned and crispy bits are forming, break it up, drain off any excess grease if you feel you need to, and then add your diced onion and both bell peppers. Let those cook down until the onions look clear and soft, which should take about 5 to 6 minutes. Don’t worry if the bottom of the pot looks a little stuck; that fond is our friend!
Step 2: Toasting Spices and Blooming Tomato Paste
Now we add the aromatics and the flavor boosters. Stir in your minced garlic—it only needs about a minute until you smell it, seriously, garlic burns fast! Next, push the meat and veggies to the side slightly and drop in your tomato paste. Cook that paste for a solid two minutes, stirring it into the hot spot on the bottom of the pot until it darkens a bit. That’s called blooming, and it removes that tinny flavor! Immediately follow up with all your dry spices: chili powder, cumin, paprika, oregano, salt, pepper, and cayenne. Stir everything together vigorously for one full minute. You’ll notice the whole pot smells incredible; you’ve just toasted those spices, which wakes up their oils beautifully. This step makes this Zero-Mistake Chili Recipe taste like it simmered for hours!
Step 3: Simmering to Achieve Hearty Consistency
Time to bring in the liquids! Pour in your crushed tomatoes, diced tomatoes, beef broth, and that tablespoon of brown sugar—the sugar is essential for balancing the tomato acidity. Stir everything until it’s totally combined, scraping up any last bits from the bottom. Bring the whole thing up to a boil over high heat. Once it’s bubbling nicely, knock the heat right down to low, cover it partially (we want some steam to escape), and let it simmer for 25 to 30 minutes. Stir it every five to ten minutes so nothing sticks. After half an hour, your chili should have thickened up nicely into that hearty consistency we’re looking for. Taste it now and adjust your salt or cayenne before serving hot!

Tips for Success with Your Zero-Mistake Chili Recipe
Even with a foolproof recipe like this, sometimes things go slightly off track, usually because of the specific can of tomatoes you grabbed or how much water was left in those beans. Don’t panic! A great cook knows how to adjust on the fly. This recipe is designed to be forgiving, but a little knowledge goes a long way in making sure your final bowl is exactly how you want it.
Adjusting Thickness and Final Seasoning Checks
If you finish the 30-minute simmer and your chili looks more like soup than chili, don’t worry! Just remove the lid completely and let it simmer uncovered for another 10 to 15 minutes until some of that liquid evaporates. Another cool trick: take a spoonful of the beans and mash them right against the side of the pot with your spoon. That starch thickens the liquid almost instantly. When it comes to seasoning, always taste *after* the simmer. If it tastes a little flat, add a tiny pinch more salt or chili powder. If it needs a little brightness, a small squeeze of lime juice (if you have one handy) works wonders!
Ingredient Notes and Simple Substitutions
Make sure you drain and rinse those canned beans thoroughly! All that leftover liquid from the can adds unnecessary starch and can throw off the texture and make your chili cloudy. As for protein, ground turkey works fine, but you might need to add a little extra fat, like a splash of oil when browning, since turkey is so lean. Also, if you don’t have brown sugar, a teaspoon of maple syrup works beautifully to balance the acidity in this Zero-Mistake Chili Recipe.
Serving Suggestions for Your Hearty Chili
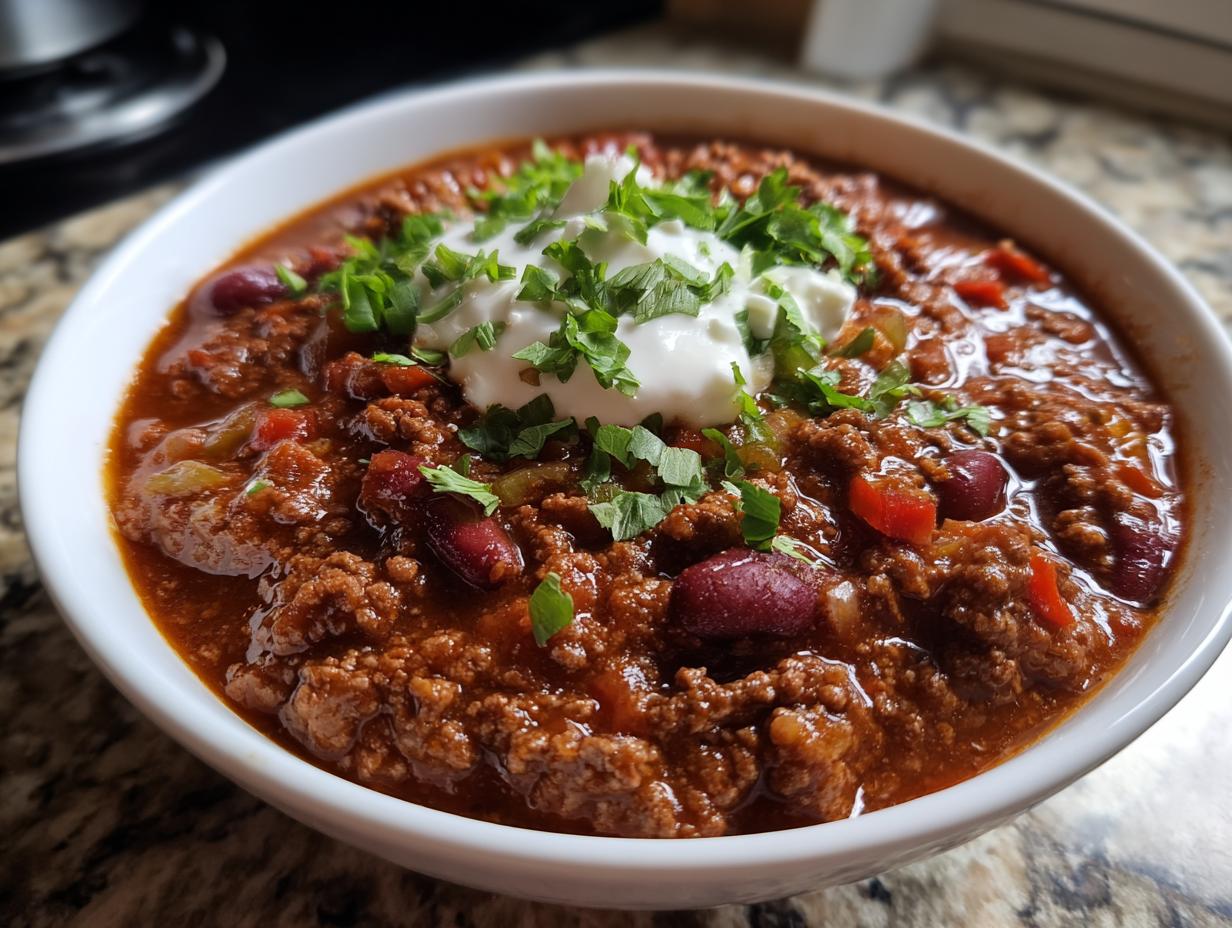
This chili is fantastic all on its own, but the toppings are where you personalize the experience! Since we nailed the deep, savory flavor profile in the pot, you want toppings that add coolness, texture, or a little sharpness. Shredded sharp cheddar cheese is non-negotiable for me; it melts perfectly into the hot beef.
I always serve mine with a big dollop of cool sour cream right in the middle to cut the richness. If you like a little crunch, crush up some tortilla chips right over the top just before eating—don’t put them in too early or they get soggy! And for a fresh, bright finish, nothing beats finely diced green onions or a sprinkle of fresh cilantro. It really lifts the whole heavy flavor profile.
Storing and Reheating Your Zero-Mistake Chili Recipe
The absolute best part about making a big batch of this chili is that it tastes even better the next day. Seriously, the spices meld overnight! If you’re planning ahead, this recipe is perfect for meal prepping. Just make sure you let the chili cool down completely on the counter before sealing it up. You never want to put piping hot food directly into the fridge; it raises the internal temperature of your appliance.
To keep this Zero-Mistake Chili Recipe on hand, make sure you portion it out into airtight containers. You can store it in the refrigerator for up to four days, but I find it’s best reheated within the first three. It freezes like a dream, too, which is perfect for those nights when you need dinner ready in two minutes flat.
Safe Storage Times and Methods
- Refrigerate cooled chili in airtight containers for up to 4 days.
- For freezing, use freezer-safe containers or heavy-duty zip-top bags, leaving about an inch of headspace for expansion.
- This chili keeps beautifully in the freezer for up to 3 months. Label the container with the date!
Best Practices for Reheating Leftovers
When you’re ready to eat the refrigerated stuff, just put it in a small pot over medium-low heat and stir until it’s steaming hot all the way through. If you’re reheating frozen chili, let it thaw in the fridge overnight first, then reheat gently on the stove. If you’re in a real rush, you can microwave it, but stir it every minute or so to ensure it heats evenly and doesn’t develop hot spots.
Frequently Asked Questions About This Foolproof Chili
I get so many questions about this recipe because people are always shocked at how easy it is to get such deep flavor without a long simmer time. Here are the things I hear most often about making this Zero-Mistake Chili Recipe perfectly every time.
Can I make this Zero-Mistake Chili Recipe using ground turkey?
Yes, you absolutely can swap out the ground beef for ground turkey or even ground chicken! Just remember that poultry is leaner. If you use turkey, I highly recommend adding that extra splash of oil in Step 1 when you start browning the meat, or you might end up with a slightly dry texture once everything is done simmering.
How spicy is this chili recipe?
I designed this to be flavorful rather than fiery, so the base level, using just the ¼ teaspoon of cayenne, gives you a nice warmth that most people enjoy. If you love heat, go ahead and double that cayenne, or add a dash of your favorite hot sauce during the final seasoning check in Step 3. You are in total control of the fire level!
Why is browning the meat for so long important?
That long, slow browning in Step 1 is your secret weapon for flavor depth, honestly. When the meat browns deeply, you’re creating something called the Maillard reaction. This reaction creates hundreds of new, complex flavor compounds that just don’t exist if you just cook the meat until it turns gray. It’s the difference between bland ground beef and rich, savory chili!
Do I have to use both kidney and pinto beans?
Not at all! Feel free to use any canned beans you have on hand, like black beans or even cannellini beans. Just make sure you drain and rinse them well, as we talked about, to keep that simmering time focused on thickening the sauce, not boiling off excess starch.
Final Thoughts on Your Homemade Chili
See? No stress, no fuss, just incredible, hearty chili ready for your toppings! I hope this recipe brings as much easy comfort to your weeknights as it does to mine. Let me know in the comments how you topped yours! You can also follow along for more easy recipes on Facebook or Pinterest.
Tips for Success with Your Zero-Mistake Chili Recipe
Even with a foolproof recipe like this, sometimes things go slightly off track, usually because of the specific can of tomatoes you grabbed or how much water was left in those beans. Don’t panic! A great cook knows how to adjust on the fly. This recipe is designed to be forgiving, but a little knowledge goes a long way in making sure your final bowl is exactly how you want it.
Adjusting Thickness and Final Seasoning Checks
If you finish the 30-minute simmer and your chili looks more like soup than chili, don’t worry! Just remove the lid completely and let it simmer uncovered for another 10 to 15 minutes until some of that liquid evaporates. Another cool trick: take a spoonful of the beans and mash them right against the side of the pot with your spoon. That starch thickens the liquid almost instantly. When it comes to seasoning, always taste *after* the simmer. If it tastes a little flat, add a tiny pinch more salt or chili powder. If it needs a little brightness, a small squeeze of lime juice (if you have one handy) works wonders!
Ingredient Notes and Simple Substitutions
Make sure you drain and rinse those canned beans thoroughly! All that leftover liquid from the can adds unnecessary starch and can throw off the texture and make your chili cloudy. As for protein, ground turkey works fine, but you might need to add a little extra fat, like a splash of oil when browning, since turkey is so lean. Also, if you don’t have brown sugar, a teaspoon of maple syrup works beautifully to balance the acidity in this Zero-Mistake Chili Recipe.
Serving Suggestions for Your Hearty Chili
This chili is fantastic all on its own, but the toppings are where you personalize the experience! Since we nailed the deep, savory flavor profile in the pot, you want toppings that add coolness, texture, or a little sharpness. Shredded sharp cheddar cheese is non-negotiable for me; it melts perfectly into the hot beef.
I always serve mine with a big dollop of cool sour cream right in the middle to cut the richness. If you like a little crunch, crush up some tortilla chips right over the top just before eating—don’t put them in too early or they get soggy! And for a fresh, bright finish, nothing beats finely diced green onions or a sprinkle of fresh cilantro. It really lifts the whole heavy flavor profile.
Storing and Reheating Your Zero-Mistake Chili Recipe
The absolute best part about making a big batch of this chili is that it tastes even better the next day. Seriously, the spices meld overnight! If you’re planning ahead, this recipe is perfect for meal prepping. Just make sure you let the chili cool down completely on the counter before sealing it up. You never want to put piping hot food directly into the fridge; it raises the internal temperature of your appliance.
To keep this Zero-Mistake Chili Recipe on hand, make sure you portion it out into airtight containers. You can store it in the refrigerator for up to four days, but I find it’s best reheated within the first three. It freezes like a dream, too, which is perfect for those nights when you need dinner ready in two minutes flat.
Safe Storage Times and Methods
- Refrigerate cooled chili in airtight containers for up to 4 days.
- For freezing, use freezer-safe containers or heavy-duty zip-top bags, leaving about an inch of headspace for expansion.
- This chili keeps beautifully in the freezer for up to 3 months. Label the container with the date!
Best Practices for Reheating Leftovers
When you’re ready to eat the refrigerated stuff, just put it in a small pot over medium-low heat and stir until it’s steaming hot all the way through. If you’re reheating frozen chili, let it thaw in the fridge overnight first, then reheat gently on the stove. If you’re in a real rush, you can microwave it, but stir it every minute or so to ensure it heats evenly and doesn’t develop hot spots.
Frequently Asked Questions About This Foolproof Chili
I get so many questions about this recipe because people are always shocked at how easy it is to get such deep flavor without a long simmer time. Here are the things I hear most often about making this Zero-Mistake Chili Recipe perfectly every time.
Can I make this Zero-Mistake Chili Recipe using ground turkey?
Yes, you absolutely can swap out the ground beef for ground turkey or even ground chicken! Just remember that poultry is leaner. If you use turkey, I highly recommend adding that extra splash of oil in Step 1 when you start browning the meat, or you might end up with a slightly dry texture once everything is done simmering.
How spicy is this chili recipe?
I designed this to be flavorful rather than fiery, so the base level, using just the ¼ teaspoon of cayenne, gives you a nice warmth that most people enjoy. If you love heat, go ahead and double that cayenne, or add a dash of your favorite hot sauce during the final seasoning check in Step 3. You are in total control of the fire level!
Why is browning the meat for so long important?
That long, slow browning in Step 1 is your secret weapon for flavor depth, honestly. When the meat browns deeply, you’re creating something called the Maillard reaction. This reaction creates hundreds of new, complex flavor compounds that just don’t exist if you just cook the meat until it turns gray. It’s the difference between bland ground beef and rich, savory chili!
Do I have to use both kidney and pinto beans?
Not at all! Feel free to use any canned beans you have on hand, like black beans or even cannellini beans. Just make sure you drain and rinse them well, as we talked about, to keep that simmering time focused on thickening the sauce, not boiling off excess starch.
Final Thoughts on Your Homemade Chili
See? No stress, no fuss, just incredible, hearty chili ready for your toppings! I hope this recipe brings as much easy comfort to your weeknights as it does to mine. Let me know in the comments how you topped yours!
Print
Amazing Zero-Mistake Chili Recipe in 1 Hour
- Total Time: 55 minutes
- Yield: 8 servings
- Diet: Omnivore
Description
Foolproof chili recipe with a step-by-step checklist to avoid common mistakes. This rich, hearty chili is ready in under an hour, perfect for busy weeknight dinners.
Ingredients
- 2 tablespoons olive oil
- 1½ pounds ground beef (85% lean)
- 1 large yellow onion, diced
- 1 red bell pepper, diced
- 1 green bell pepper, diced
- 4 cloves garlic, minced
- 3 tablespoons chili powder
- 1 tablespoon ground cumin
- 2 teaspoons smoked paprika
- 1½ teaspoons dried oregano
- 1 teaspoon salt
- ½ teaspoon black pepper
- ¼ teaspoon cayenne pepper
- 3 tablespoons tomato paste
- 1 (28-ounce) can crushed tomatoes
- 1 (15-ounce) can diced tomatoes
- 1 (15-ounce) can kidney beans, drained and rinsed
- 1 (15-ounce) can pinto beans, drained and rinsed
- 2 cups beef broth
- 1 tablespoon brown sugar
- Optional Toppings: Shredded cheddar cheese, Sour cream, Diced green onions, Tortilla chips, Fresh cilantro
Instructions
- Heat olive oil in a large Dutch oven or heavy-bottomed pot over medium-high heat until shimmering, about 2 minutes.
- Add ground beef and cook, breaking it apart, until deeply browned with crispy edges, 8–10 minutes.
- Add diced onion and both bell peppers; cook until vegetables soften and onions turn translucent, 5–6 minutes.
- Stir in minced garlic and cook until fragrant, about 1 minute, then add tomato paste and cook for 2 minutes, stirring constantly until it darkens slightly.
- Add chili powder, cumin, smoked paprika, oregano, salt, black pepper, and cayenne pepper; stir to coat, cooking for 1 minute to toast the spices.
- Pour in crushed tomatoes, diced tomatoes, both beans, beef broth, and brown sugar; stir well to combine.
- Bring mixture to a boil, then reduce heat to low and simmer uncovered for 25–30 minutes, stirring occasionally, until chili thickens.
- Taste and adjust seasoning with additional salt, chili powder, or cayenne as needed; serve hot and ensure internal temperature reaches 165°F.
Notes
- Chili tastes better the next day; refrigerate overnight and reheat gently.
- Stir in 1 tablespoon maple syrup or brown sugar to balance acidity.
- If chili is too thin after simmering, cook uncovered for 10 more minutes or mash a few beans against the pot side to thicken.
- Freeze cooled chili in individual containers for up to 3 months.
- Prep Time: 15 minutes
- Cook Time: 40 minutes
- Category: Main Dish
- Method: Stovetop Simmering
- Cuisine: American