Forget those rock-hard dinner rolls you’ve wrestled with! I’m here to tell you that making bakery-style soft rolls with the tang of sourdough is totally achievable, even if you think natural leaven is scary. Seriously, these sweet sourdough rolls are my absolute favorite way to use up that bubbly starter without making a massive loaf of bread.
When I first started baking with sourdough, I stuck to basic loaves. But my neighbor, bless her heart, brought these over one chilly morning. They were so tender, just slightly sweet, and the texture was unbelievable. I asked for the recipe, and she just winked and said, “It’s all in the butter timing.” That was my turning point! These feel fancy, but they are surprisingly straightforward because the starter does a lot of the heavy lifting for that incredible fluffiness. You’re going to love how they turn out.

Essential Components for Your Sweet Sourdough Rolls
When we’re making something as special as these sweet sourdough rolls, the ingredients really matter. This isn’t just about flour and water; we need a few specific things to get that fluffy, slightly sweet interior that tastes like it came straight from a fancy bakery. Don’t sweat the sourdough starter—as long as it’s active and bubbly, it’s ready to go!
The sugar content is low, which is why they don’t taste overly sweet, but it’s just enough to feed the yeast and balance the natural tang from the starter. And the butter? It has to be soft. Trust me, adding cold butter ruins the texture we’re trying to build here. It’s all about these small details!
Ingredient Breakdown and Preparation Clarity
Let’s look closely at what you need so there are no surprises when you start mixing. The milk needs to be warmed slightly—just warm to the touch, not hot, or it can shock your starter. Also, make sure your egg is at room temperature; cold ingredients fight the dough structure!
- Active Sourdough Starter: Must be bubbly and passed the float test!
- Bread Flour: We need that high protein for the best structure.
- Whole Milk: Warmed just a little bit.
- Softened Butter: This is key for the final kneading stage.
Equipment Needed for Perfect Sweet Sourdough Rolls
You don’t need a fancy stand mixer for this batch of sweet sourdough rolls, though it certainly helps! What you absolutely need is a good sturdy bowl for mixing and rising. I also find a bench scraper incredibly helpful when dealing with the slightly tacky dough after the butter goes in.
- Large mixing bowl
- 9×13 inch baking dish
- Plastic wrap or a clean kitchen towel
- Measuring cups and spoons (or better yet, a kitchen scale!)
Step-by-Step Guide to Preparing Sweet Sourdough Rolls
Okay, now for the fun part! Getting these sweet sourdough rolls mixed and kneaded is where the magic starts to happen. Remember, with sourdough, we are working with time, not just effort. Don’t rush the resting period—it lets the flour hydrate properly, making kneading much easier later on.
Mixing the Dough and Initial Rest
First things first, grab your biggest bowl. We’re combining all the wet-ish ingredients first—the starter, that slightly warmed milk, the sugar, the egg, and the salt. Whisk it until it looks like a happy, slightly cloudy liquid. Then, dump in all that bread flour. Mix it with a wooden spoon or spatula until you can barely see any dry spots and it just forms a shaggy mess. Don’t overmix here! Cover that bowl up—I use a damp tea towel—and let it chill out for about 20 minutes. This is called the autolyse, and it’s crucial for hydration.
Incorporating Butter and Developing Structure
After the rest, it’s time to work it out! Knead the dough on a lightly floured surface for about six minutes. It will feel a little rough, but that’s okay. Now comes the crucial part: the butter. You have to add that softened butter one tablespoon at a time. Seriously, wait until the first bit is completely absorbed before adding the next spoonful. It’s going to feel sticky and gross for a minute, but keep kneading! After all six tablespoons are in, knead for five more minutes. It should transform into this beautiful, smooth, slightly tacky dough. If it’s too sticky to handle, just dust your hands lightly; resist adding more flour!
The Bulk Fermentation for Sweet Sourdough Rolls
Once your dough is smooth, shape it into a tight ball and put it in a lightly oiled bowl. Cover it well. Now we wait. This is the bulk fermentation step, where the sourdough flavor develops. Depending on how warm your kitchen is, this can take around four hours until the dough has doubled in size. You’ll know it’s ready because it looks pillowy and feels airy when you gently poke it. This long rest is what gives our sweet sourdough rolls that incredible depth of flavor.
Shaping and Final Proofing
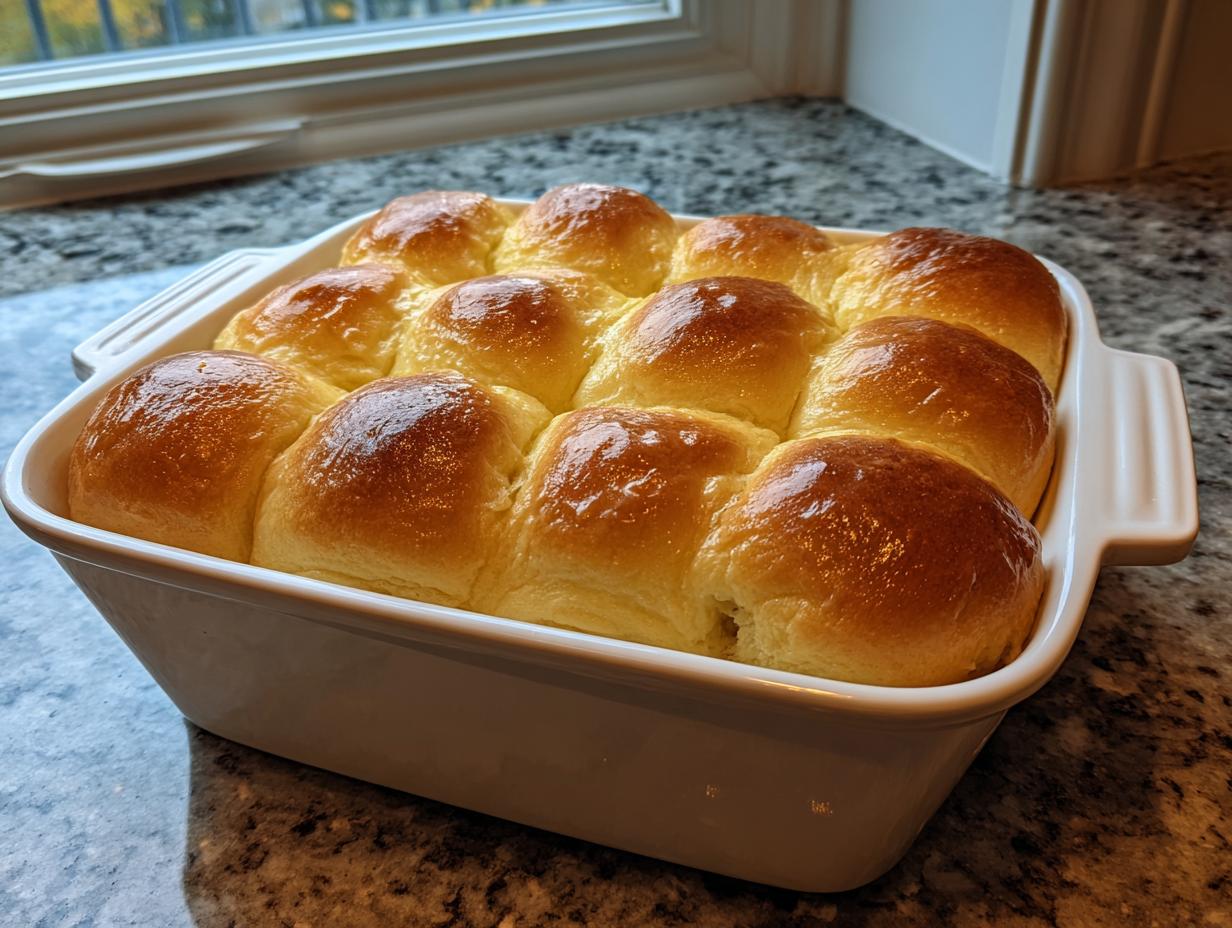
Gently turn the dough out and divide it into 12 equal pieces. I weigh mine out—about 70 grams each—just to keep them uniform, but eyeballing it works too! Cup your hands around each piece and roll them tight into small balls. They need to be firm little spheres. Arrange these snugly in your greased 9×13 pan, leaving a little space between them. Cover them again and let them proof for about two more hours. They should puff up significantly, looking puffy and touching their neighbors before they go into the oven.

Baking Your Fluffy Sweet Sourdough Rolls to Golden Perfection
The moment of truth! Make sure your oven is fully preheated to 375 degrees Fahrenheit well before you plan to bake. If the oven isn’t hot enough, the rolls won’t get that beautiful oven spring we are looking for. While it’s heating, prepare your egg wash. I just whisk one egg with a tablespoon of milk—it gives the sweet sourdough rolls that gorgeous, shiny, golden-brown top without making them taste eggy.
Brush the wash lightly over the puffy tops of the rolls. Don’t drown them, or the wash can weigh down the final proof. Bake them for about 22 minutes. I watch them closely around the 18-minute mark. You are looking for rich golden color, and the internal temperature should hit 190 degrees F if you use a thermometer. Pull them out, but don’t serve them immediately! Let them cool right there in the pan for about 10 minutes. This short rest helps them set up so they don’t tear apart when you pull them free.
Tips for Achieving Expert Texture in Your Sweet Sourdough Rolls
Getting that signature soft crumb in these sweet sourdough rolls really comes down to feel, not just following the clock. When you’re kneading in the butter—and I know it gets messy—keep going! If you stop too soon because it feels sticky, the butter won’t fully incorporate, and you’ll end up with denser spots instead of fluffy pockets.
Also, pay attention to your proofing environment. If your kitchen is cold, the rise time in both the bulk and final proof will be much longer. I often use my oven with just the light on for the final proof when it’s chilly outside; it creates the perfect warm, humid spot. That final puff before baking is essential for that bakery-style pull-apart texture.
Finally, when you divide and shape those 12 pieces, be firm! Rolling them into tight little balls creates surface tension that helps them spring upwards in the oven instead of spreading outwards. If you handle the dough gently but firmly during shaping, your sweet sourdough rolls will be perfectly tender and light when they come out!
Storing and Refreshing Your Homemade Sweet Sourdough Rolls
Now, the hardest part: keeping your hands off these delicious sweet sourdough rolls long enough for them to cool slightly! These are truly best on the day you bake them, served warm right out of the pan. But they store beautifully for a few days.
If you have leftovers, just keep them in a sealed container at room temperature. Don’t refrigerate them, or they get hard fast! If they do seem a little less fluffy the next day, don’t worry—a quick refresh brings them right back to life. I just pop two or three rolls on a baking sheet for about five minutes at 325 degrees F. They steam themselves slightly and taste perfect again.
| Storage Method | Duration | Reheating Tip |
|---|---|---|
| Airtight Container (Room Temp) | Up to 3 days | 5 minutes at 325°F |
| Freezer (Wrapped tightly) | Up to 2 months | Thaw completely, then reheat |
Frequently Asked Questions About Sweet Sourdough Rolls
It’s normal to have a few questions when you start baking with sourdough, especially when you want something tender like these sweet sourdough rolls! Here are the things I get asked most often when people try this recipe for the first time.
Q1. My starter isn’t very active, can I still make these sweet sourdough rolls?
I really wouldn’t recommend it! Since this recipe relies heavily on the natural leaven for its structure and flavor, you need a starter that is actively bubbling and has doubled in size within 4-6 hours of feeding. If yours is sluggish, feed it twice a day for a couple of days before trying these rolls to ensure you get that beautiful rise.
Q2. Can I substitute all-purpose flour for the bread flour?
You can, but you’ll lose some of that great toothsome structure that makes them bakery-style. Bread flour has a higher protein content, which handles the butter and the long fermentation better. If you absolutely must substitute, use a good quality all-purpose, but expect the dough to feel softer and perhaps a bit stickier when kneading.
Q3. My rolls didn’t touch each other during the final proof—is that okay?
That just means you have some space between them, which is fine! They will still bake up beautifully. In the oven, they will puff up and touch their neighbors. If they didn’t touch before baking, they just might end up as 12 individual little buns instead of one big pull-apart sheet of sweet sourdough rolls. Either way, they taste incredible!
Q4. Why are these rolls only slightly sweet compared to brioche?
That’s intentional! We keep the sugar low so the natural tang of the sourdough can shine through. If you want them sweeter, you can increase the sugar in the initial mix by up to two tablespoons, but I find that level masks the lovely complexity the starter brings to these sweet sourdough rolls.
Sharing Your Success with Sweet Sourdough Rolls
Honestly, seeing your beautiful bakes is the best part of sharing recipes! I put my heart into making sure these sweet sourdough rolls are foolproof, but baking is always a journey, and I love hearing how they turned out for you.
Did you find the butter incorporation tricky? Did they end up perfectly soft? Did your family devour them in under five minutes? Tell me everything! Your feedback helps me know what to emphasize for the next person tackling this recipe.
Please drop a rating below—five stars if they made your kitchen smell amazing! And if you snap a picture of your gorgeous pull-apart buns, tag me on social media. I can’t wait to see your fluffy, tangy creations. Happy baking! Check out our Facebook for more baking inspiration.
Print
Amazing Sweet Sourdough Rolls in 12 Steps
- Total Time: 47 minutes
- Yield: 12 rolls
- Diet: Vegetarian
Description
These sweet sourdough rolls bake up soft, fluffy, and lightly sweet with a tender crumb and golden tops. Perfect for everyday meals or make ahead baking.
Ingredients
- 1 cup active sourdough starter
- 3 1/2 cups bread flour
- 3/4 cup whole milk warmed
- 1 large egg at room temperature
- 1/4 cup granulated sugar
- 1 teaspoon fine sea salt
- 6 tablespoons unsalted butter softened
- Egg wash: 1 large egg
- Egg wash: 1 tablespoon whole milk
Instructions
- Combine sourdough starter, milk, sugar, egg, and salt in a large bowl and whisk until smooth.
- Add bread flour and mix until a soft dough forms. Cover and rest for 20 minutes.
- Knead the dough for 6 minutes until elastic. Add butter one tablespoon at a time and knead 5 minutes more until smooth and slightly tacky.
- Shape the dough into a ball, place in a lightly greased bowl, cover, and let rise at room temperature until doubled, about 4 hours.
- Divide the dough into 12 equal portions, about 70 grams each, and shape into tight balls.
- Arrange the rolls in a greased 9 by 13 inch baking dish with slight spacing.
- Cover and proof until the rolls are puffy and touching, about 2 hours.
- Heat the oven to 375°F. Whisk egg and milk and brush lightly over the rolls.
- Bake for 22 minutes until golden brown and the internal temperature reaches 190°F.
- Cool in the pan for 10 minutes before serving warm.
Notes
- This recipe uses natural leavening for flavor and texture.
- The rolls are best served warm.
- Prep Time: 25 minutes
- Cook Time: 22 minutes
- Category: Bread
- Method: Baking
- Cuisine: American