I’m going to let you in on a little secret: I used to think chili had to be a three-alarm fire to be good. You know, face-melting heat that makes you sweat out your sins. But I realized most people—especially when feeding a crowd—want something deep, satisfying, and easy to eat without reaching for the milk jug every five minutes. That’s why I developed this Sweet-and-Smoky Chili.
This isn’t your grandma’s plain ground beef chili, and it certainly isn’t a five-alarm scorcher. We’re taking simple pantry staples and giving them a gentle flavor upgrade. The magic here is the balance. We use just enough brown sugar to balance out the tomato acidity—it never tastes like dessert, trust me—and we layer in smoked paprika for that incredible, slow-cooked barbecue depth. It’s the perfect recipe for when you want something that tastes like you fussed over it for hours, but really, you didn’t.

Why This Sweet-and-Smoky Chili Recipe Works for Everyone
If you’ve ever felt intimidated by making chili from scratch, this is your starting line. Seriously, if you can brown meat and open a can, you can nail this recipe. I’ve been perfecting batch after batch for years, trying to find that sweet spot where the flavor is complex but the process is dead simple. It’s the best homemade chili.
The star players are the brown sugar and the smoked paprika. They work in harmony. The sugar smooths out any harsh edges from the tomato sauce, and the smoked paprika tricks your brain into thinking you slow-cooked this all day in a smoker. It’s foolproof, crowd-pleasing, and ready in under an hour. It’s the chili I make when I want everyone to ask for the recipe.
Gathering Your Ingredients for the Sweet-and-Smoky Chili
Alright, let’s talk ingredients! This is where we set ourselves up for success with this incredible Sweet-and-Smoky Chili. Since this recipe comes together so quickly, having everything prepped and ready to go before you even turn on the stove is key. Don’t skip the prep work here; it makes the actual cooking feel like a breeze!
Ingredient Clarity and Preparation
We need some fresh stuff and some canned stuff. Make sure your yellow onion and red bell pepper are finely diced—we want them to melt into the background flavor-wise, not stick out as huge chunks. Garlic needs to be minced nice and small, too. For the canned goods, grab your black beans and pinto beans, but remember to drain them really well and give them a good rinse; nobody wants that starchy liquid in their chili!
Now for the flavor heroes: We’re using 2 tablespoons of brown sugar—don’t be tempted to add more yet! And the smoked paprika? That needs to be a generous 1.5 tablespoons. That specific amount is what gives us that deep, gentle smoke we’re looking for.
Equipment Needed for the Sweet-and-Smoky Chili
You don’t need any fancy gadgets for this batch of Sweet-and-Smoky Chili. Honestly, the most important thing you need is a large, heavy-bottomed pot or, even better, a Dutch oven. This helps distribute the heat evenly when we start simmering. A good sturdy wooden spoon for stirring everything together is a must as well!
Step-by-Step Instructions for Perfect Sweet-and-Smoky Chili
This is the fun part! We’re moving fast, but don’t panic about the timing. Since this is an easy recipe, the steps flow right into each other. Just make sure your heat is right, and we’ll have a pot bubbling away in no time!
Browning the Beef and Sautéing Aromatics
First thing’s first: heat up your olive oil in that big pot or Dutch oven over medium-high heat. You want it shimmering, not smoking. Toss in the ground beef and start breaking it up right away. You’re looking for about 7 to 8 minutes here until it’s completely browned and crumbly. Don’t rush this part; getting a good sear adds flavor!
Once the beef looks good, throw in your diced onion and bell pepper, along with that minced garlic. Give that a stir and let it cook down for about 4 or 5 minutes. We just want the vegetables to start getting soft and sweet. You’ll start smelling that lovely savory base building up already.
Blooming the Spices in Your Sweet-and-Smoky Chili
Okay, this next bit is crucial for making this Sweet-and-Smoky Chili taste like it simmered all day. Turn the heat down just a touch and stir in all your dry spices: the chili powder, that smoked paprika, cumin, garlic powder, onion powder, oregano, salt, pepper, and the cayenne. You need to stir this around and cook it for about 2 to 3 minutes. This is called “blooming” the spices, and it wakes up their flavor! You’ll notice the brown sugar dissolving into the meat mixture right here, too.
When the spices are fragrant, pour in the tomato sauce and the beef broth. Scrape up any browned bits stuck to the bottom—that’s pure flavor gold! Then, add in those rinsed black and pinto beans and stir everything together well.

Simmering for Flavor Development
Time to bring it up to a nice rolling boil over medium-high heat. Once it’s boiling hard, immediately drop the heat down to medium-low. Cover the pot partially—we want some steam to escape so it thickens up—and let it simmer for a solid 30 to 45 minutes. Seriously, stir it every 10 minutes or so just to make sure nothing is sticking.
If, after that 45 minutes, you taste it and think, “Hmm, needs to be thicker,” just pull the lid off completely and let it simmer uncovered for another 10 minutes. This is your chance to taste! Adjust that salt or maybe add a tiny pinch more brown sugar or smoked paprika if you think it needs a boost. Make sure it’s piping hot, over 165°F, before you ladle out a bowl of that amazing Sweet-and-Smoky Chili!
Tips for Making the Best Sweet-and-Smoky Chili
We’ve got the method down, but every great cook knows the final touches separate “good” from “absolutely unforgettable.” Since this is a flavor-forward recipe, tasting near the end is non-negotiable. You’ve put in the work, now trust your palate! If you want to see more great tips, check out our latest articles on Medium.
Adjusting Seasoning for Flavor Balance
The absolute final step before serving is the taste test. Remember, we started with just 2 tablespoons of brown sugar. If your tomato sauce was extra acidic that day, you might need a little more sweetness to balance it out. Add it in small amounts—a teaspoon at a time—and stir until it dissolves. Taste again!
If it tastes flat, it needs salt. If it tastes too heavy, a tiny splash of vinegar (don’t tell anyone I said that!) can brighten it up. If you want a touch more heat, just add a spare pinch of cayenne right before serving. This final adjustment ensures your Sweet-and-Smoky Chili is perfectly tailored to your tastebuds.
Making Ahead for Better Flavor
This is my biggest pro tip for any chili, but especially this one: it’s always better on Day Two. Seriously! When you let the Sweet-and-Smoky Chili cool down and chill overnight in the fridge, those smoky notes from the paprika and the sweetness from the sugar really marry up with the cumin and beef. It deepens the whole profile.
When you reheat it the next day, it tastes like you let it simmer all afternoon. If you have time, make it the day before, cool it completely, and then reheat it low and slow before company arrives. It’s the secret trick to looking like a culinary genius without spending all day at the stove! Feel free to share your results on our Facebook page.
Serving Suggestions for Your Easy Chili Recipe
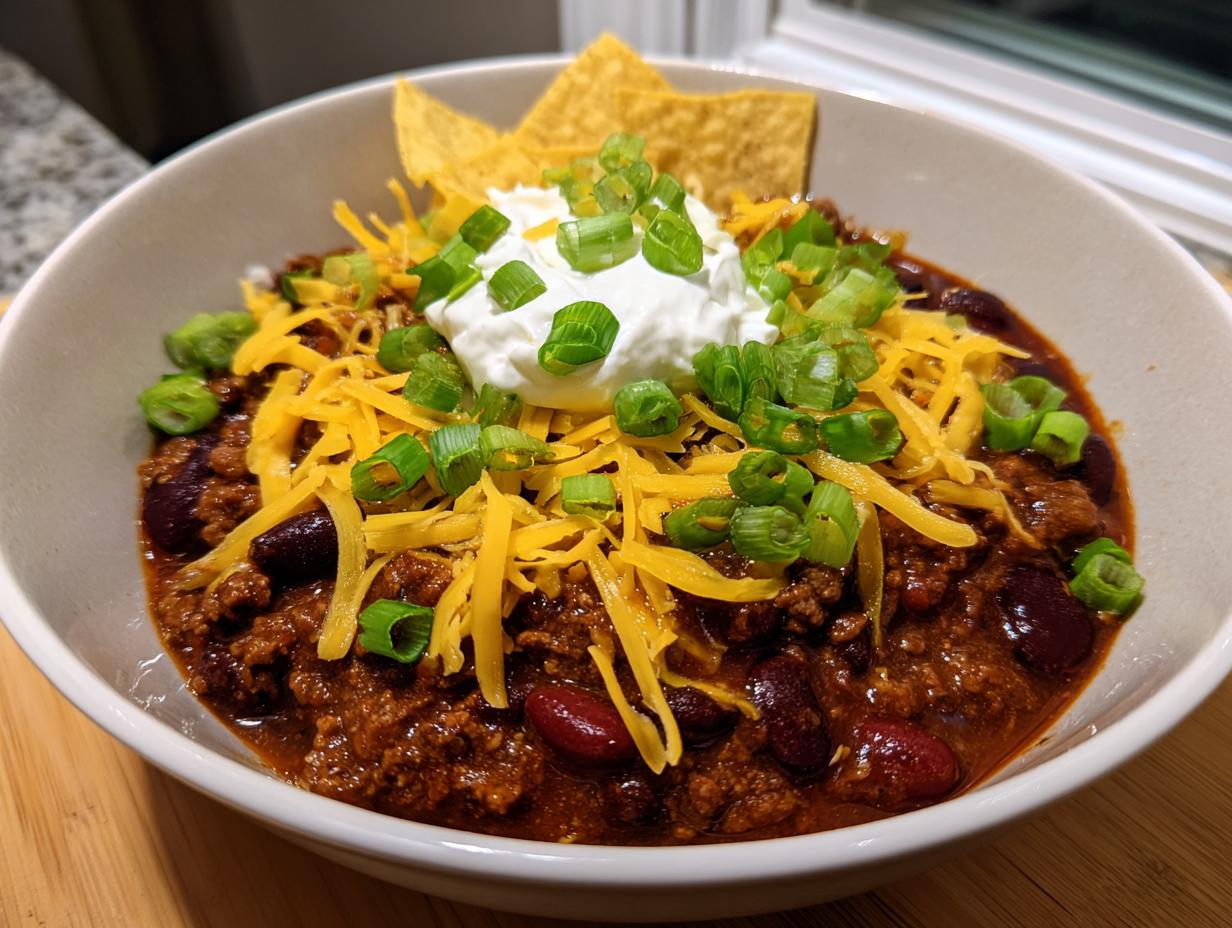
Now that you have this rich, easy chili ready, we have to talk toppings! Since we have that lovely sweet and smoky flavor profile going on, you want toppings that offer a cool, creamy contrast or a little crunch. My family always piles on heaps of shredded cheddar cheese—it melts down beautifully into the sauce.
You absolutely need a dollop of cool, tangy sour cream to cut through that richness. A sprinkle of fresh, sharp sliced green onions adds a nice bite. And please, don’t forget the tortilla chips! They are essential for scooping up every last bit of this fantastic Sweet-and-Smoky Chili. For more easy dinner ideas, check out our Sheet Pan Chicken Parmesan.
Storing and Reheating Leftover Sweet-and-Smoky Chili
One of the best things about making a big batch of chili is knowing you have leftovers ready to go. This Sweet-and-Smoky Chili freezes like a dream, which is perfect for busy weeknights when you just need something hearty fast. Make sure you let the chili cool down completely before you put it away, though; we don’t want to rush the cooling process!
For the fridge, airtight containers are your best friend. It stays perfectly good for up to five days. If you know you won’t eat it within that time, get it into the freezer! I usually portion it out into single-serving bags or containers so I can just grab one when I need it. It keeps beautifully for about three months this way. You can find more storage tips on Pinterest.
Storage and Reheating Quick Reference Table
Here’s a quick rundown so you don’t have to hunt through my notes when you’re hungry:
- Refrigeration: Store in airtight containers for up to 5 days.
- Freezing: Cool completely, then freeze for up to 3 months.
- Thawing: Always thaw overnight in the refrigerator before reheating.
- Reheating: Reheat slowly on the stovetop or in the microwave until it reaches 165°F internal temperature.
Frequently Asked Questions About This Sweet-and-Smoky Chili
I get so many questions about customizing this recipe, which is wonderful because it means everyone is making it! Here are a few of the things I hear most often when people are planning their batch of Sweet-and-Smoky Chili.
Q1. Is this chili very spicy? I need something mild.
Absolutely not! That’s the beauty of this recipe. We use cayenne pepper for a tiny bit of warmth, but the brown sugar and smoked paprika are the main players. If you are worried, just leave out the cayenne pepper entirely. It will still have that fantastic sweet and smoky profile without any real heat.
Q2. Can I skip the brown sugar? I don’t want any sugar.
You certainly can, but you’ll lose that crucial flavor balance! The brown sugar isn’t there to make it sweet; it’s there to neutralize the sharpness of the tomato sauce. If you must skip it, try stirring in a tiny pinch of baking soda when you add the liquids—it neutralizes acid, but honestly, the brown sugar tastes much better! Try our Walnut Banana Muffins if you are looking for something sweet but balanced.
Q3. What if I only have kidney beans on hand instead of black and pinto?
Go for it! Beans are pretty interchangeable in chili, especially when you are simmering for flavor development. Kidney beans hold their shape really well. Just make sure you drain and rinse them exactly the same way you would the others. You’ll still end up with a perfect pot of Sweet-and-Smoky Chili.
Q4. Can I use ground turkey instead of ground beef?
Yes, you can! Ground turkey is a bit leaner, so you might want to add an extra teaspoon of olive oil when you start cooking your vegetables, just to make sure you don’t lose too much richness during the browning process.
Share Your Sweet-and-Smoky Chili Experience
I truly hope this recipe becomes a staple in your rotation just like it has in mine! Now that you’ve tasted the magic of the brown sugar and smoked paprika, I’d love to hear what you think. Did you top it with extra cheese? Did you sneak a taste before it cooled down?
Don’t be shy—head down to the comments below and leave me a rating and tell me how your batch of Sweet-and-Smoky Chili turned out. Bonus points if you share a picture of your toppings spread!
Print
Amazing 1 Sweet-and-Smoky Chili Secret
- Total Time: 55 minutes
- Yield: 8 servings
- Diet: Omnivore
Description
This easy sweet-and-smoky chili uses brown sugar and smoked paprika for gentle flavor upgrades. Perfect for beginners who want balanced, crowd-pleasing chili.
Ingredients
- 2 tablespoons olive oil
- 1½ pounds ground beef
- 1 medium yellow onion, diced
- 1 red bell pepper, diced
- 4 cloves garlic, minced
- 3 tablespoons chili powder
- 2 tablespoons brown sugar
- 1½ tablespoons smoked paprika
- 1 tablespoon ground cumin
- 1 teaspoon garlic powder
- 1 teaspoon onion powder
- 1 teaspoon dried oregano
- ¾ teaspoon salt
- ½ teaspoon black pepper
- ¼ teaspoon cayenne pepper
- 1 can (45 ounces) tomato sauce
- 1 can (15 ounces) black beans, drained and rinsed
- 1 can (15 ounces) pinto beans, drained and rinsed
- 1 cup beef broth
- Shredded cheddar cheese (for serving)
- Sour cream (for serving)
- Sliced green onions (for serving)
- Tortilla chips (for serving)
Instructions
- Heat olive oil in a large pot or Dutch oven over medium-high heat until shimmering.
- Add ground beef and cook for 7 to 8 minutes, breaking it into small crumbles until completely browned.
- Add diced onion, bell pepper, and minced garlic to the pot; cook for 4 to 5 minutes, stirring occasionally, until vegetables soften.
- Stir in brown sugar, chili powder, smoked paprika, cumin, garlic powder, onion powder, oregano, salt, black pepper, and cayenne pepper; mix well to coat the beef evenly.
- Cook the spice-coated meat for 2 to 3 minutes, stirring frequently, to allow the brown sugar to dissolve and the smoked paprika to bloom.
- Pour in tomato sauce and beef broth; stir thoroughly to combine all ingredients.
- Add black beans and pinto beans to the pot and stir well to distribute evenly.
- Bring the mixture to a rolling boil over medium-high heat, stirring occasionally.
- Reduce heat to medium-low, cover the pot partially, and simmer for 30 to 45 minutes, stirring every 10 minutes.
- After simmering, remove the lid and continue simmering uncovered for 10 more minutes if the chili is too thin.
- Taste and adjust brown sugar, salt, or smoked paprika as needed for balanced flavor.
- Ensure the chili reaches an internal temperature of 165°F; ladle into bowls and serve topped with cheese, sour cream, green onions, and tortilla chips.
Notes
- Brown sugar balances tomato acidity without making the chili sweet like candy.
- Smoked paprika adds deep smoky flavor without adding heat, suitable for mild chili preference.
- The sweet and smoky combination creates a universally appealing barbecue-inspired flavor.
- Start with 2 tablespoons brown sugar and adjust sweetness at the end.
- This chili tastes better the next day after flavors meld.
- Store leftovers in airtight containers for up to 5 days in the refrigerator.
- Freeze cooled chili for up to 3 months; thaw overnight in the refrigerator before reheating.
- Prep Time: 10 minutes
- Cook Time: 45 minutes
- Category: Main Dish
- Method: Stovetop Simmering
- Cuisine: American