Are you tired of reaching for those processed, salty bags of chips when that afternoon craving hits? Me too! That’s why I’m absolutely thrilled to share my go-to recipe for the most addictive, crunchy, and surprisingly healthy roasted chickpeas snack you will ever make. Seriously, these are game-changers.
When I first started cooking, I thought anything this satisfying had to involve deep frying or complicated steps. I remember ruining my first batch of chickpeas because I didn’t dry them enough—they ended up steamed, not roasted! But this recipe changed everything. It’s my ultimate beginner-friendly snack because it proves you can get incredible flavor and crunch with minimal effort and just a few pantry spices.
This oven-baked version is packed with plant protein and fiber, making it a snack I feel genuinely good about eating while I’m blogging or watching a movie. You just toss, spread, and forget them for a little while. Trust me, once you master this simple technique for the perfect roasted chickpeas snack, you won’t look back!

Essential Ingredients for Your Roasted Chickpeas Snack
Okay, listen up, because the magic of this roasted chickpeas snack is that it uses stuff you probably already have! We’re not messing around with weird specialty items here. We need two cans of chickpeas, those lovely little protein bombs, and we want them drained and rinsed really well. After that, it’s all about the oil and the spice blend that gives these their beautiful color and incredible savory flavor.
For the oil, keep it simple: two tablespoons of good old olive oil. That’s what helps everything stick and brown up nicely in the oven. Don’t skimp on the spices—the amounts are really specific here because they balance out perfectly for that classic savory taste we’re aiming for.
Gathering Your Spices for Flavor
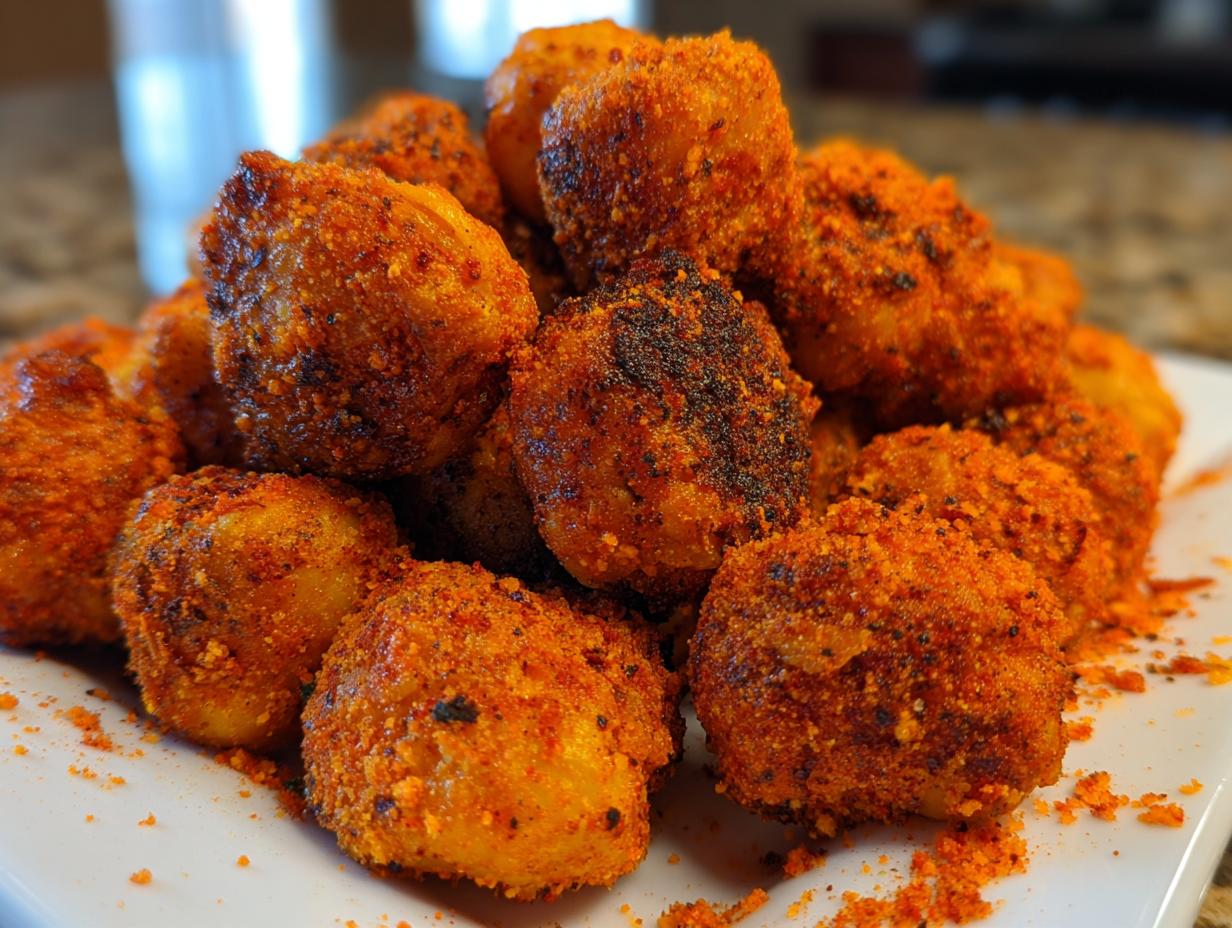
The spice mix is what transforms a plain bean into a craveable snack. We use paprika—that gives us that gorgeous, deep golden color you see in the pictures. Then we add garlic powder and ground cumin; these two are non-negotiable for that warm, earthy background note. A little black pepper and fine sea salt to bring it all home, and that’s it! Simple, yet so effective.

Equipment Needed for This Roasted Chickpeas Snack
You don’t need a whole arsenal of fancy gadgets for this recipe, which is just another reason I love it so much! The most important piece of gear is a good, sturdy mixing bowl. You need something big enough to toss everything without making a huge mess—trust me on that one, I learned the hard way!
Next up, you absolutely need a rimmed baking sheet. The rim is important because it stops the chickpeas from tumbling off when you shake the pan. And finally, a clean kitchen towel or a few layers of paper towels. This is crucial for the drying step, so make sure those towels are ready to go!
Step-by-Step Instructions for the Best Roasted Chickpeas Snack
Alright, let’s get roasting! This is where the real fun begins, and honestly, it’s so straightforward that you’ll be making this roasted chickpeas snack every single week. First things first: get your oven cranked up to 400°F. We want it nice and hot when these go in.
Once the oven is warming up, grab your rinsed chickpeas. Now, this next part is non-negotiable if you want that perfect crunch. You need to drain and rinse them, sure, but then you have to dry them—and I mean *completely* dry them.
After they are patted down, toss them into your big bowl. Add the olive oil and all those lovely spices we talked about: paprika, garlic powder, cumin, pepper, and salt. Now, use your hands or a big spoon and toss, toss, toss! You want every single chickpea glistening and coated evenly. If you see dry spots, keep tossing!
Next, we move them to the baking sheet. This is another crucial step for the perfect roasted chickpeas snack: spread them out in one single layer. Do not let them pile up! If they overlap too much, they steam instead of roast, and we don’t want soggy chickpeas, do we? Give them space to breathe.
Into the oven they go for about 30 to 35 minutes. But here’s the secret timing: every 10 minutes, you need to pull that pan out and give it a good shake. This moves them around so they crisp up evenly on all sides. After about 30 minutes, start checking them closely!
Achieving Maximum Crispiness: The Drying Step
I know I mentioned it before, but I need to really hammer this home because it’s the number one reason people end up with soft chickpeas instead of crunchy ones. Think of it this way: water is the enemy of crispiness. If there is any lingering moisture on the outside of the chickpea when it hits that hot oven, it’s going to create steam, and steam equals soggy. Yuck!
So, after you rinse them, lay them out on a clean kitchen towel. Cover them with another towel and just gently roll them around. You’ll be amazed how much water comes out! Keep patting and rubbing until they feel genuinely dry to the touch. This extra five minutes of drying effort pays off tenfold when you bite into that perfect roasted chickpeas snack.
Roasting Times and Visual Cues
The 30 to 35 minute window is a guideline, but your oven might run a little hotter or cooler than mine. You are looking for a deep golden-brown color—not pale yellow, and definitely not burnt black! They should look slightly shrunken and definitely hard when you tap them.
Remember that shaking every 10 minutes? That’s key. By the 20-minute mark, you should start seeing some browning. By 30 minutes, they should be getting hard. When you pull them out, let them cool on the baking sheet for about five minutes. They firm up a lot as they cool down, so resist the urge to taste-test immediately! If they click when you stir them on the cool pan, you nailed it.
Tips for Success with Your Roasted Chickpeas Snack
Even though this recipe for a roasted chickpeas snack is super simple, there are just a couple of little things that can trip you up if you’re not careful. My biggest piece of advice, which I’ve already preached about, is the drying step. If you skip that, you might as well just eat canned chickpeas, because they won’t get that satisfying crunch we want!
The second big no-no is overcrowding the pan. I know it’s tempting to try and fit them all on one sheet so you don’t have to dirty a second one, but resist! If they are touching too much, they steam. If they steam, they get soft. You need space around every single chickpea so the hot air can circulate and turn them into that perfect crunchy snack. Use two pans if you have to—it’s worth the extra dishwashing later!
Also, don’t pull them out too early just because they look golden. Give them the full time, shaking regularly. They firm up significantly as they rest outside the oven. Follow these few rules, and your batch of roasted chickpeas snack will be perfectly crispy every single time!
Ingredient Notes and Simple Substitutions
When making your roasted chickpeas snack, the quality of your starting ingredients really shines through, even with just a few spices involved. For the salt, I always reach for fine sea salt because it dissolves easily and coats the chickpeas evenly during the toss. If you only have coarse salt, just make sure you toss really well so you don’t get salty pockets!
As for the oil, olive oil is my favorite because it has a nice flavor that complements the cumin and paprika. You can certainly use a neutral oil like avocado oil if you prefer something without much flavor, but please avoid anything labeled as low-fat or cooking spray here—we need that actual fat content to help the spices adhere and achieve that crisp exterior.
If, by some chance, you run out of paprika, a pinch of chili powder will give you a similar color and a little kick, but try to stick to the original spice list for that authentic savory profile! If you are looking for other savory snack ideas, check out this guide on savory cottage cheese toast.
Storing and Reheating Your Roasted Chickpeas Snack
The biggest challenge with any great crispy snack is keeping it crunchy after you’ve made it! Luckily, this roasted chickpeas snack holds up pretty well if you treat it right. As soon as they come out of the oven and cool down for those five minutes, you need to get them into an airtight container immediately. If you leave them sitting out on the counter, humidity will sneak in and turn them soft faster than you can say “cumin.”
If they do go a little soft the next day—and don’t worry, it happens—don’t throw them out! They are easily revived. Just pop them back into a 350°F oven or an air fryer for about five minutes. That little blast of dry heat completely re-crisps them. It’s like magic! Here’s a quick guide for keeping track of your leftovers:
| Storage Method | Container Type | Duration |
|---|---|---|
| Room Temperature | Airtight Container | Up to 3 Days |
| Reheat Method | Oven or Air Fryer | 5 Minutes at 350°F |
Frequently Asked Questions About This Roasted Chickpeas Snack
I get so many questions about this recipe because everyone wants to know the secret to that perfect snap! Here are some of the things I hear most often about making the best roasted chickpeas snack.
Q1. Can I use canned black beans instead of chickpeas?
You certainly can try! Black beans are a bit softer and have a different skin texture, so they might not get *quite* as hard and crunchy as chickpeas do in the oven. They still make a delicious, healthy snack, but you might need to roast them for an extra 5 to 10 minutes to dry them out.
Q2. Why did my oven-baked chickpeas stick to the pan?
That almost always means one of two things happened: either you didn’t use enough oil to coat them, or you didn’t spread them out enough. Remember, they must be in a single layer with space between them! Overcrowding causes steaming, which leads to sticking.
Q3. Can I add other spices, like chili powder, to this roasted chickpeas snack?
Absolutely! Feel free to customize the spice blend. If you want a little heat, swap half the paprika for chili powder, or try adding a dash of smoked paprika for a deeper flavor. Just don’t skip the salt; that’s the flavor enhancer!
Q4. Are these really a healthy snack option?
Yes, they are! Because this recipe is oven-baked and uses minimal olive oil, you skip all the unhealthy fats from deep frying. You get great plant protein and fiber, making this a much more satisfying and nutritious option than chips. For more healthy snack inspiration, see our snacks category.
Serving Suggestions for Your Roasted Chickpeas Snack
Once you pull that perfectly crunchy roasted chickpeas snack out of the oven, you might be tempted to just eat them straight off the pan—and I totally support that! But they are also fantastic when paired with other things. They add a wonderful texture boost to simple meals, much better than croutons, in my opinion.
For a really easy lunch, try sprinkling a handful over a simple green salad. The savory spices go great with a light vinaigrette dressing. They also make a fantastic topping for creamy soups, like tomato or butternut squash, right before you serve them. They give you that satisfying crunch without the heaviness of bread.
If you’re just looking for something to munch on while watching TV, try tossing them with a tiny drizzle of honey right after they come out of the oven for a sweet and savory mix. Honestly, once you have that base flavor down, the possibilities for your crunchy chickpea snack are endless! You can find more great ideas on our Pinterest page.
Nutritional Estimates for Roasted Chickpeas Snack
I always want to know what I’m putting into my body, even when I’m just grabbing a quick bite. These numbers are just estimates, of course, because the exact amount of oil we use can vary slightly, but this gives you a great idea of why this is such a fantastic healthy snack alternative. It’s all about that plant protein and fiber!
When you’re enjoying your roasted chickpeas snack, you’re getting a good dose of energy without a ton of fat or sugar. It’s a winner in my book for satisfying those mid-day hunger pangs!
| Nutrient | Amount Per Serving |
|---|---|
| Calories | 130 |
| Fat | 4 g |
| Carbohydrates | 18 g |
| Protein | 5 g |
Share Your Roasted Chickpeas Snack Creations
I truly hope you loved making this simple, crunchy roasted chickpeas snack as much as I love eating it! It’s one of those recipes that just brings me so much joy because it’s so easy to nail. Now, I’d absolutely love to see how yours turned out! Did you stick to the classic savory spices, or did you try a fun variation? Feel free to share your photos on Facebook!
Please leave a rating below and tell me what you thought in the comments. If you snapped a picture of your golden, crispy batch of roasted chickpeas snack, share it on social media and tag me! Happy snacking, everyone!
Print
Amazing Roasted chickpeas snack: 1 trick
- Total Time: 45 minutes
- Yield: 6 servings
- Diet: Vegetarian
Description
This roasted chickpeas snack recipe is crunchy, flavorful, and easy to make. A healthy oven-baked snack packed with plant protein and fiber.
Ingredients
- 2 cans chickpeas 15 ounces each drained and rinsed
- 2 tablespoons olive oil
- 1 teaspoon paprika
- 1 half teaspoon garlic powder
- 1 half teaspoon ground cumin
- 1 quarter teaspoon black pepper
- 3 quarter teaspoon fine sea salt
Instructions
- Preheat the oven to 400°F.
- Drain and rinse the chickpeas, then pat them completely dry with a clean kitchen towel.
- Transfer the chickpeas to a large bowl.
- Add the olive oil, paprika, garlic powder, cumin, black pepper, and salt.
- Toss until the chickpeas are evenly coated.
- Spread the chickpeas in a single layer on a rimmed baking sheet.
- Roast for 30 to 35 minutes, shaking the pan every 10 minutes, until deeply golden and crisp.
- Remove from the oven and cool for 5 minutes to allow them to fully crisp.
Notes
- This snack is crispy, savory, and perfect for everyday snacking.
- It uses simple pantry spices and bakes up crunchy without frying.
- Prep Time: 10 minutes
- Cook Time: 35 minutes
- Category: Snack
- Method: Oven Baking
- Cuisine: General