I used to think breakfast had to be crunchy. Seriously, every morning was a battle against dry toast that felt like eating sandpaper! I craved something tender, something that melted in my mouth. That’s why I spent ages perfecting this recipe for soft breakfast bread. It’s my answer to those hard, disappointing mornings.
Forget complicated overnight processes. The magic here is speed and moisture. We’re talking about slices that become unbelievably fluffy in under ten minutes, right on the stovetop. It’s the easiest, most comforting thing you’ll make all week. Trust me, once you try this milk-soaked technique, you’ll never go back to plain toast again. It’s truly a game-changer for quick weekday mornings!

Why This Soft Breakfast Bread Recipe Works
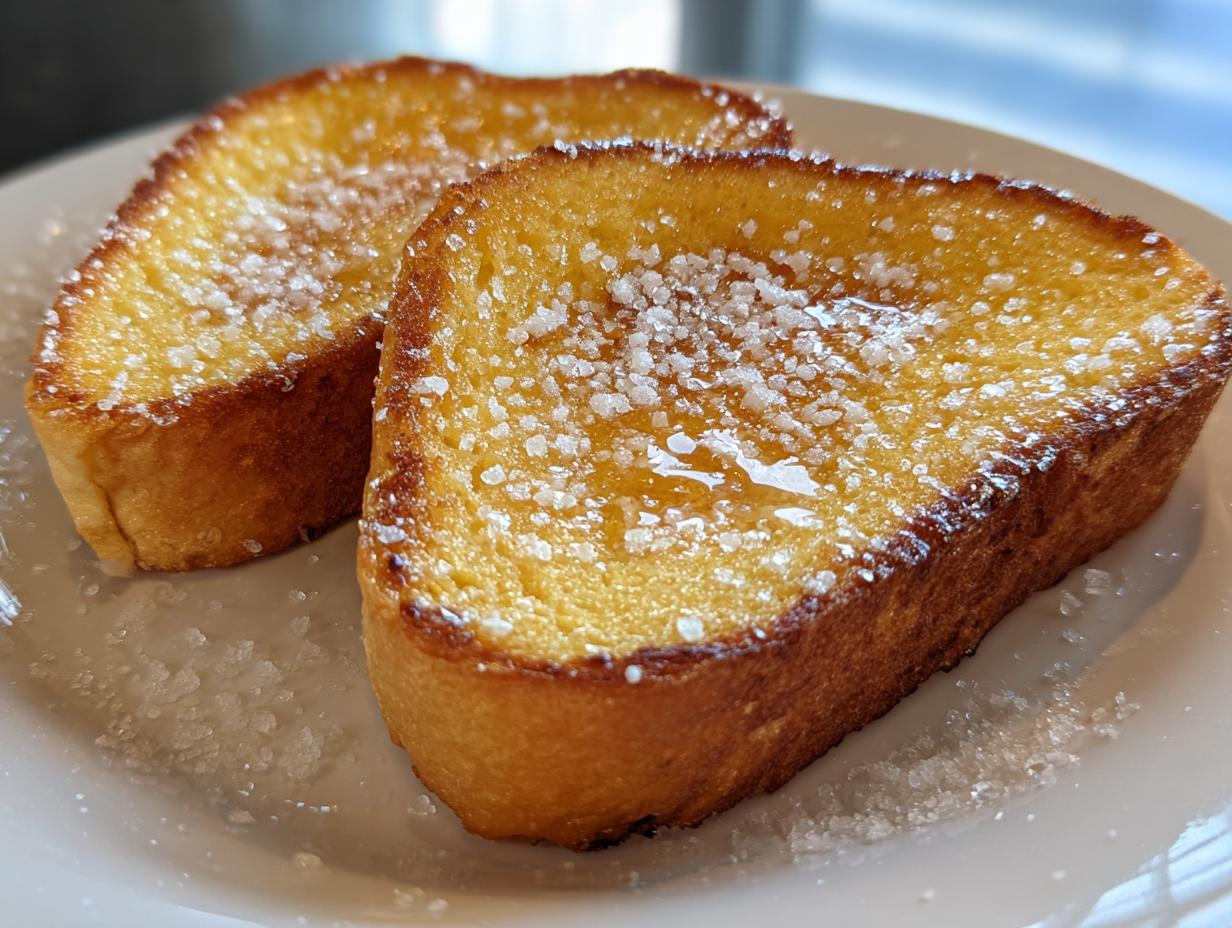
This recipe works because we treat the bread like French toast, but without the egg bath! It’s all about the quick milk soak and the patient, low heat cooking. That’s how we achieve that signature texture that defines truly soft breakfast bread. It’s incredibly tender inside but gets just the slightest kiss of golden crispness on the outside.
When I first started cooking, I burned everything. Seriously, smoke alarms were my reality! This recipe changed that for me because it’s so forgiving. You can’t mess up medium-low heat, and the ingredients are so simple. It taught me that delicious food doesn’t have to be complicated. It’s the perfect confidence builder for anyone new to the kitchen, proving you can get amazing results fast. If you are looking for other quick meal ideas, check out my tips on easy breakfast roll ups recipe.
Essential Ingredients for Perfectly Soft Breakfast Bread
For this soft breakfast bread, every single ingredient matters, and you can’t skimp on quality or precision. We need four slices of sandwich bread that are thick—not flimsy, thin white stuff. The milk has to be whole milk; that fat content is crucial for moisture retention. Also, please use real unsalted butter for the pan; the flavor is unmatched.
Don’t try to substitute the sugar for anything else, either. Granulated sugar on the outside melts slightly and creates that lovely, slightly caramelized crust that contrasts beautifully with the soft interior.
Necessary Equipment for Your Soft Breakfast Bread
You don’t need a lot of fancy gear, which is why I love this recipe! Make sure you have a good nonstick skillet—this prevents sticking when you flip. You’ll also want a plate for soaking, a small bowl for mixing the milk/sugar/salt, and a sturdy spatula for turning those delicate slices.
Step-by-Step Instructions for Soft Breakfast Bread
Alright, let’s get cooking! This is so fast you’ll blink and miss it, so have everything ready to go before you even turn on the stove. We’re aiming for speed and tenderness here, and timing is everything for that perfect soft breakfast bread texture.
Preparing the Milk Soak for Soft Breakfast Bread
First things first, grab your four slices of sandwich bread. Remember, they need to be nice and sturdy, about half an inch thick—that thickness is key to soaking up the milk without falling apart. Lay them out flat on a regular dinner plate in a single layer so they don’t overlap.
In a small cup or bowl, quickly whisk together your three tablespoons of whole milk, one and a half tablespoons of granulated sugar, and just a tiny pinch of salt—that little bit of salt really wakes up the sweetness! Now, drizzle this mixture evenly over both sides of the bread slices. You want them damp, not swimming. Give the sugar a little extra sprinkle over the tops after the milk is absorbed; this helps with the crust later.
Cooking Your Soft Breakfast Bread to Perfection
Time for the heat! Grab your best nonstick skillet and set it over medium-low heat. I cannot stress this enough: too high, and you’ll end up with burnt bread with a cold, raw center—the opposite of what we want for soft breakfast bread. Let the pan warm up for a minute or two.
Add your tablespoon and a half of butter. Let it melt completely and swirl it around so the bottom of the pan is totally coated. Once the butter is melted and looks foamy, carefully place the milk-soaked bread slices into the pan. Don’t crowd them; if you have to do it in batches, that’s fine! We need space.
Cook each side for about two to three minutes. You’re looking for a gentle, pale golden color. If it’s browning too fast, turn that heat down immediately! After that first side is golden, flip carefully with a wide spatula and cook the second side for another two to three minutes. You’ll know they are done when they feel warm all the way through when gently pressed. Pull them out right away and serve them hot! You can find more great cooking tips on our Medium page.
Tips for Achieving Maximum Softness in Your Breakfast Bread
Listen, achieving that cloud-like texture in your soft breakfast bread isn’t just about the ingredients; it’s about how you treat the bread during the cooking phase. This is where most people go wrong, and honestly, I learned this the hard way after ruining several batches!
My biggest tip centers around bread thickness. If you use standard, super-thin sandwich bread, it just turns into mush when you soak it. You absolutely need bread that’s about a half-inch thick. If you can only find thin slices, try soaking them for just 15 seconds per side instead of letting them sit. Thicker bread holds up to the milk soak beautifully!
The second crucial tip is heat management. I know you want this done fast, but medium-low heat is your best friend here. If the pan is too hot, the sugar on the outside burns before the milk inside has time to steam-soften the bread fibers. Be patient, watch the color, and you’ll get that perfect tender crumb every time.

Ingredient Notes and Simple Substitutions
The ideal bread for this recipe is a sturdy white or brioche loaf cut thick. If you only have thin bread, you can try using slightly less milk in your soak, or you can use day-old bread, which is actually great because it’s a little drier and absorbs the milk better without immediately collapsing.
As for milk, whole milk gives the best richness, but if you need to swap, 2% milk works fine. Skim milk is okay in a pinch, but the resulting bread will be noticeably less rich. You could swap the granulated sugar topping for a dusting of cinnamon sugar, but do that *after* cooking, not before, or it will scorch in the pan.
Storing and Reheating Your Leftover Soft Breakfast Bread
Okay, real talk: this bread is absolutely best eaten the second it comes out of the pan, piping hot and fluffy. But sometimes life happens, right? If you have leftovers, you don’t want to toss them! The main goal when storing pan-fried bread is keeping it from getting soggy or turning hard.
For short-term storage, just let the slices cool completely on a wire rack—don’t stack them while warm, or they steam themselves into a soggy mess! For reheating, we want to bring back that soft interior without burning the outside. A quick zap in the microwave or a few seconds in a dry, warm pan works wonders to revive the texture.
Here’s a quick guide on how long you can keep them around and the best way to bring them back to life:
| Storage Method | Duration | Best Reheating Tip |
|---|---|---|
| Airtight Container (Room Temp) | Up to 1 day | Microwave for 10-15 seconds |
| Freezer (Wrapped well) | Up to 2 weeks | Reheat in a toaster oven until warmed through |
| Airtight Container (Fridge) | Up to 3 days | Warmed gently in a dry skillet |
Frequently Asked Questions About Soft Breakfast Bread
I get so many questions about this quick recipe because everyone is shocked at how simple it is to make amazing soft breakfast bread! Here are the things folks ask me most often when they’re planning their first batch of this easy breakfast treat. If you want to see what others are saying, check out our Facebook page.
Can I make this Soft Breakfast Bread ahead of time?
While you absolutely *can* make this ahead, I strongly advise against it if you are looking for that signature fluffy texture. This bread is designed to be eaten immediately after it comes out of the pan. If you make it too far ahead, the milk soak soaks *too* much, and the bread compresses, losing that beautiful, cloud-like interior we worked so hard for. If you must prepare it early, store it airtight and reheat it quickly in a dry skillet to try and revive some of the softness.
What kind of milk is best for this easy breakfast bread?
For the absolute best results—richness, tenderness, and that perfect chew—you should use whole milk. The fat content in whole milk helps keep the bread slices moist and prevents them from drying out, even when cooking over low heat. If you are trying to make this an even lighter meal, 2% milk is the next best option for this pan-fried bread.
If you are avoiding dairy, you can certainly use a creamy plant-based milk like oat milk or soy milk. Just remember that those alternatives might not yield quite the same rich flavor profile as the full-fat dairy version, but they still work well for a quick morning meal!
Nutritional Snapshot of This Easy Breakfast Bread
Now, I’m a cook, not a nutritionist, so please take these numbers with a grain of salt! Since we’re using simple pantry staples here, the values are pretty straightforward, but slight variations in butter used or bread brand can change things.
These estimates are based on the recipe serving two people, meaning two slices per person. If you happen to eat all four slices yourself—no judgment here—just double these figures! For more recipe ideas, see our Pinterest profile.
| Component | Per Serving (2 Slices) |
|---|---|
| Calories | 215 |
| Total Fat | 9 g |
| Carbohydrates | 27 g |
| Protein | 5 g |
Remember, these are just estimates based on standard ingredients. If you use low-fat milk or skip the sugar dusting, those numbers will shift!
Share Your Experience Making This Soft Breakfast Bread
I truly hope this recipe brings a little bit of that morning comfort to your kitchen. Tell me, how did your batch of soft breakfast bread turn out? Did you manage to get that perfect golden color on medium-low heat? Drop your thoughts, ratings, and any little tweaks you made down below. I love hearing how this simple recipe makes your mornings better!
Print
Soft breakfast bread: 1 secret to dreamland
- Total Time: 10 minutes
- Yield: 2 servings
- Diet: Omnivore
Description
Soft breakfast bread slices cooked on the stovetop with milk and butter for a tender fluffy texture. Perfect for quick mornings.
Ingredients
- 4 slices sandwich bread (about 1/2 inch thick)
- 3 tablespoons whole milk
- 1 1/2 tablespoons unsalted butter
- 1 tablespoon granulated sugar
- 1/8 teaspoon salt
Instructions
- Place the bread slices on a plate in a single layer.
- Drizzle the milk evenly over both sides of each slice.
- Sprinkle the sugar lightly over the bread and add the salt.
- Heat a nonstick skillet over medium low heat.
- Melt the butter in the skillet and swirl to coat.
- Add the bread slices in a single layer.
- Cook for 2 to 3 minutes per side until warmed through soft and lightly golden.
- Remove from the skillet and serve immediately.
Notes
- Use sandwich bread that is about 1/2 inch thick for the best texture.
- Medium low heat prevents the bread from browning too quickly before warming through.
- Prep Time: 4 minutes
- Cook Time: 6 minutes
- Category: Breakfast
- Method: Stovetop
- Cuisine: American