If you are craving that perfect backyard campfire experience but it’s pouring rain outside, you have come to the absolute right place! Forget messy s’mores sticks that keep falling into the fire pit. We are making S’mores Skillet Brownies, and trust me, they are going to change your dessert game forever. This recipe is my go-to when I need something spectacular but I only have about an hour, including cleanup!

When I first tried making a dessert in cast iron, I was terrified. I thought I’d burn the bottom or that the pan would be impossible to clean. But this recipe is so forgiving—it’s actually designed for that cozy, slightly rustic finish. The secret to these S’mores Skillet Brownies is that fudgy, rich base that bakes up perfectly while the topping melts into gooey perfection. It really feels like cheating because it tastes like you slaved over it all day, but honestly, the prep is shockingly fast!
I’ve tested this about a million times to make sure even a brand-new baker can nail that perfect, slightly underbaked center. It’s all about the timing, which I’ll show you step-by-step. Get your skillet ready; we’re going to bring the best part of camping right into your kitchen!
Gathering Your Ingredients for S’mores Skillet Brownies
Getting ready for these S’mores Skillet Brownies is half the fun, and honestly, the prep takes almost no time at all! The key here is having everything measured and ready to go before you even think about turning on the oven. This recipe uses pantry staples, but the quality of your chocolate matters a lot when it’s going to be melted like this.
Make sure your eggs are at room temperature; it really helps them incorporate smoothly into that buttery sugar mixture. Also, don’t grab the quick-cooking, instant cocoa powder if you can help it—the unsweetened kind gives you that deep, rich brownie flavor we are aiming for.
Essential Components for the Brownie Base
For the base, you’ll need 1 cup of unsalted butter, melted down and cooled just a touch. Then, we mix that with 1 cup of white granulated sugar and 1 cup of packed light brown sugar for that molasses depth. You need 3 large eggs, and remember, room temperature is best! For the dry stuff, measure out 1 1/4 cups of all-purpose flour, 1 full cup of unsweetened cocoa powder, 1 teaspoon of fine sea salt, and 1 teaspoon of baking powder.
Toppings: Marshmallows, Chocolate, and Graham Crackers
This is where the magic happens! You want about 2 cups of mini marshmallows, or if you use the big ones, just cut them into halves so they melt evenly. For the chocolate, use 1 cup of semisweet chocolate chunks or big chips—chunks melt better, in my opinion. And finally, the graham crackers! Break 1 1/2 cups of them into random, bite-size pieces. No fine crumbs allowed; we want texture!
Equipment Needed for Perfect S’mores Skillet Brownies
Your most important tool for these S’mores Skillet Brownies is a 10 to 12-inch cast-iron skillet. It holds heat so beautifully and gives you that perfect crust. Crucially, set that skillet onto a baking sheet before you take it anywhere near the oven. That sheet catches any buttery drips, saving you a huge mess later! You’ll also need a couple of good mixing bowls and a spatula for gentle folding.
Step-by-Step Instructions for Perfect S’mores Skillet Brownies
Alright, let’s get baking! This process is super straightforward, but we have to respect the timing, especially when dealing with that beautiful cast iron. First things first: preheat your oven to 350°F. Don’t forget that little trick—place your 10 to 12-inch cast-iron skillet right onto a baking sheet first. This prevents any little messes from dripping onto the oven floor while we make these amazing S’mores Skillet Brownies.
Next, grease that skillet really well with oil or softened butter. We want everything to slide right out later, or at least slide right out of the pan when we dig in!
Preparing the Brownie Batter
In a big bowl, we start with the wet stuff. Whisk your melted butter—make sure it’s not piping hot, just slightly cooled—with both the granulated and brown sugars. You want to whisk this until it looks thick and glossy, almost like a shiny syrup. Then, toss in your 3 room-temperature eggs and the vanilla extract. Keep whisking until the mixture lightens up just a bit in color. Don’t rush this part; it sets up the texture!
Now for the dry ingredients. Sift your flour, cocoa powder, salt, and baking powder together in a separate bowl. Sifting is key here because cocoa powder loves to clump up into little rocks. Once they are combined, add the dry mix to the wet mixture. This is critical: use a spatula and gently fold everything together. I mean *gently*. Stop folding the second you don’t see any white flour streaks left. Overmixing this batter is the fastest way to lose that fudgy texture we are chasing.
Baking the Fudgy Base
Pour that thick, glorious batter right into your prepared skillet and spread it out so it’s even. Pop the whole setup—skillet on the sheet—into the preheated oven. Bake this base for about 20 to 25 minutes. How do you know it’s done? Look for the edges to look set, but the middle should still look a little soft. Insert a toothpick about two inches from the center; you want moist crumbs clinging to it, not wet batter. If it comes out clean, oops, you’ve gone too far!
Layering and Toasting the S’mores Topping
Once the base is baked, carefully pull the skillet out. Now, work fast! Immediately sprinkle those broken graham cracker pieces evenly over the top, giving them a tiny press. Scatter your chocolate chunks over those crackers. Finally, cover everything in an even blanket of marshmallows. Leave small gaps; you want some chocolate peeking through!
Return the skillet to the oven, but watch like a hawk! Bake for 5 to 8 minutes until those marshmallows are puffed up. If they aren’t toasty enough for your liking, switch the oven to the broiler for just 1 to 2 minutes. I mean it—stay right there! Marshmallows go from golden to charcoal in seconds. Pull those perfect S’mores Skillet Brownies out when they look gooey and toasted. Let it rest for 10 to 15 minutes before anyone dives in; this lets the brownie set up just enough so it doesn’t fall apart completely when you serve it warm.

Why You Will Love These S’mores Skillet Brownies
Honestly, once you make these, you might never go back to traditional sheet pan brownies again. There’s just something magical about eating dessert straight out of a hot, heavy skillet. It’s the ultimate cozy food experience, perfect for movie nights or when you need a serious chocolate fix fast. Trust me, the smell alone will have everyone crowding the kitchen!
Here is why these S’mores Skillet Brownies are guaranteed to become a regular feature in your house:
- Lightning Fast Prep: You can have the batter mixed and in the oven in under 20 minutes. That’s faster than ordering delivery!
- Intense Flavor Profile: You get the deep richness of the cocoa paired with the smoky sweetness of toasted marshmallow—it’s the best of three desserts rolled into one.
- Cozy Factor: Serving dessert warm, straight from the cast iron—it just screams comfort.
- Easy Cleanup: Since everything cooks in one pan, you skip the messy cooling racks and mixing bowls (well, mostly!).
Tips for Success with Your S’mores Skillet Brownies
I’ve ruined a few batches of these S’mores Skillet Brownies in my early days, usually by getting too eager! But through trial and error, I figured out the little secrets that guarantee that perfect, gooey result every single time. The main thing to remember is that this dessert is meant to be eaten warm, which means we intentionally underbake the base slightly. Don’t panic when the center looks a little soft; that’s the sign of success!
Also, please, please heed my warning about the skillet handle. Cast iron holds heat like a furnace, and you will burn yourself if you forget. Always use a thick oven mitt or place the skillet on a wooden trivet before setting it anywhere near the table.
Achieving the Ideal Fudgy Texture
The absolute biggest pitfall is overmixing the flour into the wet ingredients. When you fold in that cocoa mixture, stop mixing the second the dry streaks disappear. If you mix until it’s perfectly smooth, you’re developing gluten, and that turns a fudgy brownie into a cakey one—and we definitely don’t want cake here! For the base bake, pull it out when the toothpick has moist crumbs. If the toothpick comes out totally clean, it’s already overdone for this recipe.
Mastering the Marshmallow Toast
The broiler is your friend, but it’s also a huge menace! When you add the marshmallows, they need about 5 to 8 minutes in the oven just to melt nicely. If you want that perfect golden-brown char, switch to the broiler, but you must stand there and watch. I mean it—don’t walk away to answer the phone! Move your oven rack up high if you can, and keep the door slightly ajar so you can see the action. If you see brown spots developing, yank it out immediately. They toast much faster than you think!
Storage and Serving Suggestions for S’mores Skillet Brownies
You have to eat these S’mores Skillet Brownies warm the first time around, seriously! Dig in right out of the skillet after that short 10-minute rest. Use a sturdy spoon and scoop from the edge inward; the center will be super molten, and that’s exactly how it should be. If you do manage to have leftovers—which is rare in my house—you need to treat them right.
Don’t try to cut them neatly while they are warm; they will just smear everywhere. Let them cool down significantly, or better yet, store them whole in the pan covered tightly. They are still perfectly delicious the next day, even if the marshmallows deflate a bit!
Keeping Your S’mores Skillet Brownies Fresh
If you need to keep these around for a few days, cover the skillet tightly with plastic wrap or foil and pop it right into the fridge. They keep well for up to 3 days there. For longer storage, which I sometimes do when I’m feeling ambitious, you can actually take portions out of the skillet and freeze them.
When you want to reheat them, I highly recommend the microwave. Just zap a square for about 15 to 20 seconds. It brings that fudgy texture right back and melts the chocolate perfectly again. If you freeze them, wrap the individual portions really well in plastic wrap first!
| Storage Method | Duration | Best Reheating Method |
|---|---|---|
| Room Temp (Covered) | Up to 1 day | Microwave (15 seconds) |
| Refrigerated (Covered in Skillet) | Up to 3 days | Microwave (20 seconds) |
| Frozen (Tightly Wrapped) | Up to 2 months | Microwave or oven thaw |
Frequently Asked Questions About S’mores Skillet Brownies
I know you’re going to have questions once you see how amazing these S’mores Skillet Brownies turn out! It’s natural when you’re dealing with hot cast iron and melting marshmallows. Here are a few things folks always ask me when they first try to recreate this campfire treat at home.
Don’t worry if your first batch isn’t perfect; baking is all about learning the quirks of your oven. But if you follow the basic rules about not overmixing, you’ll end up with gorgeous, fudgy brownies every time!
Can I make S’mores Skillet Brownies in a different pan?
You certainly *can* try it in a regular 9-inch cake pan or even a glass pie dish, but honestly, you’ll miss out on the best part! The whole point of these S’mores Skillet Brownies is the way the cast iron conducts heat. It creates that beautifully crisp, dark edge around the outside while keeping the center incredibly soft. If you must use another pan, make sure it’s oven-safe and use parchment paper, but I highly recommend sticking to the cast iron for that authentic texture.
How do I prevent the marshmallows from burning too fast?
This is the trickiest part! The brownie base is already done when you put the marshmallows on, so you are only heating them. If your oven runs hot, just use the regular 350°F setting for about 8 minutes until they are melted. If you want that golden toast, use the broiler, but you need to move your oven rack to the highest position possible. Keep the door slightly open and watch like a hawk for about 60 seconds. The second you see any dark spots, pull it out—they go from perfect to burnt in a blink!
Share Your Experience Making S’mores Skillet Brownies
I am so excited for you to try this recipe! Seriously, these S’mores Skillet Brownies are the best comfort dessert ever. Once you’ve dug in and gotten marshmallow all over your face, please come back and tell me how it went! Share your success with us!
Let me know what you thought! Leave a rating below and drop a comment sharing your favorite part—was it the fudgy base or the toasted topping? I love hearing from you! You can also check out more of our baking adventures on Medium.
Print
Amazing 1 S’mores Skillet Brownies treat
- Total Time: 55 minutes to 1 hour
- Yield: 6 to 8 servings
- Diet: Omnivore
Description
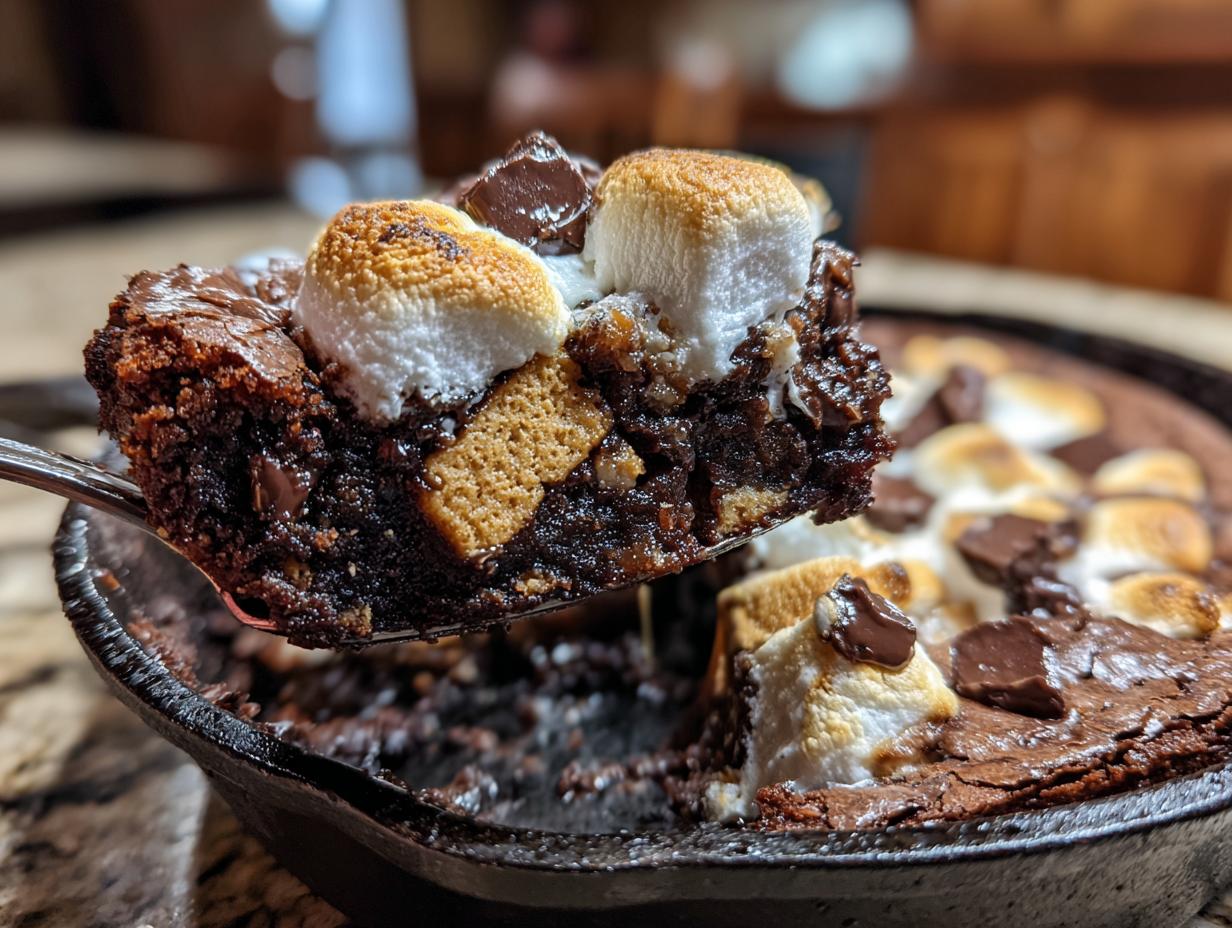
S’mores Skillet Brownies bake in a cast-iron skillet, topped with marshmallows, graham pieces, and chocolate chunks for a cozy winter campfire-at-home dessert. The fudgy base finishes with toasty marshmallows and melty chocolate, perfect for digging into while warm.
Ingredients
- 1 cup unsalted butter, melted and slightly cooled
- 1 cup granulated sugar
- 1 cup packed light brown sugar
- 3 large eggs, at room temperature
- 2 teaspoons vanilla extract
- 1 1/4 cups all-purpose flour, spooned and leveled
- 1 cup unsweetened cocoa powder
- 1 teaspoon fine sea salt
- 1 teaspoon baking powder
- 2 cups mini marshmallows or large marshmallows cut in halves
- 1 1/2 cups graham crackers broken into bite-size pieces
- 1 cup semisweet chocolate chunks or large chocolate chips
- Neutral oil or softened butter for greasing (for skillet)
Instructions
- Preheat the oven to 350°F. Set a 10 to 12 inch cast-iron skillet on a baking sheet to catch drips.
- Lightly grease the skillet with oil or softened butter, coating the bottom and sides well.
- In a large bowl, whisk the melted butter, granulated sugar, and brown sugar until the mixture looks thick and glossy.
- Add the eggs and vanilla to the sugar mixture and whisk until smooth and slightly lightened in color.
- In a separate bowl, sift together the flour, cocoa powder, salt, and baking powder, breaking up any cocoa lumps.
- Add the dry ingredients to the wet mixture and gently fold with a spatula just until no flour streaks remain and the batter is thick and even.
- Pour the brownie batter into the prepared skillet and spread it into an even layer, smoothing the top.
- Bake for 20 to 25 minutes, until the edges look set and a toothpick inserted 2 inches from the center comes out with moist crumbs, not wet batter.
- Carefully remove the skillet and immediately sprinkle the graham cracker pieces evenly over the surface, lightly pressing them in.
- Scatter the chocolate chunks over the graham crackers, then top with an even blanket of marshmallows, leaving some gaps.
- Return the skillet to the oven and bake for 5 to 8 minutes, or until the marshmallows are puffed and starting to turn golden brown; switch to the broiler for 1 to 2 minutes for deeper toast, watching closely.
- Take the skillet out and let it sit for 10 to 15 minutes so the brownie sets slightly while staying warm and gooey.
- Check that the brownie portion has reached an internal temperature of 165°F or 74°C before serving.
- Serve the S’mores Skillet Brownies warm straight from the pan with spoons.
Notes
- Do not overbake the brownie base to keep it fudgy and gooey.
- Watch closely when broiling marshmallows; they burn fast.
- Serve the skillet on a trivet or wooden board and wrap the handle because it is hot.
- Scoop from the edge inward first, where the brownie is more set, to keep portions from being too molten.
- Refrigerate leftovers tightly covered for up to 3 days or freeze portions for up to 2 months.
- Prep Time: 20 minutes
- Cook Time: 30 to 35 minutes
- Category: Dessert
- Method: Baking
- Cuisine: American