Gochujang Mayo Chicken Sandwich. That’s what I hear people ordering at those fancy fusion spots downtown, and honestly, I used to think it was totally out of my league. When I first started NoobRecipes, I promised myself we’d tackle the intimidating stuff, but make it totally foolproof. And folks, this sandwich is proof that you can conquer restaurant-quality flavor without needing a culinary degree.
We’re talking about the crispiest chicken you can fry up in a skillet—no deep fryer needed, I promise! It gets tossed in this unbelievable sweet, savory, and spicy glaze that just sings. I developed this version because my attempts at spicy chicken sandwiches usually ended up soggy or burnt. Oops!

This recipe is all about technique, not fancy equipment. We’re using a simple buttermilk soak and a quick dredge that locks in the crunch. Seriously, if you can mix three things in a bowl, you can absolutely nail this Gochujang Mayo Chicken Sandwich. It’s ready faster than delivery, and you control the spice level. Let’s get frying!
Why This Gochujang Mayo Chicken Sandwich Works for You
I know when you look at recipes with ingredients like gochujang, you might think, “Adam, this is too complicated for me.” But trust me, this Gochujang Mayo Chicken Sandwich is built specifically for the beginner cook. The active time is ridiculously short—we’re talking maybe 15 minutes of work before the magic happens in the pan.
The real genius here is the flavor balance. We aren’t just throwing heat at you; we are layering it. The marinade tenderizes the chicken, the crispy coating gives you that satisfying crunch, and the mayo ties it all together with creaminess and just the right amount of sweet heat. It’s complex tasting, but so simple to execute.
Quick Prep and Flavor Balance in Your Gochujang Mayo Chicken Sandwich
When you’re making this, focus on tasting as you go, especially with the spicy mayo. That’s the key to making it your own. That small amount of rice vinegar and honey cuts through the richness of the mayo and the spice of the gochujang, creating a sauce that clings perfectly to the chicken. You get sweet, a little tang, and a kick, all in one bite. It’s done cooking in under 10 minutes, which means you’re eating this amazing sandwich way sooner than you think!
Essential Ingredients for Your Gochujang Mayo Chicken Sandwich
Okay, listen up. The ingredient list for this Gochujang Mayo Chicken Sandwich looks long, but don’t panic! It’s just broken down into three simple sections. We have the stuff that makes the chicken tender, the stuff that makes it crispy, and the stuff that makes the spicy mayo sing. I didn’t want anything complicated here, so feel free to use what you have on hand.
The most important thing I want you to pay attention to is the specific needs of each component. For example, the chicken can sit for a while, but the mayo needs to be mixed separately so you can adjust that heat level perfectly for your taste buds. Grab your bowls, and let’s get organized!
Chicken Marinade Components
- 2 boneless, skinless chicken thighs or breasts
- 1/2 cup buttermilk or plain yogurt
- 1 tablespoon soy sauce
- 1 tablespoon gochujang
- 1 teaspoon garlic powder
- 1/2 teaspoon paprika
- 1/2 teaspoon kosher salt
Crispy Coating Mix
- 3/4 cup all-purpose flour
- 1/4 cup cornstarch
- 1 teaspoon paprika (for coating)
- 1/2 teaspoon garlic powder (for coating)
- 1/2 teaspoon kosher salt (for coating)
Flavorful Gochujang Mayo Mixture
- 1/3 cup mayonnaise
- 1–1.5 tablespoons gochujang (for mayo)
- 1 teaspoon honey
- 1 teaspoon rice vinegar
- 1/4 teaspoon sesame oil
- Pinch of salt (for mayo)
Step-by-Step Instructions for the Gochujang Mayo Chicken Sandwich
This is where the magic happens, and honestly, it’s easier than cleaning up afterward! We need to move through these steps methodically, but don’t rush the waiting parts—that’s where the flavor builds up. Remember, this is beginner cooking, so if you take your time, success is guaranteed.
Marinating and Flavor Infusion
First things first, we need happy chicken. Grab that wet mixture you made—the buttermilk, soy sauce, and that initial tablespoon of gochujang. Whisk it all up until it looks smooth. Now, drop your chicken pieces right into that bowl. Make sure they are totally covered. You can leave this on the counter for about 30 minutes if you’re in a rush, but honestly, cover it and stick it in the fridge for at least an hour, or even up to six. That buttermilk tenderizes the meat so nicely, and it soaks up all that savory flavor while you do other things.
Preparing the Spicy Gochujang Mayo
While the chicken is chilling out, let’s make the sauce you’ll be dreaming about later. In a separate small bowl, combine your mayonnaise, the gochujang you’re using for the mayo (this is where you control the fire!), honey, rice vinegar, sesame oil, and that little pinch of salt. Whisk it well. Now, here’s my crucial tip: taste it! If you like it spicy, add another half teaspoon of gochujang. If it tastes a little flat, maybe a tiny splash more vinegar. This spicy mayo needs to be perfect before it hits the bun.
Mastering the Crispy Dredge and Rest
Time to get messy! Mix your dry coating ingredients—flour, cornstarch, and the coating spices—in a shallow dish. Take your marinated chicken out, but let the excess marinade drip off; we don’t want soggy coating. Dredge that chicken really thoroughly in the flour mix. Press the flour onto it! This is important: once it’s coated, set it on a clean plate or wire rack and let it rest for exactly 5 minutes. I know, waiting again! But this rest period lets the flour hydrate and stick properly, which stops it from falling off in the hot oil. Seriously, don’t skip the 5 minutes.
Pan-Frying the Chicken to Perfection
Get your neutral oil heating up in a sturdy pan. You want it to hit about 350°F (175°C). If you don’t have a thermometer, drop a tiny pinch of flour in; if it sizzles right away but doesn’t burn, you’re good to go. Carefully lay your rested chicken into the hot oil—don’t crowd the pan! Fry for about 4 to 5 minutes on each side. You’re looking for a deep, beautiful golden brown color. Once it’s cooked through, pull it out and put it on a wire rack to drain. That rack keeps the bottom from steaming, which means maximum crispiness!

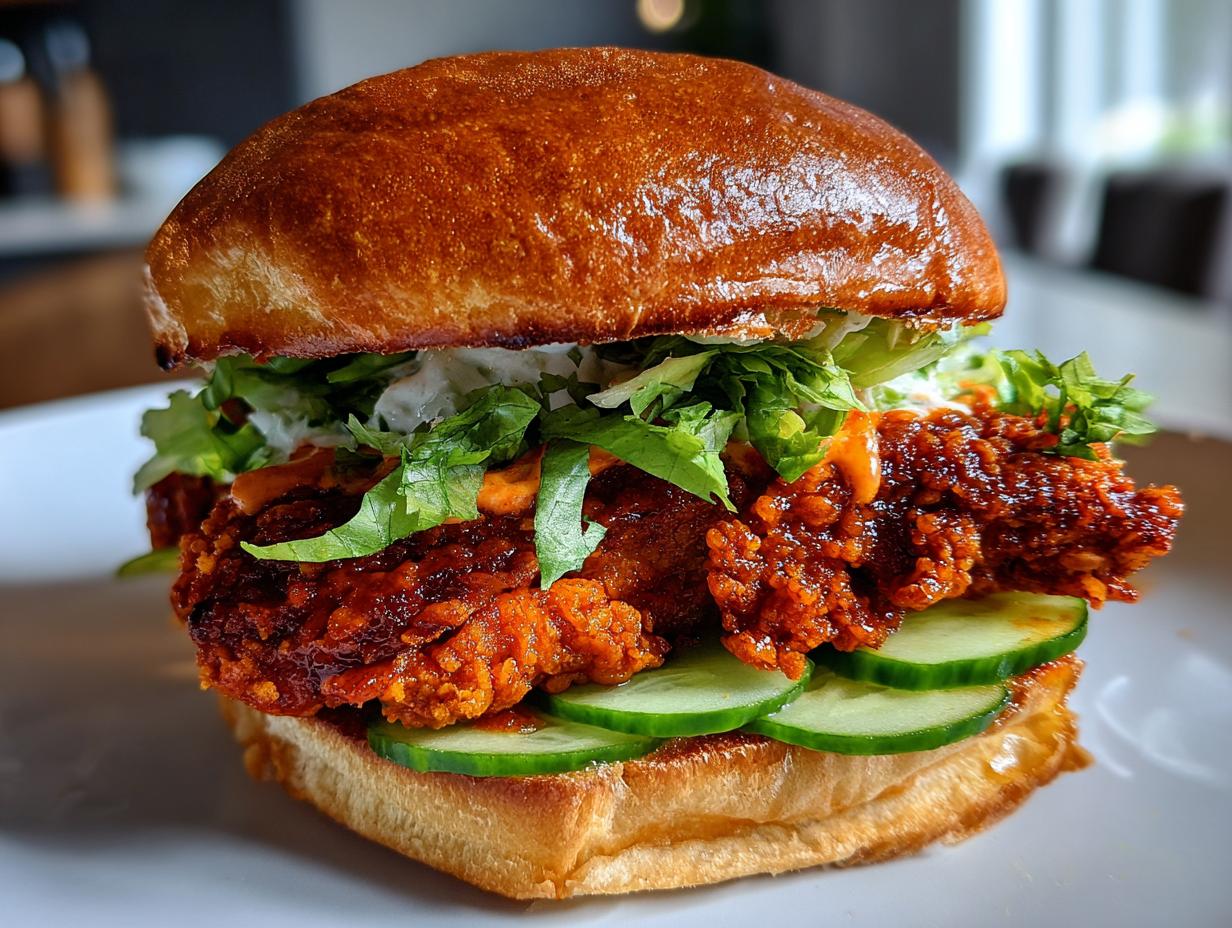
Assembling Your Perfect Gochujang Mayo Chicken Sandwich
Almost there! Toast your brioche buns lightly; it adds stability and a touch of sweetness. Slather that amazing spicy gochujang mayo generously on both the top and bottom halves. Now, for structure: start with your lettuce or shredded cabbage on the bottom bun—this acts as a barrier against the mayo so the bun doesn’t get instantly soggy. Place that hot, crispy chicken right on top of the greens. Finish with your cool, crunchy cucumber slices or pickles. Cap it off, press gently, and eat it before it cools down!
Tips for Achieving Expert Results with Your Gochujang Mayo Chicken Sandwich
Even though this recipe is super beginner-friendly, a few small tricks I’ve learned over testing batches can really elevate your Gochujang Mayo Chicken Sandwich from good to “Wow, I can’t believe I made this.” It’s all about respecting the ingredients and knowing when to step away and let things rest.
Ingredient Sourcing and Quality Checks
If you can find boneless, skinless chicken thighs, use them! They have a little more fat, which keeps them juicier than breasts, even with the buttermilk marinade. For the gochujang itself, look for one that lists fermented soybeans and rice in the ingredients—the flavor depth is way better than the cheaper stuff. If you can only find breasts, pound them to an even thickness so they cook evenly in that hot oil.
Adjusting Heat Levels in Your Gochujang Mayo
The beauty of making your own spicy mayo is total control. If you want it mild, stick to just one tablespoon of gochujang in the sauce and skip adding any extra to the marinade. If you are brave, add a teaspoon of gochujang to the mayo *and* use the full tablespoon in the marinade. Remember, the heat builds a little bit as it sits, so start low and add more gochujang in tiny increments until you hit your sweet spot. Always err on the side of less at first!
Common Questions About Making a Gochujang Mayo Chicken Sandwich
I get so many questions after people try this recipe for the first time, mostly about what they can swap out or how to store the leftovers. Don’t worry if you can’t grill or don’t have a thermometer—we have solutions for everything here. This is supposed to be the easiest fried chicken sandwich you’ve ever made!
Can I Bake or Air Fry My Chicken Instead?
Absolutely, you can! If you aren’t feeling the pan-frying, you can totally bake or air fry. After marinating, dredge the chicken as normal. For baking, place it on a rack over a baking sheet and bake at 400°F (200°C) until done, maybe 18–20 minutes, flipping halfway. For the air fryer, cook at 375°F (190°C) for about 12 minutes, flipping once. You won’t get that exact deep-fried texture, but it’s still fantastic and way healthier!
How Long Can I Store the Gochujang Mayo?
This is one of the best parts for meal prepping! The gochujang mayo keeps beautifully because of the vinegar and salt content. You can store it in an airtight container in the fridge for up to a week. I often make a double batch of the mayo and some quick pickles on Sunday so I can assemble a quick Gochujang Mayo Chicken Sandwich for lunch later in the week.
What Are the Best Toppings for This Sandwich?
The recipe calls for simple lettuce and cucumber, which are great, but you need that acidic crunch to cut through the richness of the mayo and the fried coating. If you make quick pickles, use those! If you have kimchi on hand, definitely add a small layer of that; the fermented tang is incredible with the spicy mayo. It really balances out the whole experience!
Storing and Reheating Leftover Gochujang Mayo Chicken
If you have leftover chicken pieces—which, let’s be honest, is rare—you need to store them properly if you want that crunch back. Never store the assembled sandwich; the bread will get mushy fast. Store the cold, leftover crispy chicken pieces in an airtight container in the fridge. The spicy mayo should also be kept separately in its own container.
To bring that crispiness back, don’t use the microwave! It’s the enemy of crunch. The best way to reheat the chicken is quickly in a toaster oven or even back in a dry, hot skillet for just a minute or two per side. This brings the heat back without softening the coating. Here is a quick guide for keeping things fresh:
| Component | Storage Method | Max Time |
|---|---|---|
| Crispy Chicken Pieces | Airtight container, refrigerated | 3 Days |
| Gochujang Mayo | Airtight container, refrigerated | 1 Week |
| Toasted Buns | Room temp, covered loosely (best fresh) | 1 Day |
Sharing Your Homemade Gochujang Mayo Chicken Sandwich
See? I told you that you could master this! When you take that first bite of your homemade Gochujang Mayo Chicken Sandwich—the crunch, the creamy heat, the tender chicken—you’ll realize there was nothing to be afraid of. That’s the whole point of NoobRecipes: breaking down those intimidating restaurant dishes into simple, successful steps you can nail on a Tuesday night. If you want to see more of these easy recipes, follow us on Pinterest!
I really want to know how yours turned out! Did you crank up the heat in the mayo? Did you try it with kimchi? Drop a comment below and tell me what you thought, or even better, leave a rating so other new cooks can see just how easy this amazing fusion sandwich really is. Happy cooking, everyone! You can also share your creations on Facebook.
Tips for Achieving Expert Results with Your Gochujang Mayo Chicken Sandwich
Even though this recipe is super beginner-friendly, a few small tricks I’ve learned over testing batches can really elevate your Gochujang Mayo Chicken Sandwich from good to “Wow, I can’t believe I made this.” It’s all about respecting the ingredients and knowing when to step away and let things rest.
Ingredient Sourcing and Quality Checks
If you can find boneless, skinless chicken thighs, use them! They have a little more fat, which keeps them juicier than breasts, even with the buttermilk marinade. I always recommend thighs for fried chicken. For the gochujang itself, look for one that lists fermented soybeans and rice in the ingredients—the flavor depth is way better than the cheaper stuff. If you can only find breasts, pound them to an even thickness so they cook evenly in that hot oil. A thin, even piece of chicken is your friend here!
Adjusting Heat Levels in Your Gochujang Mayo
The beauty of making your own spicy mayo is total control. If you want it mild, stick to just one tablespoon of gochujang in the sauce and skip adding any extra to the marinade. If you are brave, add a teaspoon of gochujang to the mayo *and* use the full tablespoon in the marinade. Remember, the heat builds a little bit as it sits, so start low and add more gochujang in tiny increments until you hit your sweet spot. Always err on the side of less at first!
Common Questions About Making a Gochujang Mayo Chicken Sandwich
I get so many questions after people try this recipe for the first time, mostly about what they can swap out or how to store the leftovers. Don’t worry if you can’t grill or don’t have a thermometer—we have solutions for everything here. This is supposed to be the easiest fried chicken sandwich you’ve ever made, so let’s tackle those last few hurdles!
Can I Bake or Air Fry My Chicken Instead?
Absolutely, you can! If you aren’t feeling the pan-frying, you can totally bake or air fry. After marinating, dredge the chicken as normal. For baking, place it on a rack over a baking sheet and bake at 400°F (200°C) until done, maybe 18–20 minutes, flipping halfway. For the air fryer, cook at 375°F (190°C) for about 12 minutes, flipping once. You won’t get that exact deep-fried texture, but it’s still fantastic and way healthier! It’s a great way to make this an even easier fried chicken option. If you are looking for other easy chicken options, check out our guide on best chicken marinade.
How Long Can I Store the Gochujang Mayo?
This is one of the best parts for meal prepping! The spicy mayo keeps beautifully because of the vinegar and salt content. You can store it in an airtight container in the fridge for up to a week. I often make a double batch of the mayo and some quick pickles on Sunday so I can assemble a quick Gochujang Mayo Chicken Sandwich for lunch later in the week. Just make sure the container seals tight!
What Are the Best Toppings for This Sandwich?
The recipe calls for simple lettuce and cucumber, which are great, but you need that acidic crunch to cut through the richness of the mayo and the fried coating. If you make quick pickles, use those! If you have kimchi on hand, definitely add a small layer of that; the fermented tang is incredible with the spicy mayo. It really balances out the whole experience!
Storing and Reheating Leftover Gochujang Mayo Chicken
If you have leftover chicken pieces—which, let’s be honest, is rare—you need to store them properly if you want that crunch back. Never store the assembled sandwich; the bread will get mushy fast, and we can’t have that! Store the cold, leftover crispy chicken pieces in an airtight container in the fridge. The spicy mayo should also be kept separately in its own container so it doesn’t affect the coating.
To bring that crispiness back, don’t use the microwave! It’s the enemy of crunch. The best way to reheat the chicken is quickly in a toaster oven or even back in a dry, hot skillet for just a minute or two per side. This brings the heat back without softening the coating. Here is a quick guide for keeping things fresh:
| Component | Storage Method | Max Time |
|---|---|---|
| Crispy Chicken Pieces | Airtight container, refrigerated | 3 Days |
| Gochujang Mayo | Airtight container, refrigerated | 1 Week |
| Toasted Buns | Room temp, covered loosely (best fresh) | 1 Day |
Sharing Your Homemade Gochujang Mayo Chicken Sandwich
See? I told you that you could master this! When you take that first bite of your homemade Gochujang Mayo Chicken Sandwich—the crunch, the creamy heat, the tender chicken—you’ll realize there was nothing to be afraid of. That’s the whole point of NoobRecipes: breaking down those intimidating restaurant dishes into simple, successful steps you can nail on a Tuesday night. If you’re looking for other easy dinner ideas, check out our guide on dinner and lunch recipes.
Seriously, I want to hear all about it! Did you crank up the heat in that spicy mayo? Did you try it with kimchi or stick to the pickles? Drop a comment below and tell me what you thought, or even better, leave a rating so other new cooks can see just how easy this amazing fusion sandwich really is. Knowing you conquered this makes my day!
Tips for Achieving Expert Results with Your Gochujang Mayo Chicken Sandwich
Even though this recipe is super beginner-friendly, a few small tricks I’ve learned over testing batches can really elevate your Gochujang Mayo Chicken Sandwich from good to “Wow, I can’t believe I made this.” It’s all about respecting the ingredients and knowing when to step away and let things rest.
Ingredient Sourcing and Quality Checks
If you can find boneless, skinless chicken thighs, use them! They have a little more fat, which keeps them juicier than breasts, even with the buttermilk marinade. I always recommend thighs for fried chicken. For the gochujang itself, look for one that lists fermented soybeans and rice in the ingredients—the flavor depth is way better than the cheaper stuff. If you can only find breasts, pound them to an even thickness so they cook evenly in that hot oil. A thin, even piece of chicken is your friend here!
Adjusting Heat Levels in Your Gochujang Mayo
The beauty of making your own spicy mayo is total control. If you want it mild, stick to just one tablespoon of gochujang in the sauce and skip adding any extra to the marinade. If you are brave, add a teaspoon of gochujang to the mayo *and* use the full tablespoon in the marinade. Remember, the heat builds a little bit as it sits, so start low and add more gochujang in tiny increments until you hit your sweet spot. Always err on the side of less at first!
Common Questions About Making a Gochujang Mayo Chicken Sandwich
I get so many questions after people try this recipe for the first time, mostly about what they can swap out or how to store the leftovers. Don’t worry if you can’t grill or don’t have a thermometer—we have solutions for everything here. This is supposed to be the easiest fried chicken sandwich you’ve ever made, so let’s tackle those last few hurdles!
Can I Bake or Air Fry My Chicken Instead?
Absolutely, you can! If you aren’t feeling the pan-frying, you can totally bake or air fry. After marinating, dredge the chicken as normal. For baking, place it on a rack over a baking sheet and bake at 400°F (200°C) until done, maybe 18–20 minutes, flipping halfway. For the air fryer, cook at 375°F (190°C) for about 12 minutes, flipping once. You won’t get that exact deep-fried texture, but it’s still fantastic and way healthier! It’s a great way to make this an even easier fried chicken option.
How Long Can I Store the Gochujang Mayo?
This is one of the best parts for meal prepping! The spicy mayo keeps beautifully because of the vinegar and salt content. You can store it in an airtight container in the fridge for up to a week. I often make a double batch of the mayo and some quick pickles on Sunday so I can assemble a quick Gochujang Mayo Chicken Sandwich for lunch later in the week. Just make sure the container seals tight!
What Are the Best Toppings for This Sandwich?
The recipe calls for simple lettuce and cucumber, which are great, but you need that acidic crunch to cut through the richness of the mayo and the fried coating. If you make quick pickles, use those! If you have kimchi on hand, definitely add a small layer of that; the fermented tang is incredible with the spicy mayo. It really balances out the whole experience!
Storing and Reheating Leftover Gochujang Mayo Chicken
If you have leftover chicken pieces—which, let’s be honest, is rare—you need to store them properly if you want that crunch back. Never store the assembled sandwich; the bread will get mushy fast, and we can’t have that! Store the cold, leftover crispy chicken pieces in an airtight container in the fridge. The spicy mayo should also be kept separately in its own container so it doesn’t affect the coating.
To bring that crispiness back, don’t use the microwave! It’s the enemy of crunch. The best way to reheat the chicken is quickly in a toaster oven or even back in a dry, hot skillet for just a minute or two per side. This brings the heat back without softening the coating. Here is a quick guide for keeping things fresh:
| Component | Storage Method | Max Time |
|---|---|---|
| Crispy Chicken Pieces | Airtight container, refrigerated | 3 Days |
| Gochujang Mayo | Airtight container, refrigerated | 1 Week |
| Toasted Buns | Room temp, covered loosely (best fresh) | 1 Day |
Sharing Your Homemade Gochujang Mayo Chicken Sandwich
See? I told you that you could master this! When you take that first bite of your homemade Gochujang Mayo Chicken Sandwich—the crunch, the creamy heat, the tender chicken—you’ll realize there was nothing to be afraid of. That’s the whole point of NoobRecipes: breaking down those intimidating restaurant dishes into simple, successful steps you can nail on a Tuesday night.
Seriously, I want to hear all about it! Did you crank up the heat in that spicy mayo? Did you try it with kimchi or stick to the pickles? Drop a comment below and tell me what you thought, or even better, leave a rating so other new cooks can see just how easy this amazing fusion sandwich really is. Knowing you conquered this makes my day!
Print
Stunning Gochujang Mayo Chicken Sandwich in 5 Steps
- Total Time: 25 minutes (plus marination)
- Yield: 2 servings
- Diet: Omnivore
Description
Make a restaurant-quality Gochujang Mayo Chicken Sandwich at home easily. This recipe gives you crispy fried chicken coated in a spicy and savory gochujang mayo, perfect for beginners.
Ingredients
- 2 boneless, skinless chicken thighs or breasts
- 1/2 cup buttermilk or plain yogurt
- 1 tablespoon soy sauce
- 1 tablespoon gochujang
- 1 teaspoon garlic powder
- 1/2 teaspoon paprika
- 1/2 teaspoon kosher salt
- 3/4 cup all-purpose flour
- 1/4 cup cornstarch
- 1 teaspoon paprika (for coating)
- 1/2 teaspoon garlic powder (for coating)
- 1/2 teaspoon kosher salt (for coating)
- Neutral oil for pan-frying
- 2 brioche buns, toasted
- 1/3 cup mayonnaise
- 1–1.5 tablespoons gochujang (for mayo)
- 1 teaspoon honey (for mayo)
- 1 teaspoon rice vinegar
- 1/4 teaspoon sesame oil
- Pinch of salt (for mayo)
- Lettuce or shredded cabbage
- Thin cucumber slices or simple quick pickles
- Optional: kimchi
Instructions
- Whisk buttermilk, soy sauce, gochujang, garlic powder, paprika, and salt in a bowl. Add chicken and marinate for 30 minutes up to 6 hours chilled.
- Stir together mayonnaise, gochujang, honey, rice vinegar, sesame oil, and a pinch of salt for the gochujang mayo. Adjust the gochujang amount to control the heat.
- Mix flour, cornstarch, paprika, garlic powder, and salt in a separate shallow dish.
- Remove chicken from the marinade, letting excess drip off. Dredge the chicken thoroughly in the flour mixture. Let the coated chicken rest for 5 minutes.
- Heat neutral oil in a pan to about 350°F (175°C). Pan-fry the chicken for 4–5 minutes per side until golden brown and fully cooked. Drain the chicken on a wire rack.
- Toast the brioche buns. Spread the gochujang mayo on both halves. Layer with lettuce or cabbage, the crispy chicken, and cucumber slices or pickles. Add kimchi if you like. Cap the sandwich and serve immediately while hot.
Notes
- For a grilled option, skip the dredging step. Marinate the chicken, then grill over medium-high heat for 4–6 minutes per side. Glaze lightly with extra gochujang and honey before serving.
- Make the gochujang mayo and quick pickles up to 1 week ahead and keep them refrigerated.
- Prep Time: 15 minutes
- Cook Time: 10 minutes
- Category: Sandwich
- Method: Pan-Frying
- Cuisine: Fusion (Korean/American)