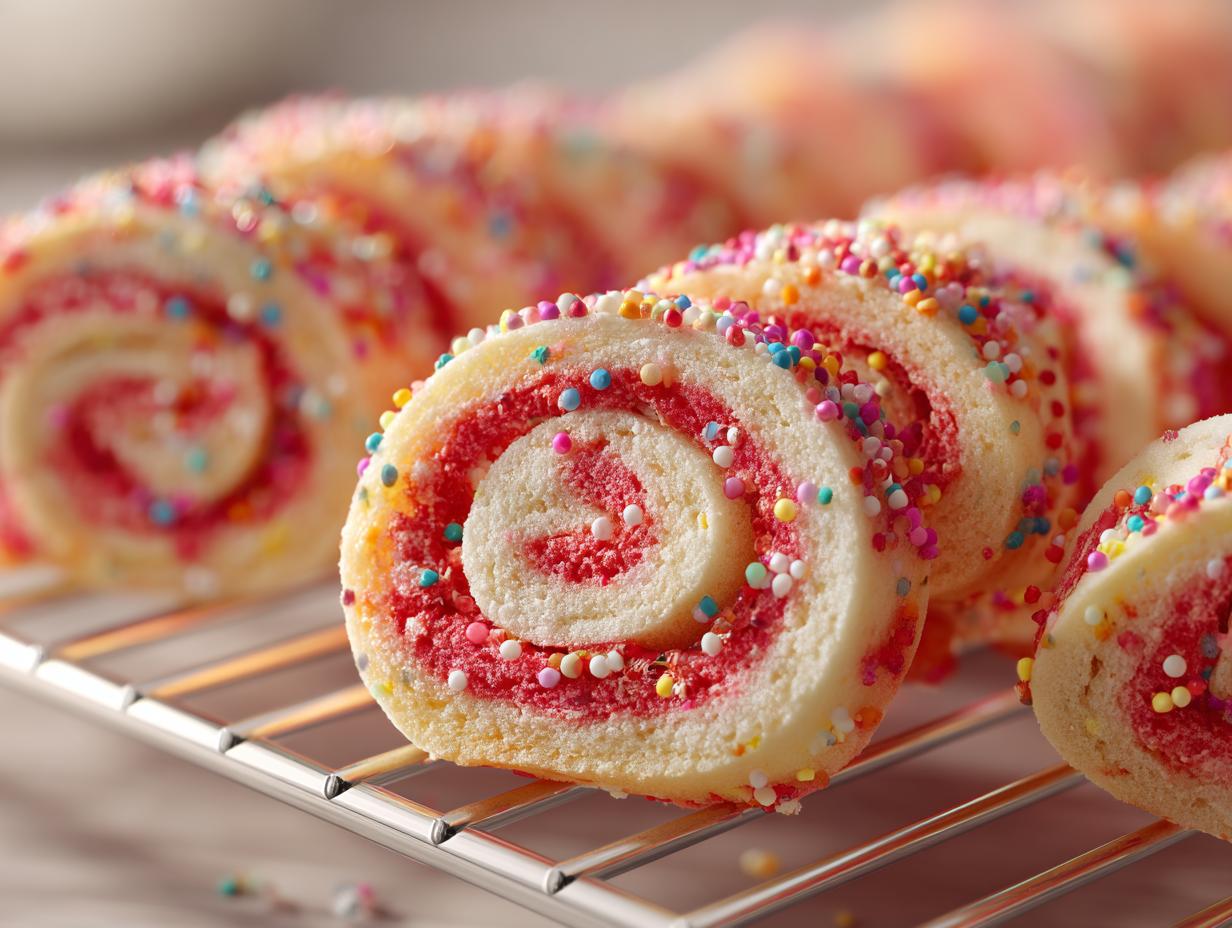
Okay, listen up, because I’ve finally cracked the code on the most stunning yet ridiculously easy cookie you’ll ever make: the Colorful Swirl Cookies Recipe! Seriously, these pinwheels look like they took hours of fancy pastry work, but trust me, they are slice-and-bake magic. I remember the first time I tried making swirl cookies; I ended up with a muddy brown log. Yuck! But this method, which I’ve refined over many messy batches, guarantees sharp, bright layers every single time.
The secret isn’t complicated technique; it’s patience during the chilling phases, which keeps those colors true and distinct. These are perfect for when you need a showstopper for a holiday party or just want to brighten up a Tuesday afternoon. If you follow these steps exactly, you will master this beginner-friendly recipe and be making these vibrant treats for years to come. They hold their shape beautifully, which means they travel well for gifting, too. I just love pulling that chilled log out of the fridge—it feels like unwrapping a colorful present!

Gathering Everything for Your Colorful Swirl Cookies Recipe
Before we get into the fun part—the rolling and swirling—we need to have everything ready to go. Organization is key here, especially since we’ll be chilling the dough multiple times. Don’t try to substitute liquid food coloring for the gel type; trust me, the liquid stuff will thin out your dough and ruin the sharp lines you’re aiming for!
Get your mixer bowl ready, make sure your butter is perfectly softened (not melted!), and have your parchment paper handy. Because this is a slice-and-bake situation, prepping the ingredients first ensures a smooth assembly process later on. You want to move quickly once the dough is colored!
Essential Ingredients for Colorful Swirl Cookies Recipe
Here’s what you need on your counter before you start mixing. I always use a kitchen scale for the flour, but standard measuring cups work just fine if you scoop and level them properly.
| Ingredient | Amount |
|---|---|
| All-purpose flour | 2 cups |
| Baking powder | 1/2 teaspoon |
| Salt | 1/4 teaspoon |
| Powdered sugar | 2/3 cup |
| Granulated sugar | 1/4 cup |
| Unsalted butter, softened | 1 cup |
| Vanilla extract | 1 teaspoon |
| Red gel food coloring | 1/2 teaspoon |
| Multicolored nonpareil sprinkles | 1 1/2 cups |
Step-by-Step Instructions for the Colorful Swirl Cookies Recipe
This is where the fun starts, but you have to respect the chill time! If you rush this, the colors bleed, and you end up with a boring, uniform dough. We are aiming for pinwheels, remember? I always put on some good music during this stage because it’s a bit hands-on, but totally worth the effort.
Creating the Base Dough and Coloring Half
First things first, get your structure right. Whisk the flour, the baking powder, and that tiny bit of salt together in a separate bowl. Set that aside—it’s the dry team waiting for their moment. In your stand mixer (or a big bowl if you’re beating it by hand like my uncle does), cream that softened butter with both the powdered sugar and the granulated sugar. You want it light and fluffy, which usually takes about two minutes on medium speed. Don’t skimp here; this creaming builds the cookie’s structure!
Mix in your vanilla extract until everything looks happy. Now, slowly add those dry ingredients you whisked earlier. Mix it just until the dough comes together into a ball. Stop the mixer! Overmixing develops gluten, and we want tender cookies, not tough ones. Divide that dough right down the middle onto two pieces of plastic wrap.
Take one of those halves, add your red gel food coloring—use the gel, seriously—and mix it until it’s a solid, beautiful red color. It might take a minute for the color to distribute evenly. You now have one plain dough half and one bright red dough half.
Assembling and Chilling the Colorful Swirl Cookies Log
Now for the rolling! Place each dough half between two sheets of parchment paper. You need to roll them out into rectangles, both roughly 11 inches long and 9 inches wide, aiming for about a quarter-inch thickness. Get them as even as you can. Pop both sheets onto a baking pan and stick them in the fridge for a full hour. They need to be firm enough that they don’t stretch when you stack them.
Once chilled, peel the parchment off the plain dough. Give that plain dough a very light brush with water—just enough to make it tacky. Lay the red dough right on top of the plain dough, lining up those long edges as best you can. Gently press the edges together to seal them up, and trim the whole thing into a neat rectangle. Now, start rolling tightly from that long side, creating a firm log. Brush the outside of the log with a little more water, then roll it aggressively in those multicolored nonpareil sprinkles until it’s completely coated. Wrap that log tightly in plastic wrap and back into the fridge it goes for at least two hours. I usually leave mine overnight; it makes the slicing SO much cleaner.

Baking and Cooling Your Colorful Swirl Cookies Recipe
When you’re ready to bake, preheat your oven to 350°F and line your baking sheets with fresh parchment paper. Take the log out and slice it into rounds about 1/4-inch thick. Make sure you space them about two inches apart on the sheet because they spread just a tiny bit. Bake them for 11 to 13 minutes. You’re looking for the edges to just barely turn light golden brown—if they get dark, they’ll be crunchy, and we want that soft texture!
Let them cool right there on the baking sheet for about five minutes. They are delicate when hot! Then, gently transfer them to a wire rack to cool completely. That’s it! You’ll be amazed at the perfect pinwheel effect.
Tips for Perfect Slice-and-Bake Colorful Swirl Cookies Recipe
Making these cookies successfully really comes down to respecting the chill time. If you skip the chilling, you risk one of two big problems: the colors run together, or the whole log slumps when you try to slice it. We want those sharp, beautiful layers, so don’t rush it! Proper chilling is what separates a good batch from an award-winning batch of Colorful Swirl Cookies Recipe.
Another thing people often get wrong is slicing the log straight from the freezer. If it’s rock hard, the slices crack, and you lose the pinwheel shape. It needs to be firm, but still yielding enough for a sharp knife to glide through the dough without tearing it apart. I always pull mine out about 10 minutes before I plan to slice them up.
Dealing with Dough Consistency and Shaping
If your dough feels too soft when you first divide it half before coloring? Don’t panic! That usually means your kitchen is too warm or your butter wasn’t quite cold enough when you started creaming. Pop both halves back in the fridge for an extra 15 minutes before you roll them out. Soft dough spreads too easily during rolling, making your final log too wide and thin.
Now, if your dough feels too crumbly after you mix in the flour, it just needs a little encouragement. Do not add more liquid—we already established that ruins the color payoff! Instead, take a small piece of the crumbly dough and press it between your hands until it holds together, then work that piece back into the main dough ball. If the whole batch is crumbly, wet your hands slightly before kneading the dough together right on the plastic wrap. A little moisture from your hands can save a dry batch before you roll it out for chilling.
Ingredient Notes and Substitutions for Your Colorful Swirl Cookies
The integrity of these swirl cookies absolutely depends on a few key ingredient choices. First up: the coloring. Please, please, please use gel food coloring. Liquid coloring has too much water content, and adding even a tiny bit to the dough will make it sticky and cause your colors to bleed together during the rolling process. We need that sharp contrast!
Next is the butter. It must be softened, not melted. Softened means you can press a finger into it and leave an indent, but it still holds its shape at room temperature. If it’s melted, your creaming step won’t incorporate the air needed for the soft texture, and your final cookies will bake up flat and greasy. Everything else is pretty standard, but respecting the butter and the gel color keeps that beautiful pinwheel structure intact!
Frequently Asked Questions About Colorful Swirl Cookies Recipe
I get so many questions about these cookies, mostly because people can’t believe how easy they are to make once you know the tricks! Here are the things I hear most often when folks are trying the Colorful Swirl Cookies Recipe for the first time.
Q1. Why is my dough cracking when I try to roll it into a log?
That usually means your dough was too cold, or you didn’t press hard enough when you layered the red and plain dough together. If the dough is cracking during the final roll, take the log off the plastic wrap, gently massage it with your warm hands for about 10 seconds just to soften the exterior slightly, and then try rolling it again. Remember, the dough needs to be firm, but not frozen solid!
Q2. Do I have to use red food coloring?
Not at all! You can absolutely use different colors. Just remember the rule about quantity: stick to using only one color and keep the amount small—about 1/2 teaspoon of gel coloring per half of the dough. If you try to use too much color, it throws off the dough’s texture, and you won’t get those sharp lines in your Slice-and-Bake cookies.
Can I use different colors in my Colorful Swirl Cookies Recipe?
Yes, you can use any color you like! Think green and white for Christmas, or pink and yellow for Easter. The important thing is that you use gel coloring, not liquid, because the liquid adds too much moisture and makes the dough sticky, blending your colors into a muddy mess. Also, make sure the colors you choose contrast well so you can actually see the swirl pattern when you slice them.
How long do these Slice-and-Bake Pinwheel Cookies keep?
Because these are essentially shortbread cookies and they don’t have eggs that add much moisture, they keep really well. Once they are completely cooled, store your Pinwheel Cookies in an airtight container at room temperature. They stay perfectly fresh and delicious for up to a week, sometimes even ten days! If you need to store them longer, you can freeze the baked cookies in a sealed container for up to three months.
Storing and Reheating Your Colorful Swirl Cookies
The best part about these cookies is that they are designed for advance prep! You can bake them, and they stay wonderfully soft for days, which is why they are my go-to for holiday cookie trays. Always make sure they are completely cool before you put them away, or you’ll end up with a soggy mess inside your container.
You can also freeze the unbaked logs, which is a huge time-saver. Just wrap them up super tight! Here’s a quick look at how I store them once they are baked and cooled:
| Storage Location | Duration |
|---|---|
| Airtight Container (Counter) | Up to 7 days |
| Airtight Container (Freezer) | Up to 3 months |
What to Serve With Your Pinwheel Cookies
These cookies are sweet, buttery, and have a satisfying little crunch from those sprinkles. Because they are so visually striking, you don’t need much fanfare alongside them! They honestly shine all on their own, which is why I usually keep the accompaniments super simple when I bring them to a gathering. They are the star of the show!
Beverage Pairings for Colorful Swirl Cookies
You absolutely cannot go wrong with a tall, cold glass of milk. It’s classic for a reason, and the coolness of the milk cuts through the richness of the butter perfectly. If I’m serving these in the afternoon, I always have a pot of simple black tea brewing. A straightforward Earl Grey or even just a plain breakfast blend lets the vanilla and the sugar in the cookies really shine through without competing.
Share Your Colorful Swirl Cookies Success
I truly hope you loved making these as much as I love eating them! When I see those bright red and white pinwheels come out of the oven, I feel like I accomplished something big, even though the recipe is so straightforward. Honestly, seeing your success stories is the best part of sharing my recipes online. You can follow along for more baking inspiration on Pinterest!
So, if you made these vibrant treats, please let me know how it went! Did your swirl come out sharp? Did the kids go wild for the sprinkles? Take a second and leave a rating below—it helps other home cooks know whether to trust my favorite slice-and-bake methods. I can’t wait to read all your comments about making the Colorful Swirl Cookies Recipe! Feel free to share your creations on Facebook as well.
Print
Make 1 Colorful Swirl Cookies Recipe
- Total Time: 55 minutes
- Yield: 36 cookies
- Diet: Vegetarian
Description
Make stunning swirl cookies with vibrant dough layers and sprinkles. This easy slice-and-bake treat creates a striking pinwheel effect, perfect for gatherings.
Ingredients
- 2 cups all-purpose flour
- 1/2 teaspoon baking powder
- 1/4 teaspoon salt
- 2/3 cup powdered sugar
- 1/4 cup granulated sugar
- 1 cup unsalted butter, softened
- 1 teaspoon vanilla extract
- 1/2 teaspoon red gel food coloring
- 1 1/2 cups multicolored nonpareil sprinkles
Instructions
- Whisk flour, baking powder, and salt in a large bowl.
- Beat powdered sugar, granulated sugar, and butter in a stand mixer on medium until creamy, about 2 minutes.
- Mix in vanilla until combined.
- Add dry ingredients gradually; mix until dough forms a ball.
- Divide dough in half.
- Return one dough half to mixer; add food coloring and mix until uniform red.
- Roll each dough half between two sheets of parchment to 11×9 inches and 1/4-inch thick.
- Chill on a baking sheet for 1 hour until firm.
- Peel parchment from plain dough; brush lightly with water.
- Place red dough atop plain dough; press edges to seal and trim to even rectangle.
- Roll tightly from long side into a log; brush lightly with water.
- Roll log in sprinkles to coat; wrap in plastic and chill 2 hours.
- Preheat oven to 350°F; line sheets with parchment.
- Slice log into 1/4-inch rounds; place 2 inches apart.
- Bake 11 to 13 minutes until edges are lightly golden.
- Cool on sheet 5 minutes, then transfer to rack.
Notes
- Soft texture holds shape well for gifting or parties.
- Two dough colors roll together for a striking pinwheel effect.
- Prep Time: 30 minutes
- Cook Time: 25 minutes
- Category: Dessert
- Method: Bake
- Cuisine: American