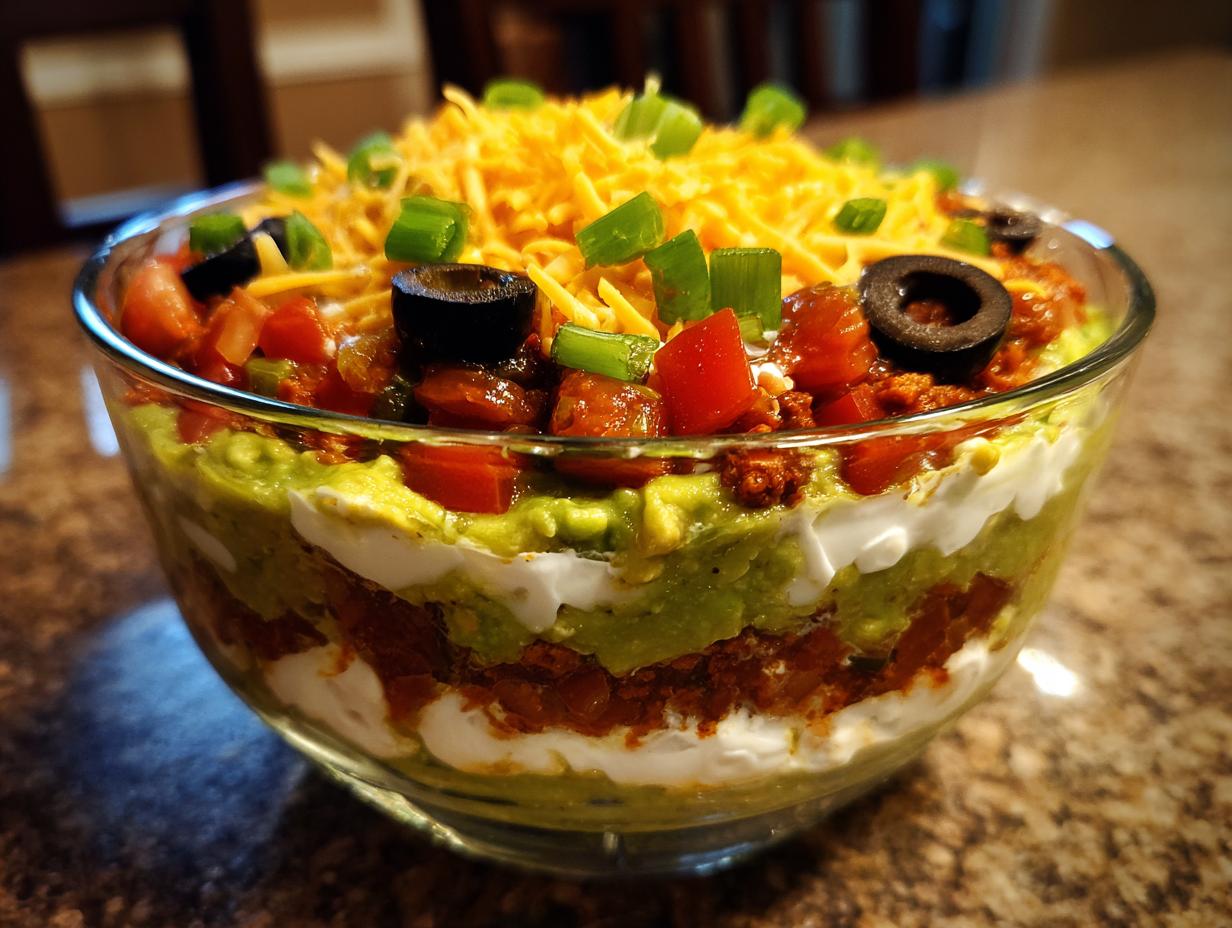
Seven Layer Dip was the first “fancy” appetizer I ever tried to make when I started NoobRecipes, and honestly, I almost ruined game day. I thought layering that much stuff perfectly was going to require advanced geometry or something! I ended up with a soupy mess because I skipped the most important step—draining the salsa. Yikes. Trust me, I learned the hard way so you don’t have to. This recipe is my perfected, foolproof version. It’s bright, it’s zesty, and because it requires zero actual cooking, it’s the ultimate confidence booster for anyone just starting out in the kitchen. We’re talking maximum flavor impact for minimum effort, guaranteed to impress your friends without stressing you out.

Why You’ll Love This Seven Layer Dip Recipe
This isn’t just another dip; it’s the perfect starter project. Seriously, if you can spread things in layers, you can nail this recipe. It’s a total crowd-pleaser because:
- It takes less than 20 minutes of active time.
- Absolutely no oven or stove time required—it’s pure assembly!
- The vibrant colors look amazing in a clear dish.
- It’s the ultimate low-stress appetizer for any gathering.
Essential Ingredients for Your Seven Layer Dip
To build the perfect, structured Seven Layer Dip that doesn’t slide apart when you scoop it, you need to pay attention to the quality and preparation of your components. We are using simple, store-bought staples here, but treating them right makes all the difference. Remember, every layer matters in this classic Tex-Mex party dip!
Ingredient Specifications and Preparation Notes
Don’t just dump everything in! A little prep goes a long way toward keeping that gorgeous presentation intact. The key here is moisture control. You absolutely must drain the liquid from your salsa—if you skip this, the bottom bean layer gets soggy fast, and nobody wants that.
Also, please, please shred your own cheese if you can. Pre-shredded stuff is coated in anti-caking agents that make it clump. For the guacamole, using ripe avocados is non-negotiable for that smooth texture. And when it comes to those tomatoes, dice them small—we want pops of color, not watery chunks.
Finally, make sure your sour cream is full-fat for the best texture when mixed with the taco seasoning for that crucial middle layer.
Kitchen Tools Required for Seven Layer Dip Assembly
Since this is a no-cook appetizer, you won’t need any complicated gadgets for making your wonderful Seven Layer Dip. Just grab a few basic mixing bowls—one for the beans, one for the guac, and one for the seasoned sour cream. The most important piece of gear is a clear, shallow serving dish, preferably a 9-inch square or a 7×11-inch rectangle. You need to see those beautiful layers!
Step-by-Step Instructions for Perfect Seven Layer Dip
Okay, this is where the magic happens! As I mentioned before, the success of your Seven Layer Dip hinges entirely on how carefully you build each component. Don’t rush the spreading; take your time and make sure each layer goes right to the edges of the dish. This keeps things neat when people start scooping! This appetizer is perfect for parties.
Creating the Base Bean Layer
First up, the foundation! Grab a medium bowl and combine your can of refried beans with one tablespoon of taco seasoning and the smaller amount of sour cream—just two tablespoons. You’re just trying to loosen the beans up a bit and add flavor. Mix this until it’s as smooth as you can get it. Now, gently spoon this mixture into the bottom of your serving dish. Use the back of a spoon or an offset spatula to spread it evenly across the entire bottom. Make sure it’s flat and reaches every corner. This layer is strong, so it can handle a little pressure!
Building the Guacamole and Creamy Middle Layers
Next, let’s tackle the guacamole. In a separate bowl, mash those three ripe avocados. Add in the lime juice—this keeps it green, which is important for presentation!—plus the cilantro, jalapeño, garlic powder, and salt. Mash it until it’s mostly smooth but still has a little texture. Spread this green layer carefully over the beans. Don’t mix them up! Now for the second creamy layer: mix the larger amount of sour cream—that one and a half cups—with the other tablespoon of taco seasoning. Stir that until it’s perfectly creamy and then spread it gently over the guacamole. Be slow here; you don’t want to drag up any avocado.
Final Toppings and Chilling the Seven Layer Dip
Time for the colorful stuff! Make sure that salsa is really well-drained. Spoon that chunky salsa evenly over the seasoned sour cream layer. Now, sprinkle your shredded cheese right over the top of the salsa. This cheese acts like glue for the final fresh veggies! Scatter your diced tomatoes, the sliced black olives, and the thinly sliced green onions over the cheese. Finish it off with a light sprinkle of that extra chopped cilantro for garnish. Now, this is critical for a beautiful Seven Layer Dip: cover the whole dish tightly with plastic wrap and get it into the fridge. It needs at least 30 minutes to chill down. This waiting time lets the flavors meld and firms up those layers so they don’t squish together when you serve it.

Tips for Making the Best Seven Layer Dip
Look, anyone can dump ingredients in a dish, but making a truly great Seven Layer Dip that holds its structure is all about technique. My biggest piece of advice, which I learned the hard way, is moisture control. If you want those layers to stay sharp and distinct, you have to manage liquids.
Always drain your salsa thoroughly. You can press it gently between a few layers of paper towels—don’t skip this step, or you’ll end up with a soupy bottom layer that ruins the presentation. Also, when you’re spreading the bean layer and the seasoned sour cream layer, go slow and steady. Use a gentle, sweeping motion with the back of your spoon to avoid digging into the layer beneath. If you see any mixing, stop, pause, and let it settle before continuing. This patience is what separates a messy dip from a show-stopping party centerpiece. You can find more tips on our blog.
Ingredient Substitutions for Your Seven Layer Dip
I always promote using what you have, so feel free to tweak this Seven Layer Dip! If you want to lighten things up a bit, you can totally substitute plain Greek yogurt for some or all of the sour cream called for in the recipe. I often swap out half the sour cream with yogurt in the main creamy layer—it adds protein and a nice little tang, but you must season it well!
For the cheese, if you don’t like cheddar, stick to a Mexican blend, or even Monterey Jack works beautifully. And if you absolutely cannot find black olives, try adding some finely chopped green chiles to the bean layer instead for a different kind of savory kick. Just remember that the fresh avocado layer needs that lime juice to stay vibrant green!
Frequently Asked Questions About Seven Layer Dip
Because I know new cooks have questions, I gathered the most common things people ask about this classic recipe. Don’t worry if you’ve never made a layered dip before; we’ll sort out all the details here!
Q1. Can I make this Seven Layer Dip ahead of time? How long does it last?
Yes, this is the best kind of party dip because you absolutely can make it ahead! I recommend assembling the entire dip, covering it tightly, and chilling it for at least 30 minutes before you serve it—that helps the layers set up nicely. It will stay fresh and delicious in the fridge for up to two days, though honestly, it’s always gone by the end of the party!
Q2. My guacamole layer turned brown! What went wrong with my no-cook appetizer?
That’s the biggest fear with any avocado dish! The browning happens when the avocado oxidizes. The key to keeping that guacamole layer bright green is the lime juice. Make sure you mix the lime juice into the avocado right away. Also, spreading the seasoned sour cream layer directly on top of the guac acts like a seal, protecting it from the air. If you aren’t serving right away, pressing plastic wrap directly onto the guacamole layer before adding the sour cream can help even more.
Q3. Can I add meat to this dip to make it heartier?
You totally can, but since this is primarily a no-cook appetizer, you must use fully cooked meat. If you want to add a layer, I suggest using about a cup of shredded, seasoned rotisserie chicken or ground beef that has been cooked until piping hot and completely drained of grease. Place this fully cooked meat layer right on top of the bean layer, or sometimes I put it just under the cheese. Just make sure it’s not warm when you add it, or it can melt the sour cream layer beneath it! For more appetizer ideas, check out our Facebook page.
Q4. What do I serve with the Seven Layer Dip besides chips?
While chips are the classic choice, serving this with crisp, fresh vegetables is a fantastic, healthier option. I love using carrot sticks, celery sticks, bell pepper strips, and sturdy cucumber slices. They hold up well to the thick layers of the dip and give you a great crunch!
Storing and Reheating Your Seven Layer Dip
Since this Seven Layer Dip is assembly-only, we don’t have to worry about reheating at all—and you shouldn’t try to! Heating it would turn the sour cream runny and make the veggies wilted. The best thing about this appetizer is that it tastes just as good, if not better, the next day after the flavors have really settled together in the fridge.
Keep leftovers tightly covered with plastic wrap. If you notice the top veggies look a little sad after a day or two, just carefully scrape them off and top with a fresh sprinkle of onions and tomatoes before serving. It’s important to serve this dip chilled, so make sure you pull it out of the fridge about 10 minutes before you plan to serve it, but no longer. It’s designed to be cool and refreshing! If you are looking for other easy appetizers, check out our quick pepper jelly cream cheese appetizer.
Storage and Serving Table
| Component | Storage Duration | Best Serving Temperature |
|---|---|---|
| Seven Layer Dip | Up to 2 days (covered) | Chilled (Straight from the fridge or rested 10 min) |
| Leftover Toppings | 1 day | Cold |
Share Your Seven Layer Dip Experience
That’s it! You’ve mastered the ultimate no-cook party dip. I really hope this recipe helps you feel super confident in the kitchen. Please let me know in the comments below how your Seven Layer Dip turned out, and don’t forget to give it a star rating! Happy dipping!
Print
Seven Layer Dip: 1 Foolproof Guide
- Total Time: 20 minutes
- Yield: 12 servings
- Diet: Vegetarian
Description
Whip up zesty Seven Layer Dip in 20 minutes with beans, guacamole, salsa, and cheese. This no-cook appetizer is colorful, creamy, and perfect for game day snacking or any gathering.
Ingredients
- 1 16-ounce can refried beans
- 1 tablespoon taco seasoning
- 2 tablespoons sour cream (for beans)
- 3 medium ripe avocados
- 2 tablespoons lime juice
- 1/4 cup finely chopped cilantro
- 1 small jalapeño, finely chopped
- 1/4 teaspoon garlic powder
- 1/2 teaspoon kosher salt
- 1 1/2 cups sour cream (for top layer)
- 1 tablespoon taco seasoning (for top layer)
- 1 cup thick and chunky salsa, drained of excess liquid
- 2 cups finely shredded cheddar or Mexican blend cheese
- 1 cup diced Roma tomatoes
- 1/3 cup sliced black olives
- 1/3 cup thinly sliced green onions
- 2 tablespoons chopped cilantro (for garnish)
- Tortilla chips (for serving)
- Crisp veggie sticks (for serving)
Instructions
- In a bowl, mix refried beans with 1 tablespoon taco seasoning and 2 tablespoons sour cream until smooth. Spread this mixture evenly in the bottom of a 9-inch square or 7×11-inch dish.
- Mash avocados with lime juice, cilantro, jalapeño, garlic powder, and salt until mostly smooth. Gently spread the guacamole layer over the beans.
- Stir 1 1/2 cups sour cream with 1 tablespoon taco seasoning until creamy. Spread this mixture over the guacamole.
- Spoon the drained salsa evenly over the sour cream layer.
- Sprinkle the shredded cheese evenly over the salsa.
- Scatter diced tomatoes, black olives, green onions, and the remaining chopped cilantro over the cheese layer.
- Cover the dish and refrigerate for at least 30 minutes before serving chilled with tortilla chips and veggies.
Notes
- Use Roma tomatoes and drain salsa well to prevent a watery top layer.
- Spread each layer fully to the edges of the dish to keep the layers distinct.
- Finely shred your own cheese for the best texture.
- Assemble the dip in a clear dish so you can see the neat layers.
- Chill briefly before serving for tidier scoops.
- For a heartier version, add fully cooked chicken (165°F internal temperature) as a layer.
- You can substitute half or all of the sour cream with plain Greek yogurt for extra protein.
- Prep Time: 20 minutes
- Cook Time: 0 minutes
- Category: Appetizer
- Method: No-Cook Assembly
- Cuisine: Tex-Mex