I used to think real, crusty, bakery-style bread was reserved for professional bakers who had fancy starters and endless patience. Me? I need dinner rolls ready when dinner is, not the next day! But then I cracked the code on these Easy Overnight Artisan Dinner Rolls, and honestly, my life changed. No kidding. If you’ve ever been intimidated by yeast or worried about complicated folding techniques, stop right there. This recipe is my secret weapon for making incredible, crusty yet soft rolls with almost zero effort.
This recipe fits perfectly into my philosophy here on the blog: big results from small steps. We aren’t kneading for an hour or worrying about oven spring in a Dutch oven. We’re mixing four things, walking away, and letting time do the heavy lifting. It’s the kind of baking that makes you look like a culinary genius when you pull that perfectly golden batch out of the oven!

Why This Easy Overnight Artisan Dinner Rolls Recipe Works for Beginners
If you’re new to baking, this recipe is your confidence booster. There are literally only four things in the bowl: flour, salt, yeast, and water. That’s it! You can’t mess up the ingredient list, which is half the battle, right? The real magic, the thing that gives you that incredible, open, artisan crumb, is the long, slow rest overnight.
Because we let the dough hang out for 10 to 12 hours, the yeast works slowly. This develops deep, complex flavors that you usually only get from sourdough. Best of all, it means your active work time is maybe fifteen minutes total. The dough does all the hard work while you’re sleeping soundly. Trust me, you’ll build so much trust in the process after seeing how perfectly happy this dough is in the morning.
Gather Your Simple Ingredients for Easy Overnight Artisan Dinner Rolls
You read that right—just four things! That’s the beauty of these Easy Overnight Artisan Dinner Rolls. When you keep the ingredient list this short, you really focus on quality, but honestly, even standard pantry staples shine here. You don’t need fancy equipment or rare flours; just make sure you have a big enough bowl because this dough expands like crazy!
Prep is just a matter of measuring and stirring, which takes no time at all. I always get my ingredients out the night before so I can mix it up fast before bed. It’s truly that simple to set yourself up for success the next morning.
Essential Components for Your Easy Overnight Artisan Dinner Rolls
Because we rely so heavily on these four items, I want to be super clear about what you need. Don’t try to swap the flour, or you’ll end up with something closer to a pancake! The slow fermentation process needs the high protein found in bread flour to create that chewy structure we’re after in these artisan rolls.
Here’s exactly what you need to grab before you start mixing:
- Bread Flour: This is non-negotiable for that chewy texture.
- Kosher Salt: It dissolves nicely and gives us the cleanest salty flavor.
- Active Dry Yeast: We need this specific type to wake up slowly overnight.
- Room-Temperature Water: Not hot, not cold—just gentle water to wake up the yeast without shocking it.
Equipment Needed for Perfect Easy Overnight Artisan Dinner Rolls
You don’t need a stand mixer or fancy proofing baskets for these rolls, which is exactly why I love them! We are sticking to basic kitchen must-haves here. Make sure you have a big bowl where the dough can comfortably double or triple in size. A sturdy spatula is key for that initial mix, too.
- Large mixing bowl (needs a lid or plastic wrap)
- Sturdy spatula or wooden spoon
- Baking sheet
- Parchment paper
- Kitchen scale (optional, but super helpful for dividing dough evenly)
Preparing the Dough for Your Easy Overnight Artisan Dinner Rolls
Okay, let’s get mixing! This is where your active time begins, and trust me, it’s fast. Grab your big bowl and dump in the flour, the salt, and the yeast. Give those dry guys a quick whisk around so they are evenly distributed. If you skip this, you might end up with a salty patch in one roll and no yeast in another—oops! That’s the only real prep work required for these Easy Overnight Artisan Dinner Rolls.
Next, pour in your room-temperature water. Don’t worry about the temperature too much, just don’t use boiling water or ice water! Now, you take your sturdy spatula—or a wooden spoon if you’re feeling old school—and stir everything together. You’re not kneading, you’re just combining. Keep going until you can’t see any dry pockets of flour hiding anywhere. The result will look shaggy, sticky, and frankly, a little messy. That’s perfect! You want that sticky, wet dough because that means the structure is ready to form over time.
The Overnight Rest: Developing Flavor in Your Easy Overnight Artisan Dinner Rolls
Once it’s mixed, cover that bowl up tight—plastic wrap works great—and put it somewhere on your counter that isn’t too cold. This is the magic window: 10 to 12 hours. I usually mix mine up right after dinner, and by morning, it’s bubbly and doubled, maybe even tripled, in size! This long, slow rest is what separates these from your average quick yeast roll. It allows the yeast to create those beautiful, complex flavors that mimic true artisan loaves.
That slow fermentation builds structure and gives the rolls that signature open crumb. You aren’t actively doing anything during this time, which is the best part! You’re just letting time work its magic to ensure your Easy Overnight Artisan Dinner Rolls have that incredible depth of flavor when they finally hit the oven.
Shaping and Baking Your Easy Overnight Artisan Dinner Rolls
Morning arrives, and your dough should look airy and full of bubbles—it’s ready for its quick transformation! First things first: get that oven hot. We need it screaming at 425\u00b0F. Seriously, don’t skimp on the preheat, because that high initial heat is what sets up that gorgeous artisan crust on our Easy Overnight Artisan Dinner Rolls. Line a baking sheet with parchment paper so you don’t have any sticky surprises later!
Now, flour your counter generously. Turn that sticky dough out onto the flour. It will deflate a bit, which is totally normal. You want to handle this dough gently, almost like you’re folding laundry. Just fold it over on itself a few times. This helps coat the outside with flour and builds a little surface tension without knocking out all the air we worked so hard to create overnight. Don’t overwork it, or you’ll lose the airiness! If you enjoy simple bread recipes, you might also like my No Knead Skillet Bread with Crispy Crust.
Next, divide the dough into 12 equal pieces. If you have a scale, use it! If not, just eyeball it—they don’t need to be perfect clones. Take each piece and shape it into a loose ball. I do this by gently pulling the edges down towards the bottom and pinching them together underneath. Place them pinched-side up on your prepared sheet. Let them rest, uncovered, for about 20 minutes while the oven finishes heating up. Then, pop them in and bake for 15 minutes. Rotate the pan for even browning, and bake for five more minutes until they are a deep, beautiful golden brown.
Achieving That Crusty Exterior and Soft Interior
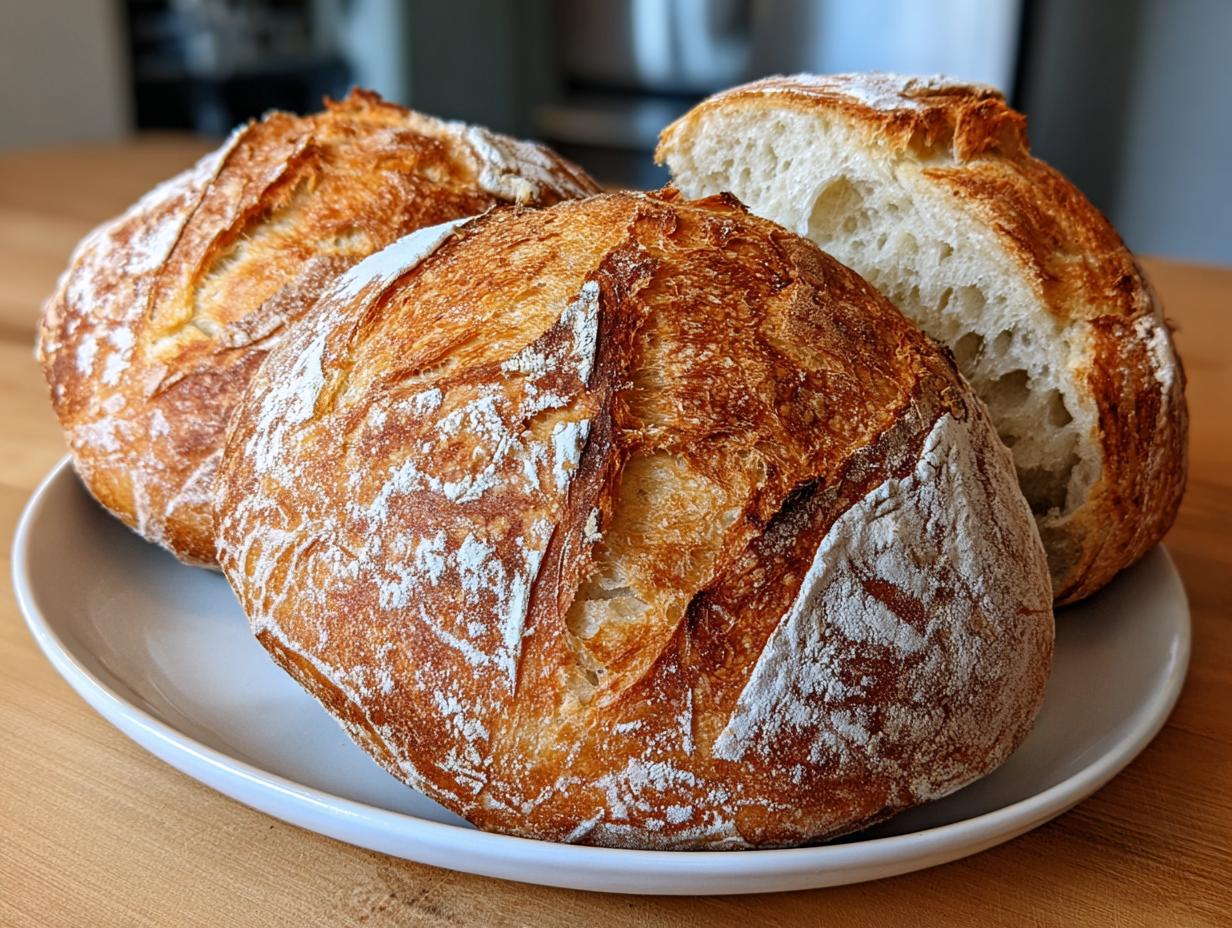
The visual cue is everything here. You are aiming for a color that looks almost dark brown, not pale gold! That deep color means the crust is fully developed and wonderfully crisp. If they look pale after the full baking time, put them back in for three more minutes—I’ve learned that lesson the hard way. Once they are out, you absolutely must transfer them immediately to a wire rack.
Don’t leave them sitting on the hot pan, or the bottoms will steam and go soft instead of staying crusty. Let these Easy Overnight Artisan Dinner Rolls cool down for at least ten minutes on that rack. That brief cooling period is crucial; it lets the steam escape, locking in that soft, fluffy interior while keeping that snappy crust intact. It’s the perfect texture combo!
Tips for Success with Easy Overnight Artisan Dinner Rolls
Since this recipe is so minimal, small details really make a difference in the final product. I’ve learned a few tricks over the years to ensure my Easy Overnight Artisan Dinner Rolls come out perfectly crusty every time. Don’t panic if your dough looks too sticky at first; that’s exactly what you want!
Here are my must-know tips:
- Water Temperature Matters: Aim for lukewarm water, around 100 to 105 degrees Fahrenheit if you have a thermometer. If the water is too hot, you’ll kill the yeast before it even gets to relax overnight. If it’s too cold, the rise will take 16 hours instead of 10!
- Don’t Over-Flour During Shaping: When you turn the dough out, use the flour sparingly. You need enough to keep it from sticking to your hands and the counter, but too much flour will create a tough, dry crust on the outside of your rolls.
- Be Gentle When Folding: Remember, we aren’t kneading! Think of the folding as gently tucking the dough in. You want to create surface tension so the roll holds its shape, but you must preserve those big gas bubbles created during the long rest.
- Deep Golden Brown is the Goal: Don’t pull them out when they are just light tan. That deep, rich golden-brown color is the signal for a truly crisp crust.
Frequently Asked Questions About Easy Overnight Artisan Dinner Rolls
I get so many messages about these rolls after people try them the first time! It’s usually because they’re worried about the long rest period or what happens if they mess up the water temperature. Don’t sweat it! These Easy Overnight Artisan Dinner Rolls are incredibly forgiving, but here are the answers to the most common things people ask me.
Q1. Can I use all-purpose flour instead of bread flour?
While you technically can, I really advise against it for these rolls. Bread flour has a higher protein content, which is what builds that strong, chewy structure needed for artisan bread. If you use all-purpose, your rolls will likely be softer and much more cake-like, losing that wonderful crusty exterior we worked so hard for.
Q2. What happens if my dough doesn’t rise much overnight?
If your dough hasn’t visibly expanded much, it usually means your kitchen was too cold, or your yeast wasn’t very active. Don’t throw it out! Just cover it back up and let it sit another 2 to 4 hours at room temperature. The slow fermentation is the key to the flavor, so a little patience is always worth it.
Q3. Can I proof these rolls in the fridge instead of on the counter?
You certainly can, but it changes the flavor profile! The counter method (room temperature) develops those deep, complex notes that make these Easy Overnight Artisan Dinner Rolls taste like they came from a fancy bakery. The fridge slows everything down too much and results in a milder flavor. Stick to the counter for the best results!
Q4. How important is the 20-minute rest before baking?
That final 20 minutes is crucial! After you shape the dough, those little balls need time to relax and warm up slightly before they hit the hot oven. This resting period—called the final proof—is what ensures they puff up nicely instead of staying dense when baking.
Storing Leftover Easy Overnight Artisan Dinner Rolls
These rolls are honestly best eaten the day they are baked, warm from the oven with butter melting into those open pockets. But if you happen to have any of these glorious Easy Overnight Artisan Dinner Rolls left over, don’t worry about them going stale too quickly! Because of the high hydration, they stay surprisingly soft for a couple of days.
The key is keeping the air out. Store them in an airtight container or a sealed zip-top bag at room temperature. Resist the urge to put them in the fridge—that just makes bread go hard faster! Reheating is quick and brings back that fresh-baked crust.
| Method | Time/Temp | Result |
|---|---|---|
| Oven Reheat (Best) | 350\u00b0F for 5 minutes | Crisp crust, warm center |
| Microwave (Quickest) | 10-15 seconds | Soft, but crust may soften |
Sharing Your Homemade Easy Overnight Artisan Dinner Rolls
I really hope you give these a try the next time you need fantastic bread without the fuss! Seriously, pull the dough together tonight, and wake up to bakery-quality rolls tomorrow. If you loved how easy these Easy Overnight Artisan Dinner Rolls were, please leave me a star rating right below this section. I always love hearing from you, so drop a comment and let me know how your crust turned out! You can also follow along for more easy recipes on our Facebook page or save this recipe on Pinterest.
Print
Amazing 12 Easy Overnight Artisan Dinner Rolls
- Total Time: 35 minutes active plus overnight rise
- Yield: 12 rolls
- Diet: Vegetarian
Description
Crusty yet soft artisan dinner rolls made with four simple ingredients. This easy overnight rolls recipe delivers bakery-style bread with minimal effort.
Ingredients
- 4 cups bread flour plus more for shaping
- 2 teaspoons kosher salt
- 1 teaspoon active dry yeast
- 2 cups room-temperature water
Instructions
- Whisk bread flour, salt, and yeast in a large bowl until evenly combined.
- Add water and stir with a sturdy spatula until all flour incorporates and a sticky dough forms.
- Cover the bowl tightly and let rise at room temperature for 10 to 12 hours until bubbly and expanded.
- Line a baking sheet with parchment paper and heat oven to 425°F.
- Generously flour a work surface and turn the dough out, folding it over itself several times to coat with flour.
- Divide dough into 12 equal portions and shape each into a loose ball by pulling edges under and pinching together.
- Place rolls pinched-side up on the prepared baking sheet and let rest for 20 minutes.
- Bake for 15 minutes, rotate the pan, then bake 5 minutes more until deeply golden.
- Transfer rolls to a rack and cool slightly before serving.
Notes
- A long, slow rise creates the signature open crumb and deep flavor of artisan-style bread.
- Prep Time: 15 minutes
- Cook Time: 20 minutes
- Category: Bread
- Method: Baking
- Cuisine: American