If you thought making real, artisan-style bread meant wrestling with sticky dough and endless kneading, stop right there! I’m so excited to share my absolute favorite recipe with you today: the Rosemary Garlic Bread that changed everything for me. When I first started baking, I was terrified of yeast, but this no-knead method is pure magic. Seriously, the secret weapon here is patience—we let time do all the hard work through a slow fermentation process right on my counter.
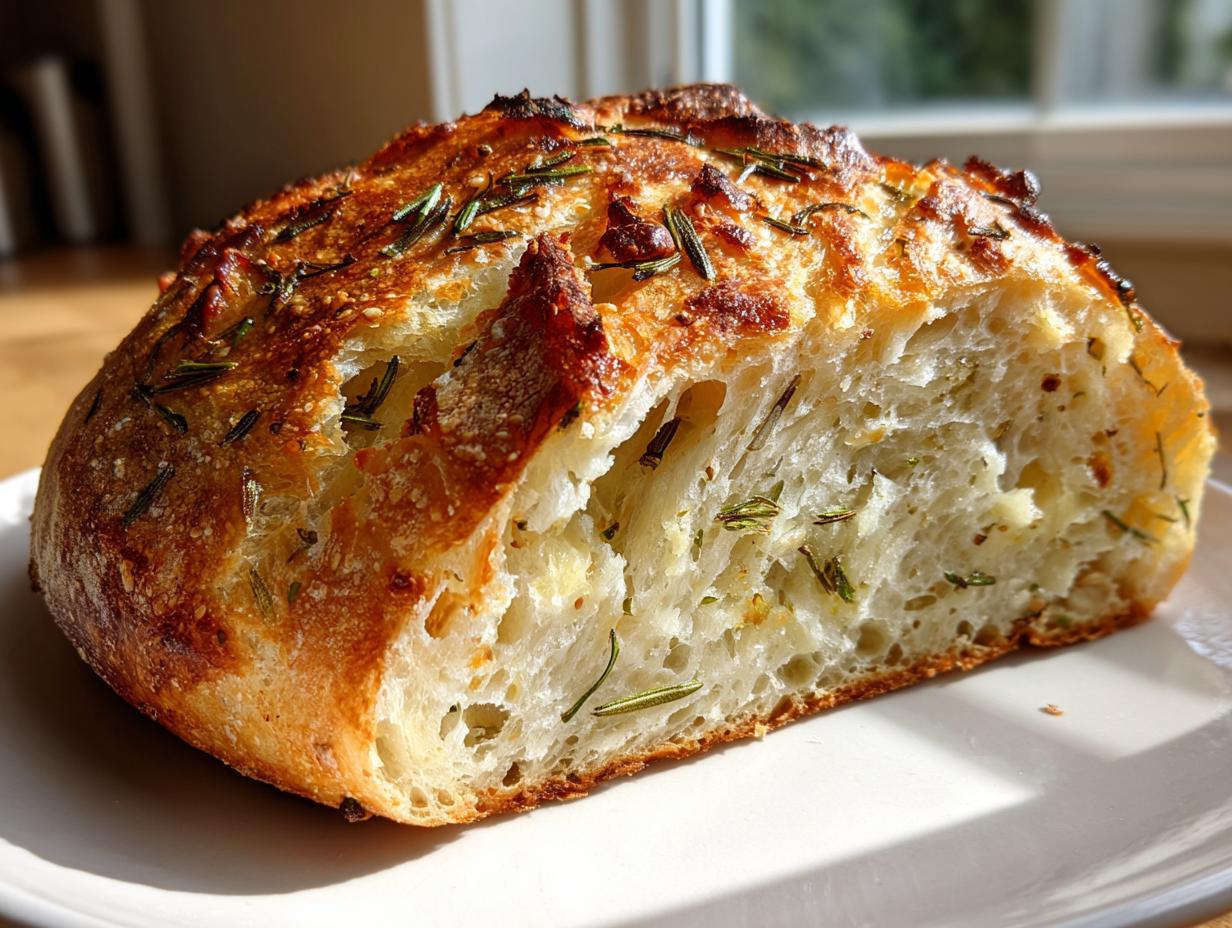
We bake this rustic round right in a cast iron skillet, which gives it the crispiest crust you’ve ever tasted outside a fancy bakery. I remember my first attempt at homemade bread ended up dense and sad, but this technique—combining fresh rosemary, savory garlic, and that long rest—guarantees a soft, open interior every single time. Trust me, once you master this, you won’t buy store-bought loaves anymore!

Ingredients for Your Perfect Rosemary Garlic Bread
Okay, let’s talk about what you need! Because this is a no-knead recipe, precision matters, but don’t panic—it’s mostly just measuring. We are using simple pantry staples, but how you prep the rosemary and garlic really makes this loaf sing. Grab your largest mixing bowl, because the dough gets big!
Dry Ingredients for Rosemary Garlic Bread
For the dry mix, we need three full cups of all-purpose flour—no fancy bread flour required here, which is great for beginners. We use kosher salt because it dissolves nicely, about one and a half teaspoons of it. We’re using instant yeast, just a half teaspoon, since the slow fermentation is doing most of the heavy lifting. Make sure your fresh rosemary is finely chopped—we need one tablespoon of that fragrant herb, plus a half teaspoon of black pepper to give it a little kick.
Wet Ingredients and Flavorings
The water needs to be room temperature, not cold and definitely not hot—we are looking for one and one-third cups of that. For that amazing garlic flavor that permeates the whole loaf, mince up three cloves nice and fine. And don’t forget the olive oil; we need one tablespoon to coat the skillet later, which is crucial for that crust!
Essential Equipment for Artisan Rosemary Garlic Bread
You don’t need a stand mixer or fancy proofing baskets for this loaf, which is what I love about it! To get that incredible artisan quality, you just need a few core items. Make sure you have a large mixing bowl—the dough expands a lot during that long rest. The star of the show is definitely a 10-inch cast iron skillet; it holds the heat perfectly for that crispy bottom. And finally, grab a wire rack so the bread can breathe once it comes out of the oven.
Step-by-Step Instructions for Rosemary Garlic Bread
This is where the magic happens, and I promise it’s easier than it looks. The process is broken down into four main parts: the initial mix, the long rest, the quick shape, and the bake. Don’t worry about the dough looking messy at first; that’s exactly how it should be for this no-knead method!
Mixing and Slow Fermentation
Start by grabbing that big bowl. Whisk together all your dry ingredients—the flour, kosher salt, instant yeast, that lovely chopped rosemary, and the black pepper—just until everything looks evenly distributed. Now, pour in the room-temperature water and that minced garlic. Grab a sturdy wooden spoon and stir everything until you can’t see any more dry flour pockets. It’s going to look shaggy, sticky, and frankly, a little unappetizing—like a wet, lumpy mess. That’s okay! Cover that bowl tightly with plastic wrap. Now, put it somewhere out of the way and forget about it for 18 to 24 hours. Yes, really! This long, slow fermentation is what develops that deep, tangy, bakery-quality flavor. Don’t rush this part; it’s the most important step for flavor development.
Preparing the Skillet and Shaping the Dough
Once the dough has doubled and looks bubbly after its long rest, it’s time to prep your skillet. Brush the bottom and sides of your 10-inch cast iron skillet thoroughly with olive oil. Then, sprinkle the cornmeal evenly over the bottom. This cornmeal acts like tiny ball bearings, helping the crust get super crispy and preventing sticking. Now, turn that sticky dough out onto a surface you’ve lightly dusted with a bit more flour. Don’t knead it! We just want to gently fold the edges toward the center four times, creating a rough ball shape. You’re just trying to build a little surface tension. Gently place that dough ball into your prepared skillet, making sure the seam side—where you folded everything together—is facing down against the cornmeal.
Final Proofing and Baking the Rosemary Garlic Bread
Cover your skillet loosely with a clean kitchen towel. We need a final rest, which is much shorter—about 2 hours in a warm spot. It should puff up nicely and almost double again in size. While that’s happening, preheat your oven way up high to 450 degrees Fahrenheit. Once it’s proofed, slide that skillet onto the center rack. Bake it for 30 to 35 minutes. You’re looking for a deep, beautiful golden brown on top. If you have an instant-read thermometer, check the center; it needs to hit 190 degrees Fahrenheit to know it’s fully cooked through.

Cooling for Optimal Texture
This last step is the hardest because the smell will be intoxicating! As soon as it comes out, immediately remove the bread from that hot skillet and set it right onto a wire rack. You have to let it cool for at least 15 minutes before you slice into it. If you cut it right away, all that built-up steam escapes too fast, and you’ll end up with a gummy interior. That 15 minutes allows the crumb structure to set perfectly. Then, slice it up and enjoy the best Rosemary Garlic Bread you’ve ever made!
Why You Will Love This Rosemary Garlic Bread Recipe
Honestly, this recipe is a total game-changer for weeknight baking. It gives you that satisfying, rustic loaf without any of the hard work. I keep coming back to it because it delivers incredible results with minimal effort on my part. If you need a showstopper bread that’s surprisingly easy, this is it!
- Quick Prep Time: Only about 15 minutes of active work required!
- Artisan Quality: The slow fermentation creates a complex flavor and an amazing open, airy crumb.
- Perfect Crust: Baking in the cast iron skillet guarantees a wonderfully crisp exterior.
- Simple Ingredients: It’s a naturally vegetarian recipe using pantry staples you probably already have.
Troubleshooting Common Rosemary Garlic Bread Questions
It happens! Baking is science, but sometimes the kitchen environment acts up. My first batch of this no-knead bread looked a little wonky, so let’s talk about what might be going on with your dough.
Q: Why is my dough still sticky after folding? That’s totally normal for this style of bread! Since we aren’t kneading in gluten, the dough remains very high in hydration. When you turn it out onto the counter, use just enough flour to stop it from sticking to your hands while you do those four quick folds. If it’s too dry, the final loaf will be dense.
Q: My kitchen is cold. Do I still rest it for 24 hours? You might need longer! Fermentation time is super flexible depending on how warm your room is. If your kitchen is chilly, let it go for 24 or even 26 hours. You’re looking for visual cues—lots of bubbles and a definite increase in volume—not the clock. The long rest is crucial for flavor!
Q: Can I use a Dutch oven instead of a cast iron skillet for this skillet bread? Yes, you absolutely can! A Dutch oven works wonderfully because it traps steam, which helps the bread rise beautifully during the first part of the bake. Just make sure whatever you use is oven-safe up to 450 degrees. The cast iron is my preference for that exceptionally crisp bottom crust, though!
Storing and Reheating Your Flavorful Rosemary Garlic Bread
This bread is so good fresh from the oven that you might not have leftovers, but if you do, we need to treat it right! The biggest enemy of that beautiful, crispy crust is moisture, so we have to be careful how we store it. For short-term storage, just keep it on the counter wrapped loosely in a paper bag or a clean kitchen towel. Don’t seal it tightly in plastic wrap, or you’ll steam that crust right back into softness!
If you have a lot left over, freezing is your best friend. Slice the loaf completely before freezing—it makes reheating so much easier later. Reheating is key to bringing back that bakery magic. Pop slices directly onto a baking sheet in a 350-degree oven for about 5 to 8 minutes. That blast of dry heat revives the crunch instantly. It’s like making it fresh all over again!
Storage Guidelines Table
| Storage Duration | Method |
|---|---|
| Up to 2 days | Store at room temperature wrapped loosely in a paper bag or cloth. |
| Up to 3 months | Wrap slices tightly in plastic wrap, then place in a freezer-safe bag. |
Estimated Nutritional Information for Rosemary Garlic Bread
Since this is a rustic, slow-fermented loaf made with simple ingredients, the nutrition is actually pretty straightforward! Please remember that these numbers are just an estimate based on the ingredients listed and the yield of 10 servings. Your exact numbers might shift slightly based on how much flour sticks to your hands during shaping!
| Nutrient | Amount Per Slice |
|---|---|
| Calories | 145 kcal |
| Total Fat | 1 g |
| Carbohydrates | 29 g |
| Protein | 4 g |
Share Your Homemade Rosemary Garlic Bread Experience
Well, that’s it—you’ve made your very own artisan loaf! I truly hope you loved the smell of that fresh rosemary and garlic filling your kitchen. This recipe is one I come back to again and again, and I can’t wait to hear about your results. Did your dough rise perfectly? Did that crust get super crispy in the cast iron skillet?
Please leave me a rating below and tell me in the comments how your first taste of this homemade bread turned out. Happy baking, friends! You can also follow along for more easy recipes on Facebook or save this recipe on Pinterest.
Print
Amazing Rosemary Garlic Bread in 1 bake
- Total Time: 19 hours 50 minutes
- Yield: 10 servings
- Diet: Vegetarian
Description
This effortless rosemary garlic bread uses slow fermentation for a bakery-quality loaf with a crisp crust and soft interior. The no-knead process uses a cast iron skillet to make a rustic artisan round.
Ingredients
- 3 cups all purpose flour
- 1 1/2 teaspoons kosher salt
- 1/2 teaspoon instant yeast
- 1 tablespoon fresh rosemary, chopped
- 1/2 teaspoon black pepper
- 1 1/3 cups water, room temperature
- 3 cloves garlic, minced
- 2 tablespoons all purpose flour, for dusting
- 1 tablespoon olive oil
- 1 tablespoon cornmeal
Instructions
- Whisk the three cups of flour, kosher salt, instant yeast, chopped rosemary, and black pepper together in a large mixing bowl.
- Add the room temperature water and minced garlic to the dry ingredients and stir with a wooden spoon until a shaggy and sticky dough forms.
- Cover the bowl tightly with plastic wrap and let it sit at room temperature for 18 to 24 hours to ferment and rise.
- Brush the bottom and sides of a 10 inch cast iron skillet with the olive oil and sprinkle the cornmeal evenly over the bottom.
- Turn the sticky dough out onto a clean surface lightly dusted with the two tablespoons of flour.
- Fold the edges of the dough toward the center four times to create a rough ball shape.
- Place the dough into the prepared skillet with the seam side facing down.
- Cover the skillet loosely with a clean kitchen towel and let the dough rise in a warm spot for 2 hours until it doubles in size.
- Preheat the oven to 450 degrees Fahrenheit.
- Bake the bread on the center rack for 30 to 35 minutes until the top is deep golden brown.
- Verify the loaf is done by checking that the internal temperature reaches 190 degrees Fahrenheit in the center.
- Remove the bread from the skillet immediately and let it cool on a wire rack for at least 15 minutes before slicing.
Notes
- The fermentation time can range from 18 to 24 hours depending on room temperature.
- Cool the bread completely before slicing for the best texture.
- Prep Time: 15 minutes
- Cook Time: 35 minutes
- Category: Bread
- Method: Skillet Baking
- Cuisine: American