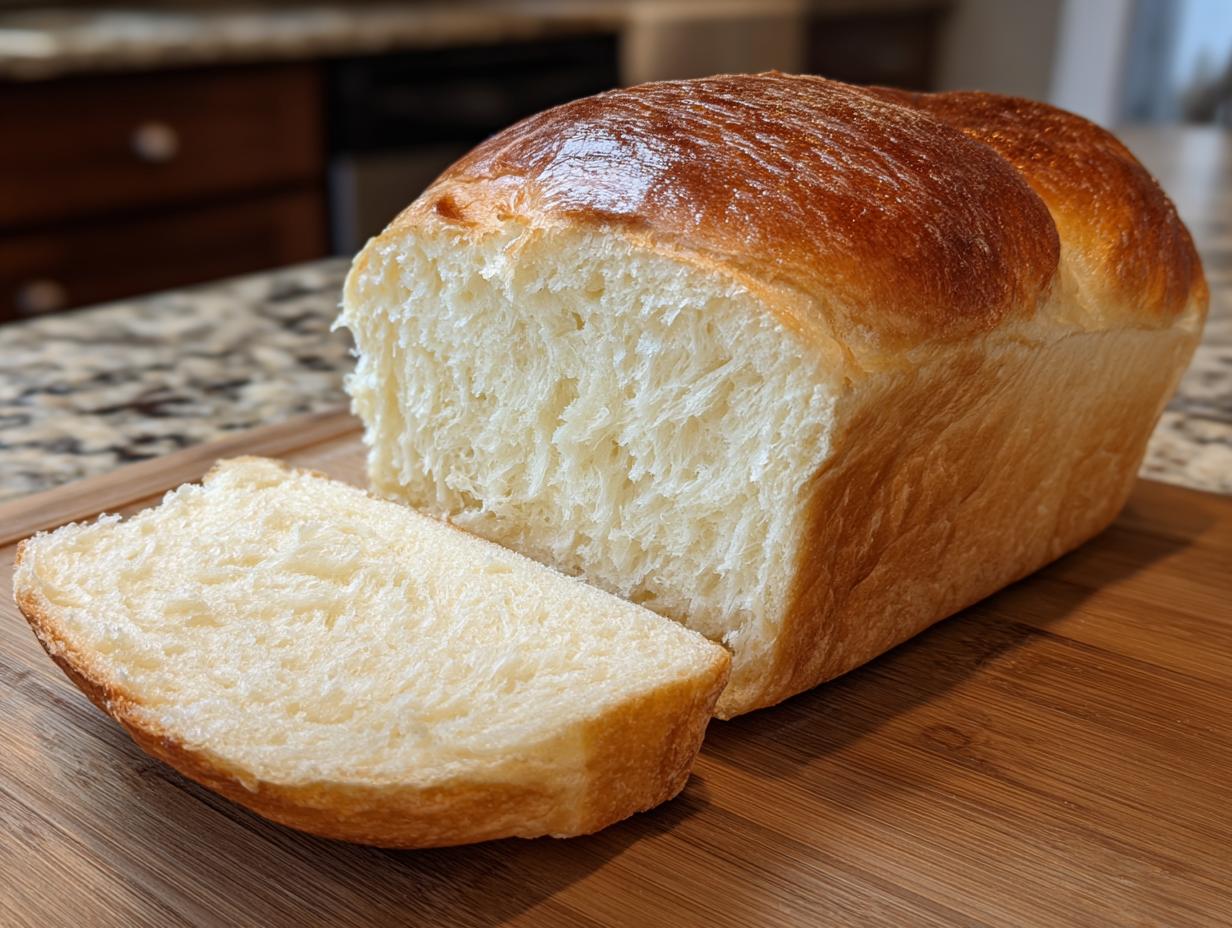
I finally cracked the code, folks! If you thought sourdough meant those big, open-crumb rustic boules that are amazing but sometimes just too chewy for a Tuesday morning sandwich, you were totally right. But I’ve got something here that changes everything: the Soft Sourdough Milk Bread. Seriously, this is the recipe you need when you want that slight tang from your starter mixed with the pillowy softness of classic Japanese milk bread (Shokupan). It’s ridiculously tender.
I spent months tweaking the hydration and the butter incorporation because I wanted a naturally leavened bread that a beginner could tackle and get that perfect, fine, fluffy crumb on the first try. The secret is using active starter combined with just enough warm milk and sugar to give the yeast a little boost while it works its magic. This recipe is my go-to for the softest sandwich bread imaginable. Forget those complicated tangzhong methods; we’re keeping it simple, warm, and absolutely delicious. Trust me, once you smell this baking, you’ll never look back.

Why You Will Love This Soft Sourdough Milk Bread
This isn’t just bread; it’s basically a cloud you can slice! Honestly, every time I pull this loaf out, I’m amazed at how soft it is, especially since we’re using sourdough. It has just enough sweetness to feel special, but it’s not dessert—it’s perfect for everything. If you’ve been scared of sourdough, this is your gateway recipe. It’s much more forgiving than a free-form artisan loaf.
I promise you’ll be thrilled with the results. Here are the main reasons this recipe has earned permanent superstar status on my counter:
Key Benefits for Your Baking Journey
- The texture is unbelievably fine and pillowy—it practically melts.
- It slices beautifully, even when it’s fresh out of the oven (if you can wait!).
- It’s incredibly versatile: amazing toasted or used for fancy sandwiches.
- The natural leavening gives it a depth of flavor that plain yeast breads just can’t match.
Gathering Ingredients for Your Soft Sourdough Milk Bread
Okay, before we get to the fun part—the kneading!—we need to talk about the lineup. Gathering your ingredients first makes the whole process smooth, especially with sourdough, because we don’t want to be scrambling around later. Precision is key here, especially when we are aiming for that super fine crumb structure. Don’t try to eyeball the salt or the sugar; this bread relies on balance!
I’ve listed everything you need below. Make sure your active starter is bubbly and ready to go, and remember that room temperature egg and slightly warmed milk are crucial for an even mix. Trust me on this; cold ingredients throw off the whole hydration balance!
| Ingredient | Amount |
|---|---|
| Active Sourdough Starter | 1 cup |
| Bread Flour | 3 1/4 cups |
| Whole Milk (warmed slightly) | 3/4 cup |
| Large Egg (room temperature) | 1 |
| Granulated Sugar | 3 tablespoons |
| Fine Sea Salt | 1 teaspoon |
| Unsalted Butter (softened) | 5 tablespoons |
Essential Components and Measurements
Let’s look closer at the prep for these items. The butter absolutely must be softened—not melted! If it’s too soft, it just incorporates into the dough too fast and ruins the structure we build later. For the egg, pulling it out about 30 minutes before you start mixing is perfect. The milk just needs to be lukewarm, not hot, so it doesn’t kill your starter activity.
The flour choice matters too. Bread flour gives us the high protein we need for that beautiful stretch and rise. And please, use fine sea salt; coarse salt doesn’t dissolve well enough in this wetter dough, and we want everything evenly distributed.
Equipment Needed for Soft Sourdough Milk Bread
You don’t need a ton of fancy gear, but having the right home base helps! You’ll definitely need a large mixing bowl—I usually use my stand mixer bowl, but a big sturdy one works if you prefer mixing by hand initially. Make sure you have a good quality 9 by 5 inch loaf pan ready to go.
If you have a stand mixer with a dough hook, it will save your arms during the kneading stages, especially when we add that butter later. If you are mixing by hand, make sure your counter space is clean, and wear an apron because this dough can be sticky until it develops structure!
Step-by-Step Instructions for Soft Sourdough Milk Bread
This is where the magic happens! Don’t be intimidated by the long rise times; the actual hands-on work is minimal. We’re just setting up the dough for success so it can develop that incredible fluffy texture all on its own. Read through these steps once before you start mixing, and you’ll be golden.
Mixing the Initial Dough
First things first, grab your big bowl. We start by whisking together all the wet stuff and flavorings: your active sourdough starter, that warmed milk, the room temperature egg, the sugar, and the salt. Whisk it until it looks totally smooth—no lumps of sugar hiding at the bottom. This ensures everything is perfectly distributed before we add the heavy flour.
Now, dump in all 3 1/4 cups of bread flour all at once. Mix this until you just get a shaggy, soft dough. It won’t look pretty yet, and it might feel a little sticky, which is totally normal for a high-hydration dough like this. Cover the bowl with a kitchen towel or plastic wrap and let it rest for 20 minutes. This rest period, called autolyse, lets the flour fully hydrate before we start working the gluten.
Kneading and Incorporating Butter
After that 20-minute rest, it’s time to develop that strength! If you’re using a mixer, use the dough hook and knead on low speed for about 6 minutes. If you’re doing this by hand, get ready for a good workout! You want the dough to start coming together and becoming noticeably elastic. It will still be soft, but it shouldn’t stick everywhere.
Now for the secret to true milk bread softness: the butter. The dough must be elastic before you add the fat. Add your 5 tablespoons of softened butter one tablespoon at a time. Wait until the previous bit is mostly incorporated before adding the next. This takes patience! You need to knead for about 5 more minutes total after the butter is added until the dough is smooth, stretchy, and passes the windowpane test—meaning you can stretch a small piece thin enough to almost see through without tearing. That’s the sign of perfect gluten development!
Bulk Fermentation and Shaping the Loaf
Gently shape the dough into a nice tight ball. Lightly grease a clean bowl—don’t use too much oil, or the dough might slip around too much—and place the ball inside. Cover it up and let it do its thing at room temperature until it doubles in size. Depending on how warm your kitchen is, this could take anywhere from 4 to 6 hours. Don’t rush this long fermentation; it builds flavor!
Once doubled, gently turn the dough out onto a clean, *unfloured* surface. Gently deflate it—don’t punch it! You want to keep those nice air bubbles inside. Shape it into a tight loaf suitable for your 9 by 5 inch pan. Roll it up tightly like a jelly roll, making sure to seal the seam underneath. Place it seam-side down in your greased pan.
Final Proofing and Preparing for the Oven
Cover the loaf pan again. The final proof, or second rise, is crucial for that final puff. Let it sit until the dough rises about 1 inch above the rim of the pan. This usually takes about 3 hours, but check it often! If you over-proof it, it might collapse in the oven.
About 15 minutes before the proofing is done, crank your oven up to 350°F. Right before it goes in, take 2 tablespoons of milk and gently brush the top of the loaf. This milk wash is what gives us that beautiful, soft, golden crust we’re looking for.

Baking and Cooling the Soft Sourdough Milk Bread
Carefully place the loaf into the preheated 350°F oven. Bake it for about 35 minutes. You are looking for a light golden color, but the real test is the temperature. Stick an instant-read thermometer right into the center of the bread; you want it to hit 190°F internally. If the top starts browning too fast, you can always loosely tent it with foil.
Once it hits that mark, pull it out immediately! Leave it in the pan on a cooling rack for exactly 10 minutes. This lets the structure set up slightly so it doesn’t steam itself soggy. After 10 minutes, gently turn the loaf out onto the rack to cool completely. Seriously, let it cool completely before slicing! I know it’s hard, but slicing warm bread ruins that fine, fluffy crumb we worked so hard for!
Tips for Success with Soft Sourdough Milk Bread
Getting that textbook soft sourdough milk bread texture really comes down to a few key moments. First, never skip that 20-minute rest after mixing the flour in. If you try to knead it right away, you’ll fight the dough the whole time. Let the flour soak up the liquid first!
The second big tip is the butter incorporation. Add it slowly, I mean *slowly*. If you dump it all in at once, you’ll end up with greasy patches instead of a smooth, stretchy dough. You must wait until the previous bit is absorbed before adding the next tablespoon. This technique is what guarantees a fine, pillowy crumb.
Also, keep an eye on your final proof. If you bake it when it’s under-proofed, the bread will look dense. If it’s over-proofed, it might collapse when it hits the heat. Aim for that sweet spot where it’s really puffy but still has some spring when you gently tap the side of the pan.
Storage and Reheating Your Fluffy Bread
This soft sourdough milk bread is amazing because it stays pillowy for days, unlike some rustic loaves that go stale fast! The milk and butter content helps keep it wonderfully moist. For short-term storage, just wrap the cooled loaf tightly in plastic wrap, and then maybe put that in a zip-top bag. This keeps air out and maintains that soft exterior.
If you want it to last longer, slicing it first makes reheating much easier later on. Here’s my quick guide for keeping this fluffy bread perfect:
| Storage Method | Duration | Reheating Tip |
|---|---|---|
| Countertop (Wrapped) | Up to 3 days | Toast slice directly |
| Freezer (Airtight) | Up to 3 months | Microwave wrapped slice for 15 seconds |
Frequently Asked Questions About Soft Sourdough Milk Bread
I totally get it; baking sourdough can bring up a ton of questions, especially when you’re aiming for something this soft! People always ask me about substitutions, but honestly, sticking to the main ingredients gives you the best chance at that perfect fluffy bread. Here are a few things I hear all the time!
Can I use a different type of flour in this Soft sourdough milk bread
I strongly recommend sticking to bread flour for this recipe if you want that classic soft sourdough milk bread texture. Bread flour has higher protein, which means more gluten development, and that’s what gives you the stretch and the fine crumb structure. If you swap in all-purpose flour, your loaf will likely be a bit denser and it won’t rise quite as high. You could try substituting maybe 1/2 cup of the bread flour with whole wheat for a nuttier flavor, but don’t go much higher than that!
How long will this bread last if stored correctly
Because this recipe uses milk and butter, it stays noticeably softer than a standard country loaf. If you wrap it tightly after it’s completely cool, it should stay wonderfully moist on the counter for about three days. If you think you won’t finish it by then, slicing it and freezing the slices is the best way to keep it fresh. It freezes beautifully!
What is the ideal room temperature for the first rise
Sourdough loves warmth, but too much heat can make it ferment too fast and ruin the texture we’re aiming for. For that long bulk fermentation, aim for a spot that’s around 72 to 76 degrees Fahrenheit. If your kitchen is colder, say 68 degrees, it will just take longer—maybe 6 or 7 hours instead of 5. Just watch the dough, not the clock, and wait until it’s doubled!
Share Your Soft Sourdough Milk Bread Results
I honestly cannot wait to see your beautiful, fluffy loaves! Baking is all about sharing, and I love hearing how this Soft Sourdough Milk Bread turned out in your kitchen. Did you manage to get that perfect tender slice? If you want to share your baking triumphs, feel free to connect with us on Facebook!
Go ahead and leave me a rating below and tell me your favorite way to eat this bread—toasted with jam, or maybe just standing over the sink eating it plain? Drop your comments and photos right here! You can also find more great recipes on our Pinterest page.
Print
Amazing Soft Sourdough Milk Bread in 1 Try
- Total Time: 65 minutes
- Yield: 10 slices
- Diet: Vegetarian
Description
Soft sourdough milk bread bakes up fluffy, tender, and lightly sweet with a fine crumb. Perfect for sandwiches, toast, and everyday baking.
Ingredients
- 1 cup active sourdough starter
- 3 1/4 cups bread flour
- 3/4 cup whole milk warmed
- 1 large egg at room temperature
- 3 tablespoons granulated sugar
- 1 teaspoon fine sea salt
- 5 tablespoons unsalted butter softened
- Milk wash: 2 tablespoons whole milk
Instructions
- Whisk sourdough starter, milk, egg, sugar, and salt in a large bowl until smooth.
- Add bread flour and mix until a soft dough forms. Cover and rest for 20 minutes.
- Knead the dough for 6 minutes until elastic. Add butter one tablespoon at a time and knead 5 minutes more until very smooth and stretchy.
- Shape the dough into a ball, place in a lightly greased bowl, cover, and let rise at room temperature until doubled, about 5 hours.
- Turn the dough onto a clean surface, gently deflate, and shape into a tight loaf. Place into a greased 9 by 5 inch loaf pan.
- Cover and proof until the dough rises 1 inch above the pan, about 3 hours.
- Heat the oven to 350°F. Brush the loaf gently with milk.
- Bake for 35 minutes until lightly golden and the internal temperature reaches 190°F.
- Cool in the pan for 10 minutes, then transfer to a rack to cool completely before slicing.
Notes
- This bread stays pillowy and moist, making it ideal for slicing, freezing, and daily use.
- Prep Time: 30 minutes
- Cook Time: 35 minutes
- Category: Bread
- Method: Baking
- Cuisine: Western