Miracle No Knead Bread changed everything for me when I started NoobRecipes. I remember trying to make sourdough—it involved feeding a starter, folding dough every thirty minutes, and crying softly over a flat, dense brick I pulled out of the oven. I almost gave up baking entirely! Seriously, my kitchen looked like a flour bomb went off, and I still ended up ordering pizza.
Then a friend sent me a link to a recipe that promised amazing results with zero effort. I was skeptical, but when I pulled that first loaf out of the Dutch oven—golden, cracked, smelling like heaven—I knew I had found the secret weapon for every new baker out there. This isn’t just bread; it’s proof that you don’t need fancy skills to bake something truly spectacular.

Why This Miracle No Knead Bread Recipe Works for Beginners
The magic of this **Miracle No Knead Bread** is that time does all the hard work for you. We aren’t doing any of that tricky kneading that makes beginners nervous about gluten development or overworking the dough. Nope! You just mix four basic things in a bowl, cover it up, and walk away for most of the day. That long, slow fermentation is what builds incredible flavor and that signature open, chewy crumb.
Seriously, the reward-to-effort ratio here is off the charts. When you see those big bubbles forming in the dough the next morning, you’ll feel like a baking wizard! It takes maybe fifteen minutes of actual hands-on time, and you end up with a crusty, artisan-style loaf that people will swear you bought from a fancy bakery. If you’ve ever been intimidated by yeast, this recipe is your ticket to immediate success. Trust me, I wouldn’t put my reputation on the line for anything less than a genuine miracle!
Gathering Your Ingredients for Miracle No Knead Bread
Okay, so for this **Miracle No Knead Bread**, you literally only need four things. Four! It’s almost suspicious how few ingredients are required to get such an amazing result. Don’t let the simplicity fool you; the quality of these few items really matters, especially the water temperature. We aren’t doing much work, so we have to let the ingredients do theirs perfectly.
I always keep these things stocked now because you never know when you’ll get a sudden craving for fresh bread. Just make sure you have a big bowl ready for that long rest! Here’s exactly what you need to grab before you start mixing:
- 3 cups all-purpose flour
- 1 1/2 teaspoons salt
- 1/2 teaspoon instant yeast
- 1 1/2 cups room temperature water
Precise Ingredient Measurements
Since we aren’t kneading, we need precision in the mix. For the flour, just scoop it lightly into your measuring cup and level it off—don’t pack it down, or your dough will be too stiff. The yeast absolutely must be **instant yeast**. Active dry yeast needs to be bloomed first, and that throws off the timing of our long rest period. It’s just not worth the headache here.
The water is key, too. Make sure it’s just room temperature, not hot! Hot water will kill the yeast before it even gets started during that 18-hour nap. If your kitchen is cold, using slightly warmer than cool water is fine, but generally, just tap water that isn’t shocking cold works perfectly. That’s it for preparation!
Essential Equipment for Perfect Miracle No Knead Bread
You might think making artisan bread requires a stand mixer or fancy proofing baskets, but nope! For this **Miracle No Knead Bread**, we are keeping the toolkit minimal. The single most important piece of equipment you need is a heavy, 6-quart Dutch oven or a similar oven-safe pot with a tight-fitting lid. That pot traps the steam, which is what gives you that incredible, crackly crust.
Next, grab some parchment paper. This is a total game-changer. It lets you lower the sticky dough right into that screaming hot pot without burning yourself or making a massive mess. You’ll also need a large bowl for mixing and plastic wrap for covering it overnight. That’s seriously all you need!
Step-by-Step Instructions: Making Your Miracle No Knead Bread
Alright, let’s get down to the fun part—which is mostly waiting! This is where the magic happens, and I mean that literally. Remember, since we aren’t engaging the gluten structure by hand, the yeast needs a whole lot of time to develop flavor and create those beautiful gas pockets. Don’t rush this first step, or you won’t get that signature crust on your **Miracle No Knead Bread**.
Mixing the Dough and Long Rest Period
First things first: grab your large bowl. Whisk together your flour, salt, and instant yeast really well. You want those dry ingredients evenly distributed so the yeast knows where to start working. Now, pour in that room temperature water all at once. Use a spatula or a wooden spoon—don’t use your hands yet!—and stir until everything is just combined. It’s going to look shaggy, messy, and way too wet. That’s exactly what you want! If it seems really stiff, add a tablespoon or two more water until it’s definitely sticky.
Cover that bowl tightly with plastic wrap. Now, find a warm spot in your kitchen—maybe on top of the fridge or just on the counter away from drafts. You need to let this sit for a long time. I aim for 16 hours, but anywhere between 12 and 18 hours is perfect. Go to bed, go to work, live your life! When you come back, the dough should look puffy and covered in bubbles. That means the yeast has been working hard for you!

Preheating and Preparing for the Bake
This next part requires timing, so set a timer! Put your 6-quart Dutch oven, with the lid on, into the cold oven. Now, crank that oven up to 450°F (232°C). You need that pot to get scorching hot—this is non-negotiable for that amazing crust. Let it preheat for a solid 30 minutes once the oven hits temperature.
While the pot is heating, gently scrape your wonderfully bubbly dough out onto a lightly floured surface. Try not to punch all the air out! Just gently fold the edges over onto themselves a couple of times to form a loose ball. It will still be sticky, so just dust your hands lightly. Place this dough ball onto a square of parchment paper. Leave it covered with a tea towel while the pot finishes its intense heating session. Seriously, you want that pot ripping hot before the dough goes in.
Baking Your Crusty Loaf
Okay, time for the dramatic part! Carefully take your Dutch oven out of the oven—use really thick oven mitts, please, because that cast iron is dangerously hot. Remove the lid. Using the parchment paper as a sling, carefully lower your dough ball right into the hot pot. It’s okay if the parchment paper touches the sides; it’s just there to protect you and the dough!
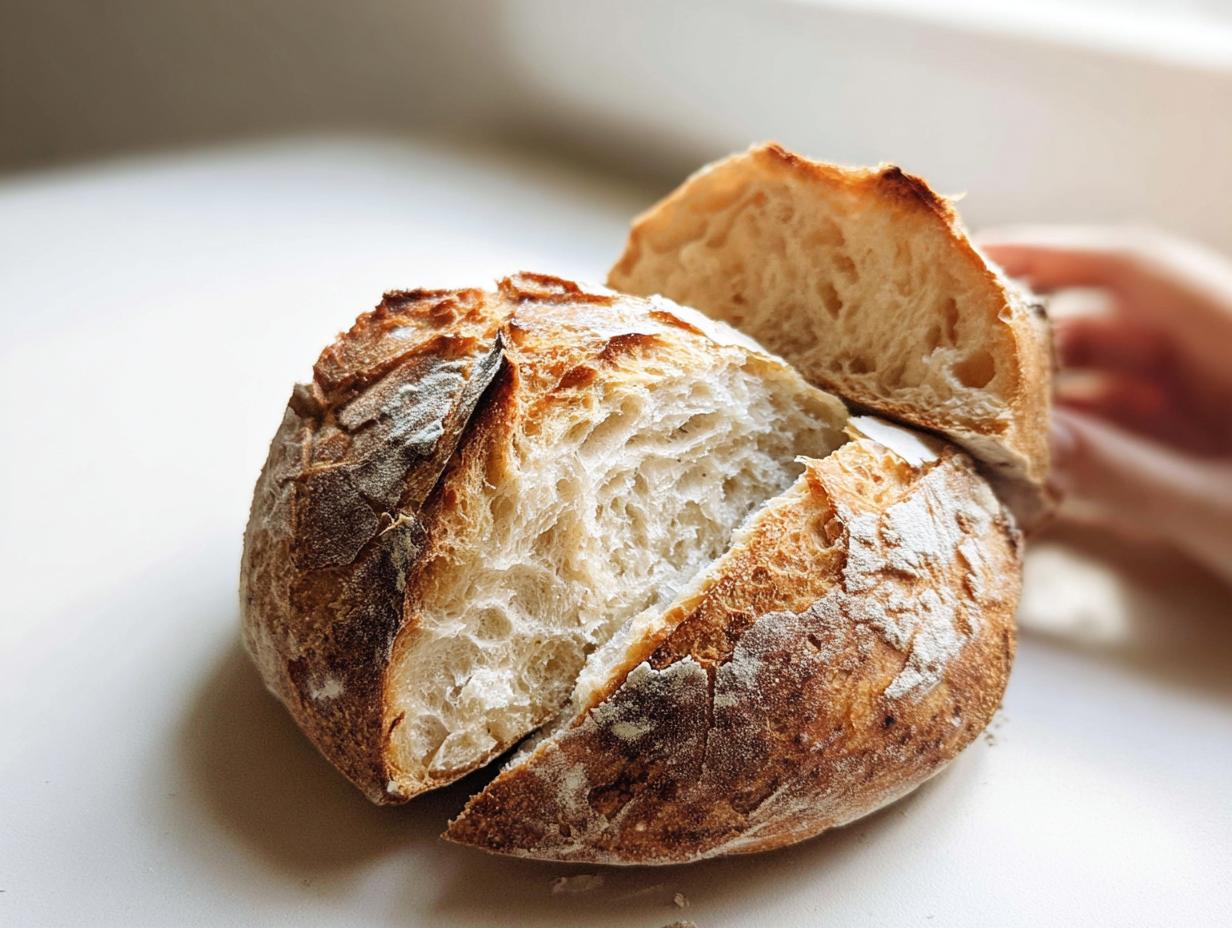
Put the lid back on tight and slide it into the oven. Bake covered for exactly 30 minutes. This trapped steam keeps the crust soft initially so the bread can expand fully—that’s the oven spring everybody talks about! When the timer goes off, carefully take the lid off. Wow, look at that rise! Now, bake it uncovered for another 10 to 15 minutes. You are looking for a deep golden brown color that looks hard and crackly. Once it hits that perfect color, pull it out, slide it onto a cooling rack, and try not to cut into it for at least an hour. The internal structure is still setting, and slicing too early makes for a gummy interior!
Pro Tips for Truly Exceptional Miracle No Knead Bread
Even though this is the easiest bread recipe out there, I’ve learned a few things over the years that take it from great to absolutely mind-blowing. If your dough feels way too sticky to handle before the bake, don’t panic or add a ton of flour! That extra flour is what leads to a dense loaf. Instead, just wet your hands slightly before you shape the ball. Water sticks to water better than dry flour does, so it helps you manage the dough without incorporating excess dry ingredients.
If you get your dough out and it seems flat—like it didn’t rise much during the long rest—it usually means your kitchen was too cold overnight. Yeast hates the cold! Next time, try putting the covered bowl in your oven with just the light on. That tiny bit of warmth makes a huge difference. Another thing: don’t skip that 30-minute preheat for the Dutch oven. If the pot isn’t scorching hot, you won’t get that signature oven spring and the crust won’t be nearly as shattering.
Finally, when you remove the lid for the last 15 minutes, if the top looks pale but you think it needs more color, you can carefully brush the top lightly with a little melted butter right before putting it back in. It helps achieve that gorgeous, deep brown shade every time.
Storing and Reheating Your Homemade Bread
The hardest part about making this **Miracle No Knead Bread** is waiting for it to cool down, but the second hardest part is figuring out how to keep it nice once it’s baked! Because this bread has such a wonderful, rustic crust, you definitely don’t want to keep it in a plastic bag. That traps moisture and makes the crust go soft almost immediately—and we worked so hard for that crunch!
For best results, just leave it on the counter. If you have an actual bread box, that’s perfect, as it lets the bread breathe while keeping it sheltered. If you plan on eating the whole loaf within two days, stick to room temperature storage. If you need it to last longer, freezing is the way to go. Just make sure it’s completely cool before you wrap it tightly!
Storage Table for Miracle No Knead Bread
Here is a quick rundown on keeping your beautiful loaf fresh:
| Storage Method | Duration |
|---|---|
| Room Temperature (Paper Bag or Bread Box) | Up to 2 days |
| Freezer (Tightly Wrapped) | Up to 2 months |
If you froze a half loaf, just pull out the piece you need and let it thaw on the counter for an hour. Or, if you want that fresh-baked crust back instantly, pop a slice directly into a 350°F toaster oven for just a few minutes. It’s like magic!
Frequently Asked Questions About No Knead Baking
When I first started sharing this recipe online, the questions just flooded in! It’s completely normal when you switch from traditional kneading methods to this long-fermentation style. People always worry about the yeast or how to know when that long bake is actually done. Don’t fret; once you nail the timing, this becomes your go-to easy bread recipe. Here are the top things folks ask me most often about achieving that perfect crusty bread.
Can I use a different type of yeast in this Miracle No Knead Bread?
I really, really recommend sticking to **instant yeast** for this one. The whole timing structure—the 12 to 18 hours—is built around instant yeast, which doesn’t need to be proofed separately. If you use active dry yeast, you’d have to proof it in warm water first, and that throws off the hydration balance of the dough. It’s just not worth the risk of guessing when you have a recipe this foolproof!
How to tell if the Miracle No Knead Bread is fully baked?
Visually, you are looking for a deep, rich golden brown color on the crust—it should look dark enough that you’re nervous, but trust me, that’s where the flavor is! If you tap the bottom of the loaf (carefully, once it’s out of the pot!), it should sound hollow. That hollow sound means the structure is set. If you own an instant-read thermometer, aim for an internal temperature of 205°F (96°C) right in the center. That guarantees you’ve cooked off all the excess moisture.
Understanding the Nutrition in Your Homemade Loaf
It’s pretty amazing that something this easy to make can taste so artisan, and the nutrition profile is pretty excellent too, especially since you control exactly what goes in it. Since this **Miracle No Knead Bread** uses just flour, water, salt, and yeast, the fat content is almost zero, which I love for a simple staple bread. It really lets the flavor of the slow fermentation shine through!
Remember, these numbers are based on the specific recipe measurements provided, and they are just estimates, so take them with a grain of salt—pun intended! You’re getting a great base of carbohydrates for energy without much sugar added at all.
Estimated Nutritional Breakdown Table
| Nutrient | Amount Per Slice |
|---|---|
| Calories | Approx. 180 |
| Carbohydrates | Approx. 38g |
| Protein | Approx. 5g |
| Fat | Approx. 0.5g |
| Sodium | Approx. 300mg |
Sharing Your Results
Now that you’ve mastered the long wait and pulled that incredible crusty loaf out of the oven, I want to see it! Take a picture of your first slice—show off that airy interior. Tell me what you served it with; mine is currently drowning in butter and homemade jam. Tag me in your posts so I can cheer you on! You can find more inspiration and share your baking triumphs with our community on Facebook or save this recipe on Pinterest.
Print
Miracle No Knead Bread: 1 Easy Loaf
- Total Time: 18 hours 40 minutes
- Yield: 8 servings
- Diet: N/A
Description
This Miracle No Knead Bread recipe creates a crusty loaf with a soft, chewy center using minimal effort. It’s perfect for beginner bakers.
Ingredients
- 3 cups all-purpose flour
- 1 1/2 teaspoons salt
- 1/2 teaspoon instant yeast
- 1 1/2 cups room temperature water
Instructions
- Whisk the flour, salt, and yeast in a large bowl.
- Stir in the water until a chunky, thick dough forms. Add a few tablespoons more water if needed, aiming for a slightly wet dough.
- Cover the bowl with plastic wrap and let it rest at room temperature for 12–18 hours.
- Preheat your oven to 450°F (232°C). Place a 6-quart Dutch oven in the oven for 30 minutes to heat.
- Gently scrape the risen dough onto a floured surface and lightly shape it into a ball.
- Set the dough on parchment paper and cover it while the pan finishes heating.
- Remove the plastic wrap from the dough. Carefully lift the dough using the parchment paper and place it into the hot Dutch oven.
- Bake covered for 30 minutes.
- Remove the cover and bake for an additional 10–15 minutes until the crust is golden brown and crisp.
Notes
- The dough should appear rough and irregular; this is normal.
- The final dough should be puffy with small bubbles before baking.
- Store the baked bread at room temperature in a paper bag or bread box for up to 2 days.
- Prep Time: 15 minutes
- Cook Time: 40 minutes
- Category: Bread
- Method: Baking
- Cuisine: American