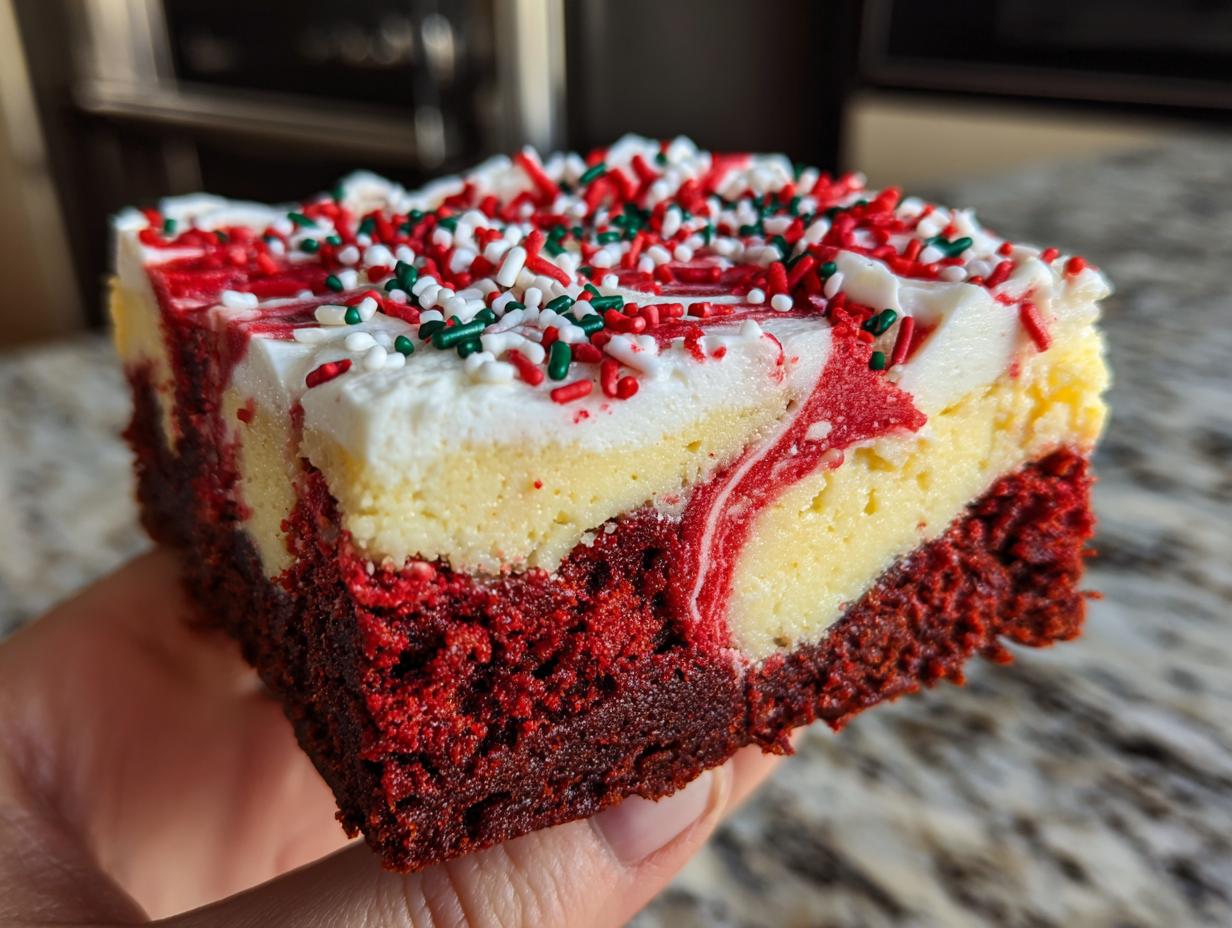
No heading needs to be written for the introduction. Just look at these amazing Red Velvet Cheesecake Brownies! They look like they took all day to swirl and frost, right? But trust me, I’ve taken a recipe that looks super fancy and stripped it down so even if you’re just starting out, you can get those stunning marbled bars on your dessert board. I’m all about making impressive desserts without needing a culinary degree.
This recipe is my secret weapon when I need something that wows everyone but doesn’t keep me chained to the kitchen for hours. We’re talking fudgy, tangy, sweet, and creamy all in one bite! I spent ages tweaking the ratios so that the cheesecake doesn’t sink entirely and the red velvet stays perfectly rich. I think you’re going to love how straightforward the process is, even with all those gorgeous layers.

Why These Red Velvet Cheesecake Brownies Are a Must-Bake
Honestly, these aren’t just any dessert bars; they are showstoppers that taste way more complicated than they actually are to make. If you’ve been intimidated by layered desserts, these Red Velvet Cheesecake Brownies are your gateway! They come together so fast, which is a huge win for me when I need something last minute.
-
Quick Prep for Impressive Results
- We’re talking less than 30 minutes of active mixing time here. Once they are chilled, the clean-up is easy, and you’ve got a stunning dessert ready for any party or just a Friday night treat.
-
The Ultimate Marbled Texture
- This is the real magic! You get the dense, slightly fudgy texture from the brownie layer, which contrasts perfectly with that cool, tangy, silky smooth cheesecake swirl. It’s the best of both worlds combined in one bite.
Gathering What You Need for Red Velvet Cheesecake Brownies
Okay, let’s talk ingredients! To get those beautiful, distinct layers in these Red Velvet Cheesecake Brownies, preparation is everything. If you take away just one tip from me, please make sure your cream cheese and eggs are at room temperature. Seriously, if the cream cheese is cold, you’ll end up with lumps, and nobody wants a lumpy swirl!
Getting everything measured out before you even turn on the oven makes the whole baking process feel calm instead of chaotic. I always lay everything out on the counter so I can easily grab what I need for each stage.
Ingredients for the Red Velvet Brownie Layer
For the base, you need that melted butter to be slightly cooled down before you mix it with the sugars—we don’t want to scramble those room temperature eggs! Don’t forget the cocoa powder for depth, the vinegar, and plenty of that vibrant liquid red food coloring to get that true red velvet look. You’ll fold in the flour and salt last, very gently, so don’t overwork it!
Components for the Cream Cheese Swirl
This is where the tang comes in! You absolutely must have 12 ounces of cream cheese, softened completely. We mix that with granulated sugar, one large egg (also room temperature, remember?), vanilla, and just a little bit of Greek yogurt or sour cream to keep the texture silky and light.
Items for the Cream Cheese Frosting and Topping
For the top layer, we soften the cream cheese and butter again. The powdered sugar needs to be sifted—it makes such a difference in texture! Then, we add vanilla and milk or cream slowly until it spreads just right. And finally, the fun part: sprinkles! Get your favorite red, white, or seasonal ones ready to press lightly on top.
Essential Equipment for Baking Red Velvet Cheesecake Brownies
You don’t need a million fancy gadgets for these bars, but having the right pans and bowls is half the battle won! I always make sure my bowls are large enough so I’m not splashing batter everywhere—which is a guaranteed way to make a mess!
We need a good whisk for the initial steps and then something sturdy for folding. Having two different sizes of mixing bowls is helpful because we are making three separate mixtures (brownie, cheesecake, and frosting).
Pan Preparation Details
The pan size is crucial here. You absolutely need a standard 9 x 13 inch baking pan. This size ensures the layers bake evenly and gives you the perfect thickness for slicing. You must line it with parchment paper, making sure you leave an overhang on two sides. That overhang is your built-in handle later when you need to lift the whole slab out to cut those clean squares!
Step-by-Step Instructions for Red Velvet Cheesecake Brownies
Alright, deep breath! This is where the fun happens. Don’t rush these steps—especially the mixing and the chilling—because that’s what separates a good brownie from a spectacular one. We’re going to build this dessert layer by layer, and I promise, it’s less complicated than it looks when you see the final product!
Preparing the Oven and Pan
First things first, get that oven preheating to 350\u00b0F. While it’s warming up, grab your 9 x 13 inch pan. You need to grease it really well, but the most important part is lining it with parchment paper. Make sure you leave a little extra paper hanging over two opposite sides. These flaps are going to save your life later when you need to lift the whole thing out in one piece!
Mixing the Red Velvet Brownie Base
In a big bowl, whisk together your melted butter, the granulated sugar, and the light brown sugar until that mixture looks thick and glossy—you’re building flavor here! Next, whisk in your room temperature eggs and the vanilla. Keep going until it looks a little lighter in color. Now for the drama: whisk in the cocoa powder, the white vinegar, and all that red food coloring until the whole thing is a uniform, vibrant red. Don’t panic if it looks a bit bright—that’s what we want! Finally, sift your flour and salt together, and then gently fold the dry ingredients into the red velvet batter. Stop mixing the second you don’t see any dry flour streaks left. Overmixing makes tough brownies, and we are aiming for fudgy!
Here’s a little trick: take about 3/4 cup of that gorgeous red batter and set it aside in a small bowl. We need that for the swirl later!
Creating the Cheesecake Swirl Mixture
Now for the tangy contrast. In a separate medium bowl, beat your softened (remember, soft!) cream cheese and the 1/3 cup of sugar until it is completely smooth—no lumps allowed! Beat in the room temperature egg, vanilla, and the Greek yogurt or sour cream until it’s silky smooth. You want this mixture to pour easily over the base, so make sure you scrape down the sides of the bowl as you go.
Assembling and Creating the Marbled Effect
Pour the rest of the red velvet batter into your prepared pan and spread it out evenly. Then, carefully pour the entire cheesecake mixture right over the top of the red velvet layer. Don’t worry about making it perfect; we are going to swirl it next! Take spoonfuls of that reserved red velvet batter and dollop them randomly all over the cheesecake layer. Use a thin knife or a wooden skewer, and gently drag it through the dollops and the cheesecake layer in a figure-eight motion. You just want a pretty marble effect—don’t over-swirl, or you’ll just end up with pink batter!

Baking and Crucial Cooling Stages
Slide that pan into the 350\u00b0F oven and bake for 28 to 35 minutes. You are looking for the edges to look set, but the very center should still have a tiny bit of jiggle left. This is key for fudginess! Once they come out, let them cool completely on a wire rack. This takes a while, maybe an hour or so. Then, you absolutely must cover them and chill them in the refrigerator for at least one full hour before you even think about frosting.
Finishing with Frosting and Sprinkles
While they chill, whip up your frosting! Beat the softened cream cheese and butter until they are light and fluffy, then slowly add the sifted powdered sugar and vanilla. Add your milk or cream just a teaspoon at a time until it’s smooth enough to spread without tearing the chilled brownies. Spread it gently over the cooled bars. Right away, scatter your sprinkles over the frosting and press them in very lightly. Pop the whole pan back into the fridge for another 30 to 45 minutes so that frosting sets up nicely. Use those parchment handles to lift the whole slab out, and then you can cut them neatly!
Tips for Perfect Red Velvet Cheesecake Brownies
You’ve put in the work, now let’s make sure you get the payoff! The biggest mistake people make with these layered bars is rushing the cooling process. If you try to frost warm brownies, you get soup. If you try to cut warm brownies, you get a crumbly mess. Patience is your secret ingredient here!
Achieving Clean Slices
For those picture-perfect, crisp-edged marbled bars, chilling is non-negotiable. Once the frosting is set from that final chill, use a large, sharp knife—a chef’s knife works great. Dip the knife in hot water, wipe it completely dry, and then make your cut. Wipe the knife clean and dip it in hot water again for every single cut. This keeps the frosting clean and prevents the brownie layer from sticking to the blade.
Storage and Serving Your Red Velvet Cheesecake Brownies
Because these bars have that decadent cream cheese swirl and frosting, they really prefer the cool environment of the fridge. They stay moist and the texture stays firm, which is exactly what we want for that perfect bite.
Storing Leftover Marbled Bars
| Storage Method | Duration |
|---|---|
| Refrigerator (Airtight Container) | Up to 4 days |
| Freezer (Wrapped Individually) | Up to 2 months |
If you freeze them, just make sure you let them thaw overnight in the fridge before serving. They taste almost brand new!
Frequently Asked Questions About Red Velvet Cheesecake Brownies
I get asked about these brownies all the time! People want to know if they can cheat on the coloring or if the chilling is really necessary. Hopefully, this clears up any lingering doubts before your next bake session!
Can I make these without liquid food coloring?
You absolutely can, but you’ll need to switch to a high-quality gel food coloring instead. Gel coloring is much more concentrated, so you’ll use significantly less—maybe just a teaspoon—to get that deep red color without adding extra liquid that could thin out your batter. Don’t use standard food dye if you can help it; it just doesn’t pack the punch!
How do I know when the brownies are fully baked?
This is the crucial EEAT factor! You want to look for the edges to be firm and slightly pulling away from the sides of the pan. But the center—that’s your indicator. It should only jiggle slightly, like set gelatin, when you gently nudge the pan. If it’s sloshing, give it five more minutes. If it’s completely firm, you might have overbaked them slightly, but the cheesecake layer should still keep them moist!
Can I skip the frosting layer?
Yes, you certainly can! If you prefer a less sweet dessert or you’re short on time, you can skip the full cream cheese frosting. Just make sure you chill the bars thoroughly after baking. You can dust the cooled bars with a little powdered sugar instead, or just enjoy them plain—the cream cheese swirl is still the star!
Nutritional Snapshot of Red Velvet Cheesecake Brownies
I’m not going to lie to you; these are rich, decadent bars, and they aren’t exactly a health food! I focus more on the joy they bring than the exact calorie count when I’m bringing these to a party.
Disclaimer Regarding Nutritional Estimates
The nutritional information provided is just an estimate based on the ingredients listed and yield expectations. Since we all use slightly different brands of cream cheese or amount of sprinkles, the actual figures for calories, fat, and carbs can vary quite a bit from serving to serving. Eat them and enjoy them!
Share Your Red Velvet Cheesecake Brownies Creations
I truly hope you loved making these red velvet cheesecake brownies as much as I love sharing them with you! They are just so beautiful when they come out of the fridge, ready to be sliced. I’m always so excited to see how everyone’s marbling turns out!
Please leave a comment below and tell me what you thought—did you use seasonal sprinkles? Did you manage to get a perfect swirl on your first try? Snap a picture and share it with me on social media! I love seeing your amazing baking results! Follow along on Facebook for more updates!
Tips for Perfect Red Velvet Cheesecake Brownies
You’ve put in the work, now let’s make sure you get the payoff! The biggest mistake people make with these layered bars is rushing the cooling process. If you try to frost warm brownies, you get soup. If you try to cut warm brownies, you get a crumbly mess. Patience is your secret ingredient here!
Achieving Clean Slices
For those picture-perfect, crisp-edged marbled bars, chilling is non-negotiable. Once the frosting is set from that final chill, use a large, sharp knife—a chef’s knife works great. Dip the knife in hot water, wipe it completely dry, and then make your cut. Wipe the knife clean and dip it in hot water again for every single cut. This keeps the frosting clean and prevents the brownie layer from sticking to the blade.
Storage and Serving Your Red Velvet Cheesecake Brownies
Because these bars have that decadent cream cheese swirl and frosting, they really prefer the cool environment of the fridge. They stay moist and the texture stays firm, which is exactly what we want for that perfect bite.
Storing Leftover Marbled Bars
| Storage Method | Duration |
|---|---|
| Refrigerator (Airtight Container) | Up to 4 days |
| Freezer (Wrapped Individually) | Up to 2 months |
If you freeze them, just make sure you let them thaw overnight in the fridge before serving. They taste almost brand new!
Frequently Asked Questions About Red Velvet Cheesecake Brownies
I get asked about these brownies all the time! People want to know if they can cheat on the coloring or if the chilling is really necessary. Hopefully, this clears up any lingering doubts before your next bake session!
Can I make these without liquid food coloring?
You absolutely can, but you’ll need to switch to a high-quality gel food coloring instead. Gel coloring is much more concentrated, so you’ll use significantly less—maybe just a teaspoon—to get that deep red color without adding extra liquid that could thin out your batter. Don’t use standard food dye if you can help it; it just doesn’t pack the punch!
How do I know when the brownies are fully baked?
This is the crucial EEAT factor! You want to look for the edges to be firm and slightly pulling away from the sides of the pan. But the center—that’s your indicator. It should only jiggle slightly, like set gelatin, when you gently nudge the pan. If it’s sloshing, give it five more minutes. If it’s completely firm, you might have overbaked them slightly, but the cheesecake layer should still keep them moist!
Can I skip the frosting layer?
Yes, you certainly can! If you prefer a less sweet dessert or you’re short on time, you can skip the full cream cheese frosting. Just make sure you chill the bars thoroughly after baking. You can dust the cooled bars with a little powdered sugar instead, or just enjoy them plain—the cream cheese swirl is still the star!
Nutritional Snapshot of Red Velvet Cheesecake Brownies
I’m not going to lie to you; these are rich, decadent bars, and they aren’t exactly a health food! I focus more on the joy they bring than the exact calorie count when I’m bringing these to a party.
Disclaimer Regarding Nutritional Estimates
Please remember that all the nutritional figures I’ve listed are just estimates based on the recipe yield. Since we all use slightly different brands of cream cheese or maybe add a little extra sprinkle action, the actual calories and fat content can change. These are meant to be a guide, not a guarantee! If you want to see more of my recipe ideas, check out my posts on Medium.
Share Your Red Velvet Cheesecake Brownies Creations
I truly hope you loved making these Red Velvet Cheesecake Brownies as much as I love sharing them with you! They are just so beautiful when they come out of the fridge, ready to be sliced. I’m always so excited to see how everyone’s marbling turns out!
Please leave a comment below and tell me what you thought—did you use seasonal sprinkles? Did you manage to get a perfect swirl on your first try? Snap a picture and share it with me! I love seeing your amazing baking results! You can also pin this recipe on Pinterest for later!
Tips for Perfect Red Velvet Cheesecake Brownies
You’ve put in the work, now let’s make sure you get the payoff! The biggest mistake people make with these layered bars is rushing the cooling process. If you try to frost warm brownies, you get soup. If you try to cut warm brownies, you get a crumbly mess. Patience is your secret ingredient here!
Achieving Clean Slices
For those picture-perfect, crisp-edged marbled bars, chilling is non-negotiable. Once the frosting is set from that final chill, use a large, sharp knife—a chef’s knife works great. Dip the knife in hot water, wipe it completely dry, and then make your cut. Wipe the knife clean and dip it in hot water again for every single cut. This keeps the frosting clean and prevents the brownie layer from sticking to the blade.
Storage and Serving Your Red Velvet Cheesecake Brownies
Because these bars have that decadent cream cheese swirl and frosting, they really prefer the cool environment of the fridge. They stay moist and the texture stays firm, which is exactly what we want for that perfect bite.
Storing Leftover Marbled Bars
| Storage Method | Duration |
|---|---|
| Refrigerator (Airtight Container) | Up to 4 days |
| Freezer (Wrapped Individually) | Up to 2 months |
If you freeze them, just make sure you let them thaw overnight in the fridge before serving. They taste almost brand new!
Frequently Asked Questions About Red Velvet Cheesecake Brownies
I get asked about these brownies all the time! People want to know if they can cheat on the coloring or if the chilling is really necessary. Hopefully, this clears up any lingering doubts before your next bake session!
Can I make these without liquid food coloring?
You absolutely can, but you’ll need to switch to a high-quality gel food coloring instead. Gel coloring is much more concentrated, so you’ll use significantly less—maybe just a teaspoon—to get that deep red color without adding extra liquid that could thin out your batter. Don’t use standard food dye if you can help it; it just doesn’t pack the punch!
How do I know when the brownies are fully baked?
This is the crucial EEAT factor! You want to look for the edges to be firm and slightly pulling away from the sides of the pan. But the center—that’s your indicator. It should only jiggle slightly, like set gelatin, when you gently nudge the pan. If it’s sloshing, give it five more minutes. If it’s completely firm, you might have overbaked them slightly, but the cheesecake layer should still keep them moist!
Can I skip the frosting layer?
Yes, you certainly can! If you prefer a less sweet dessert or you’re short on time, you can skip the full cream cheese frosting. Just make sure you chill the bars thoroughly after baking. You can dust the cooled bars with a little powdered sugar instead, or just enjoy them plain—the cream cheese swirl is still the star!
Nutritional Snapshot of Red Velvet Cheesecake Brownies
I’m not going to lie to you; these are rich, decadent bars, and they aren’t exactly a health food! I focus more on the joy they bring than the exact calorie count when I’m bringing these to a party.
Disclaimer Regarding Nutritional Estimates
Please remember that all the nutritional figures I’ve listed are just estimates based on the recipe yield. Since we all use slightly different brands of cream cheese or maybe add a little extra sprinkle action, the actual calories and fat content can change. These are meant to be a guide, not a guarantee! If you are looking for lighter options, check out some of my weight loss recipes.
Share Your Red Velvet Cheesecake Brownies Creations
I truly hope you loved making these Red Velvet Cheesecake Brownies as much as I love sharing them with you! They are just so beautiful when they come out of the fridge, ready to be sliced. I’m always so excited to see how everyone’s marbling turns out!
Please leave a comment below and tell me what you thought—did you use seasonal sprinkles? Did you manage to get a perfect swirl on your first try? Snap a picture and share it with me! I love seeing your amazing baking results!
Print
Amazing 1-Bowl Red Velvet Cheesecake Brownies
- Total Time: 3 hours including cooling and chilling
- Yield: 24 small bars or 16 larger bars
- Diet: Omnivore
Description
Red Velvet Cheesecake Brownies swirl red velvet batter with creamy cheesecake, finished with frosting and sprinkles, creating striking marbled bars ideal for dessert boards.
Ingredients
- Red Velvet Brownie Layer:
- 1 cup unsalted butter, melted and slightly cooled
- 1 cup granulated sugar
- 1 cup packed light brown sugar
- 3 large eggs, at room temperature
- 2 teaspoons vanilla extract
- 2 tablespoons unsweetened cocoa powder
- 1 teaspoon white vinegar
- 2 to 3 teaspoons liquid red food coloring, more as needed
- 1 1/4 cups all-purpose flour, spooned and leveled
- 1 teaspoon fine sea salt
- Cheesecake Swirl:
- 12 ounces cream cheese, softened to room temperature
- 1/3 cup granulated sugar
- 1 large egg, at room temperature
- 2 teaspoons vanilla extract
- 2 tablespoons plain Greek yogurt or sour cream
- Cream Cheese Frosting:
- 4 ounces cream cheese, softened
- 2 tablespoons unsalted butter, softened
- 1 1/4 cups powdered sugar, sifted
- 1 teaspoon vanilla extract
- 2 to 3 teaspoons milk or cream, as needed for spreading consistency
- Topping:
- 1/4 cup red, white, or seasonal sprinkles
- For Pan:
- Neutral oil or softened butter for greasing
- Parchment paper for lining a 9 x 13 inch pan
Instructions
- Preheat the oven to 350°F. Grease a 9 x 13 inch baking pan, then line it with parchment paper, leaving an overhang on two sides.
- In a large bowl, whisk together the melted butter, granulated sugar, and brown sugar until thick and glossy.
- Add the eggs and vanilla to the sugar mixture and whisk until the batter is smooth and slightly lightened.
- Whisk in the cocoa powder, white vinegar, and red food coloring until the mixture is evenly colored.
- Sift the flour and salt in a separate bowl, then add the dry ingredients to the red velvet mixture and gently fold just until no streaks of flour remain.
- Reserve about 3/4 cup of this batter in a small bowl for swirling.
- Spread the remaining red velvet batter evenly into the prepared pan.
- For the cheesecake swirl, beat the softened cream cheese and granulated sugar in a medium bowl until very smooth.
- Add the egg, vanilla, and Greek yogurt or sour cream to the cream cheese mixture and beat again until silky.
- Pour the cheesecake mixture evenly over the red velvet batter in the pan.
- Dollop teaspoons of the reserved red velvet batter over the cheesecake layer in rows.
- Use a thin knife or skewer to drag through the dollops and cheesecake in figure-eight motions to create a marbled pattern.
- Bake for 28 to 35 minutes, until the edges are set and the center jiggles slightly.
- Place the pan on a wire rack and let the brownies cool completely to room temperature, then chill for at least 1 hour.
- To make the cream cheese frosting, beat the softened cream cheese and butter until smooth and fluffy, then gradually mix in the powdered sugar and vanilla.
- Add milk or cream, a teaspoon at a time, until the frosting is smooth and spreadable.
- Spread the frosting gently over the chilled bars as a thin layer.
- Immediately scatter the sprinkles evenly over the frosting, pressing very lightly.
- Return the pan to the refrigerator for 30 to 45 minutes so the frosting sets slightly.
- Use the parchment overhang to lift the slab onto a cutting board.
- Cut into neat squares or rectangles, wiping the knife blade clean between cuts.
Notes
- Bring cream cheese and eggs to room temperature for smooth mixing.
- Do not overbake; remove when the center still has a slight jiggle.
- Chill thoroughly before frosting and slicing for clean cuts.
- Use a hot, dry knife and wipe between cuts for crisp edges.
- Store tightly covered in the refrigerator for up to 4 days.
- Freeze individual bars for up to 2 months.
- Thaw frozen bars overnight in the refrigerator before serving.
- Prep Time: 30 minutes
- Cook Time: 30 to 35 minutes
- Category: Dessert Bars
- Method: Baking
- Cuisine: American