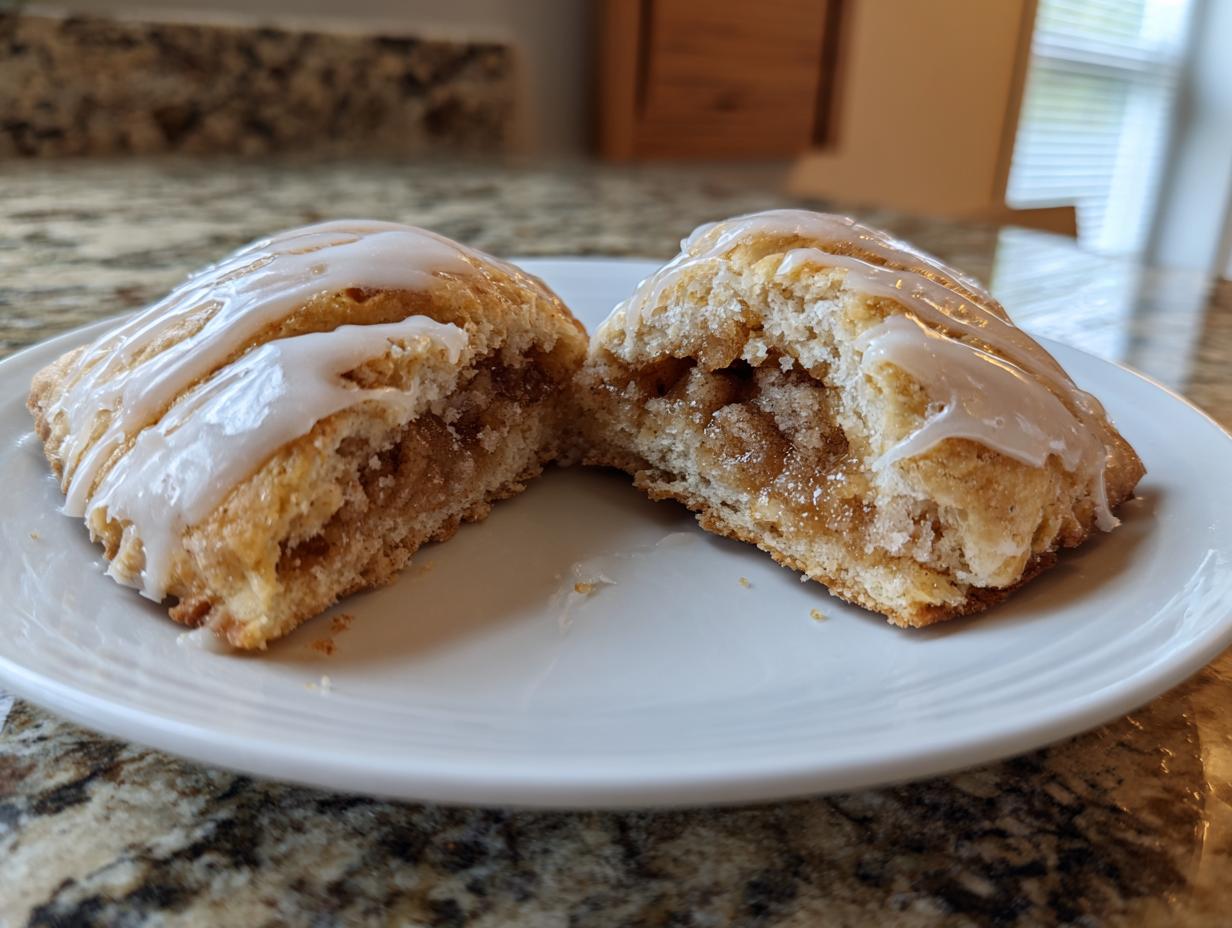
Brown Sugar Pop Tart Cookies winter are officially here, and let me tell you, this recipe is going to be your new best friend when the weather turns chilly. When I first started NoobRecipes, I swore I’d only share things that wouldn’t make a beginner baker cry, and these cookies are the definition of comfort without complication. Forget those finicky, flaky toaster pastries; we’re taking all that gooey, caramelized flavor and tucking it into the easiest cookie dough imaginable. Seriously, if you can cream butter and sugar, you can master this.
I remember trying to recreate that classic pastry filling years ago, and it was a disaster—too sticky, too runny! But this cookie format? It’s foolproof. We’re using a soft, buttery brown sugar dough, stuffing it with a spiced brown sugar center that tastes like Christmas morning, and then finishing it all off with a simple, sweet drizzle. They are deeply flavorful, perfectly soft, and honestly, they make the whole kitchen smell incredible. Get your mixer ready; we’re making the best winter cookie you’ve ever had!

Why You’ll Love These Brown Sugar Pop Tart Cookies winter
I know you’re busy, and I know sometimes baking feels like too much effort. That’s why I designed these to be the easiest way to get that cozy, nostalgic flavor you crave when it gets cold outside. They are truly a winner for anyone just starting out!
- They use simple mixing methods—no fancy rolling or cutting required.
- The deep brown sugar flavor is pure, warm winter comfort in every bite.
- They freeze beautifully, meaning you can bake now and treat yourself later!
- The soft cookie shell melts perfectly around the gooey, spiced filling.
Ready for Winter Baking Simplicity
We took the idea of a layered pastry and turned it into a drop-and-seal cookie. It cuts down on all the fussy rolling and folding you’d normally do with pie dough. It’s basically a hug in cookie form, and it comes together surprisingly fast.
The Ultimate Brown Sugar Comfort
That flavor profile is everything, right? It’s not just sweet; it’s that rich, molasses depth from the brown sugar, warmed up with a hint of cinnamon. When you pull these out of the oven, the smell alone will make you want to grab a blanket and sit by the fire. It’s the perfect easy treat for a snowy afternoon.
Essential Equipment for Brown Sugar Pop Tart Cookies winter
You don’t need a commercial kitchen for these, don’t worry! But having the right tools makes the job much cleaner and faster, which is key for us beginners. Trust me on these basics; they make shaping the cookies so much easier.
Tools for Perfect Shaping and Baking
- A reliable stand mixer or a good hand mixer for creaming the butter.
- Two sturdy baking sheets lined with parchment paper—this is a must!
- A 1/4 cup measuring scoop for portioning the cookie dough evenly.
- A small spoon or teaspoon for rolling those filling balls.
- A wire cooling rack for setting the final glaze.
Gathering Your Brown Sugar Pop Tart Cookies winter Ingredients
Okay, let’s talk ingredients. The secret to these cookies tasting like the real deal—but easier—is really focusing on the quality of the brown sugar and making sure things are the right temperature. I’ve broken down the list so you can shop smart. Don’t skip the chilling step, though; that’s what keeps these cookies from spreading into flat discs!
Ingredients for the Dough
For the actual cookie shell, we need the classics, but make sure your butter is truly room temperature—soft but not melty. You’ll need one full cup of unsalted butter, half a cup of the white sugar, and a full cup of light brown sugar packed tightly into your measuring cup. Don’t forget the two eggs and a splash of vanilla. For the structure, we are using cake flour—yes, cake flour!—along with cornstarch, baking soda, powder, and salt. It sounds like a lot, but it’s what makes the dough so tender.
Ingredients for the Spiced Brown Sugar Filling
This little center pocket is where all the magic happens, and it’s so simple. You just need 5 tablespoons of softened butter, three-quarters cup of packed light brown sugar, one whole teaspoon of cinnamon (don’t be shy!), and 2 tablespoons of cake flour to thicken it up. Mix this until it’s a lovely, thick paste. These get rolled into tiny balls later, so get everything ready!
Ingredients for the Sweet Brown Sugar Glaze
The glaze is the final touch that makes them look official. It’s just a cup of powdered sugar mixed with half a teaspoon of cinnamon. The liquid binder is key: melt 3 tablespoons of butter and let it cool down a bit, then mix that with 2 and a half tablespoons of milk. Whisk it all together until it’s smooth enough to drizzle but thick enough to hold its shape.
| Component | Ingredient | Quantity |
|---|---|---|
| Dough | Unsalted Butter (room temp) | 1 cup |
| Dough | Granulated Sugar | 1/2 cup |
| Dough | Light Brown Sugar (packed) | 1 cup |
| Dough | Eggs (room temp) | 2 |
| Dough | Vanilla Extract | 1 teaspoon |
| Dough | Cake Flour | 3 3/4 cups |
| Dough | Cornstarch | 2 Tablespoons |
| Dough | Baking Soda & Powder | 1 tsp & 1 1/2 tsp |
| Dough | Kosher Salt | 1 teaspoon |
| Filling | Unsalted Butter (softened) | 5 Tablespoons |
| Filling | Light Brown Sugar (packed) | 3/4 cup |
| Filling | Cinnamon | 1 teaspoon |
| Filling | Cake Flour | 2 Tablespoons |
| Glaze | Powdered Sugar | 1 cup |
| Glaze | Cinnamon | 1/2 teaspoon |
| Glaze | Unsalted Butter (melted, cooled) | 3 Tablespoons |
| Glaze | Milk | 2 1/2 Tablespoons |
Step-by-Step Instructions for Brown Sugar Pop Tart Cookies winter
This is where the magic happens, and remember, because this is NoobRecipes, we are taking it slow! Don’t rush the chilling, and don’t panic if your dough looks a little soft at first. We’re building layers of flavor here.
Preparing the Cookie Dough Base
First up, the mixer needs to get happy. Beat your room temperature butter, the granulated sugar, and that beautiful packed brown sugar together on medium-high speed for a good three minutes. We want it light and fluffy—this whips air into the dough, which is important! Next, add your eggs one at a time, followed by the vanilla extract, mixing for another minute or two until everything looks perfectly combined and pale yellow. While that’s going, take a separate bowl and whisk together all your dry cookie ingredients: the cake flour, cornstarch, baking soda, baking powder, and salt. Now, slowly add those dry ingredients to the wet mixture, mixing on medium speed for about two minutes, scraping down the sides as you go. Once it looks like cohesive dough, wrap that whole bowl up tight and put it in the fridge for at least one hour. Seriously, don’t skip this chill time!
Creating the Rich Brown Sugar Filling
While the dough is chilling, we make the center! In a small bowl, just stir together the softened butter, the 3/4 cup of brown sugar, the cinnamon, and the 2 tablespoons of cake flour. You just want to mix it until it’s smooth, almost like a thick paste. Once it’s mixed, grab a heaping teaspoon, scoop out the filling, and roll it quickly between your palms into a snug little ball. Place these filling balls on a small plate or sheet pan and put them back in the fridge while the dough finishes chilling. Keeping them cold helps them hold their shape when we stuff them later.
Assembling Your Brown Sugar Pop Tart Cookies winter
Time to shape! Preheat your oven to 350°F and line those baking sheets with parchment paper—I cannot stress enough how much parchment saves your cleanup time. Grab your chilled dough and use a 1/4 cup measure to scoop out the dough portions. Take one scoop, split it into two equal halves. Now, take one half and flatten it slightly into a disk. Make a nice little well right in the center of that disk. Take one of your cold filling balls and gently nestle it right into that well. Now, take the second half of the dough and carefully press it over the top of the filling, sealing it completely. Pinch those seams closed really well, because if they pop open, the filling will ooze out! Once sealed, gently roll the whole thing between your palms to smooth it into a nice, round ball again. Arrange these assembled cookies about 2 inches apart on your baking sheets.

Baking and Cooling Procedures
Pop those trays into your 350°F oven and bake them for 11 to 13 minutes. You’re looking for the tops to be set—they shouldn’t look wet anymore—and the edges should just be starting to turn a very light gold. Don’t overbake them! They will firm up as they cool. Let them sit right there on the hot baking sheet for 5 minutes; this lets them firm up just enough so they don’t break. Then, very gently, use a spatula to move them over to a wire rack to cool completely before you even think about glazing them.
Finishing with the Brown Sugar Glaze
Once they are totally cool, make the glaze! Whisk together your powdered sugar and the half teaspoon of cinnamon. Melt the 3 tablespoons of butter and let it cool down slightly—hot butter can make the glaze seize up! Add the cooled butter and the 2 1/2 tablespoons of milk, whisking until it’s smooth and pourable. Place a sheet of parchment paper underneath your cooling rack—this will catch the drips! Spoon the icing over each cookie, letting it naturally spread toward the edges. Let them sit for about 15 minutes so that glaze can set nicely before you try to stack or eat them!
Handling Dough Temperature
If your butter was too warm when you started, your dough might feel a little greasy after chilling. If that happens, just pop it back in the fridge for another 15 minutes before shaping. If you chilled it too long and it’s rock hard, let it sit on the counter for about half an hour until you can handle it without cracking it apart when you try to roll it.
Achieving a Sealed Center
When you seal the two dough halves together over the filling, really press hard along the edges, almost like you’re crimping a pie crust. If you see any little cracks after you roll it into a smooth ball, just pinch them closed again. A good seal means all that gooey brown sugar stays inside where it belongs, making your homemade pop tarts truly perfect.
Tips for Perfect Brown Sugar Pop Tart Cookies winter
Baking is supposed to be fun, not frustrating! Since I’ve definitely made my share of mistakes learning this recipe, I wanted to share a few quick tricks that will guarantee success for you, especially if you’re using the dough straight from the fridge. These little adjustments make a huge difference between a good cookie and a fantastic one.
I remember one batch where I got impatient waiting for the dough to soften, and I ended up cracking half the cookies while trying to seal them. Total rookie move! Now, I always double-check the temperature before I start shaping them. A little patience here saves a lot of heartache later on. If you want to see more of my baking adventures, follow along on Facebook!
Handling Dough Temperature
Why room temperature butter? Because we need to cream it with the sugar to beat in air. If the butter is too cold, it won’t mix properly, and your cookie will be dense and tough instead of soft. If, after chilling, your dough is too stiff to work with—maybe it feels like a brick—don’t try to force it! Just let it sit on the counter for 20 to 30 minutes. It needs to warm up just enough so you can shape it without tearing it.
Achieving a Sealed Center
The filling is molten gold, and we want it trapped inside! When you press the top dough layer over the filling ball, really work those edges together. Think about pinching the dough like you’re trying to get every last bit of air out of a balloon. If you have a tiny bit of excess dough around the seam, you can even use the tines of a fork to gently press a pattern around the edge. That extra sealing action ensures you get that perfect, gooey center when you bite in. For more easy baking inspiration, check out my collection of dessert and cake recipes.
Storing Your Homemade Brown Sugar Pop Tart Cookies winter
These cookies are great for making ahead, especially when you’re prepping for a winter gathering! The best part is that they hold up really well, provided you follow a couple of simple rules about keeping them sealed up tight. Here is my quick guide on how to keep them tasting fresh, whether you plan to eat them tomorrow or next month. You can also save this recipe easily on Pinterest!
| Storage Method | Duration | Notes |
|---|---|---|
| Airtight Container (Room Temp) | Up to 3 days | Perfect for snacking over the next couple of days. |
| Refrigeration | Up to 1 week | Keep them sealed well, as the fridge can dry out baked goods slightly. |
| Freezing (Un-iced) | Up to 3 months | Freeze the formed cookies solid before bagging. Add 1-2 minutes to baking time if baking straight from frozen. |
Frequently Asked Questions About Brown Sugar Pop Tart Cookies winter
I get a lot of emails asking about substitutions, especially since I designed these to be easy cookies for beginners. Don’t stress if your pantry isn’t perfectly stocked! Here are the most common questions I get about making these brown sugar treats. If you are looking for other easy recipes, check out my guide on easy snacks.
Can I use regular all-purpose flour instead of cake flour in this recipe?
You totally can, but here’s the catch: cake flour has less protein, which is why our cookies are so tender and melt-in-your-mouth soft. If you only have all-purpose flour, I recommend swapping out 2 tablespoons of it for the 2 tablespoons of cornstarch listed in the recipe. This helps mimic the tenderness you get from cake flour. If you use straight AP flour without the extra cornstarch, the cookie will be a bit chewier, which isn’t bad, but it won’t be quite as delicate as the original!
How can I make these Brown Sugar Pop Tart Cookies winter look more rustic?
If you like that slightly less perfect, homemade pop tarts look, skip rolling the dough completely smooth after you seal the edges. Just pinch them closed and leave them in their slightly lumpy ball shape. You can also skip the glaze entirely and just dust them with powdered sugar right after they cool. That gives them a beautiful, snowy winter look!
Is the chilling time essential for these easy cookies?
Yes, absolutely essential! That hour in the fridge does two major jobs for us. First, the butter firms up, which means the cookies won’t spread out into thin pancakes when they hit the hot oven. Second, it lets the flour fully absorb the liquid, which improves the final texture. If you skip it, you will likely end up with cookies that spread too much and might leak filling.
Sharing Your Brown Sugar Pop Tart Cookies winter Creations
I really hope you loved making these easy cookies as much as I love sharing them with you! Seeing your creations pop up online is honestly the best part of running NoobRecipes. Once you’ve baked these, snap a picture and tag me! I always love seeing your beautiful brown sugar treats.
Let me know in the comments below how yours turned out—did you go heavy on the glaze, or did you stick to a simple dusting? Happy baking!
Print
5 Star Brown Sugar Pop Tart Cookies winter Joy
- Total Time: 1 hour 43 minutes
- Yield: About 2 dozen cookies
- Diet: N/A
Description
These Brown Sugar Pop Tart Cookies deliver the comforting flavor of a homemade brown sugar toaster pastry in a simple, delicious cookie format. Perfect for beginner bakers, these cookies feature a soft brown sugar cookie shell filled with a rich, spiced brown sugar center and topped with a sweet glaze.
Ingredients
- Cookies:
- 1 cup unsalted butter, room temperature
- 1/2 cup granulated sugar
- 1 cup light brown sugar, packed
- 2 eggs, room temperature
- 1 teaspoon vanilla extract
- 3 3/4 cups cake flour
- 2 Tablespoons cornstarch
- 1 teaspoon baking soda
- 1 1/2 teaspoons baking powder
- 1 teaspoon kosher salt
- Brown Sugar Filling:
- 5 Tablespoons unsalted butter, softened
- 3/4 cup light brown sugar, packed
- 1 teaspoon cinnamon
- 2 Tablespoons cake flour
- Brown Sugar Glaze:
- 1 cup powdered sugar
- 1/2 teaspoon cinnamon
- 3 Tablespoons unsalted butter, melted and cooled
- 2 1/2 Tablespoons milk
Instructions
- Beat the butter, granulated sugar, and brown sugar in a mixer on medium-high speed for 2-3 minutes.
- Add the vanilla and eggs, then beat for 1-2 minutes until light and fluffy.
- Whisk the dry cookie ingredients in a separate bowl.
- Add the dry ingredients to the wet ingredients and mix on medium speed for 1-2 minutes, scraping the bowl as needed.
- Cover the dough and chill for one hour.
- Preheat your oven to 350°F and line two baking sheets with parchment paper.
- Stir the filling ingredients together until smooth. Scoop the filling using a heaping teaspoon, roll it into a ball, and place it on a baking sheet.
- Scoop the chilled dough using a 1/4 cup measure. Split the dough in half. Create a well in one half.
- Place one filling ball inside the well. Press the other dough half on top. Pinch the seams closed and roll into a smooth ball.
- Arrange the cookie balls 2 inches apart on the prepared baking sheets.
- Bake for 11-13 minutes, until the tops are set and the edges are lightly golden.
- Cool on the baking sheet for 5 minutes, then move to a wire rack to cool completely.
- Make the glaze by whisking the icing ingredients until smooth.
- Place parchment paper under the cooling rack. Spoon the icing over each cookie, letting it spread to the edges.
- Allow the glaze to set for 15 minutes before serving.
Notes
- Use room temperature butter that feels cool to the touch (about 60°F) for the best cookie texture.
- If you chill the dough longer than one hour, let it sit at room temperature for 30 minutes before shaping.
- Store finished cookies in an airtight container at room temperature for up to 3 days or refrigerated for one week.
- Freeze un-iced cookies until solid, then transfer to a freezer bag for up to 3 months. Thaw them overnight in the fridge before glazing.
- You can bake cookies directly from frozen; add 1-2 minutes to the baking time.
- Prep Time: 30 minutes
- Cook Time: 13 minutes
- Category: Cookies
- Method: Baking
- Cuisine: American