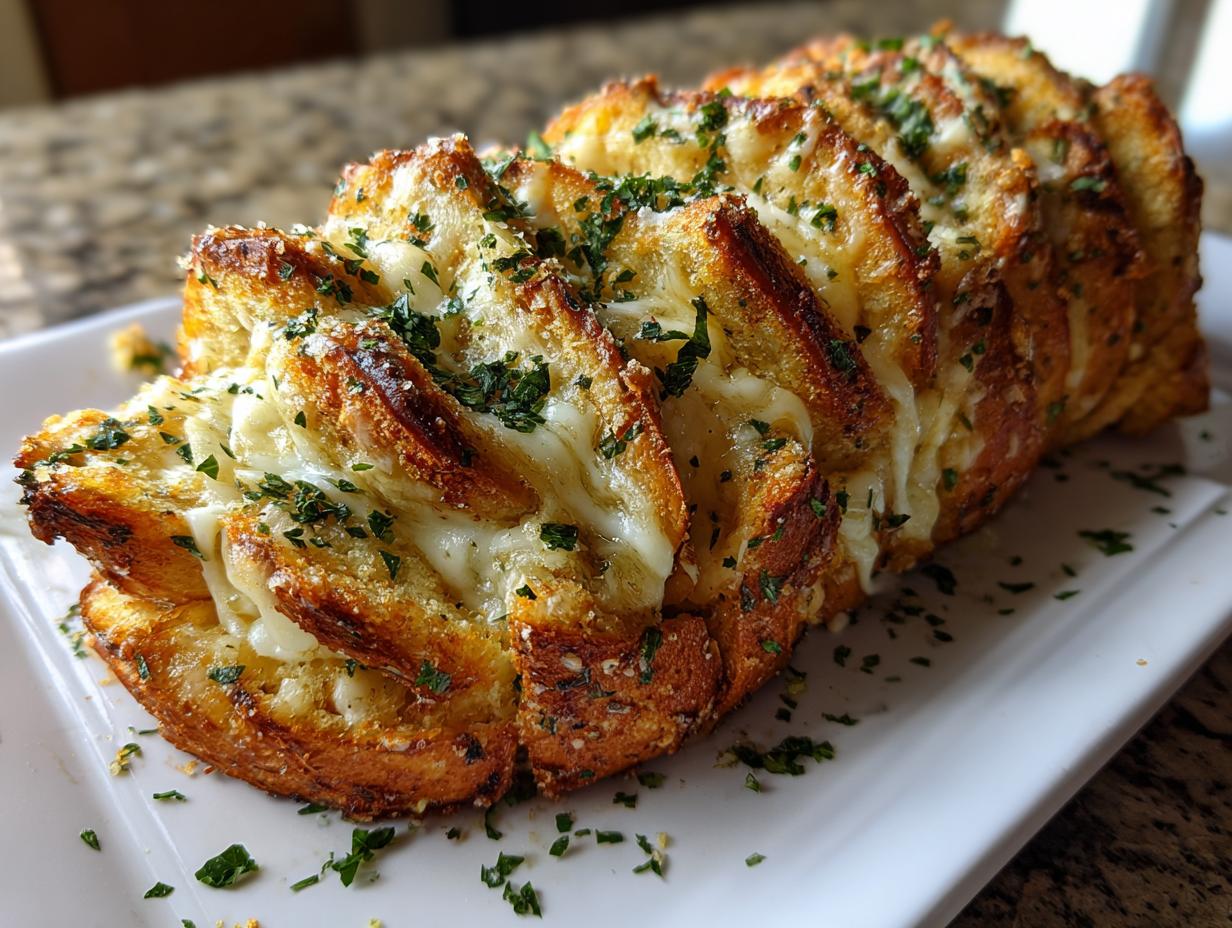
Forget those sad, dry rolls you sometimes see at parties! We are making the BEST pull-apart garlic bread you have ever tasted, and it looks like a show-stopping holiday tree! Seriously, this recipe is my secret weapon when I need something impressive but don’t have hours to fuss. When I first started baking bread years ago, I was terrified of yeast. I thought I’d end up with a brick, not a beautiful, soft loaf. But this recipe is so forgiving—the dough practically tells you what it needs. The magic of this pull-apart garlic bread is that it’s layered, cheesy, garlicky perfection that everyone can grab a piece of without needing a knife.

Why This Pull-Apart Garlic Bread Recipe Works for Everyone
I know what you’re thinking: yeast means complicated, right? Wrong! This recipe walks you through activating the yeast so gently that even if you’re a total beginner, you’ll get that beautiful, bubbly foam, which is the first sign of success. It gives you the confidence boost you need. The shaping into a tree might look intimidating, but trust me, it’s basically just rolling out rectangles and making diagonal cuts—a fun activity, honestly! Because we layer it so generously with that herb butter and three kinds of cheese, even if your twists aren’t perfect, the final baked result is guaranteed to be gooey, cheesy, and absolutely delicious.
Gather Your Ingredients for Pull-Apart Garlic Bread
Alright, let’s get our mise en place ready! Making this incredible pull-apart garlic bread means grouping your ingredients so everything flows smoothly when it’s time to assemble the tree. Don’t stress about the measurements; just make sure you have everything ready to go before you start kneading that soft dough. It really makes the whole process feel calm instead of rushed.
Dough Components
- 1 cup warm water (it needs to be around 110°F—not too hot, or you’ll kill the yeast!)
- 2 \u00bc teaspoons active dry yeast (that’s one standard packet)
- 3 cups all-purpose flour, plus more just for dusting the counter
- 1 teaspoon salt
- 3 tablespoons unsalted butter, melted (for the dough itself)
Herb Garlic Butter and Cheese Filling
- 6 tablespoons unsalted butter, melted (this is specifically for the glorious garlic butter layer)
- 4 cloves garlic, minced finely—don’t skimp here!
- 2 tablespoons fresh parsley, finely chopped
- \u00bc teaspoon black pepper and \u00bd teaspoon salt
- 1\u00bd cups mozzarella cheese, shredded
- \u00be cup sharp cheddar cheese, shredded
- 2 tablespoons grated Parmesan cheese
Finishing Touches
You’ll need 1 tablespoon of unsalted butter, melted, for brushing the top right when it comes out of the oven. For garnish, just have some extra fresh parsley, chopped, and maybe a little flaky sea salt if you want that bakery look.
Step-by-Step Instructions for Preparing Pull-Apart Garlic Bread
Now for the fun part! Making this gorgeous pull-apart garlic bread tree is easier than it looks, I promise. We are going to break down the yeast process first because that’s where most people get nervous. Once the dough is happy, everything else is just layering and cutting.
Making and Rising the Yeast Dough
First things first: activate your yeast. Gently combine the warm water (aim for that 110°F sweet spot—warm to the touch, not hot!) with the honey and the yeast in a big bowl. Wait about five minutes until it gets nice and foamy on top. That foam means your yeast is alive and ready to work! Next, stir in the flour, salt, and the 3 tablespoons of melted butter until you have a shaggy mess. Turn it out onto a lightly floured surface and knead it for about 5 or 6 minutes until it feels smooth and elastic. Pop that dough ball into an oiled bowl, cover it up with a towel, and let it sit somewhere warm for a full hour until it has doubled in size. Patience here is key!
Preparing the Flavor Layers
While that dough is getting happy, get your flavors ready. In one small bowl, mix together the 6 tablespoons of melted butter designated for the garlic butter, the minced garlic, the parsley, salt, and pepper. Make sure you stir that really well so the garlic gets nice and coated. In a separate bowl, just toss together your mozzarella, cheddar, and Parmesan cheeses. Keep these two mixtures separate for now; we layer them next!
Assembling the Festive Tree Shape
Once the dough has risen, gently punch it down and divide it into four equal pieces. Roll each piece out onto your floured surface into a big 10-by-12-inch rectangle. Now we build! Lay down the first dough rectangle, brush it generously with the garlic butter, and sprinkle on about a third of your cheese mixture. Repeat this layering two more times, ending with the fourth dough rectangle on top. Now, use a sharp knife to cut the shape: trim the sides into a triangle shape, leaving a small rectangular trunk at the bottom. Along both sides of the triangle, make 1-inch-wide diagonal cuts, but here’s the crucial part: do not cut through the center column or the trunk! That center column keeps the whole thing together.
Twisting, Resting, and Baking Your Pull-Apart Garlic Bread
Take each strip you just cut and twist it twice toward the center to create those beautiful spiral branches that show off the gooey cheese inside. Cover the whole tree loosely and let it rest for 20 minutes—this second rest relaxes the dough again. Preheat your oven to 375°F and brush the entire tree surface with any remaining garlic butter. Bake it for about 22 to 25 minutes. You are looking for that golden brown color and an internal temperature of 190°F. The cheese should be bubbly and melted!

Finishing and Serving
As soon as it comes out of the oven, brush it quickly with that final tablespoon of melted butter—this keeps the crust soft. Garnish it with a sprinkle of fresh parsley and maybe some flaky sea salt if you have it. Let it cool for just five minutes. That’s it! You can now just pull apart those twisted branches and serve this amazing bread warm.
Tips for Perfect Pull-Apart Garlic Bread
Even with a recipe this straightforward, sometimes the dough throws a little tantrum. Don’t worry; these little issues are easy to fix, and they won’t ruin your beautiful pull-apart garlic bread! The goal is maximum flavor and easy handling, especially when you’re creating those layers.
Dough Handling Secrets
If you find the dough fighting you while you’re trying to roll out those rectangles—maybe it keeps shrinking back—that just means the gluten is too tight. Stop fighting it! Just cover it up and let it rest for five minutes. It will relax, and you can roll it out easily afterward. Also, when you are cutting those strips for the tree branches, please use a pizza cutter if you have one. It gives you the cleanest, straightest cuts without dragging the dough underneath, which helps keep your twists looking neat.
Flavor Boosters and Substitutions
If you want to take the flavor up a notch, try mixing a half teaspoon of Italian seasoning right into that garlic butter mix. It adds such a lovely depth! For an even richer interior, I sometimes beat in two tablespoons of softened cream cheese with the butter—it makes the filling extra decadent. If you’re out of fresh garlic, you can use garlic powder, but you’ll need about a teaspoon instead of four cloves. And don’t feel locked into the cheese blend; Monterey Jack melts beautifully if you want a milder flavor, or try Gruyère for something nutty!
Frequently Asked Questions About Cheesy Pull-Apart Garlic Bread
I get so many emails asking about little adjustments, so I wanted to put the most common questions right here. Everyone wants to make this the best pull-apart garlic bread for their table, and I’m happy to share what I’ve learned from trial and error!
Can I Use Store-Bought Dough?
Absolutely, you can! If you’re in a huge rush, using two packages of store-bought pizza dough will cut your prep time down dramatically, maybe to just 30 minutes total before baking. It won’t have that incredible texture that the homemade yeast dough gives, but it’s a fantastic shortcut for busy weeknights!
What Dipping Sauces Pair Well?
Since this bread is loaded with cheese and garlic, you have a few great options for dipping. My family always goes for a warm bowl of marinara sauce, which feels very classic. But honestly, a creamy ranch dressing is surprisingly good with the sharp cheddar notes in the filling. It’s perfect for parties!
Why Did My Tree Fall Flat?
Usually, a flat tree means the yeast didn’t get the proper environment to work, or you rushed the process. Did you check that water temperature? If it was too hot, it killed the yeast. Also, make sure you kneaded it long enough—about 5 or 6 minutes is needed to build structure. Finally, don’t skip that second 20-minute rest after twisting the branches; that rest lets the dough relax so it can puff up nicely in the oven instead of spreading out.
Storing and Reheating Your Leftover Pull-Apart Garlic Bread
I rarely have leftovers of this amazing pull-apart garlic bread because everyone devours it, but when I do, storing it correctly is key to keeping that soft texture for the next day! You want to make sure you store it in a way that keeps the moisture locked in but doesn’t make the crust soggy. It’s surprisingly good the next day, too, if you reheat it properly. Don’t just toss the rest in a zip-top bag—we want to keep the garlic flavor locked in! If you want more bread ideas, check out my stuffed bread recipes.
Best Storage Methods
If you know you’ll eat it all within a day or two, an airtight container at room temperature works perfectly. If you need it to last longer, definitely move it to the fridge, but remember it might firm up a bit. For the very best results for later, wrap it up really tightly in plastic wrap and then foil before tossing it in the freezer. It keeps beautifully for up to two months that way!
Reheating for Best Texture
If you are in a rush, you can microwave an individual piece for about 20 to 30 seconds, but be warned—it gets soft, not crispy. For the best, almost-fresh texture, especially if you are reheating a whole piece, wrap the bread tightly in foil and pop it back into a 325°F oven for about 10 to 12 minutes. Then, unwrap it and bake it for just 3 to 5 minutes more. That final quick blast dries out the exterior just enough to bring back that lovely crust!
| Storage Duration | Method |
|---|---|
| Up to 2 Days | Airtight Container (Room Temp) |
| Up to 4 Days | Refrigerated |
| Up to 2 Months | Tightly Wrapped (Freezer) |
Measuring Nutrition for Pull-Apart Garlic Bread
I know some of you are tracking macros, and others just want to know what you’re digging into! While homemade bread nutrition can vary slightly based on how much butter you slather on your piece, these numbers give you a good general idea for our cheesy pull-apart garlic bread. Remember, this is just an estimate based on dividing the entire recipe into 10 generous servings. It’s worth every single calorie when you taste that melted cheese!
Estimated Nutritional Breakdown
| Nutrient | Estimated Value |
|---|---|
| Serving Size | 1 serving (of 10) |
| Calories | 305 |
| Fat | 15g |
| Carbohydrates | 32g |
| Protein | 10g |
Share Your Festive Pull-Apart Garlic Bread Creations
I absolutely love seeing your kitchen creations! If you made this festive tree bread, please come back and leave a rating—it really helps other bakers know they can tackle this recipe. And if you took a picture of your beautiful, cheesy, twisted branches, tag me on social media! I can’t wait to see how your holiday bread turned out! You can follow my latest recipe updates on Pinterest.
Print
Divine 305-Calorie Pull-apart garlic bread
- Total Time: 2 hours 10 minutes
- Yield: 8-10 servings
- Diet: Vegetarian
Description
This pull-apart holiday tree bread features layers of garlic butter and melted cheese in a festive shape. Soft dough is layered with herb garlic butter and two types of cheese, shaped into a tree, and baked until golden. Each twisted branch pulls away easily for sharing.
Ingredients
- 1 cup warm water (110°F)
- 2 tablespoons honey
- 2¼ teaspoons active dry yeast (1 packet)
- 3 cups all-purpose flour, plus more for dusting
- 1 teaspoon salt
- 3 tablespoons unsalted butter, melted
- 6 tablespoons unsalted butter, melted (for garlic butter)
- 4 cloves garlic, minced
- 2 tablespoons fresh parsley, finely chopped
- ½ teaspoon salt (for garlic butter)
- ¼ teaspoon black pepper
- 1½ cups mozzarella cheese, shredded
- ¾ cup sharp cheddar cheese, shredded
- 2 tablespoons grated Parmesan cheese
- 1 tablespoon unsalted butter, melted (for topping)
- Fresh parsley, chopped (for garnish)
- Flaky sea salt (optional)
Instructions
- Combine warm water, honey, and yeast in a large bowl. Let stand for 5 minutes until foamy.
- Add flour, salt, and 3 tablespoons melted butter to the yeast mixture. Stir until a shaggy dough forms. Knead for 5-6 minutes until smooth and elastic.
- Place dough in a lightly oiled bowl, cover with a clean kitchen towel, and let rise in a warm spot for 1 hour until doubled in size.
- While dough rises, prepare the garlic butter by mixing melted butter, minced garlic, parsley, salt, and pepper in a small bowl. Combine mozzarella, cheddar, and Parmesan in another bowl.
- Punch down the dough and divide it into 4 equal portions. Roll each portion into a 10×12-inch rectangle on a floured surface.
- Place one dough rectangle on a parchment-lined baking sheet. Brush generously with garlic butter and sprinkle with one-third of the cheese mixture. Repeat layering twice more. Top with the final dough rectangle.
- Cut a triangle shape with a small rectangular trunk at the bottom to form a tree. Make 1-inch-wide diagonal cuts along both sides of the tree, leaving a 1-inch center column intact.
- Twist each strip twice to create spiral branches, revealing the cheese filling. Cover loosely and let rest for 20 minutes.
- Preheat oven to 375°F. Brush the tree with remaining garlic butter.
- Bake for 22-25 minutes until golden brown and the internal temperature reaches 190°F. Cheese should be melted and bubbly.
- Remove from oven, brush with 1 tablespoon melted butter, and garnish with fresh parsley and flaky sea salt if desired.
- Let cool for 5 minutes before serving. Pull apart the twisted branches and enjoy warm.
Notes
- Use store-bought pizza dough to cut total prep time to 30 minutes.
- Replace fresh garlic with 1 teaspoon garlic powder for a milder flavor.
- Swap mozzarella for Monterey Jack or Gruyère for different cheese flavors.
- Add ½ teaspoon Italian seasoning or dried oregano to the garlic butter for extra flavor.
- For a richer taste, add 2 tablespoons of softened cream cheese to the filling.
- Make it spicy by mixing ¼ teaspoon red pepper flakes into the garlic butter.
- Keep the center column at least 1 inch wide when cutting strips to prevent the tree from falling apart during twisting.
- Do not cut all the way through the bottom layer; this keeps the tree intact while baking.
- Use a pizza cutter for clean, even cuts when shaping the tree.
- If the dough becomes too elastic while rolling, let it rest for 5 minutes before continuing.
- Serve with marinara sauce or ranch dressing for dipping.
- Store leftovers in an airtight container at room temperature for up to 2 days or refrigerate for up to 4 days. Freeze, wrapped tightly, for up to 2 months. Reheat wrapped in foil at 325°F for 10-12 minutes, then unwrap and bake 3-5 minutes more. Microwave individual pieces for 20-30 seconds for quick reheating.
- Prep Time: 25 minutes
- Cook Time: 25 minutes
- Category: Bread
- Method: Baking
- Cuisine: American