Okay, listen up! If you think making those gorgeous, flaky pastries you see in the bakery window is impossible at home, you are absolutely wrong. I spent years messing up yeast doughs—seriously, mountains of sticky, sad dough—before I cracked the code on easy, impressive baking. That’s why I am so thrilled to share this strawberry danish recipe with you!
Forget fussy kneading! The secret weapon here is store-bought puff pastry. It does all the heavy lifting for you, giving us that incredible, buttery, light crunch without the all-day commitment. Trust me, I know what it’s like trying to bake something special when you only have 30 minutes before everyone wakes up. This recipe is designed for real life.
We combine that perfect flakiness with a super simple, tangy cream cheese filling and bright, fresh strawberries. You get that bakery-quality result, and honestly, it tastes even better because you made it! It’s my go-to when I want to look like a pastry genius with minimal effort. Let’s get started making the best strawberry danish you’ve ever had!

Why You Will Love This Easy Strawberry Danish Recipe
I truly believe this is the recipe you’ll keep coming back to when you need a showstopper without the stress. We are talking about a genuine bakery experience right on your own kitchen counter. It’s fast, it’s reliable, and it tastes heavenly—what more could you ask for in a morning treat?
Here’s the quick rundown on why this strawberry danish recipe knocks my socks off every single time:
Quick Preparation Time
The prep time is ridiculously short—we’re talking about 15 minutes max to get these assembled and into the oven. That’s faster than waiting in line at the fancy coffee shop!
Perfect Bakery Texture
Because we use frozen puff pastry, you get that amazing, light, airy, and ultra-flaky layers that just shatter when you bite into them. It’s the texture everyone chases!
Simple Ingredient Assembly
There’s no complicated yeast work here, folks. Everything is mixed, layered, and assembled in a straightforward process. If you can spread cream cheese, you can make these danishes!
Essential Equipment for Your Strawberry Danish Bake
Before you even think about thawing that pastry, let’s make sure your kitchen is set up for success. Having the right tools ready makes the assembly process fly by. Don’t worry, you probably have most of this stuff hiding in your drawers already!
Baking Surfaces and Tools
You’ll need a couple of sturdy baking sheets because we are making 12 of these beauties, and they need space to puff up! Definitely grab some parchment paper—it’s non-negotiable for easy cleanup and perfect release. And of course, you’ll need a couple of mixing bowls for the filling and the fruit mixture.
Measuring and Prep Items
Standard measuring cups and spoons are a must for accuracy, especially with the cornstarch. A small whisk or an electric hand mixer will make whipping that cream cheese filling a dream. I also find a butter knife or a small offset spatula is perfect for gently scoring that border on the pastry rectangles without cutting all the way through.
Gathering Ingredients for the Best Strawberry Danish
The beauty of this strawberry danish is that the ingredient list is short, but quality really matters here! We aren’t making anything from scratch except the filling, so focus on getting your components right. It’s all about layering simple, great flavors.
Make sure you have everything ready before you start cutting the pastry, because that stuff hates sitting around at room temperature! Here’s what you need to pull together for these amazing pastries.
Cream Cheese Filling Components
You absolutely must use 8 ounces of cream cheese that is fully softened. If it’s cold, it will lump up, and we want smooth sailing! Whip that up with 1/3 cup of powdered sugar—don’t substitute granulated here—and just a half teaspoon of pure vanilla extract for that classic sweet tang.
Fresh Strawberry Topping Mix
This is where the fresh flavor comes from! You’ll need about 3 cups of fresh strawberries, and here’s a key tip: they must be hulled and thinly sliced. Toss those slices gently with 1 tablespoon of granulated sugar and 1 teaspoon of cornstarch. The cornstarch is crucial; it helps thicken the juices that release while they sit, preventing a soggy bottom on your danish.
Puff Pastry and Egg Wash Basics
Grab two sheets of good quality puff pastry, and make sure they are completely thawed according to the package directions—no shortcuts here! For the egg wash, just beat one large egg with one teaspoon of water. This gives us that deep golden shine we look for on bakery pastries.
Optional Sweet Glaze Ingredients
If you want that extra touch of sweetness, you can mix up a quick glaze later. It’s just powdered sugar, a splash of milk, and a teeny bit of vanilla. Or, for a simpler shine, just warm up a bit of strawberry jam to brush on top!
Step-by-Step Instructions for Your Strawberry Danish
Alright, time to put it all together! This is the fun part where your kitchen starts smelling incredible. Remember, speed is key once we get to the pastry, so have all your bowls ready to go before you even turn on the oven.
Preparing the Cream Cheese Filling
First things first, let’s tackle that filling. Grab your softened cream cheese and beat it in a bowl until it’s completely smooth—I mean baby-smooth, no lumps allowed! Once you get it looking like silky frosting, slowly mix in the powdered sugar and that half teaspoon of vanilla extract. Keep beating it until it’s light and fluffy. Set this aside while you work on the fruit.
Preparing the Strawberry Fruit Layer
Next up are the berries. Take your sliced strawberries and gently toss them in a separate bowl with the granulated sugar and cornstarch. You don’t need to mix hard, just coat them evenly. Now, this is important: let this mixture sit on the counter for about 10 to 15 minutes. You’ll notice they start releasing some beautiful, syrupy juices. That liquid is gold; it adds flavor and moisture!
Shaping and Filling the Strawberry Danish Pastry
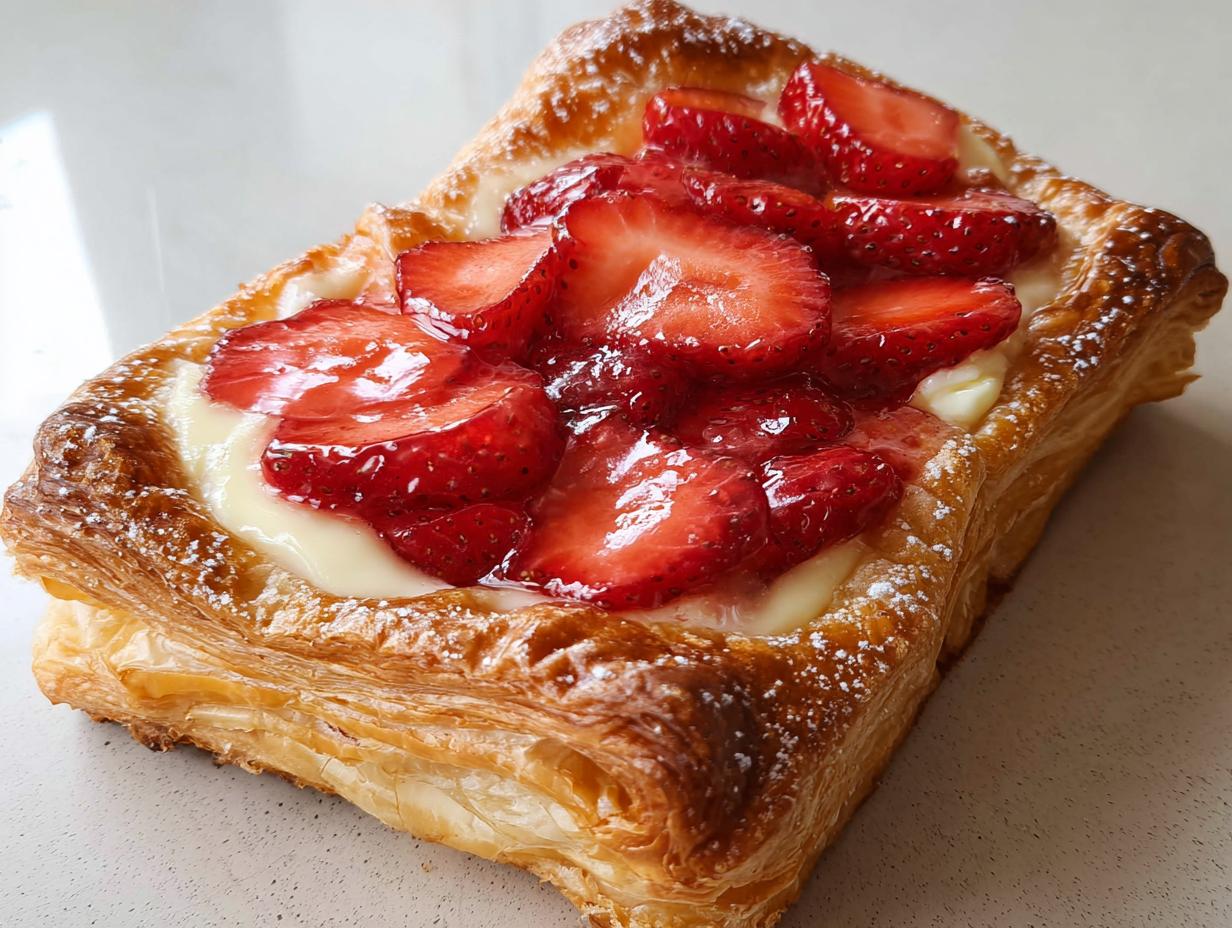
Time to preheat that oven to 400°F and line two baking sheets with parchment paper. Unfold one sheet of puff pastry. I usually cut right along the creases to make three long strips, and then cut those in half, giving you six rectangles per sheet—twelve total! Now, take a small knife and score a border about a quarter-inch in from the edge on every piece. Do not cut all the way through! This border is what puffs up to hold everything in. Spoon about a tablespoon of your fluffy cream cheese filling inside that border on each piece. Then, arrange a nice, decorative layer of your juicy strawberry slices right on top of the cream cheese. This is how you build a perfect strawberry danish!
Baking and Cooling Procedures
Brush those scored edges lightly with your egg wash—that’s the egg mixed with water—and sprinkle the edges with a little extra sugar for crunch. Pop them into the 400°F oven. They bake for about 20 to 22 minutes. You want them puffed up and gorgeously golden brown. When they come out, let them cool right there on the baking sheet for about five minutes before carefully moving them to a wire rack to finish cooling completely.
Applying the Finishing Glaze
You absolutely have to let them cool before glazing, or the glaze will just melt away into nothing! If you’re using the simple glaze, whisk the powdered sugar, milk, and vanilla until it’s just pourable. Drizzle it over the cooled pastries. If you prefer that jam shine, just warm up your strawberry jam slightly in the microwave until it’s runny, and brush that over the top for a beautiful, glossy finish.

Tips for Achieving Perfect Strawberry Danish Results
Even though this recipe is easy, puff pastry can be tricky if you don’t treat it right. I learned these little tricks the hard way when my pastries looked more like flat crackers than beautiful, puffed-up layers. Follow these tips, and your strawberry danish will look professional!
Handling Thawed Puff Pastry Correctly
The single biggest mistake people make is letting the puff pastry get too warm. It needs to stay cold! If it gets soft and greasy, the layers won’t separate properly in the oven. Work quickly when you unfold it and cut the squares. If you stop to answer the phone or chat for too long, pop the pastry back into the fridge for ten minutes. Cold butter equals flaky pastry, period.
Preventing Filling Spillage During Baking
When you score that border, you are creating a tiny wall to keep the cream cheese filling contained. Make sure you really don’t cut through to the bottom layer. Also, don’t be tempted to pile on too much filling or too many strawberries! If you overfill past that scored line, the filling will bubble up and ooze out, potentially gluing your beautiful pastry layers together. Keep it neat and tidy inside that border!
Frequently Asked Questions About Your Strawberry Danish
I know you might have a few questions buzzing around once you start baking. These pastries are usually simple, but pastry always has a few quirks! I’ve gathered the questions I get asked most often about making the perfect strawberry danish.
Can I use frozen strawberries for this strawberry danish?
You certainly can try, but fresh strawberries really give the best flavor and texture here. If you must use frozen, make sure you thaw them completely first. The big thing is draining them really, really well. Frozen berries release a lot more liquid than fresh ones, and too much juice will definitely make the bottom of your pastry soggy. If they seem watery after thawing, gently pat them dry with a paper towel before mixing them with the sugar and cornstarch.
What is the best way to store leftover cream cheese danish?
Honestly, these are best eaten the day you make them because that puff pastry loses its crispness fast. But if you have leftovers, keep them in an airtight container in the refrigerator for up to two days. Don’t leave them out on the counter! The cream cheese filling needs to stay cool, and the container keeps them from drying out too much.
How do I get the puff pastry extra flaky?
It comes down to temperature, temperature, temperature! The flakiness of your puff pastry hinges on keeping that butter cold. Make sure your pastry sheets are properly thawed but still cold to the touch when you cut them. Also, be extremely careful when scoring that border—if you accidentally cut all the way through, the steam escapes, and you won’t get that beautiful, high puff that makes a great strawberry danish!
Storing and Reheating Leftover Pastries
Now, let’s be real—these pastries are so good that you might actually have leftovers, though I doubt it! If you do manage to save a few, you need to treat them right. They definitely won’t be as perfectly crisp the next day, but we can bring them back to life with a little heat.
Refrigeration Guidelines
If you have any leftover cream cheese danish, get them into an airtight container right away. They last safely in the refrigerator for up to two days, which is the absolute maximum I’d recommend. Don’t leave them sitting out on the counter—that cream cheese filling needs to stay chilled for safety and texture!
Best Reheating Method for Crispness
To bring back that delightful crunch, you absolutely cannot use the microwave; it just turns the pastry soft and chewy. Instead, preheat your oven to a low temperature, about 300°F. Pop the pastries directly onto the baking sheet and heat them for just a few minutes until they warm through and you can hear that pastry start to crisp up again. Watch them closely so they don’t burn!
Share Your Delicious Strawberry Danish Creations
I poured all my best tips into this guide, but the real fun is seeing what you create! I absolutely love hearing from all of you when you try this strawberry danish recipe and get rave reviews. Did they look as golden and flaky as mine? Drop a comment below and let me know how it went, or share a picture with me! Find us on Facebook for more updates!
Print
Amazing 12-Minute Strawberry Danish Secret
- Total Time: 37 minutes
- Yield: 12 danishes
- Diet: Vegetarian
Description
This strawberry danish features flaky puff pastry, creamy filling, and fresh berries for a bakery-style treat perfect for breakfast or dessert.
Ingredients
- 8 oz cream cheese, softened
- 1/3 cup powdered sugar
- 1/2 teaspoon pure vanilla extract
- 3 cups fresh strawberries, hulled and thinly sliced
- 1 tablespoon granulated sugar
- 1 teaspoon cornstarch
- 2 sheets puff pastry, thawed
- 1 large egg, beaten with 1 teaspoon water
- 2 tablespoons sugar for sprinkling
- 1/4 cup strawberry jam, warmed (Optional Glaze)
- 1/2 cup powdered sugar (Optional Glaze)
- 1 tablespoon milk (Optional Glaze)
- 1/4 teaspoon vanilla extract (Optional Glaze)
Instructions
- Preheat oven to 400°F. Line two baking sheets with parchment paper.
- Beat the cream cheese until smooth. Add powdered sugar and vanilla extract; mix until fluffy.
- Toss sliced strawberries with sugar and cornstarch. Let sit for 10–15 minutes until slightly juicy.
- Unfold one puff pastry sheet. Cut along the folds to make three strips, then cut each strip in half for six rectangles. Repeat with the second sheet for twelve total rectangles.
- Score a 1/4-inch border around each rectangle without cutting through. Spoon 1 tablespoon of the cream cheese filling inside each border.
- Arrange strawberry slices over the filling in a single decorative layer.
- Brush edges with egg wash and sprinkle lightly with sugar.
- Bake for 20–22 minutes, until puffed and golden.
- Cool pastries on the pan for 5 minutes, then transfer to a rack to finish cooling.
- For glaze, whisk together powdered sugar, milk, and vanilla. Drizzle over cooled danishes or brush with warm strawberry jam for shine.
Notes
- Enjoy these pastries fresh the same day.
- Store leftovers in an airtight container in the refrigerator for up to 2 days.
- Reheat briefly in a 300°F oven to re-crisp.
- Prep Time: 15 minutes
- Cook Time: 22 minutes
- Category: Pastry
- Method: Baking
- Cuisine: American