Oh my gosh, you guys are going to LOVE this one! If you’re anything like I was when I first started trying to eat better, the idea of meal prepping felt like rocket science. I remember staring at spreadsheets, trying to calculate macros, and just ending up ordering takeout because it was easier. Seriously, the pressure was too much!
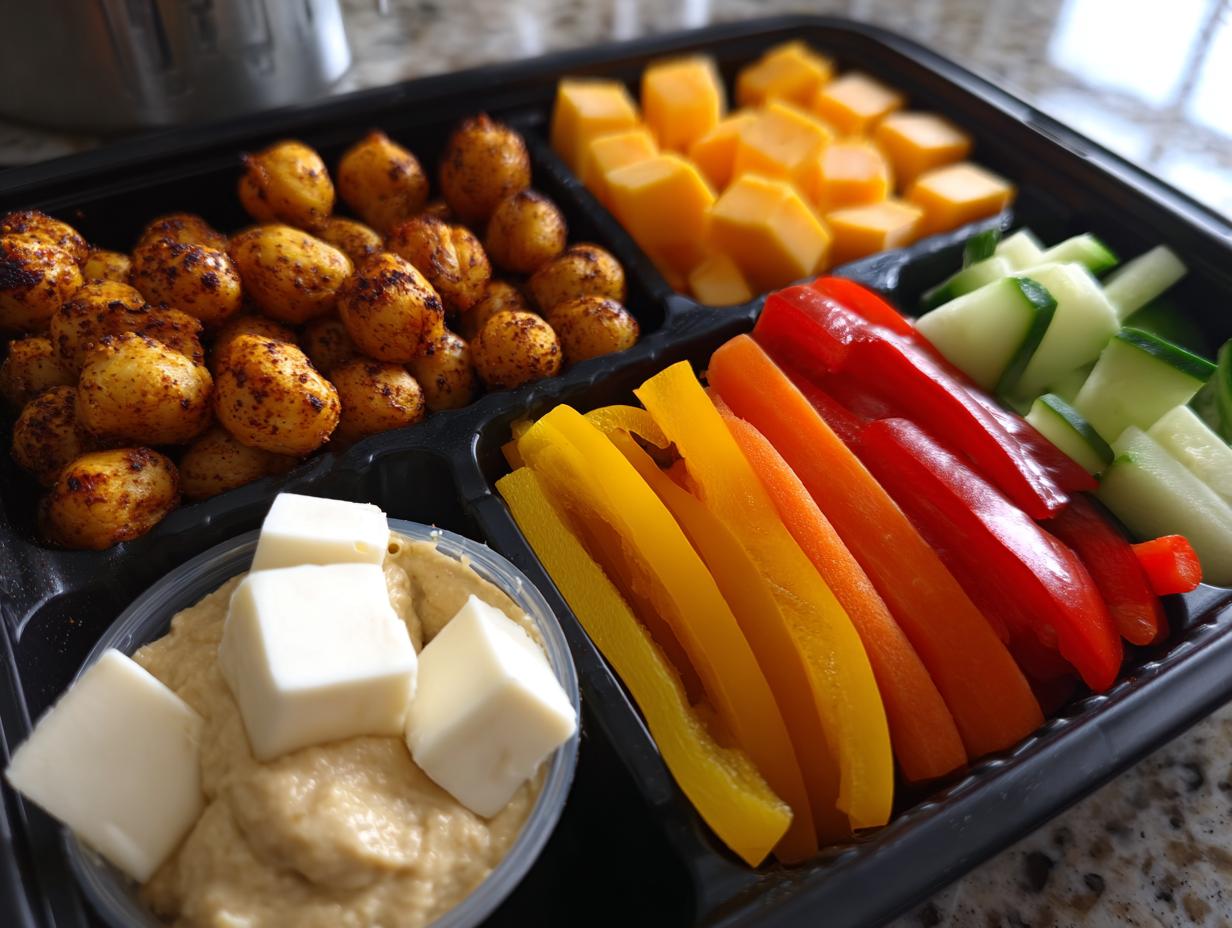
But that’s why I’m obsessed with these **Protein snack prep boxes**. They are the absolute easiest way to hit those healthy eating goals without needing a culinary degree or spending your entire Sunday stirring pots. We’re talking perfectly portioned goodness—about 18 grams of protein per box—ready to grab and go.
This recipe is my secret weapon for busy weeks. It’s so simple, even my husband, who burned toast last Tuesday, can assemble these. We’re using crunchy roasted chickpeas, sturdy cheese cubes, and crisp veggies. No fuss, no fancy cooking methods, just pure, delicious, grab-and-go fuel. Trust me, these **Protein snack prep boxes** changed my weekday snacking game forever!
Gathering Your Components for Protein Snack Prep Boxes
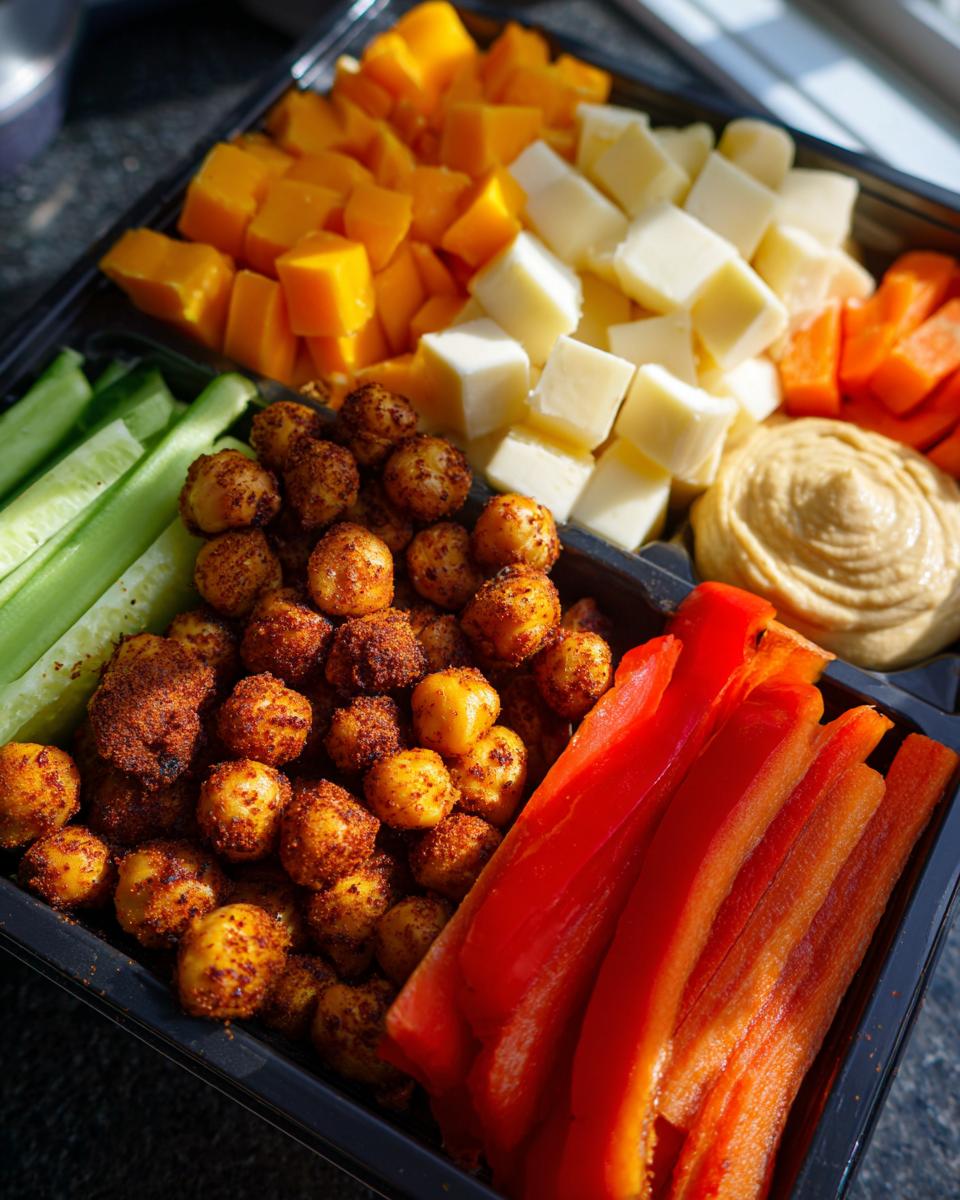
Okay, before we even think about turning on the oven, we need to get everything ready. That’s the real secret to making these **Protein snack prep boxes** go smoothly—having all your players lined up before you start the game! This isn’t complicated cooking, I promise. We’re dealing with just a few core elements that bring that great protein punch and satisfying crunch.
The magic here comes from balancing textures: something warm and spiced (the chickpeas), something cool and creamy (the cheese and hummus), and something super fresh (the veggies). Once you have all these simple components ready to go, assembly is practically instant. It’s all about simple, high-quality pieces coming together perfectly in your little prep containers.
Essential Ingredients for Protein Snack Prep Boxes
You’ll need the chickpeas, naturally, but make sure they are well-drained and rinsed before we start drying them out! For the spice kick, we’re using smoked paprika and garlic powder—don’t skip those, they make the roasting amazing. We need cheddar and mozzarella, both cut into nice little ½-inch cubes so they fit perfectly. Then load up on the fresh stuff: baby carrots, cucumber slices, and whatever colorful bell peppers you love. Finally, remember the hummus to keep things interesting!
Equipment Needed for Protein Snack Prep Boxes
You don’t need a gadget for every step, thankfully. Grab a rimmed baking sheet lined with parchment paper for the chickpeas. You’ll need a medium mixing bowl for tossing the spices, and of course, your five trusty meal prep containers to hold it all together. A sharp little knife for cubing the cheese and chopping veggies is a must!
Mastering Roasted Chickpeas for Your Protein Snack Prep Boxes
If you take anything away from this recipe, let it be this: the roasted chickpeas are the foundation of these incredible **Protein snack prep boxes**. If these aren’t crispy, the whole experience falls flat! We aren’t looking for mushy, slightly warm beans; we want that satisfying, almost cracker-like crunch that holds up beautifully in the fridge for days.
The secret isn’t just the oven time—it’s what happens *before* they ever see heat. We have to get these little guys bone dry. I know, it sounds tedious, but trust me, a damp chickpea steams instead of roasts, and that’s a tragedy we must avoid. Once they are seasoned and perfectly crisp, they become the star power that makes these snack boxes so filling and satisfying!
Preparing and Seasoning the Chickpeas
First things first: crank that oven up to 400°F and get your baking sheet ready with parchment paper. Now, take your drained and rinsed chickpeas and spread them out on a clean kitchen towel. This is the crucial drying step! Gently pat them until they feel completely dry to the touch. You might even rub them a little bit to encourage those loose skins to flake off—just toss those skins away!
Move the dry chickpeas to a bowl. Now for the flavor! Drizzle in just one tablespoon of olive oil. Then, be precise with your spices: one teaspoon of smoked paprika for color and depth, half a teaspoon of garlic powder, half a teaspoon of salt, and just a tiny pinch—one quarter teaspoon—of black pepper. Toss everything until every single chickpea is coated in that gorgeous red-orange spice mixture. Don’t be shy!
The Roasting Process and Cooling
Spread those seasoned guys out on your prepared sheet in a single, even layer. They need space to breathe and crisp up! Pop them into that hot 400°F oven for about 25 to 30 minutes total. About halfway through, maybe at the 15-minute mark, give them a good stir to make sure they brown evenly on all sides. You’ll know they are done when they look golden brown and you can hear them rattling slightly when you shake the pan.
Here is the *other* super important trick for **Protein snack prep boxes**: You must let them cool completely on that baking sheet! If you transfer them to a bowl while they are hot, the trapped steam will soften them up again. Leave them right there until they are totally cool to the touch. This locks in that amazing crispiness that we worked so hard to achieve. Once cool, they are ready to be portioned out for your weekly supply!
Assembling Your Perfect Protein Snack Prep Boxes
Alright, the chickpeas are cool, the oven is off, and now we get to the fun part: putting these beautiful **Protein snack prep boxes** together! This is where everything comes together so fast, you’ll wonder why you ever bought those sad little pre-packaged snack packs from the store. We need to get everything bite-sized and ready to nestle into those containers.
I always tackle the cutting first because I like to get the fresh, wet items out of the way before I start portioning the dry stuff. Remember, even distribution means every box gets the same great 18 grams of protein. It’s all about that balanced distribution!
Preparing Fresh Add-ins
Time to prep those veggies and cheese! Take your cheddar and mozzarella and cut them into nice, uniform ½-inch cubes. You want them chunky enough that they don’t disappear, but small enough that they fit nicely alongside the carrots. Wash your baby carrots—no cutting needed there, lucky you! For the cucumbers, slice them into manageable dipping rounds, and do the same for those colorful bell peppers, cutting them into easy-to-grab strips. Make sure everything is clean and dry before it goes into the box!
Final Container Assembly and Safety
Now, grab your five containers. We need to divide everything evenly. Start by dropping about a half cup of those crispy roasted chickpeas into one section of the box. Next, add the cheese cubes—one ounce total of cheddar and mozzarella looks about right. Then, evenly distribute your fresh veggies: half a cup of carrots, half a cup of cucumber, and half a cup of peppers go into the remaining open spaces. Finally, spoon in three tablespoons of hummus. I like to put the hummus in a little silicone cup inside the container, just to stop the veggies from getting overly damp, though that’s totally optional!
Seal those containers up tight! This is super important for food safety when you’re prepping ahead. Make sure your fridge is set correctly, at 40°F or below, and pop these assembled **Protein snack prep boxes** right in. They are ready to grab on the busiest mornings for the next few days!
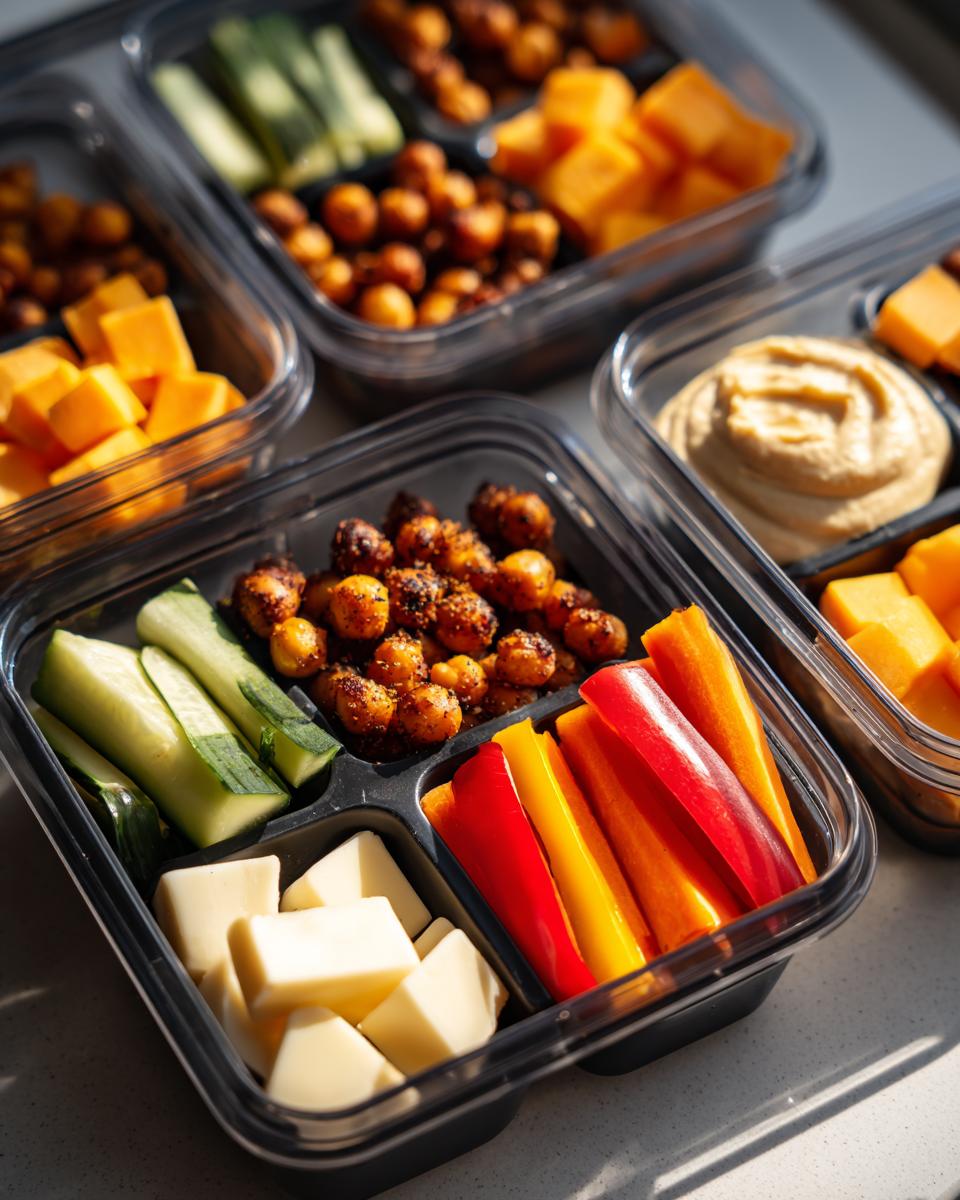
Tips for Success with Protein Snack Prep Boxes
I’ve made these **Protein snack prep boxes** more times than I can count, and I’ve learned a few little tricks that really make the difference between a good snack and an *amazing* snack. Honestly, the flexibility of this recipe is what keeps me coming back week after week when I’m trying to stay on track. If you want to see more quick meal ideas, check out our snack recipes!
First, let’s talk seasoning variations. If you get bored easily, don’t just stick to the paprika blend! Try tossing your chickpeas with some curry powder—it’s surprisingly good with the cheese—or maybe some ranch seasoning if you have it. Everything Bagel Spice works wonders too, giving you a totally different flavor profile for your boxes! For more inspiration on quick bites, you can always check out our lunch and dinner ideas.
My biggest tip for anyone building these **Protein snack prep boxes** is related to the wet stuff. Always, always consider keeping the hummus separate, even if it’s just in a tiny little cup inside the container. Veggies just don’t like swimming in dressing overnight! Also, if you want extra crunch, toss in a few whole-grain crackers or pretzels into an empty compartment. It makes the box feel more like a full meal, not just a snack! If you are looking for a great side dish to go with these, you might enjoy our roasted broccoli and carrots recipe.
Ingredient Notes and Simple Swaps
One of my favorite things about these **Protein snack prep boxes** is how forgiving they are. Life happens, right? Maybe you’re out of cheddar, or maybe you just want to switch things up for variety. The main goal is keeping that protein count high, so we need smart swaps!
If you want to skip the cheese cubes entirely—maybe you’re dairy-free one day—hard-boiled eggs are a fantastic replacement. They hold up just as well and give you a great protein boost. You could also try swapping out one of the cheeses for some small cubes of turkey or ham if you’re looking for lean meat protein instead!
For the vegetables, feel free to substitute whatever looks best at the market. Snap peas are amazing because they stay crunchy, and cherry tomatoes are always a good addition. Just try to stick to hearty veggies that won’t turn to mush overnight. The spice blend for the chickpeas is totally customizable, too—play around with those flavors!
Storing and Keeping Your Protein Snack Prep Boxes Fresh
The beauty of these **Protein snack prep boxes** is that they are built to last! Unlike salads that wilt or sandwiches that get soggy, this combination of roasted, crunchy, and sturdy components holds up beautifully in the fridge. I usually make five boxes on a Sunday, and I rely on them all the way through Thursday or Friday. You can find more storage tips on our Medium page.
The key is making sure everything is sealed well. Once everything is divided up, pop those lids on tightly. Since this is a cold snack box, we aren’t messing with the microwave at all! Everything is designed to be eaten cold straight out of the container, which makes those hectic weekday lunches so much easier to manage.
Storage and Reheating Guide
Here’s the quick rundown on keeping your snack boxes perfect:
| Component | Storage Duration | Reheating Advice |
|---|---|---|
| Assembled Boxes | Up to 4 days in the refrigerator | Eat cold only |
| Roasted Chickpeas (Separate) | Up to 1 week (airtight) | Can be briefly warmed (2 min) if desired |
Just remember that keeping the hummus separate, even inside the sealed box, helps keep those cucumbers and peppers at their peak crispness for the full four days!
Frequently Asked Questions About Protein Snack Prep Boxes
I get so many messages asking about the nitty-gritty details of these boxes, so I thought I’d tackle the most common questions right here. I want to make sure everyone feels confident setting up their **Protein snack prep boxes** for success! If you have more questions, feel free to connect with us on Facebook.
Q1. How can I boost the protein content even higher than 18g?
That’s a great question! If you want to push past 18g, the easiest swap is replacing the cheese with two hard-boiled eggs per box, which really bumps up the protein. Also, make sure you are using a full 3 tablespoons of hummus, as that adds a little boost too. The chickpeas are great, but eggs are pure protein power!
Q2. Is there any way to make the prep time shorter than 45 minutes total?
I get it, we’re busy! The 30 minutes of roasting time is hands-off, so the prep is really just 15 minutes. To speed up the chopping, try cutting all your veggies and cubing your cheese the night before. Then, on Sunday, all you have to do is roast the chickpeas and assemble everything. That cuts your active time down significantly!
Q3. Can I make these **Protein snack prep boxes** ahead of time for more than four days?
Four days is my hard limit for guaranteed freshness, especially because of the fresh veggies and hummus. If you need to go longer, don’t assemble the boxes fully. Roast your chickpeas and chop your vegetables, but store them separately in airtight containers. Then, assemble only 3 or 4 days’ worth at a time. The roasted chickpeas stay crunchy for a full week if stored away from moisture!
Q4. What if I don’t like smoked paprika? What’s a good substitute seasoning?
Oh, don’t worry if paprika isn’t your thing! You can get a great savory flavor by using half a teaspoon of onion powder mixed with half a teaspoon of your favorite dried herb blend, like Italian seasoning. It gives the chickpeas a completely different, but equally delicious, savory profile for your snack boxes. Don’t forget to follow us on Pinterest for more recipe ideas!
Sharing Your Healthy Snack Prep Journey
I really hope these simple **Protein snack prep boxes** help make your weekdays a little less stressful and a lot tastier! Seriously, seeing your creations makes my day.
If you tried these out, please come back and leave a quick star rating—it helps so much! And if you snapped a picture of your perfectly packed boxes, tag me on social media. I love seeing how you customize your veggies and spice blends!
Print
5 Genius Protein snack prep boxes hacks
- Total Time: 45 minutes
- Yield: 5 snack boxes
- Diet: Vegetarian
Description
Assemble protein snack prep boxes with roasted chickpeas, cheese cubes, and fresh vegetables for 18g protein. Perfect for meal prep and healthy snacking.
Ingredients
- 1 can (15 oz) chickpeas, drained and rinsed
- 1 tablespoon olive oil
- 1 teaspoon smoked paprika
- ½ teaspoon garlic powder
- ½ teaspoon salt
- ¼ teaspoon black pepper
- ½ cup roasted chickpeas (per box)
- 1 ounce cheddar cheese, cubed (per box)
- 1 ounce mozzarella cheese, cubed (per box)
- ½ cup baby carrots (per box)
- ½ cup cucumber slices (per box)
- ½ cup bell pepper strips (red, yellow, or orange) (per box)
- 3 tablespoons hummus (per box)
Instructions
- Preheat your oven to 400°F and line a rimmed baking sheet with parchment paper.
- Drain and rinse the chickpeas thoroughly, then spread them on a clean kitchen towel and pat completely dry, removing any loose skins.
- Transfer dried chickpeas to a medium bowl and toss with olive oil, smoked paprika, garlic powder, salt, and black pepper until evenly coated.
- Spread chickpeas in a single layer on the prepared baking sheet and roast for 25-30 minutes, stirring halfway through, until golden brown and crispy.
- Remove chickpeas from the oven and let them cool completely on the baking sheet to maintain maximum crispiness.
- Cut cheddar and mozzarella cheese into ½-inch cubes and prepare all vegetables by washing and cutting them into sticks or bite-sized pieces.
- Assemble snack boxes by dividing roasted chickpeas, cheese cubes, baby carrots, cucumber slices, bell pepper strips, and hummus evenly among 5 meal prep containers.
- Seal containers tightly and refrigerate until ready to eat, ensuring proper food safety by keeping cold at 40°F or below.
Notes
- Try different roasted chickpea seasonings like curry powder, ranch seasoning, or everything bagel spice.
- Replace cheese cubes with hard-boiled eggs for a different protein source.
- Add cherry tomatoes, snap peas, or celery sticks for more vegetable variety.
- Include a small portion of whole grain crackers or pretzels for extra crunch.
- Keep hummus in a small separate container within the box to prevent vegetables from getting soggy.
- Store assembled snack boxes in sealed containers in the refrigerator for up to 4 days.
- Prep Time: 15 minutes
- Cook Time: 30 minutes
- Category: Snack
- Method: Baking
- Cuisine: American