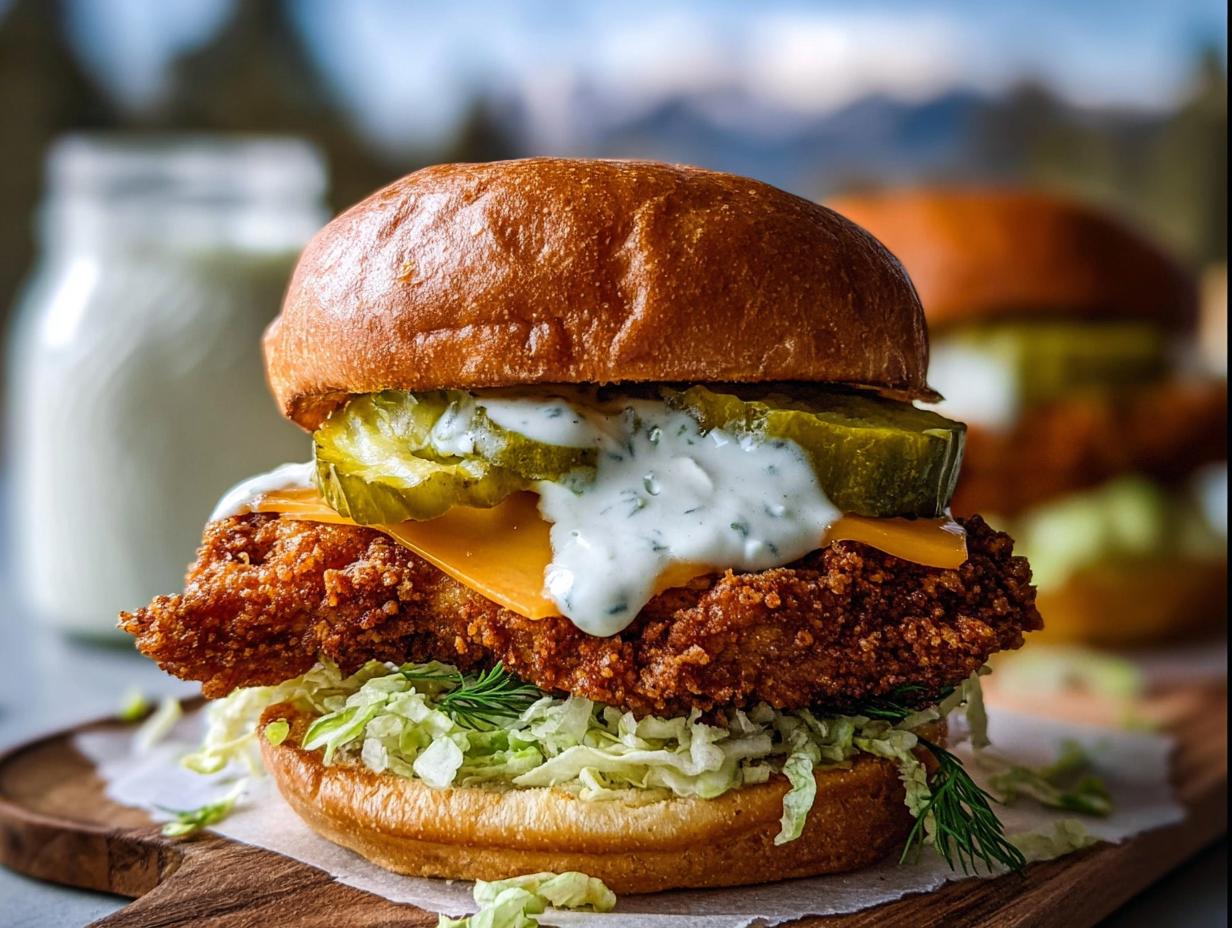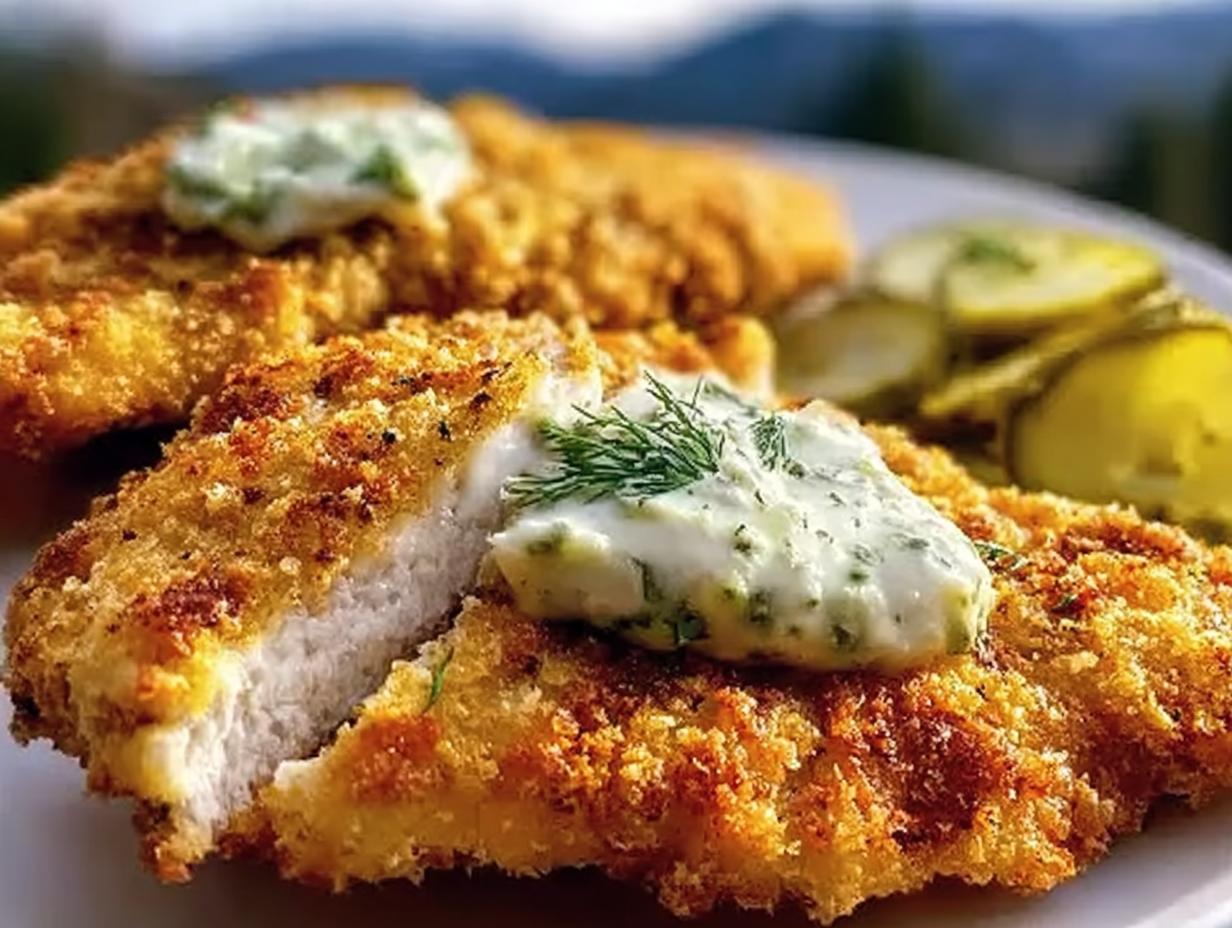
You know those days where you crave something outrageously crunchy but you also need dinner on the table faster than you can decide which streaming service to use? I felt that way last Tuesday, and that’s why this Crispy Dill Pickle Parmesan Chicken came to the rescue! I stumbled onto the pickle juice brine trick years ago for pork chops, but adapting it for chicken with that salty parmesan crust? Wow. It’s messy, but so worth every second.
What I love most is that this isn’t just crunchy—it’s incredibly juicy because of that short soak, and everything comes together in about 30 minutes flat. It’s the perfect weeknight miracle meal that tastes like you spent way more time prepping than you actually did. Forget boring protein; this is the stuff people ask you to make again next time. Let’s get cooking before the oil cools down!
Why You Need This Crispy Dill Pickle Parmesan Chicken
Honestly, the magic here is the brine. That tangy dill pickle juice works overtime to tenderize the chicken, so you get zero dry bites, even when frying fast. Pair that juiciness with that crispy panko crust, and you’ve got a winner.
- Lightning Fast: Seriously, this is on the table in 30 minutes, making it a go-to for those chaotic nights. You can check out some other quick options over at quick weeknight dinners if you’re planning ahead.
- Ultimate Texture Contrast: It’s the perfect combination of ultra-moist interior thanks to the brine, followed by that satisfying, salty crunch.
- Flavor Bomb: You get savory, salty parmesan mixed with that signature tangy dill pickle zing in every single bite. It’s unforgettable!
Gathering Ingredients for Crispy Dill Pickle Parmesan Chicken
Don’t skip the brining step, even if you’re in a huge rush! An hour in that pickle juice does wonders. If you need tips on marinades in general, check out my guide on easy chicken marinades for future inspiration.
Pulling together what you need for this chicken is surprisingly simple, mostly pantry staples plus the star ingredient: dill pickle juice. You need four boneless, skinless chicken fillets, about four nice medium-sized ones. Then we move onto the liquids—just the juice for the bath—and then setting up the dredging station: flour, eggs, and that amazing final crunchy layer. Make sure you have your seasonings measured out before you start assembling your dredging bowls so nothing gets forgotten in the chaos!
For the Crispy Dill Pickle Parmesan Chicken Coating and Chicken
Okay, here is the complete rundown of what you need to grab from your fridge and pantry. Remember, Panko breadcrumbs are non-negotiable here; they are what give us that unbeatable, shatteringly crisp exterior, so don’t default to regular breadcrumbs!
- 4 boneless skinless chicken fillets
- 1 cup dill pickle juice
- 1 cup panko breadcrumbs
- 1/2 cup grated parmesan cheese
- 1/2 cup all purpose flour
- 2 large eggs beaten
- 1 teaspoon garlic powder
- 1 teaspoon onion powder
- 1/2 teaspoon paprika
- 1 teaspoon salt
- 1/2 teaspoon black pepper
- 1/2 cup cooking oil for frying
Step-by-Step Guide to Perfect Crispy Dill Pickle Parmesan Chicken
The key to this recipe’s success, besides the pickle juice, is getting that coating to stick perfectly. If you’ve ever cooked with me, you know moisture is the enemy of a good breading, so we tackle that head-on right after the soak!
Step 1: First things first, get that chicken bathing! Place your fillets in a shallow dish and drown them in that glorious, salty pickle juice. Cover it up and pop it in the fridge for at least an hour, but honestly, two hours is even better if you can swing it. While that’s happening, start prepping your dredging stations. If you need some more ideas for quick meals like this, I’ve got a post on healthy busy night dinners you might like!
Step 2: Once the brine time is up, take the chicken out. Now, this is critical: pat those fillets *completely* dry using paper towels. I mean bone dry! If there is any pickle juice residue left, your coating is going to slide right off in the pan—which is a sad waste of good parmesan.
Step 3: Time to set up your assembly line. You need three shallow bowls ready to go. In the first bowl, whisk together your flour, garlic powder, onion powder, paprika, salt, and pepper. Bowl two is just the two beaten eggs. Bowl three is where the magic happens: mix your Panko breadcrumbs and the grated parmesan cheese together really well.
Step 4: Dredge each dried chicken piece sequentially. Dust it thoroughly in the seasoned flour first, shake off any major excess, dip it into the eggs, letting the excess drip away, and finally, press it really firmly into the Panko-Parmesan mix. I press down hard with my palms on both sides to make sure that coating is locked in. That firm press guarantees amazing results when frying, just like when I make my regular crispy parmesan crusted chicken!
Step 5: Heat about a half-inch of cooking oil in a large, heavy skillet over medium-high heat. You want that oil hot, ideally hitting about 350°F. If you don’t have a thermometer, test it by dropping a tiny sprinkle of breadcrumb in; if it sizzles hard immediately, you’re good to go.
Step 6: Carefully place the coated chicken fillets into the hot oil, making sure not to overcrowd the pan—work in batches if you need to! Cook them for about 5 to 7 minutes on the first side until they are that perfect deep golden brown color. Flip them gently and repeat on the other side. They should reach an internal temperature of 165°F.
Step 7: When done, immediately transfer the chicken to a wire cooling rack set over a baking sheet. Don’t use paper towels, trust me, they steam and get soggy! Let them rest for just five minutes. This lets the juices redistribute and locks in that final layer of crispiness. Serve them hot!

Serving Suggestions for Your Crispy Dill Pickle Parmesan Chicken
Since this chicken is rich and savory, we want sides that bring brightness and cut through that delicious fried richness! Balance is key for maximum enjoyment, especially since this isn’t exactly a light meal.
Creamy Coleslaw: A classic for a reason! A slightly sweet and tangy slaw gives you that cool, crunchy vegetable element to contrast beautifully with the hot, salty chicken. It really cleanses the palate between bites.
Roasted Asparagus with Lemon: If you want something green, roasting asparagus until it’s just tender and then squeezing fresh lemon over the top is perfection. The acidity brightens everything up. You can find some great ideas for greens over at fresh summer salad ideas for inspiration.
Mashed Potatoes (Lightly Made): If you need something comforting, a small scoop of creamy, buttery mashed potatoes is a great vehicle for soaking up any rogue pickle juice flavor running off the plate. Just make sure you save room for the chicken!
Simple Tomato Salad: Keep it ultra-simple: halved cherry tomatoes, a drizzle of olive oil, salt, and pepper. It keeps things light and adds a burst of fresh, raw sweetness that balances the fried coating.
Storing Leftovers of Your Crispy Dill Pickle Parmesan Chicken
Nobody wants soggy leftovers, especially when you’ve gone to the trouble of getting that perfect crunchy crust! Thankfully, this chicken is surprisingly resilient if you store it the right way. If you’re looking for more quick-fix dinners for the week, check out my list here: dinner recipes under an hour.
You can safely keep any leftover Crispy Dill Pickle Parmesan Chicken in the fridge for up to three days in a shallow, airtight container. The biggest mistake people make is piling the pieces right on top of each other in a sealed bag, which traps steam and guarantees a soggy mess by morning. I like to put a piece of paper towel in the bottom of the container first, then lay the chicken pieces in a single layer if I can manage it, separating them slightly.
To bring back that glorious texture, you MUST avoid the microwave. That just turns the Panko into rubber. The best reheat method is either back in a 375°F oven for about 8 to 10 minutes, or better yet, an air fryer set to 380°F for 5 minutes. That second blast of dry heat instantly re-crisps that dill pickle coating. If you’re meal prepping for the whole family, consider making a big batch of plain cooked chicken breasts and keeping the Panko-Parmesan mixture separate. Then, just bread and fry the pieces fresh each night!

Common Questions About Crispy Dill Pickle Parmesan Chicken
I get asked about substitutions all the time, but honestly, try to stick close to the recipe the first time around so you can appreciate the dill pickle magic before you start experimenting! If you’re looking for lighter uses for chicken, check out these healthy chicken salad recipes.
Why is my parmesan chicken coating soggy? This almost always happens because the chicken wasn’t fully patted dry after the pickle juice brine, or you didn’t press the coating on firmly enough in Step 4. Steam is the enemy of crunch, so make sure your pan isn’t overcrowded when frying!
Can I use regular breadcrumbs instead of Panko? You absolutely *can*, but I have to warn you, the texture won’t be nearly as light and shatteringly crispy. Panko absorbs less oil and gives you that restaurant-quality crunch that other breadcrumbs just can’t match.
How long does this chicken need to soak in the dill pickle juice? While I prefer two hours, even 30 minutes makes a noticeable difference in flavor and moisture retention. Don’t skip the soak entirely, even if you’re only making dinner on the fly!
Enjoy Making This Crispy Dill Pickle Parmesan Chicken
Seriously, I hope you give this fun twist on fried chicken a shot this week. It’s fast, flavorful, and that dill pickle tang is addictive! Let me know in the comments below if your family loved it as much as mine did, and don’t forget to check out my easy spring dinner recipes for more weeknight inspiration!
Print
Crispy Dill Pickle Parmesan Chicken
- Total Time: 30 min
- Yield: 4 servings
- Diet: Low Fat
Description
Ultra crispy parmesan chicken brined in dill pickle juice for juicy flavor and crunch. Easy weeknight dinner ready in about 30 minutes.
Ingredients
- 4 boneless skinless chicken fillets
- 1 cup dill pickle juice
- 1 cup panko breadcrumbs
- 1/2 cup grated parmesan cheese
- 1/2 cup all purpose flour
- 2 large eggs beaten
- 1 teaspoon garlic powder
- 1 teaspoon onion powder
- 1/2 teaspoon paprika
- 1 teaspoon salt
- 1/2 teaspoon black pepper
- 1/2 cup cooking oil for frying
Instructions
- Place chicken fillets in a shallow dish and pour pickle juice over them. Cover and refrigerate for 1 to 2 hours.
- Remove chicken from marinade and pat completely dry with paper towels.
- Set up three bowls. In the first, mix flour, garlic powder, onion powder, paprika, salt, and pepper. In the second, add beaten eggs. In the third, combine breadcrumbs and parmesan cheese.
- Coat each piece of chicken in the seasoned flour, dip into the eggs, then press into the breadcrumb parmesan mixture until fully coated.
- Heat oil in a large skillet over medium high heat until it reaches 350°F.
- Carefully add chicken and cook for 5 to 7 minutes per side until golden brown and crispy.
- Transfer to a wire rack and rest for 5 minutes before serving. Ensure chicken reaches an internal temperature of 165°F for safe consumption.
Notes
- For extra crispiness, press the coating firmly onto the chicken before frying.
- You can also bake at 400°F for 20 to 25 minutes or air fry at 375°F for 15 to 18 minutes.
- Prep Time: 15 min
- Cook Time: 15 min
- Category: Dinner
- Method: Frying
- Cuisine: American