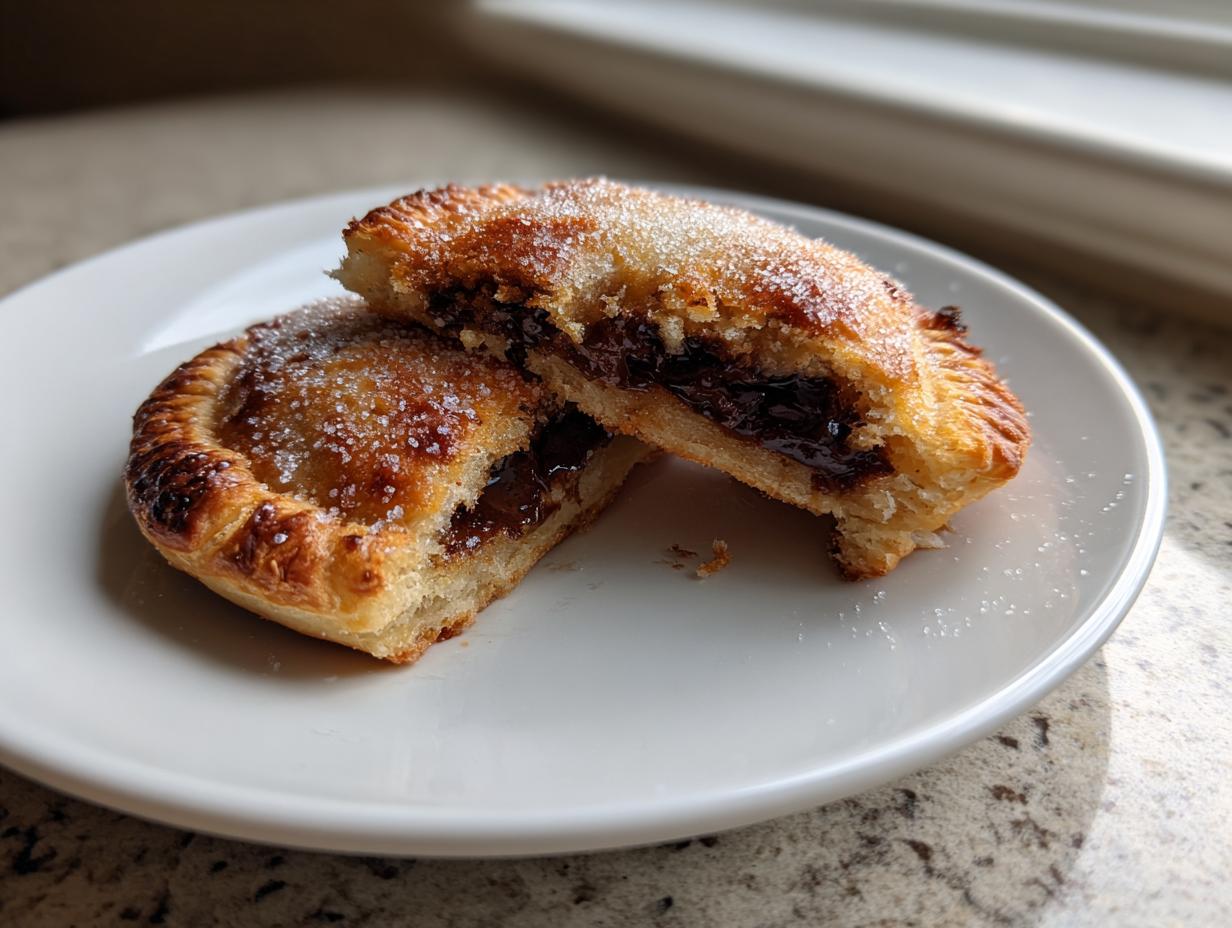
When you need something sweet right now—and I mean *right now*—you can’t beat these Nutella Toast Hand Pies. Seriously, stop what you’re doing and pay attention. This isn’t some complicated dessert that requires a trip to the specialty store. We are talking four ingredients, twenty minutes total, and the kind of crispy, gooey perfection that feels like cheating. I developed this recipe because I live for those quick baking ideas that deliver huge flavor without the fuss. Trust me, as someone who burns water half the time, if I can master these, anyone can. This is the gold standard for easy recipes to try when you’re craving a little chocolate hazelnut magic.

My Journey to the Perfect Nutella Toast Hand Pies
I used to think making a pastry meant flour everywhere and an hour of rolling dough. Oops! That’s not real life for me most weeknights. I was staring into my pantry one Tuesday, desperate for a dessert easy recipe, and I saw that jar of Nutella sitting next to the basic white bread. The lightbulb moment was instant. Why not just seal it up and bake it? The first attempt was a disaster—the filling oozed out everywhere, making a sticky, sad mess on the pan. I realized the secret wasn’t in a fancy dough; it was all about preparation. Trimming the crusts and flattening the bread just right creates the perfect little pocket. Now, these hand pies are my go-to for an easy food idea quick snack. You can find more quick snack ideas on our snacks page.
Essential Ingredients for Nutella Toast Hand Pies
You really don’t need much to make these amazing Nutella Toast Hand Pies, which is why they are such a lifesaver when you need quick baking ideas. We are relying on simple pantry staples here. The quality matters, even with just four things, because there’s nowhere for a strange flavor to hide! I always keep these on hand so I can whip up these snacks with Nutella anytime the craving hits.
The bread choice is crucial. You need soft white sandwich bread—none of that grainy, hearty stuff. We need soft, pliable material that flattens easily without cracking. Everything else is straightforward for making food to make easy snacks. If you are interested in learning more about bread basics, check out our guide on milk bread.
| Ingredient | Why It Works |
|---|---|
| Soft White Sandwich Bread | It flattens thin and seals like a dream. |
| Chocolate Hazelnut Spread (Nutella) | The gooey, decadent star of the show! |
| Unsalted Butter (Melted) | For that beautiful golden crust and a tiny bit of richness. |
| Granulated Sugar | Adds a necessary sweet crunch on top. |
Ingredient Clarity and Preparation
Let’s talk prep, because even simple ingredients need a little love. First, you absolutely must trim the crusts off the bread. Those crusts get too hard and chewy when baked, and we want a uniform, crispy edge on our hand pies. After trimming, grab your rolling pin—or even a clean wine bottle if you don’t have one handy—and gently flatten those slices until they are thin, thin, thin. Be patient; you don’t want holes!
When measuring the chocolate hazelnut spread, try to keep it to about one generous tablespoon per slice. Don’t overfill, or you’ll be cleaning Nutella off the baking sheet later! And make sure your butter is melted completely before you brush it on; cold butter won’t give you that even, golden coating we are looking for on top.
Equipment Needed for Quick Baking Ideas
You don’t need a full bakery setup for these easy recipes to try! Since we are aiming for quick baking ideas, keep your tools simple. You’ll want something to flatten the bread, which can be a rolling pin or even the side of a sturdy glass. Parchment paper is non-negotiable—it saves your pan from sticky messes.
- Baking Sheet
- Parchment Paper
- Rolling Pin (or smooth bottle)
- Pastry Brush (or silicone brush)
- Sharp Knife (for trimming)
- Fork (for sealing)
Step-by-Step Instructions for Nutella Toast Hand Pies
Okay, this is where the magic happens, and honestly, it’s faster than ordering takeout. Remember, we preheated the oven to 375 degrees Fahrenheit and lined that baking sheet with parchment paper while we prepped the bread. If you skip the parchment, you’ll spend twenty minutes scrubbing caramelized Nutella later, and trust me, you don’t want that!
Preparing the Bread and Filling
First things first: grab your soft white bread and carefully trim off those crusts. I like to do this quickly with a sharp paring knife. Once they are crust-free squares, lay them out on your clean counter. Now, take your rolling pin—or whatever heavy, smooth object you are using—and really gently start pressing down on each slice. You want them thin, almost see-through, but you have to be careful not to tear them! If you press too hard in one spot, you’ll end up with a hole, and that’s a leak waiting to happen.
Once they are flat, it’s filling time. Take four of your flattened slices and put about one tablespoon of that glorious chocolate hazelnut spread right in the center of each one. Leave a good half-inch border all the way around the edges. This border is critical; it’s what gives the fork something to grab when we seal these up. Don’t be tempted to push the filling all the way to the edge while spreading—it just melts and pushes out later!
Sealing and Finishing Your Nutella Toast Hand Pies
Take the remaining four bread slices and lay them gently over the spread-covered ones. Now, use your fork! This is the most important part for making great Nutella Toast Hand Pies. Press down firmly all the way around the perimeter, making sure those edges are sealed tight. You want a clear, crimped pattern. If you see any gaps, press again! Once they are sealed, transfer them carefully onto your prepared baking sheet.
Next, grab that melted butter and your pastry brush. Lightly paint the tops of the pies. You don’t want them swimming in butter, just a nice, thin coat. Immediately after the butter, sprinkle that granulated sugar evenly over the top. This sugar is what gives you that addictive, crispy texture that makes these so much better than just plain toast.

Baking Until Golden Brown
Get those trays into your 375°F oven. They don’t take long at all! Bake them for 10 to 12 minutes. Keep an eye on them, especially around the 10-minute mark. You are looking for a beautiful, deep golden brown color, and you should see the edges looking really crisp. If you notice one side browning faster than the other, you can quickly swap the tray halfway through, but usually, they cook quite evenly.
When they come out, pull the tray out carefully. Now, this is a note I learned the hard way: let them cool on the pan for a solid five minutes before you try to move them or bite into them. That Nutella filling is molten lava right out of the oven. Five minutes lets it set up just enough so you get that perfect warm, gooey center without burning your mouth. Enjoy your quick snack! For more dessert inspiration, check out our dessert and cakes section.
Tips for Success Making Food To Make Easy Snacks
Even though these Nutella Toast Hand Pies are super easy, a few little tricks can take them from good to absolutely perfect. If you want to avoid that dreaded filling leakage—which is the main issue with these types of food to make easy snacks—you need to pay attention to the bread preparation. My number one tip is: don’t be shy when you flatten the bread! If it’s too thick, the center won’t cook through before the edges burn, and it makes sealing much harder.
Here are a few things I always do:
- The Double Crimp: After you press the edges with the fork the first time, go around again with the tines perpendicular to the first crimp. This creates a stronger barrier against that hot filling.
- Don’t Overfill: Stick strictly to that one tablespoon of spread per slice. If you pile it high, there’s nowhere for it to go but out when the bread shrinks slightly in the oven.
- Use the Right Bread: I know I keep saying it, but you need that soft, squishy white bread. Sturdier bread, like whole wheat, doesn’t flatten properly and often cracks when you try to seal it.
Follow these steps, and you’ll have perfect, sealed pockets of chocolatey goodness every single time. These are truly the best quick baking ideas for a guaranteed win! Feel free to share your results with us on Facebook.
Storing and Reheating Your Dessert Easy Recipes
Even though these are best eaten right away—warm and crispy—sometimes you have leftovers, or maybe you want to make a batch ahead of time for a quick snack later. Since these are essentially baked sandwiches, they store pretty well! The main thing you’ll notice is that the beautiful crispiness from the sugar topping softens a bit, but the flavor is still amazing. You want to store them in an airtight container at room temperature.
Do not put them in the fridge! Refrigeration makes bread hard and stale way too fast. If you need to reheat them to bring back some of that crispy texture, the air fryer is your absolute best friend. It only takes about three minutes to revive them. For more great recipes, follow us on Pinterest.
| Storage Method | How Long They Last |
|---|---|
| Airtight Container (Room Temp) | Up to 2 days |
| Air Fryer Reheat (350°F) | 3 minutes |
| Oven Reheat (300°F) | 5-7 minutes |
Frequently Asked Questions About Nutella Toast Hand Pies
I get so many questions about these little wonders! People always want to know how to customize them or fix small mistakes, especially when trying these easy recipes to try for the first time. Here are the top things I hear about making perfect Nutella Toast Hand Pies.
Q1. Can I use something other than Nutella?
Absolutely! While the classic chocolate hazelnut spread is amazing, you can definitely swap it out. Peanut butter, Biscoff spread, or even jam work wonderfully in these snacks with Nutella’s place. Just make sure whatever you use isn’t too runny, or it might leak out during baking.
Q2. My hand pies leaked! What went wrong?
Don’t panic; this happens to everyone trying to make food ideas to make easy snacks! Usually, leakage means you either overfilled the center, or you didn’t press the edges firmly enough with the fork. The second time you go over the edges with the fork, really press hard to make a good seal.
Q3. Can I make these ahead of time?
Yes, you can assemble them entirely, even brushing with butter and sprinkling with sugar, and store them sealed in the fridge for up to a day. Bake them straight from the fridge, but you might need to add 2-3 minutes to the baking time. They are definitely one of the best dessert easy recipes for prepping a little early! You can read more of our thoughts on Medium.
Q4. What sort of bread is best for this recipe?
For the best results when looking for what to make with Nutella, stick to standard, soft white sandwich bread. It’s the softest and flattens the most evenly, which is key for a successful bake. Avoid thick-cut bread or whole-grain varieties here.
Understanding the Nutrition of Your Nutella Toast Hand Pies
Since these Nutella Toast Hand Pies are such a quick treat, sometimes we forget to think about what’s inside! Because we are using simple ingredients like bread and sugar, the nutrition is pretty straightforward. This is a decadent snack, not a health food, but knowing the basics helps when you’re planning your day. Here’s a quick look at what you can generally expect in one of these delicious, crispy pockets.
| Metric | Estimate Per Serving |
|---|---|
| Calories | 320 |
| Total Fat | 15 grams |
| Carbohydrates | 42 grams |
| Protein | 5 grams |

Amazing 4-Minute Nutella Toast Hand Pies
- Total Time: 22 minutes
- Yield: 4 hand pies
- Diet: Vegetarian
Description
Crispy Nutella toast hand pies made with sandwich bread and baked until golden. This is an easy 4 ingredient dessert ready in 20 minutes.
Ingredients
- 8 slices soft white sandwich bread
- 1 half cup chocolate hazelnut spread
- 2 tablespoons unsalted butter melted
- 2 tablespoons granulated sugar
Instructions
- Preheat the oven to 375 degrees Fahrenheit. Line a baking sheet with parchment paper.
- Trim the crusts from each slice of bread and gently flatten each slice with a rolling pin until thin but not torn.
- Spread about 1 tablespoon of chocolate hazelnut spread onto the center of four bread slices, leaving a half inch border around the edges.
- Place the remaining bread slices on top and press the edges firmly with a fork to seal all the way around.
- Brush the tops lightly with melted butter and sprinkle evenly with granulated sugar.
- Transfer the sealed pies to the prepared baking sheet and bake for 10 to 12 minutes until golden brown and crisp on the edges.
- Let cool for 5 minutes before serving. The filling will be hot.
Notes
- Press the edges firmly with a fork to prevent the filling from leaking during baking.
- Prep Time: 10 minutes
- Cook Time: 12 minutes
- Category: Dessert
- Method: Baking
- Cuisine: American