I remember the first time I tried making bread. It involved so much punching, folding, and swearing under my breath. I thought baking perfect bread was reserved for folks with fancy mixers and years of experience. Then, I stumbled upon the magic of the no-knead method, and honestly, my world changed!
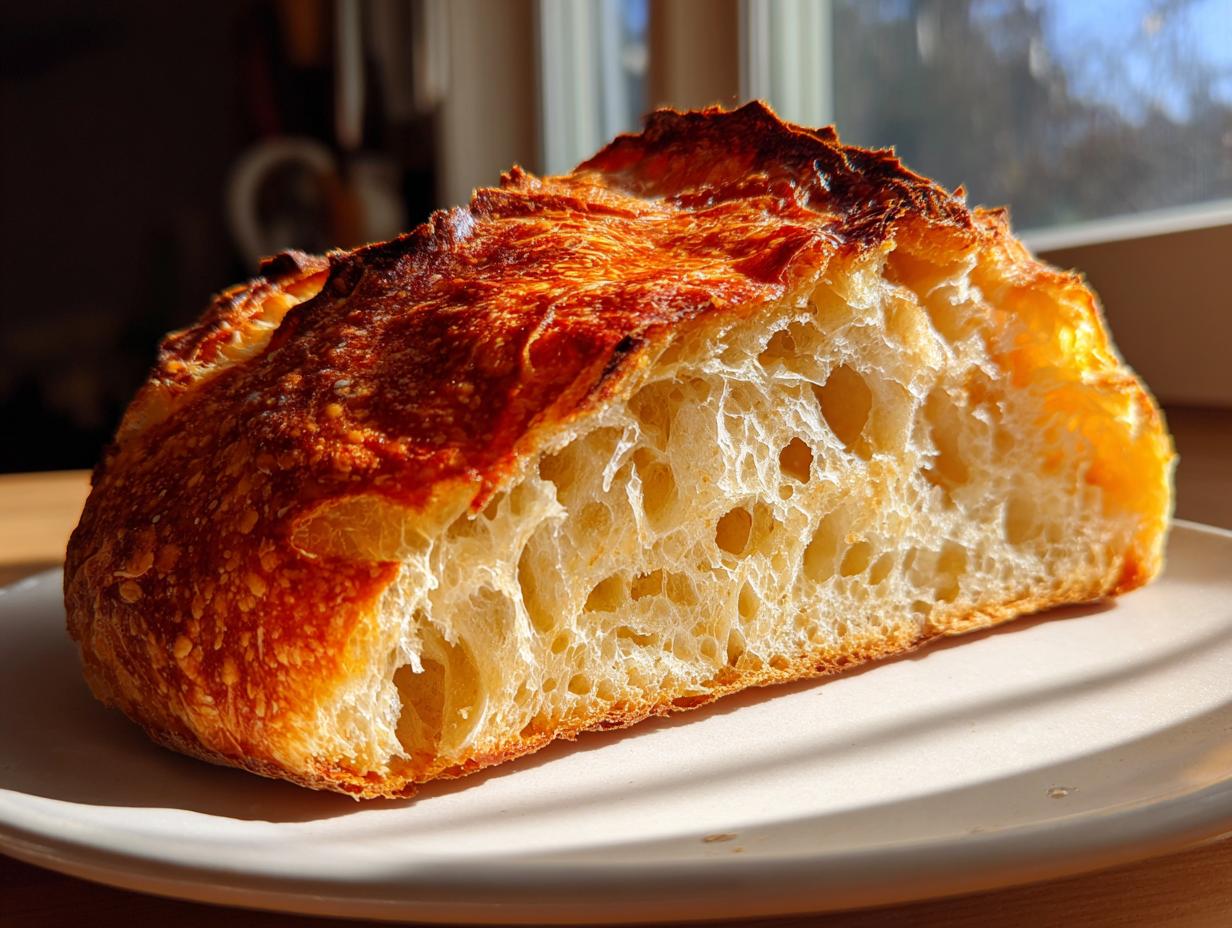
This recipe for No-Knead Dutch Oven Bread with Crispy Crust is the absolute gateway drug to baking. Seriously, it’s almost foolproof. You mix four basic things, forget about it for a few hours, and then BAM! You get this incredible, artisan-looking loaf with a shatteringly crisp crust that sounds amazing when you tap it. It’s the texture that gets me every time—that puffy, open crumb inside contrasting with that dark, crunchy shell.

When I first made this, I didn’t even own a Dutch oven; I used the heaviest stockpot I had, and it still worked! That’s the beauty of it. If I can turn humble pantry staples into bakery-quality bread, trust me, you absolutely can too. Forget the kneading; this is bread baking made easy, just waiting for you to try it. You can see more of our baking adventures on our Medium page!
Gather Your Simple Ingredients for No-Knead Dutch Oven Bread with Crispy Crust
The best part about this recipe for No-Knead Dutch Oven Bread with Crispy Crust is looking at the ingredient list. It’s short, simple, and probably everything you already have stashed away! You truly don’t need fancy things to make great bread. It’s all about the right ratios here. Don’t try to substitute anything major, especially the yeast, until you’ve mastered this basic version first. Once you see how this dough comes together with just these four items, you’ll be hooked on easy baking!
Essential Components for Your Loaf
Here is exactly what you need to gather before you even think about mixing. I always measure these out twice, just to be safe, because precision matters in baking, even when we skip the kneading!
- 3 \u00bc cups all-purpose flour or bread flour, plus more for dusting
- 1 \u00bd teaspoons fine sea salt
- 2 \u00bc teaspoons instant or active dry yeast (that’s one standard packet)
- 1 \u00bd cups warm water (make sure it’s about 100\u00b0F, not too hot!)
Step-by-Step Guide to No-Knead Dutch Oven Bread with Crispy Crust
Okay, now for the fun part—turning those simple ingredients into a beautiful loaf of No-Knead Dutch Oven Bread with Crispy Crust! Don’t worry about getting it perfect right now. The dough is supposed to look messy and sticky. That’s the secret to the fluffy inside!
Mixing the Dough and First Rise
First things first, grab your big mixing bowl. Whisk together your flour, the salt, and the yeast. Make sure they are evenly distributed—we don’t want a pocket of pure yeast sitting somewhere! Then, pour in that warm water. Remember, warm, not scalding hot, or you’ll kill your yeast, and we need those little guys working hard!
You’re just going to stir this with a wooden spoon or a sturdy spatula until it all comes together. Trust me when I say it will look weird. It should be a sticky, shaggy mess. If you try to knead it, you’ll just get dough stuck all over your hands! Once it’s combined, cover that bowl with a clean kitchen towel. Find a warm, draft-free spot in your kitchen—maybe near the stove or on top of the fridge—and just leave it alone for two to three hours. It needs to double in size and look bubbly, like it’s breathing!
Shaping and Second Rest for Your No-Knead Dutch Oven Bread with Crispy Crust
When the dough has had its long nap, it’s time to gently wake it up. Lightly flour a piece of parchment paper; this is going to be your best friend for moving the dough later! Gently scrape the dough out onto the parchment. Now, you don’t want to punch the air out of it. Just gently fold the edges toward the center a few times to form a rough ball shape. It doesn’t have to be perfect; artisanal loaves are supposed to look rustic! If you love rustic baking, check out our artisan bread recipe.
Dust the top of your dough ball lightly with a little more flour. Now, cover it again and let it rest for just 15 to 20 minutes. This short rest period is crucial while your oven gets super hot. Seriously, don’t skip this rest!
Achieving the Signature Crispy Crust Baking Method
This next step is non-negotiable if you want that amazing crust: You need to place your empty 5- or 6-quart Dutch oven, lid and all, into the cold oven. Then, set your oven to preheat to 450°F for a full 30 minutes. We need that cast iron screaming hot!
When the oven timer goes off, put on some serious oven mitts—that pot is dangerously hot! Carefully take the hot Dutch oven out and use the parchment paper handles to lower your dough right into the center. Pop the lid back on immediately. This traps the steam released by the dough, which is what creates that beautiful, oven-spring rise and a truly crispy crust. Bake it covered for 35 minutes.
After 35 minutes, take the lid off. This is where the browning happens! Let it bake uncovered for another 8 to 10 minutes until the crust is deeply golden brown. Listen for that satisfying crackle! Finally, use the parchment to lift the bread out—careful, it’s hot!—and set it on a wire rack. You must let it cool for at least 30 minutes before slicing, or you’ll just compress that beautiful crumb you worked so hard to create. For more baking tips, follow us on Pinterest!
Tips for Success with No-Knead Dutch Oven Bread with Crispy Crust
This recipe truly is simple, but a few little tricks ensure you get that incredible, bakery-worthy No-Knead Dutch Oven Bread with Crispy Crust every single time. Don’t panic if your first rise seems slow; that mostly depends on how warm your kitchen is!
- Don’t Skimp on the Preheat: I cannot stress this enough—that empty Dutch oven needs to be scorching hot. Thirty minutes at 450°F is the minimum time to get the cast iron fully saturated with heat. That initial blast of heat is what sets the crust so perfectly.
- Flour Choice Matters (A Little): While all-purpose works fine, if you have bread flour, use it! Bread flour has higher protein, which gives your loaf a slightly better structure and chew. It makes a noticeable, albeit small, difference in the final texture.
- Handle Gently During Shaping: When you move the dough onto the parchment, be gentle. We want to keep all those gas bubbles created during the long rise. If you deflate it while folding into a ball, your final loaf will be dense instead of lofty. Think of it like handling a giant, soft pillow!
- Wait to Slice: Seriously, wait the full 30 minutes on the cooling rack. If you cut into it hot, the steam escapes too fast, and you end up with a gummy texture inside. Patience earns you the best No-Knead Dutch Oven Bread with Crispy Crust!
Flavor Variations for Your Easy Bread
While the basic recipe is divine—seriously, just four ingredients!—sometimes you want to jazz things up a little bit. Since this dough relies on a very specific hydration level, we can’t swap out tons of liquid, but we can certainly add some fun mix-ins before that first long rise. This is where you can get really creative!
My favorite thing to do is add savory elements right into the dry mix. If you have some dried herbs like rosemary or thyme lying around, toss in a tablespoon before you add the water. It smells incredible while it bakes! Another winner, especially if you are serving this with soup, is grated Parmesan cheese. About a quarter cup of finely grated Parmesan mixed right in adds this salty, nutty complexity that is just heavenly. If you enjoy savory bakes, you might also like our caramelized onion and goat cheese tart.
You could also try adding a teaspoon of garlic powder to the dry ingredients for a subtle savory note. Just remember, whatever you add should be dry, or you’ll mess up the water ratio. Keep it simple, keep it tasty!
Storing and Reheating Your Delicious Loaf
If you manage to have any leftover bread—and honestly, I usually don’t—storing it correctly is key to keeping that fantastic crispy crust. This bread is best eaten the day it’s baked, but it holds up surprisingly well. Never put it in the refrigerator! That humidity will turn your beautiful crust soggy almost instantly.
Instead, just wrap the cooled loaf tightly in plastic wrap or put it in a large zip-top bag at room temperature. If you want to bring that fresh-from-the-oven crunch back, you have to reheat it properly. A quick zap in the microwave is the enemy here; we need dry heat to revive the crust.
Storage and Reheating Table
| Storage Method | Duration | Reheating Instructions |
|---|---|---|
| Room Temperature (Airtight Bag) | Up to 3 days | Wrap loosely in foil and bake at 350°F for 5-7 minutes. |
| Freezer (Well Wrapped) | Up to 3 months | Thaw completely on the counter, then reheat using the foil method above. |

Frequently Asked Questions About No-Knead Dutch Oven Bread with Crispy Crust
I get so many questions about this recipe because people are amazed at how easy it is to get a perfect loaf of No-Knead Dutch Oven Bread with Crispy Crust. Don’t worry if your first attempt looks a little different; bread is forgiving!
Q1. My dough didn’t double in size after 2 hours. Should I add more yeast?
Nope! Don’t add more yeast. The rise time is super dependent on how warm your kitchen is. If it’s cold, it might need 3 or even 4 hours. Just keep it covered in a warm spot until it looks visibly much bigger and bubbly. Patience is the main ingredient here!
Q2. Can I use a regular stockpot instead of a Dutch oven?
Yes, absolutely! I did that for ages. The key is that whatever you use must have a tight-fitting lid and be oven-safe up to 450°F. The Dutch oven is just great because it holds heat so well, which helps achieve that signature crispy crust.
Q3. What if I only have active dry yeast, not instant?
That’s totally fine. If you use active dry yeast, you just need to “proof” it first. Mix the yeast with the warm water and let it sit for about 5 to 10 minutes until it gets foamy before adding it to the flour mix. Once it’s foamy, you proceed exactly as written!
Q4. Why is my crust not as dark or crispy as yours?
Usually, this comes down to oven temperature or not enough steam. Make sure you preheat that empty pot for the full 30 minutes. Also, make sure you take the lid off for the final 8 to 10 minutes of baking so the moisture can escape and the crust can dry out and crisp up.
Share Your Baking Journey
I am so excited for you to try this bread! Seriously, once you pull that piping hot loaf out of the oven, you have to let me know how it went. Did you get that amazing crackle on the crust? Did your family devour it in five minutes flat? Don’t be shy—drop a comment below with your results or even a star rating so I know what magic you created in your kitchen! You can also connect with us on Facebook!
Print
Amazing No-Knead Dutch Oven Bread with Crispy Crust
- Total Time: 55 minutes plus rise time
- Yield: 1 large loaf
- Diet: Vegetarian
Description
Easy no-knead Dutch oven bread with a crisp crust and fluffy crumb. Just mix, rise, and bake — no kneading or fancy tools needed.
Ingredients
- 3 ¼ cups all-purpose flour or bread flour, plus more for dusting
- 1 ½ teaspoons fine sea salt
- 2 ¼ teaspoons instant or active dry yeast (1 packet)
- 1 ½ cups warm water (about 100°F)
Instructions
- In a large mixing bowl, whisk together flour, salt, and yeast.
- Pour in warm water and stir with a wooden spoon or spatula until a sticky, shaggy dough forms.
- Cover the bowl with a clean kitchen towel and let rise in a warm spot for 2 to 3 hours, until doubled in size and bubbly.
- Lightly flour a piece of parchment paper.
- Use a spatula to scrape the dough onto the parchment. Gently fold the edges toward the center to form a rough ball.
- Dust lightly with flour and let rest for 15 to 20 minutes while the oven preheats.
- Place a 5- or 6-quart Dutch oven (with lid) in your oven and preheat to 450°F for 30 minutes.
- Carefully remove the hot Dutch oven and place the parchment paper with the dough inside.
- Cover with the lid and bake for 35 minutes.
- Remove the lid and bake another 8 to 10 minutes until the crust is deeply golden and crisp.
- Lift the bread out using the parchment and let cool on a wire rack for at least 30 minutes before slicing.
Notes
- For extra flavor, mix in 1 tablespoon chopped herbs or ¼ cup grated parmesan before the first rise.
- Prep Time: 10 minutes
- Cook Time: 45 minutes
- Category: Baking
- Method: Dutch Oven
- Cuisine: American