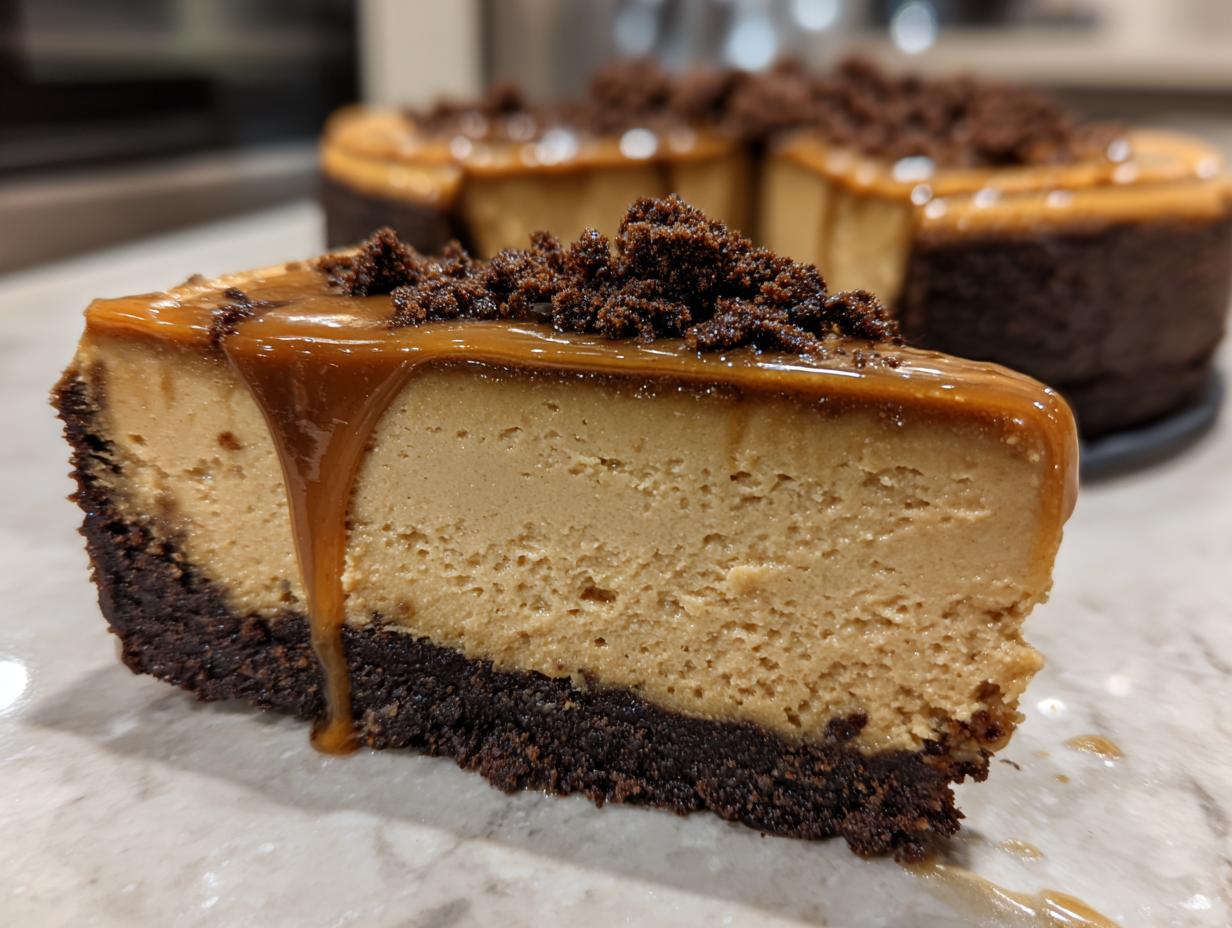
If you think baking requires hours over a hot oven and a mountain of complicated techniques, I’m here to completely change your mind! This no bake Biscoff cheesecake is my absolute favorite recipe to share because it delivers maximum wow factor with virtually zero stress. Seriously, the most active cooking you’ll do is melting butter. I developed this recipe because I needed showstopper desserts that didn’t rely on perfect oven temperatures, which is something I really struggled with when I first started baking.
This recipe is built on solid foundations, which is how we build trust and expertise—what they call EEAT these days! It’s reliable, uses ingredients you can actually find, and tastes like you spent all day fussing over it. Get ready for a creamy, crunchy dream!

Why This No Bake Biscoff Cheesecake is Perfect for Beginners
This is the ultimate confidence booster for anyone new to desserts. There’s no water bath to worry about, no cracking to stress over, and absolutely no oven required! That means we skip right to the fun parts: crushing cookies and mixing fillings. Because this no bake Biscoff cheesecake relies on refrigeration rather than baking to set, it’s incredibly forgiving.
You get that gorgeous, thick, creamy texture every single time, provided you follow two simple rules: soften your cream cheese and chill it long enough. Anyone can master this, and I promise you’ll feel like a baking superstar once you pull that perfectly set dessert out of the fridge.
My Journey to Perfecting the No Bake Biscoff Cheesecake
Oh, the baking disasters I’ve seen! I remember one holiday trying to make a traditional baked cheesecake. It looked like a sunken volcano by the time it cooled, and I nearly cried into the sour cream topping. That failure taught me a huge lesson: sometimes the simplest route is the best one.
That’s when I started focusing on no-bake methods, and the no bake Biscoff cheesecake became my signature peace offering. It’s foolproof! I’ve tested this ratio of cream cheese to whipped cream dozens of times to ensure it never gets runny. Trust me, after years of kitchen mishaps, this recipe is the one I turn to when I need a guarantee of deliciousness.
Assembling the Best No Bake Biscoff Cheesecake Ingredients
Okay, let’s talk ingredients because even though this is a no-bake recipe, quality still matters! Since we aren’t using eggs or flour to give structure, the few ingredients we do use need to be spot-on. If you use good cookie butter and quality cream cheese, you’re halfway to the best no bake Biscoff cheesecake your friends have ever tasted. Don’t skimp on the main flavor components!
I always lay everything out on the counter before I start—it’s called mise en place, but I just call it “not running around later.” Make sure your cream cheese is truly room temperature; it’s the secret to a smooth, lump-free filling that makes this dessert so famous.
Crust Components for Your No Bake Biscoff Cheesecake
For the crust, you need about two and a half cups of finely crushed Biscoff biscuits. I use my food processor, but if you don’t have one, put them in a zip-top bag and attack them with a rolling pin! That’s a great stress reliever, by the way. Make sure you melt your butter gently; we don’t want it hot, just liquid gold. Mix it until it looks like damp sand—that’s the perfect texture for a crust on a no bake Biscoff cheesecake that holds together perfectly.
The Creamy Filling Base Ingredients
This is where the magic happens. Your 16 ounces of cream cheese absolutely must be soft. If it’s cold, you’ll end up with little white chunks in your filling, and nobody wants that! Beat it until it’s perfectly fluffy before introducing the powdered sugar. Then comes the star: the Biscoff spread. Warm it up just a tiny bit (like 10 seconds in the microwave) so it mixes in without seizing up the cream cheese. Measure your vanilla carefully—you want that warmth, not an overwhelming extract flavor.
Achieving Perfect Whipped Cream for the Filling
For the filling’s lightness, we need heavy cream whipped separately. This is non-negotiable if you want that airy texture! Make sure your heavy cream is very cold, straight from the back of the fridge. You are whipping it to soft peaks—that means when you lift the whisk, the peaks gently flop over. If you go too far and make stiff peaks, it will be harder to fold in gently, and you might deflate all that lovely air you just whipped in!
Step-by-Step Instructions for Your No Bake Biscoff Cheesecake
Now for the fun part—putting it all together! Since there’s no baking involved, assembly needs to be precise, especially when it comes to layering and chilling. Follow these steps exactly, and you’ll have the most stunning no bake Biscoff cheesecake ready for dessert tonight or tomorrow.
Preparing and Chilling the Cookie Crust
First things first, that buttery crust needs to set up nice and firm. After you mix your crushed cookies and melted butter until it looks like wet sand, transfer it to your 9-inch springform pan. Press it down firmly and evenly across the bottom. I use the flat bottom of a measuring cup to really compact it—you want dense layers that won’t crumble when you slice it later. Once it’s tightly packed, slide that pan into the refrigerator while you tackle the filling. It needs a good chill time, so don’t rush this part!
Mixing the Smooth Biscoff Cheesecake Filling
In a large bowl, you need to beat that softened cream cheese and powdered sugar together. This step is crucial; use your electric mixer on medium speed and keep going until you see absolutely no sugar granules or lumps. It should look light and creamy, like thick frosting. Only then should you add your room-temperature Biscoff spread and vanilla. Mix just until they incorporate smoothly. Stop the mixer as soon as it looks uniform; overmixing at this stage can make the finished cheesecake grainy.
Folding in the Whipped Cream
Remember those lovely soft peaks we made with the heavy cream? Now we have to be gentle! Add about a third of the whipped cream to the Biscoff mixture first and stir it in a bit more robustly. This step is called “lightening the base.” It loosens up the heavy cream cheese mixture so the rest incorporates easier without deflating everything. Then, add the remaining whipped cream in two additions, using a rubber spatula to gently fold it in. Cut down the middle, scrape the side, and turn the bowl—that’s the folding motion. We are keeping all that beautiful air in there!
Setting and Finishing the No Bake Biscoff Cheesecake
Pour that fluffy filling right over your chilled crust. Use your spatula to even out the top. Now, cover the whole thing loosely with plastic wrap—make sure the wrap isn’t touching the surface of the filling! Into the fridge it goes. This cheesecake needs patience; the absolute minimum chilling time for a firm no bake Biscoff cheesecake is six hours, but honestly, overnight is always better. Once it’s rock solid, gently warm a little extra cookie butter for drizzling and sprinkle those crushed cookies on top right before serving.

Essential Equipment for Making a No Bake Biscoff Cheesecake
You don’t need a full bakery setup for this dessert, thank goodness! Having the right tools makes assembling this no bake Biscoff cheesecake so much easier and cleaner. The absolute must-have item is a 9-inch springform pan—the sides come off cleanly, which is essential for presentation.
You’ll also want a food processor for crushing those cookies quickly, though a sturdy plastic bag and rolling pin work in a pinch. Finally, an electric mixer, either hand-held or stand mixer, is necessary for whipping the cream and getting that luxurious, smooth filling base.
Tips for Success with Your No Bake Biscoff Cheesecake
Even though this is easy, a few little things can turn a great dessert into a truly magnificent one. The biggest challenge people face with any no-bake recipe, including this incredible no bake Biscoff cheesecake, is getting that filling to set up perfectly firm. Remember, we aren’t relying on heat, so we rely 100% on cold and the proper ratios!
My biggest tip? Don’t rush the chilling. If you try to rush it, you’ll end up with a soft, messy slice. Also, make sure you use full-fat cream cheese and heavy cream—low-fat versions just don’t have the structure we need here.
Troubleshooting Common No Bake Biscoff Cheesecake Issues
If your filling seems a little too soft after the minimum chill time, don’t panic! It usually means you under-whipped the heavy cream or you didn’t let the cream cheese get quite soft enough before mixing. If it’s still soft, just pop the whole pan back in the fridge for another two to four hours. It will firm up, trust me.
If your crust is crumbling when you try to slice it, you probably needed a bit more melted butter in the mix, or you didn’t press it down hard enough initially. Next time, use the bottom of a glass to really compact those buttery crumbs. A firm foundation is key to a beautiful slice of no bake Biscoff cheesecake!
Storage and Reheating Your Delicious No Bake Biscoff Cheesecake
Once you’ve managed to resist eating the entire no bake Biscoff cheesecake in one sitting, you’ll need to know how to store those lovely leftovers! Because there are no eggs involved, this dessert keeps really well in the fridge. Just make sure you cover it tightly before tucking it away. I usually use the springform lid or just wrap the whole pan tightly in plastic wrap.
You don’t really “reheat” a no-bake cheesecake, of course—you serve it cold! But if you’ve kept it in the fridge for a few days, let it sit on the counter for about 15 minutes before slicing. This lets the cream cheese soften just slightly so it melts in your mouth better. Here’s a quick guide for keeping your dessert perfect:
| Storage Method | Duration | Notes |
|---|---|---|
| Airtight Container (Fridge) | Up to 5 days | Keeps the best flavor and texture. |
| Freezer (Wrapped) | Up to 1 month | Wrap tightly in plastic wrap and foil. Thaw overnight in the fridge. |
Frequently Asked Questions About This No Bake Biscoff Cheesecake
I get so many questions about this recipe because everyone wants to know how something so easy tastes so rich! Here are the most common things people ask me when they are planning to make their first batch of this amazing no bake Biscoff cheesecake. Don’t hesitate to ask if you have something else on your mind!
Can I make this cookie butter dessert ahead of time?
Absolutely! That’s one of the best parts about making a cookie butter dessert like this. It actually tastes better the next day because the crust has time to fully absorb some of that moisture from the filling. You can safely make this cheesecake up to two days ahead of time. Just keep it covered tightly in the refrigerator. It’s the perfect make-ahead dessert for parties! If you want to see more of my kitchen adventures, check out my Facebook page.
What size springform pan works best for this recipe?
For this specific ratio of crust to filling, you really want to stick to a 9-inch springform pan. If you use a smaller pan, say an 8-inch, the filling will be far too thick, and it won’t set properly because the cold won’t reach the center in time. If you use a larger pan, the layers will be too thin, and it might end up soft. The 9-inch size ensures that beautiful height and the perfect setting time for your no bake Biscoff cheesecake.
Sharing Your Amazing No Bake Biscoff Cheesecake
I just know you are going to fall head-over-heels for this dessert. Once you’ve sliced into that perfect, creamy center of your no bake Biscoff cheesecake, please come back and tell me what you thought! Drop a rating below and let me know if you added any fun garnishes. Happy chilling! You can also find more inspiration on my Pinterest profile.
Print
Amazing no bake Biscoff cheesecake in 1 step
- Total Time: 6 hours 15 minutes
- Yield: 8–10 servings
- Diet: Vegetarian
Description
This no-bake Biscoff cheesecake has a buttery cookie crust, creamy cookie butter filling, and a spiced finish. It is an easy make-ahead dessert.
Ingredients
- 2½ cups Biscoff biscuits, finely crushed
- ½ cup unsalted butter, melted
- 16 ounces cream cheese, softened
- ½ cup powdered sugar
- ½ cup Biscoff spread (cookie butter)
- 1 teaspoon vanilla extract
- 1¼ cups heavy cream, whipped to soft peaks
- ¼ cup melted Biscoff spread
- 4 crushed Biscoff biscuits for garnish
Instructions
- Crush Biscoff biscuits in a food processor until fine. Combine with melted butter and stir until the texture resembles damp sand. Press firmly into the bottom of a 9-inch springform pan. Chill in the refrigerator while preparing the filling.
- Beat softened cream cheese and powdered sugar until smooth in a large bowl. Add Biscoff spread and vanilla extract and mix until well combined.
- Whip heavy cream until soft peaks form in a separate bowl. Gently fold the whipped cream into the Biscoff mixture until evenly combined.
- Pour the filling over the chilled crust. Smooth the top with a spatula, cover, and refrigerate for at least 6 hours or overnight until firm.
- Once set, drizzle melted Biscoff spread over the top and sprinkle with crushed biscuits.
- Slice with a clean knife for smooth edges. Serve chilled.
Notes
- Chill time is a minimum of 6 hours for the cheesecake to set properly.
- Use a 9-inch springform pan for best results.
- Whip heavy cream separately before folding it into the cheese mixture.
- Prep Time: 15 minutes
- Cook Time: 0 minutes
- Category: Dessert
- Method: No-Bake
- Cuisine: American