Forget those sad little packets and lukewarm mugs! If you’re looking for the absolute showstopper dessert that requires minimal actual cooking but delivers maximum wow factor, you’ve landed in the right spot. We’re building the ultimate Hot Chocolate Charcuterie Board, and trust me, this isn’t just cocoa; it’s an entire interactive experience. My secret? It’s all about that unbelievably rich, velvety base and giving everyone the power to build their dream cup. It’s what we pull out for every big game or rainy weekend now!

Why This Hot Chocolate Charcuterie Board Is Your New Favorite Dessert
Honestly, I used to dread making desserts for parties because they always ended up messy or disappointing. But this board changed everything! It’s the perfect centerpiece because it lets everyone customize their own treat. You just make one amazing pot of chocolate, and the fun starts there. It’s practically foolproof, which I love!
Here’s why I think you’ll be making this Hot Chocolate Charcuterie Board all winter long:
- It’s quick and simple assembly for a dramatic presentation. You spend five minutes cooking and the rest of the time just arranging things beautifully!
- It’s completely customizable for every guest’s preference—no more fighting over who gets the last peppermint topping.
- We use rich, creamy homemade Italian-style hot chocolate, which tastes miles better than anything from a can.
- It’s the perfect centerpiece for gatherings, especially movie nights or holiday get-togethers.
Essential Components for Your Hot Chocolate Charcuterie Board
Okay, before you even think about setting out the marshmallows, we need to talk about the foundation of your Hot Chocolate Charcuterie Board. Getting the quality right here makes all the difference between a good cup and a truly decadent one. It’s about setting yourself up for success!
Gathering Ingredients for the Homemade Hot Chocolate Charcuterie Board
You can’t skimp on the chocolate! Seriously, pay attention to this part. I always grab high-quality dark chocolate, and I mean it—aim for at least 65% cacao. That richer flavor cuts through the sweetness perfectly. Also, when you mix your cocoa powder and sugar, you absolutely must sift them together first. If you skip this, you’ll end up with little hard lumps in your smooth base. Trust me, sifting is non-negotiable for that velvety mouthfeel.
Necessary Equipment for Assembling the Hot Chocolate Charcuterie Board
Presentation matters here, so ditch the small cutting board. You need space to spread out! I recommend using a large wooden board or platter that’s at least 15 inches across so everything looks abundant. For the sauces like caramel and syrup, don’t just pour them straight onto the board. Grab some tiny glass jars or little ramekins. They look adorable and keep the board tidy while making drizzling easy for everyone.
Step-by-Step Instructions for the Hot Chocolate Charcuterie Board
Now for the fun part—turning those beautiful ingredients into the best movie night spread ever! We’re going to tackle the hot chocolate first, because that needs a few minutes to get perfectly velvety. Then, we’ll arrange everything so your Hot Chocolate Charcuterie Board looks like it belongs in a magazine!
Preparing the Velvety Hot Chocolate Base
Start by getting your milk warm. Pour the six cups of whole milk into your biggest saucepan and put it over medium heat. You just want a gentle simmer—don’t let it go crazy boiling! While that’s heating up, grab a separate small bowl. Sift your confectioners sugar and cocoa powder together, then whisk in that flaky sea salt. Sifting is key here, remember?
Once the milk is simmering nicely, drop the heat way down to low. Now, whisk in your sifted cocoa mix, the vanilla extract, and all that gorgeous chopped dark chocolate we talked about. This is where you need to pay attention! Whisk continuously. You need to keep everything moving until that chocolate is totally melted and the mixture thickens up a bit—it should look velvety smooth. This usually takes about two minutes of dedicated swirling. Don’t walk away!
Once it’s smooth and luxurious, take the pan off the heat. The secret to keeping it perfect for serving is transferring it immediately to your slow cooker. Set that slow cooker to the ‘Warm’ setting. This keeps the base hot and ready without scorching it while everyone piles their toppings on.
Arranging the Hot Chocolate Charcuterie Board Components
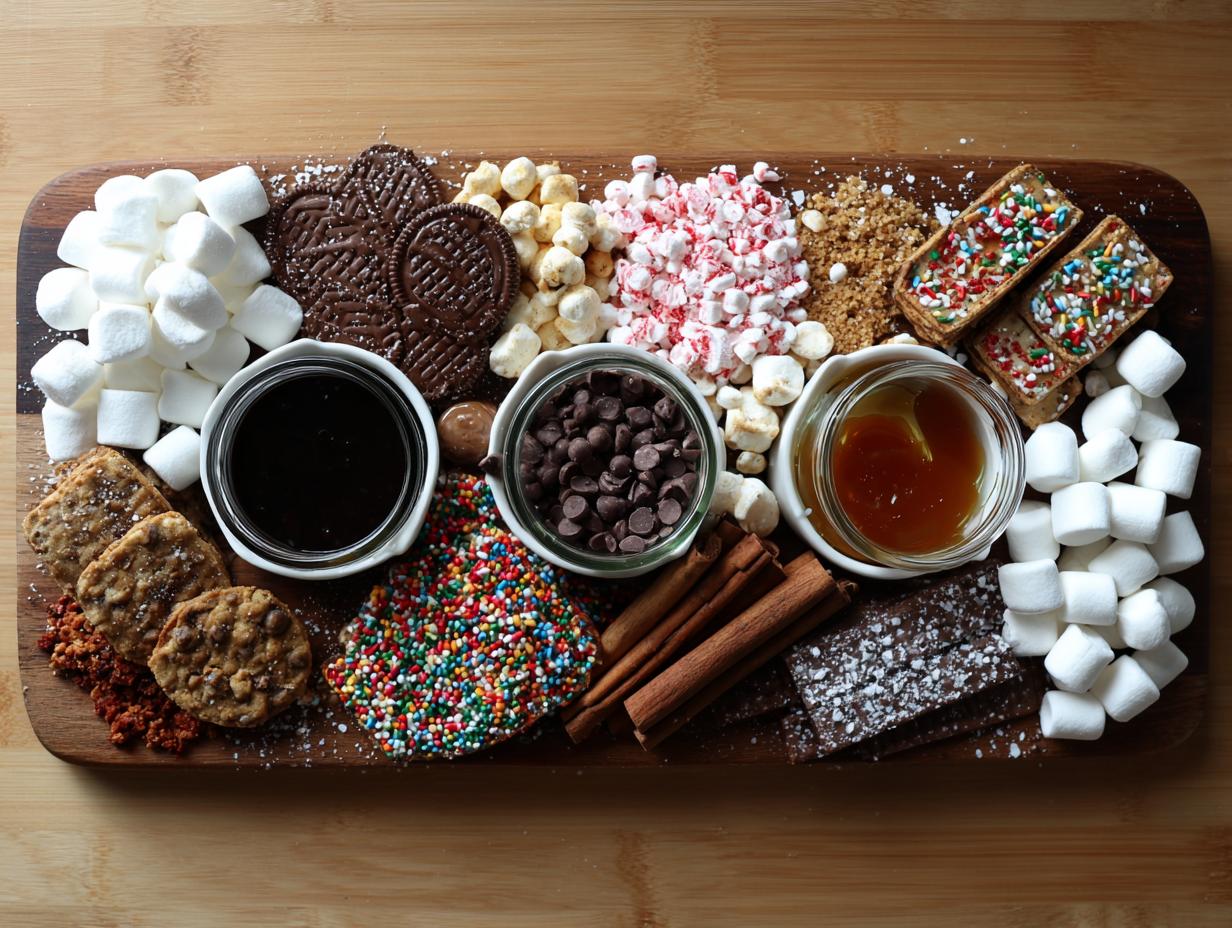
Time to build the visual magic for your Hot Chocolate Charcuterie Board! Start with the foundation. Grab three small bowls or mugs and fill them up. I put the mini marshmallows in one, the crushed candy canes in the second, and the chocolate chips (both semi-sweet and white) mixed together in the third. These are your main dipping stations.
Next, tackle the sauces. Pour your caramel sauce and chocolate syrup into those little pre-portioned jars you set aside. Place these jars strategically on the board. Then, make your cookies look tall and inviting—stand the Milano cookies and the wafer cookies upright leaning against the sauce jars or the bowls. Cluster those big, fluffy marshmallows together in a separate pile for height!
Don’t forget the cinnamon sticks; tie a few together with kitchen twine and lay them on the board like little rustic decorations. Finally, fill in all those awkward little gaps you have left on the platter. Tuck in the peppermint chocolate squares and sprinkle your assorted sprinkles everywhere! It should look abundant and overflowing. Place your mugs and spoons nearby, and you are done!

Expert Tips for a Perfect Hot Chocolate Charcuterie Board
Putting together this spread is an art, but keeping it perfect while people are actually eating it is the real challenge! I’ve learned a few tricks over the years to make sure the hot chocolate stays warm and the board looks just as good an hour later as it did when I first set it out on the table. These little details are what make your Hot Chocolate Charcuterie Board truly successful.
Maintaining Temperature and Freshness on the Hot Chocolate Charcuterie Board
Since the base is in the slow cooker on ‘Warm,’ you still need to babysit it just a little bit. I make a point to stir the hot chocolate every 15 minutes. This just prevents any tiny skin from forming on top and keeps the chocolate evenly distributed. If you’re prepping the board ahead of time—say, while the kids are finishing dinner—cover the whole thing loosely with plastic wrap. It keeps the air from drying out those beautiful marshmallows and keeps dust off, but don’t seal it tight, or condensation will make your cookies soggy!
Ingredient Notes and Substitutions for Your Hot Chocolate Charcuterie Board
If you can’t find that 65% cacao chocolate, don’t panic! You can absolutely use a slightly sweeter milk chocolate, but maybe cut back on the confectioners sugar by about a quarter cup, just so it doesn’t become too sweet overall. The rich dark chocolate is my favorite because it mimics that authentic Italian style, but use what you love! For the cookies, if you don’t have Milano cookies, shortbread works wonderfully, or even those little chocolate-covered graham crackers. The key is variety in texture for your Hot Chocolate Charcuterie Board—you want something crunchy, something soft, and something dunkable!
Frequently Asked Questions About the Hot Chocolate Charcuterie Board
Can I Make the Hot Chocolate Ahead of Time for the Hot Chocolate Charcuterie Board?
Oh yes, you totally can! That’s one of the best parts about this recipe. My notes say you can make the hot chocolate base up to a week ahead of time and just store it in the fridge. When you’re ready to serve, just transfer it to the slow cooker and let it warm up slowly on the ‘Warm’ setting. If you happen to have leftovers after the party, you can actually freeze the extra hot chocolate for up to three months. Talk about planning ahead!
What is the best way to serve this interactive dessert?
The whole point of this Hot Chocolate Charcuterie Board is the assembly line fun! The best way is to have small mugs ready right next to the board. Guests grab a mug, ladle in some of that warm, rich chocolate from the slow cooker, and then they go wild grabbing toppings. Make sure you put small spoons right on the board, maybe tucked into the sprinkle jar, so people can scoop up those little bits of candy cane or chocolate chips when their mug is almost empty! If you want to see more of our fun recipes, check out our Facebook page.
How long can the Hot Chocolate Charcuterie Board stay out?
Since the base is being kept warm in the slow cooker, it’s good to serve within about two hours. After that, you risk the texture changing. The dry toppings—the cookies, the marshmallows, the sprinkles—are fine at room temperature for hours, of course. But for safety and best texture, I wouldn’t leave the warm chocolate base sitting out for much longer than two hours. If you have leftovers, remember you can freeze the base, but the cookies might get a little soft if they sit too close to the warm chocolate for too long!
Storing and Reheating Leftover Hot Chocolate Charcuterie Board Elements
It’s rare that we have leftovers because everyone dives in, but if you do manage to save some of that amazing chocolate base, cleanup is surprisingly easy. The dry mix components are super easy to save for another night, too! I always keep a little log of what I saved so I know exactly how long things will last. It’s nice knowing you have a secret stash for a surprise cozy night in! If you enjoy finding new ideas, you might want to check out our Pinterest profile.
Here’s a quick guide on how to tuck away what’s left:
| Item | Storage Time | Reheating Tip |
|---|---|---|
| Hot Chocolate Base | Up to 1 week refrigerated | Gently reheat on the stovetop over low heat, stirring often. |
| Dry Mix Ingredients (Cocoa/Sugar/Salt) | Up to 3 months sealed | Use as normal in the next batch! |
| Leftover Base | Up to 3 months frozen | Thaw overnight in the fridge before warming. |
Share Your Hot Chocolate Charcuterie Board Creation
I absolutely love seeing how you all arrange your spreads! Seriously, send me pictures! It makes my day to know my favorite movie night staple is showing up at your house, too. For more behind-the-scenes looks, follow us on Medium.
Rate This Hot Chocolate Charcuterie Board Recipe
If you tried this recipe out, please leave me a rating below. Let me know which topping was the biggest hit at your gathering, or if you tried any wild substitutions that actually worked! Your feedback helps other cooks get excited to try this too.
Share Your Hot Chocolate Charcuterie Board Creation
I absolutely love seeing how you all arrange your spreads! Seriously, send me pictures! It makes my day to know my favorite movie night staple is showing up at your house, too.
Rate This Hot Chocolate Charcuterie Board Recipe
If you tried this recipe out, please leave me a rating below. Let me know which topping was the biggest hit at your gathering, or if you tried any wild substitutions that actually worked! Your feedback helps other cooks get excited to try this too.
Print
7 Amazing Hot Chocolate Charcuterie Board Secrets
- Total Time: 15 minutes
- Yield: 6 servings
- Diet: Omnivore
Description
This interactive dessert board features rich, creamy homemade Italian-style hot chocolate with an array of marshmallows, cookies, candies, and toppings, making it a fun, customizable spread perfect for movie nights.
Ingredients
- 6 cups whole milk
- 1 cup confectioners sugar
- 3/4 cup unsweetened cocoa powder
- 1 1/2 teaspoons flaky sea salt
- 1 1/2 teaspoons pure vanilla extract
- 18 ounces dark chocolate, chopped into small pieces
- 2 cups mini marshmallows
- 20 large marshmallows
- 1/2 cup semi-sweet chocolate chips
- 1/2 cup white chocolate chips
- 1/2 cup crushed candy canes
- 1/3 cup caramel sauce
- 1/3 cup chocolate syrup
- 12 Milano cookies
- 8 chocolate covered wafer cookies
- 10 peppermint chocolate squares
- 1 cup whipped cream
- 6 cinnamon sticks
- Assorted sprinkles
Instructions
- Place whole milk in a large saucepan over medium heat and bring to a gentle simmer, stirring occasionally.
- Sift confectioners sugar and cocoa powder together into a small bowl, then whisk in the flaky sea salt.
- Reduce heat to low and add the cocoa mixture, vanilla extract, and chopped dark chocolate to the simmering milk.
- Whisk continuously until all chocolate melts and the mixture thickens to a velvety consistency, about 2 minutes.
- Transfer the hot chocolate to a slow cooker set on the warm setting.
- Arrange three small bowls or mugs on a large wooden board or serving platter.
- Fill the bowls with mini marshmallows, crushed candy canes, and chocolate chips.
- Arrange remaining items around the bowls appealingly: place caramel and chocolate syrup in small jars, stand cookies upright, cluster large marshmallows, bundle cinnamon sticks, and fill gaps with peppermint squares and sprinkles.
- Place mugs, small spoons, and napkins nearby for serving.
Notes
- Use high-quality dark chocolate with at least 65% cacao for the best flavor.
- Keep hot chocolate warm in a slow cooker on the lowest setting, stirring every 15 minutes.
- Cover the assembled board with plastic wrap if making ahead to prevent marshmallows from drying out.
- Use a large wooden board or platter at least 15 inches across.
- Pre-portion syrup and caramel sauce into small glass jars with spoons for easy drizzling.
- Hot chocolate can be made up to 1 week ahead and stored in the refrigerator.
- Leftover hot chocolate can be frozen for up to 3 months.
- Dry hot chocolate mix ingredients can be combined and stored for up to 3 months.
- Prep Time: 10 minutes
- Cook Time: 5 minutes
- Category: Dessert
- Method: Stovetop and Assembly
- Cuisine: American