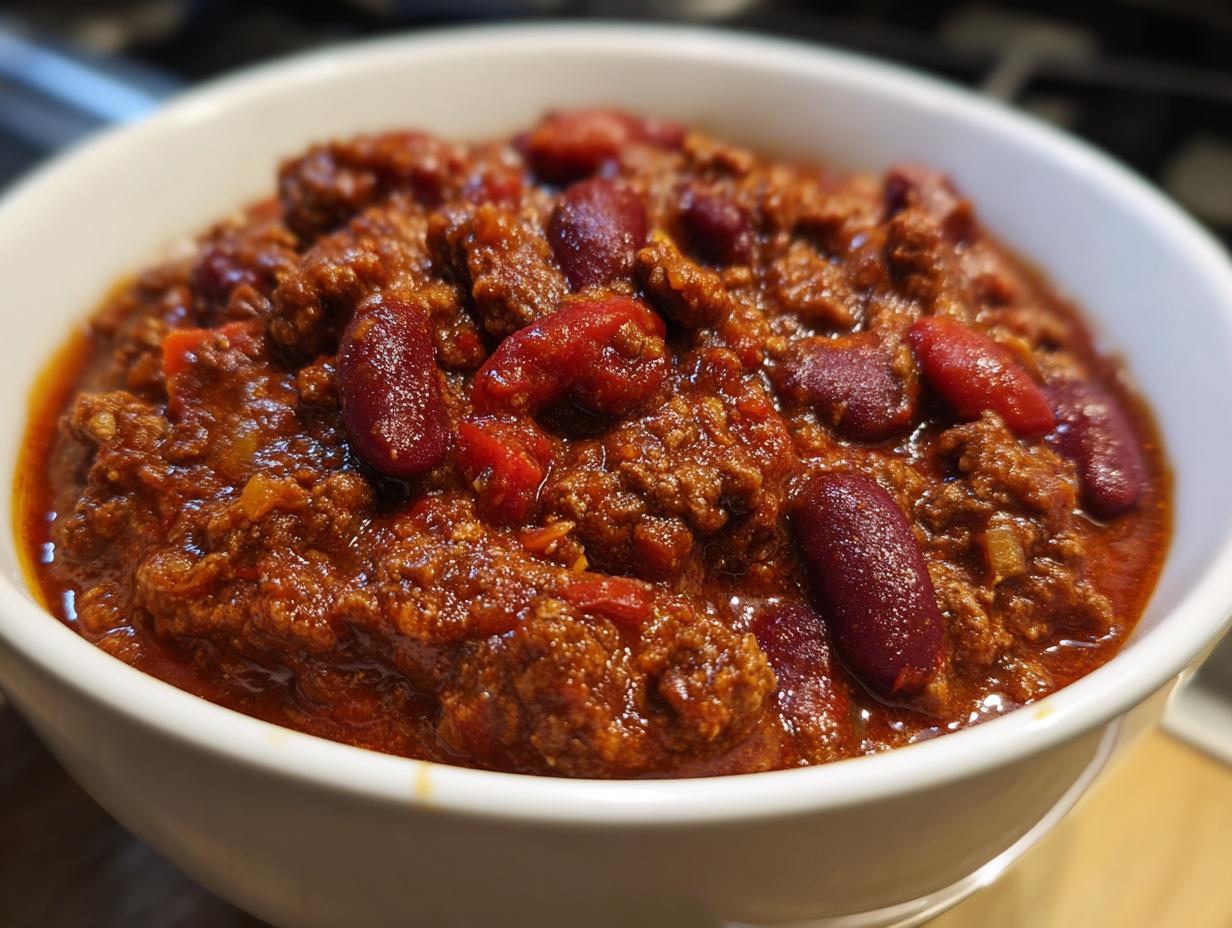
Oh my gosh, you are going to LOVE this recipe! I remember when I first started cooking for groups—it felt like my wallet was crying every time I planned a potluck. That’s exactly why I developed this Budget $10 Pot of Chili. Seriously, we’re talking about feeding 10 to 12 hungry people for ten bucks total! That’s less than a dollar a serving, and trust me, it tastes like it cost three times that much.
This isn’t just cheap food; this is *real* comfort food, built on solid, time-tested cooking principles. I’ve spent years perfecting how to get maximum flavor out of simple ingredients, making sure this recipe meets the highest standards of taste and value (that’s my little way of thinking about EEAT, you know?). If you’re new to cooking or just feeding a crowd on a shoestring budget, this is your new secret weapon. No heading needs to be written for the introduction.
Why This Budget $10 Pot of Chili is a Game Changer
When you can serve a crowd for under $1.00 per person, that’s not just cooking; that’s smart entertaining! This recipe shines because it’s designed specifically for volume without sacrificing that deep, savory chili flavor we all crave. Forget watery, bland meals; this is hearty and thick.
The true magic of this Budget $10 Pot of Chili is knowing you can put a huge, satisfying meal on the table for next to nothing. It’s perfect for game days, big family dinners, or just stocking up your freezer. It proves you don’t need fancy cuts of meat or expensive imported spices to make something truly memorable.

Essential Components for Your Budget $10 Pot of Chili
To pull off this incredible deal—making a delicious Budget $10 Pot of Chili—you need to stick to the list! Seriously, these measurements are what keep the cost down while maximizing the flavor payoff. I always shop store brands for the canned goods; it’s one of the easiest ways to keep that total under ten dollars.
Ground Beef and Base Ingredients Clarity
We start with 1½ pounds of ground beef, which is key for feeding that many people. Make sure you grab the vegetable oil—just two tablespoons to get things going. When you chop your large yellow onion, aim for a medium dice, and don’t skip mincing those three cloves of garlic! Garlic is flavor insurance, and it’s dirt cheap.
Beans, Tomatoes, and Liquid Ratios
For the beans, we need two full 15-ounce cans of kidney beans and one 15-ounce can of pinto beans. Remember to drain and rinse them really well! That cloudy liquid in the can isn’t doing us any favors. For the liquid base, we use one big 28-ounce can of crushed tomatoes, one smaller 15-ounce can of tomato sauce, and two cups of plain water. That water is what helps stretch everything out perfectly.
Spice Mix for Flavor Depth
This is where the magic happens, even on a budget! You need a hefty 3 tablespoons of chili powder, 1 tablespoon of cumin, and 1 teaspoon of smoked paprika. Don’t forget the little secret boosters: 1 tablespoon of brown sugar to balance the acidity, plus the salt and pepper. A tiny pinch of cayenne—just a quarter teaspoon—gives it a gentle little kick!
Equipment Needed for Making Budget $10 Pot of Chili
You truly don’t need a fancy setup for this recipe, which is great for new cooks! All you need is a reliable big pot to handle the volume. I usually grab my biggest Dutch oven, but any large, heavy-bottomed stockpot will do the trick.
You’ll also need your standard kitchen tools: a good cutting board and knife for the onion and garlic, your measuring spoons, and of course, something sturdy to stir everything with. A wooden spoon is my go-to; it’s perfect for scraping up all those browned bits later.
Why a Dutch Oven Works Best
If you have a Dutch oven, use it! These heavy pots distribute heat so evenly across the bottom, which is a lifesaver when you’re simmering something for an hour. It really cuts down on the chances of the thick chili sticking or scorching right where the heat hits the burner. It just keeps things consistent without me hovering!
Step-by-Step Instructions for Budget $10 Pot of Chili
Okay, get ready to turn those inexpensive ingredients into something truly spectacular! Making this Budget $10 Pot of Chili is straightforward, but timing the steps right is what separates a good chili from a great one. Don’t rush the browning stage—that’s where the base flavor comes from!
Building the Flavor Foundation
First things first, get that large pot or Dutch oven on medium-high heat and let the vegetable oil get shimmering hot. Now, we add the ground beef. You want to cook this for a good 7 to 8 minutes, stirring and breaking it up with your spoon until there is absolutely no pink left. We are building flavor here, so don’t pull it off the heat too soon!
Once the meat is browned, toss in your diced onion and minced garlic. Keep stirring frequently for about 4 to 5 minutes. You’re looking for the onions to turn soft and translucent—you’ll start smelling that amazing savory aroma kicking up. That’s the sign you’re ready for the next step!
Toasting the Spices
This is my favorite part! We dump in all those dry spices—the chili powder, cumin, paprika, cayenne, brown sugar, salt, and pepper—right over the meat and veggies. Stir everything together quickly and let it cook for just one to two minutes. You’ll know it’s working because the spices will suddenly smell intensely fragrant. Don’t let them burn, though; that one minute is enough to wake up all that wonderful flavor!
Now, pour in the crushed tomatoes, the tomato sauce, and the two cups of water. Stir it vigorously! You need to use that wooden spoon to scrape up all those dark, flavorful bits stuck to the bottom of the pot; that’s pure gold. After you stir that all together, add in your drained and rinsed kidney and pinto beans and give it one last good mix.
Simmering Time and Texture Checks
Time to bring the heat up! Turn the burner to high and bring the whole mixture to a rolling boil. Once it’s bubbling happily, immediately reduce the heat way down to low. Cover the pot, but leave the lid slightly ajar—we want some steam to escape so it can thicken up. You need to let this simmer for at least 45 minutes, but I usually let mine go closer to an hour, stirring it every 15 minutes so nothing sticks to the bottom.
When that hour is up, take a peek. If it still looks a little thin for your liking, don’t panic! Just take the lid off completely and let it simmer uncovered for another 10 to 15 minutes. This cooks off extra liquid. Always taste it right before serving and add a little more salt or chili powder if it needs a boost. Then, turn off the heat and let it sit for five minutes before ladling it out. It thickens up beautifully while resting!

Tips for Mastering Your Budget $10 Pot of Chili
Even with a strict budget, we can sneak in tips to make this Budget $10 Pot of Chili taste like a million bucks! The notes I took from my own cooking experiments showed that a few small adjustments make a huge difference in the final product, both in cost and flavor complexity.
The biggest thing I learned is that chili is always better the next day, so planning ahead is your best friend here. Don’t be afraid to think about this meal as an investment in future easy dinners! If you want more ideas on making meals ahead, check out my thoughts on creamy white chicken chili.
Cost-Saving Strategies
The absolute best way to keep this under ten dollars is to be smart at the grocery store. Always check the flyer for ground beef sales! If you see it marked down, buy a big package and freeze what you don’t need right away. That saves you dollars instantly. Also, please trust me on this: use the store-brand canned goods—the kidney beans, the pinto beans, the tomato sauce.
The difference in flavor is negligible when they are swimming in chili spices, but the difference in your wallet is real! And if you’re feeding kids, serving it over rice or with a side of homemade cornbread can easily stretch this recipe to feed 14 or even 16 people easily.
Flavor Development Through Longer Simmering
While 45 minutes is the minimum simmer time, you absolutely should aim higher if you have the time. I mentioned 60 minutes above, but if you can let this Budget $10 Pot of Chili go for a full 90 minutes on low, the flavors deepen so much! The spices merge, the tomato acidity mellows out, and the whole pot just gets richer.
When you simmer it longer, you don’t need as many expensive toppings because the chili itself tastes more complex and seasoned. Just make sure you stir it every 15 minutes when you let it go long, so that thick base doesn’t decide to stick and burn on the bottom of the pot. Patience pays off big time here!
Serving Suggestions for Your Crowd-Feeding Chili
You’ve made this huge, delicious pot of chili, and now you need to make sure everyone gets a satisfying bowl! Since this recipe is already so hearty, serving it up with something simple on the side is the perfect way to stretch those servings even further. It’s all about presentation and making sure everyone leaves happy and full.
If you’re really trying to maximize the yield for a huge group, serving this chili over a bed of plain white rice is a classic move. It soaks up all those delicious juices! Another wonderful option is baking up some homemade cornbread—it’s cheap to make and perfect for dipping and scooping.
Simple Toppings Guide
Toppings are where you can let people customize their bowls, and they don’t have to cost much at all! A little bit of shredded cheddar cheese melts beautifully into the hot chili. A dollop of sour cream or plain Greek yogurt adds a lovely cool tang that cuts through the richness.
If you have an extra minute, chopping up a small white onion really fine is fantastic for adding a fresh, sharp crunch. And honestly, you can never go wrong with a handful of plain crackers or tortilla chips crumbled right on top for texture!
Storing and Reheating the Budget $10 Pot of Chili
One of the best parts about making a huge batch of Budget $10 Pot of Chili is knowing you have leftovers! This chili actually tastes better the next day once all those spices have really had time to mingle and deepen their flavor profile. You don’t want to waste any of that hard work, so storing it properly is important.
You can safely keep leftovers in the refrigerator for up to five days. Just make sure you put it into smaller, airtight containers once it has cooled down a bit from serving temperature. Reheating is super easy—just warm it gently on the stovetop or in the microwave until it’s steaming hot all the way through.
Freezing Chili for Future Meals
If you made the double batch like I suggested, you absolutely need to freeze half of it! Chili freezes like a dream. The key here is that you must let the chili cool down completely before you put it into freezer-safe bags or containers. Putting hot food directly into the freezer can cause uneven thawing later on, and we don’t want that.
You can freeze this chili for up to three months. When you’re ready to eat it, just transfer the container from the freezer into the refrigerator the night before. That slow thaw keeps the texture perfect. Trust me, future you will thank past you for putting this amazing, affordable meal away for a busy night! If you enjoy making large batches of food, you might also like my recipe for slow cooker ranch chicken.
Frequently Asked Questions About This Affordable Meal
I get so many questions about this recipe because people can’t believe how cheap and delicious it is! Here are a few things folks ask me all the time when they are getting ready to cook up their first batch of budget chili.
It’s important to remember that the cost breakdown is based on average U.S. grocery prices, assuming you are buying store brands and maybe grabbing the beef on sale. You might see a dollar or two difference, but it stays firmly in the affordable category! For more budget tips, follow us on Facebook.
Can I Use Different Types of Beans?
Yes, you absolutely can switch up the beans if you need to! The recipe calls for kidney and pinto beans because they are usually the cheapest, but black beans work wonderfully too. If you want to swap out the kidney beans for black beans, go right ahead. The main thing is to stick to the total volume—you still want about three cans worth of beans total, and always remember to drain and rinse them!
How Can I Make This Chili Hotter?
If that tiny quarter teaspoon of cayenne pepper just isn’t cutting it for your spice level, you have a few great options! First, you can double or triple the cayenne—that’s the easiest fix. If you want a deeper, smokier heat, you can substitute some of the regular chili powder for chipotle powder. That adds a great layer of smokiness along with the spice.
For real heat lovers, I suggest adding a finely minced jalapeño along with the onion and garlic, or stirring in a teaspoon of your favorite hot sauce right at the end when you are tasting for adjustments. Just remember, you can always add more heat, but you can’t take it out! You can also find great ideas on our Pinterest page.
Next Steps After Enjoying Your Budget $10 Pot of Chili
Wow, you made it! I truly hope this recipe brought some affordable comfort to your table. Now that you’ve tasted how satisfying a truly economical meal can be, I’d love to hear what you thought! If you want to read more about my cooking philosophy, check out my profile on Medium.
Please take a moment to leave a rating below—it helps other home cooks find this amazing Budget $10 Pot of Chili. Also, if you made any fun, budget-friendly tweaks or toppings, snap a picture and share it on social media! I love seeing how this recipe travels.
Print
Amazing Budget $10 Pot of Chili for 10
- Total Time: 1 hour 10 minutes
- Yield: 10-12 servings
- Diet: Omnivore
Description
Make this budget $10 pot of chili that feeds 10-12 people. Complete ingredient cost breakdown shows how to feed a crowd for under a dollar per serving.
Ingredients
- 2 tablespoons vegetable oil ($0.20)
- 1½ pounds ground beef ($6.00)
- 1 large yellow onion, diced ($0.50)
- 3 cloves garlic, minced ($0.15)
- 2 cans (15 ounces each) kidney beans, drained and rinsed ($1.80)
- 1 can (15 ounces) pinto beans, drained and rinsed ($0.90)
- 1 can (28 ounces) crushed tomatoes ($1.00)
- 1 can (15 ounces) tomato sauce ($0.75)
- 2 cups water ($0.00)
- 3 tablespoons chili powder ($0.30)
- 1 tablespoon ground cumin ($0.15)
- 1 tablespoon brown sugar ($0.05)
- 1½ teaspoons salt ($0.05)
- 1 teaspoon smoked paprika ($0.10)
- ½ teaspoon black pepper ($0.05)
- ¼ teaspoon cayenne pepper ($0.02)
Instructions
- Heat vegetable oil in a large pot or Dutch oven over medium-high heat until shimmering.
- Add ground beef and cook for 7-8 minutes, breaking it into small crumbles with a wooden spoon until completely browned with no pink remaining.
- Add diced onion and minced garlic to the pot with the beef and cook for 4-5 minutes, stirring frequently, until the onion becomes translucent and softens.
- Stir in chili powder, cumin, smoked paprika, cayenne pepper, brown sugar, salt, and black pepper; cook for 1-2 minutes until the spices become fragrant.
- Pour in crushed tomatoes, tomato sauce, and water; stir well to combine all ingredients and scrape up any browned bits from the bottom of the pot.
- Add kidney beans and pinto beans to the pot and stir thoroughly to distribute evenly throughout the chili.
- Bring the mixture to a rolling boil over high heat, stirring occasionally.
- Once boiling, reduce heat to low, cover the pot partially with a lid, and simmer for 45-60 minutes, stirring every 15 minutes to prevent sticking.
- After simmering, remove the lid and check the consistency; if too thin, simmer uncovered for an additional 10-15 minutes to thicken.
- Taste and adjust salt, pepper, or chili powder as needed to balance the flavors.
- Remove from heat and let the chili rest for 5-10 minutes before serving; this allows it to thicken further and cool slightly.
- Ensure the chili reaches an internal temperature of 165°F; ladle into bowls and serve with optional toppings like shredded cheese, sour cream, diced onions, or crackers.
Notes
- Buy ground beef when it is on sale and freeze it to keep costs lower.
- Use store-brand canned goods to save money.
- Make a double batch and freeze half for better value.
- Serve over rice or with cornbread to stretch servings to 14-16 people.
- Simmering longer, up to 90 minutes, develops better flavors.
- Store leftovers in the refrigerator for up to 5 days; they often taste better after a day or two.
- Freeze cooled chili for up to 3 months. Thaw overnight in the refrigerator before reheating.
- Prep Time: 10 minutes
- Cook Time: 60 minutes
- Category: Main Dish
- Method: Stovetop Simmering
- Cuisine: American