If you’ve ever stared longingly at those brightly colored, chewy candies in the store and thought, “There’s no way I can make that at home,” I’m here to tell you: Stop thinking that! Seriously, making homemade sour gummy bears with real fruit is shockingly simple. I mean it—this recipe is pure magic, and it requires zero cooking time beyond a quick simmer. It’s a no-bake candy dream!
When I first started dabbling in homemade treats, I thought gelatin candies meant boiling sugar for hours or dealing with messy stovetop thermometers. Yuck! But once I discovered agar powder, everything changed. This recipe is my go-to because it lets me control exactly what goes in—real strawberries mean vibrant flavor, not just red dye. If you’re new to candy making, trust me, this is your entry point. We’re making chewy, tangy perfection, and you’ll feel like a kitchen wizard when they set.

Why I Developed This Homemade Sour Gummy Bears with Real Fruit Recipe
I used to have this terrible habit of buying those giant bags of gummy bears for movie night, but I always felt guilty about the ingredient list. It was all corn syrup and artificial flavors. I tried making gummies once using gelatin, and I ended up with a sticky, half-melted puddle on my counter because I walked away for just a second!
That failure taught me I needed something faster and more reliable, especially since I often make snacks for my niece who is a vegetarian. Enter agar! This vegan setting agent is a lifesaver. Once I figured out the right balance with the fruit puree, I realized I could create these fantastic homemade sour gummy bears with real fruit without any high-stress cooking. It’s my secret weapon for quick, guilt-free treats now. If you are looking for other quick snack ideas, check out my post on Peanut Butter and Jelly Trail Mix.
Gather Your Ingredients for Homemade Sour Gummy Bears with Real Fruit
Okay, let’s talk about what you need to grab before we even think about turning on the stove. For these marvelous homemade sour gummy bears with real fruit, the quality of your fruit really shines through, so use the best strawberries you can find. Since we are using frozen ones for convenience, make sure they are fully thawed!
This recipe is so simple because the ingredient list is short, but every item plays a huge role in getting that perfect chew and that fantastic tang.
Essential Components for the Gummy Base
For the gummy base, you’ll need your thawed strawberries—blended smooth, please! We mix that puree with water and a splash of fresh lemon juice. That lemon juice is non-negotiable; it brightens up the strawberry flavor beautifully. Then we sweeten things up just a touch with honey.
The real hero that makes these set up is the agar powder. It’s what keeps them vegetarian and firm! Make sure you have your agar measured out and ready to sprinkle right over the cold liquid before heating, otherwise, it clumps up, and nobody wants a lumpy gummy bear.
Creating the Tangy Coating for Homemade Sour Gummy Bears with Real Fruit
The coating is what takes these from ‘sweet fruit chew’ to ‘sour candy heaven.’ You’re simply mixing granulated sugar with citric acid. This is where you need to pay attention! Citric acid is strong, so measure it carefully. Too much, and your tongue might pucker right off your face! You can find more great recipes like this on our Pinterest page.
You want an even mix of the sugar and the acid. We toss the finished gummies in this mixture later. I usually use about 1 to 2 teaspoons of the acid, depending on how tart my mood is that day. You can always add more later, but you can’t take it away!
Equipment Needed for Your Homemade Sour Gummy Bears with Real Fruit
We aren’t using any fancy candy-making thermometers here, which is why I love this process! For these homemade sour gummy bears with real fruit, you just need a few basic kitchen tools. Have these ready before you start cooking the base, because agar sets fast!
You’ll need a blender to get that strawberry puree perfectly smooth. Then move over to the stove with a small saucepan, a whisk for mixing, and a spatula for scraping.
The most important item, of course, is your silicone gummy molds. If you don’t have bear shapes, any small silicone mold works! Silicone is key because pulling the set gummies out is so much easier than with plastic trays.
Step-by-Step Instructions for Homemade Sour Gummy Bears with Real Fruit
Alright, time to get cooking! Don’t panic when you see the agar—it works fast, so have your molds ready to go before you even turn the heat on. This is how we turn simple fruit into amazing homemade sour gummy bears with real fruit.
Preparing the Real Fruit Puree and Cooking the Base
First things first, get that blender fired up! Puree your thawed strawberries until they are completely, utterly smooth. If you see chunks, keep blending. We want liquid silk here.
Next, take your saucepan—the small one!—and pour in that strawberry puree, the water, the fresh lemon juice, and the honey. Give it a quick whisk just to introduce them. Now, this is important: sprinkle the agar powder evenly over the top of that cold mixture. Whisk it well right away so there are no dry pockets lurking at the bottom.
Put the pan over medium heat. You need to whisk constantly as it warms up. We are bringing this to a gentle boil. Once it’s boiling, reduce the heat slightly, but keep whisking for exactly two minutes. You’ll notice it thickens up and gets a nice glossy sheen—that means the agar is activated and ready to set! Don’t overcook it past those two minutes, or you might dry it out.
When those two minutes are up, take it right off the heat. Give it a quick look, and if you see any little bits of foam floating on top (sometimes the strawberries do that), just skim them off with a spoon. That’s the last thing you do before pouring!
Molding and Setting Your Homemade Sour Gummy Bears with Real Fruit
This is the moment of truth! Carefully pour that hot, glossy mixture into your silicone molds. Work quickly, but don’t rush so much that you spill everywhere. If you’re using bear molds, try to fill each little cavity completely.
Now, we wait. Let the molds sit out on the counter at room temperature for about 30 minutes. This gives the agar a head start. After half an hour, it’s time for the fridge! Pop them in and let them chill for a full hour. They need that cold time to get totally firm so they don’t tear when you try to unmold them.
Once they are fully set—seriously firm to the touch—it’s time to gently pop them out. Flex the mold carefully until they release. They should slide right out, especially if you used good quality silicone! If you want to see more of my kitchen tips, follow me on Facebook.

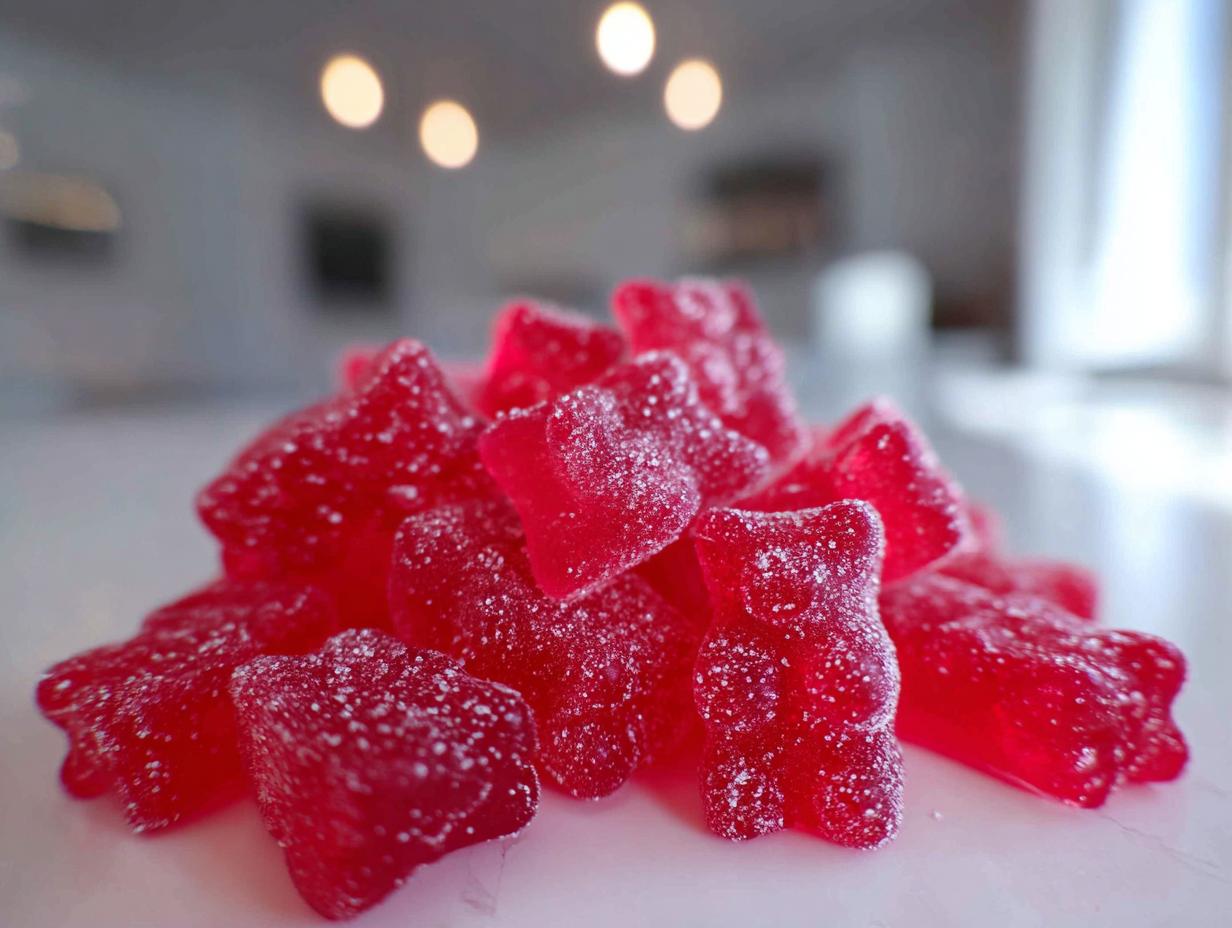
Coating Your Gummies for That Perfect Sour Finish
Time for the sour part! Grab a shallow bowl. Mix your granulated sugar and your citric acid together really well. You want that tangy powder distributed evenly throughout the sugar.
Take your beautifully set gummies and drop them into the bowl. Toss them gently but thoroughly until every single one of those homemade sour gummy bears with real fruit is coated in that sour sugar mix. Shake off any excess, and that’s it! They are ready to eat immediately. For more sweet treat ideas, check out my Vanilla Frozen Custard recipe.
Tips for Perfect Homemade Sour Gummy Bears with Real Fruit
Even though this recipe is super easy, there are a few little tricks I learned the hard way that will guarantee success with your homemade sour gummy bears with real fruit. The biggest thing to remember is that agar is quick and unforgiving! It starts setting the second it cools down, so you must have those silicone molds totally ready and waiting before you even turn the heat on the stove.
If you find your mixture starting to solidify in the saucepan while you’re pouring, don’t panic and don’t try to re-boil it! That can mess up the texture. Just scrape what you can into the molds, and if you have a little bit left over, you can gently reheat that remainder for just a few seconds until pourable again, though I usually just eat the thick bits with a spoon—waste not, want not!
Another common issue is unmolding. If your gummies are tearing when you try to pop them out, it usually means they didn’t chill long enough, or maybe your molds weren’t completely clean. Give them another 15 minutes in the fridge. For the best sour coating, make sure your gummies are completely dry before tossing them in the citric acid mix. Moisture makes the sugar clump! If you’re interested in other quick recipes, see what I’ve posted on Medium.
Storing and Handling Your Homemade Sour Gummy Bears with Real Fruit
These chewy little gems are best enjoyed fresh, but they do store nicely since we used agar instead of gelatin! Because they have real fruit in them, we need to keep them away from too much moisture to keep that sour sugar coating nice and crisp. Don’t leave your batch of homemade sour gummy bears with real fruit sitting out on the counter if it’s humid in your house!
The best way to keep them perfect is airtight. If you plan to eat them within a week, a sealed container in the pantry is fine. If you want them to last longer, the fridge is your friend. They’ll stay firm and tangy for weeks, maybe even a month if you forget about them! Just make sure they are completely dry before you seal the container.
Storage Table
| Storage Method | Duration | Notes |
|---|---|---|
| Airtight Container (Room Temp) | Up to 1 week | Keep away from heat; sugar coating may absorb moisture. |
| Airtight Container (Refrigerator) | Up to 3-4 weeks | Best for maintaining texture and freshness. |
| Freezer | 1 month | Wrap very tightly; allow to thaw completely at room temp before eating. |
Frequently Asked Questions About Homemade Sour Gummy Bears with Real Fruit
I get so many questions about these little guys, especially from folks new to using agar! Here are the most common things people ask when trying to perfect their homemade sour gummy bears with real fruit.
Q1. Can I substitute gelatin for the agar powder?
You definitely can, but it changes the texture and the process! Gelatin requires chilling overnight to set properly. Since this recipe is designed to be super fast, using agar is key. If you use gelatin, you’ll need more of it, and you lose that quick, no-bake rush!
Q2. Can I use other fruits besides strawberries?
Absolutely! The fruit puree is the heart of these homemade sour gummy bears with real fruit. Blueberries work wonderfully, or even mango! Just make sure whatever fruit you choose is pureed very smoothly and that you use the same amount of liquid measurement.
Q3. Why is my citric acid coating clumping?
That almost always means your gummies weren’t totally dry when you tossed them in the sugar mix. Agar gummies can sweat a little. Before coating, lay the gummies out on a paper towel for about 10 minutes to wick away any surface moisture. They need to be dry to the touch for that sour sugar to stick perfectly!
Q4. My gummies aren’t very sour, what did I do wrong?
That depends on the tartness of your lemon juice and how much citric acid you used. If you are aiming for that intense sour punch typical of store-bought candy, don’t be shy with the citric acid in the coating—just measure it carefully. You can always add more acid to the sugar mix next time if your first batch isn’t tart enough for your taste!
Your Homemade Sour Gummy Bears with Real Fruit Adventures!
I truly hope you loved making these homemade sour gummy bears with real fruit as much as I love eating them! They are just too fun not to share. Once you try making your own, you’ll never look back. If you are looking for more easy recipes, check out my Easy Oven Baked Fries.
If you made a batch, please come back and leave me a star rating below—it helps other folks know this recipe really works! And if you snap a picture of your perfectly coated, tangy bears, tag me on social media. I can’t wait to see your creations!
Print
Amazing 2-Minute Homemade Sour Gummy Bears
- Total Time: 20 minutes
- Yield: 30 gummy bears
- Diet: Vegetarian
Description
Easy homemade sour gummy bears made with real fruit and a tangy sugar coating. A fun no bake candy recipe for all ages.
Ingredients
- 1 cup frozen strawberries, thawed
- ⅓ cup water
- 1 tablespoon fresh lemon juice
- 2 tablespoons honey
- 2 teaspoons agar powder
- ½ cup granulated sugar
- 1 to 2 teaspoons citric acid
Instructions
- Puree the strawberries in a blender until completely smooth.
- Pour the strawberry puree, water, lemon juice, and honey into a small saucepan and whisk to combine.
- Sprinkle the agar powder evenly over the mixture and whisk well.
- Place the saucepan over medium heat and bring to a gentle boil, whisking constantly.
- Reduce heat slightly and simmer for 2 minutes until the mixture thickens and looks glossy.
- Remove from heat and skim off any foam from the surface.
- Carefully pour the hot mixture into silicone gummy molds.
- Let the gummies set at room temperature for 30 minutes, then refrigerate for 1 hour until fully firm.
- Gently remove the gummies from the molds.
- Mix the sugar and citric acid together, then toss the gummies until evenly coated.
Notes
- Agar sets quickly once heated, so have molds ready before cooking the mixture.
- Prep Time: 10 minutes
- Cook Time: 10 minutes
- Category: Candy
- Method: No Bake
- Cuisine: American