Halloween Crackers are one of those treats that always bring a huge smile to my face, and honestly, they remind me of why I started NoobRecipes in the first place! You know, back when I was just starting out in the kitchen, the idea of making anything remotely festive for holidays felt super intimidating. I’d see all these elaborate decorations and desserts and think, “No way can I do that.” But then I discovered how simple things like these crackers could be. They’re proof that you don’t need fancy skills or a million ingredients to make something awesome and totally in the Halloween spirit. My first attempt was a bit messy, I’ll admit, but they tasted amazing and looked spooktacular enough to impress my friends. Now, I can’t wait to share this ridiculously easy recipe with you all. It’s perfect for anyone who’s just dipping their toes into cooking or baking, proving that delicious and fun holiday treats are totally within reach!

Why You’ll Love These Halloween Crackers
Seriously, these Halloween Crackers are a game-changer for holiday treats! They’re so incredibly easy to whip up, even if you’ve never touched a kitchen appliance before. Here’s why you’re going to be obsessed:
- Super Simple: No complicated steps here, just dipping and drizzling!
- Lightning Fast: Ready in about 20 minutes total – perfect for last-minute plans.
- Few Ingredients: You probably have most of what you need in your pantry right now.
- Festive Fun: They look SO cute and spooky, everyone will think you’re a baking pro!
- Party Perfect: Great for school parties, Halloween night, or just a fun afternoon snack.
Perfect for Beginners
If you’re new to the kitchen, these Halloween Crackers are your new best friend. There’s no baking involved, no tricky techniques to master. You just melt some candy, dip, and drizzle. It’s honestly foolproof, and that’s exactly what NoobRecipes is all about – making delicious food accessible to absolutely everyone, no matter your skill level!
Quick and Easy Halloween Treat
Got unexpected guests or need a quick classroom treat? These Halloween Crackers are your lifesaver! With just 15 minutes of prep and about 5 minutes for the chocolate to set, you’re looking at a total time of around 20 minutes. Plus, since it’s a no-bake recipe, you don’t even need to turn on the oven. How awesome is that?
Ingredients for Your Spooky Halloween Crackers
Okay, so the best part about these Halloween Crackers is how few ingredients you actually need. It feels like magic when you see how much fun you can have with just a couple of things! You’ll want to grab your favorite candy melts – I love using black, orange, and white for that classic spooky vibe, but honestly, any colors work. And of course, you need the star of the show: good old Ritz Crackers. They’re the perfect little salty base for all that sweet chocolatey goodness. Trust me, with these simple items, you’re already halfway to creating some seriously cute and delicious Halloween treats!
| Ingredient | Quantity | Preparation |
|---|---|---|
| Candy Melts | 12 oz | Black, orange, and white |
| Ritz Crackers | 20 | Standard size |
How to Prepare Your Halloween Crackers
Alright, let’s get these spooky Halloween Crackers made! It’s honestly so simple, you’ll be amazed. We’re going to break it down into super easy steps so there’s no confusion. You’ll have a whole batch of festive treats ready in no time!
Melting the Candy Melts
First things first, we need to melt our candy. The easiest way is usually the microwave. Just pop your chosen candy melts (black, orange, white – get creative!) into a microwave-safe bowl. Heat them in 30-second intervals, stirring really well after each burst. You want it smooth and melty, not lumpy or burnt. If you prefer, you can melt them gently on the stovetop in a double boiler, but the microwave is usually quicker and just as effective for candy melts.
Dipping the Crackers
Now for the fun part! Grab your Ritz crackers and gently dip each one into the melted candy. Make sure it’s fully coated – get right to the edges. Give it a little tap on the side of the bowl to let any excess chocolate drip off. We don’t want giant globs, just a nice, even coating. You can use a fork or a toothpick to help maneuver them if that’s easier!
Setting the Chocolate
Once they’re dipped and looking delicious, carefully place the chocolate-covered crackers onto a sheet of wax paper. Don’t crowd them! Let them sit there undisturbed for a few minutes until the candy coating is completely set. This is super important before we start decorating, otherwise, you’ll have a melty mess.
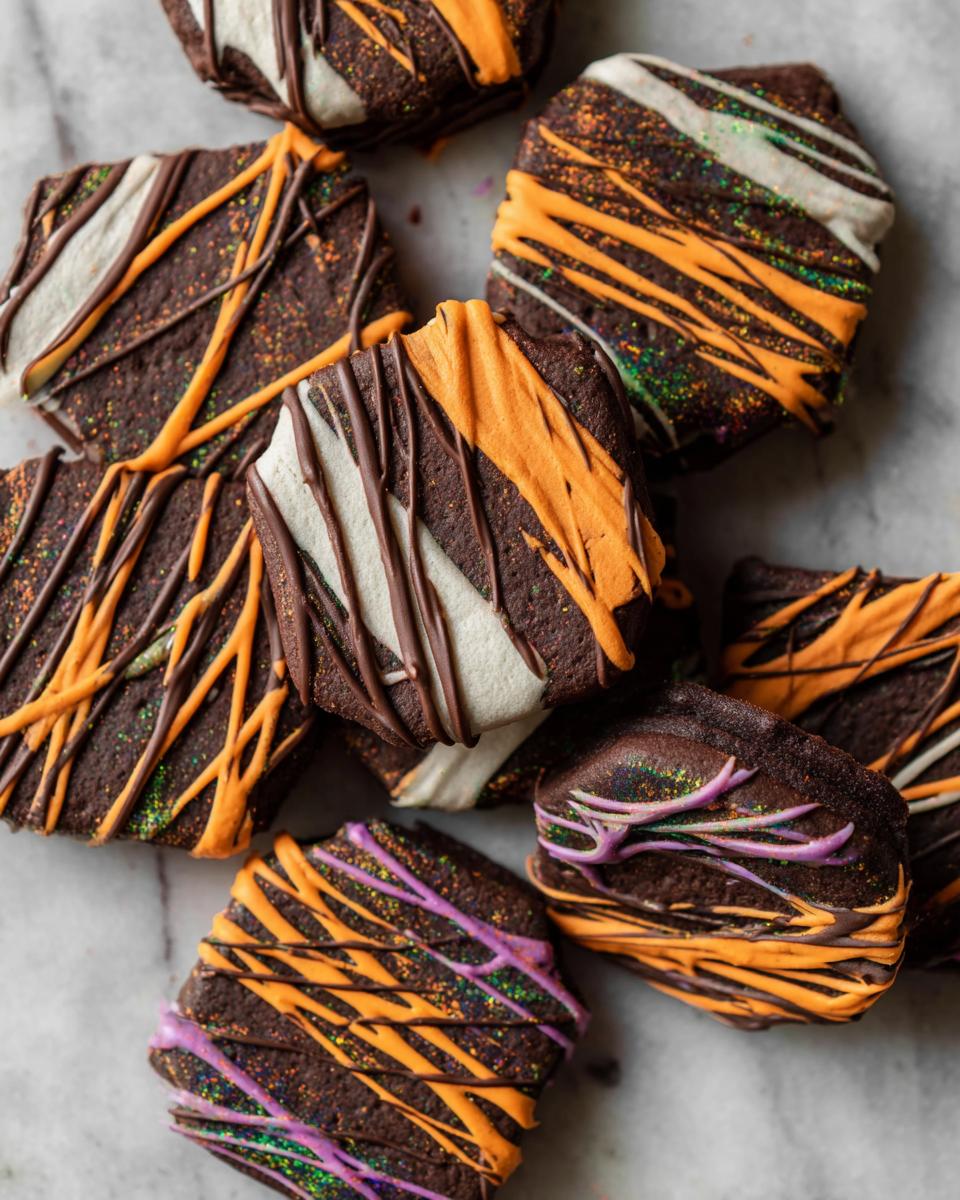
Creating Halloween Designs
Now for the real magic! Melt a little extra candy melt in your chosen decorating color. Pop it into a piping bag or, if you don’t have one, just a zip-top bag with a tiny corner snipped off. Now, get creative! You can drizzle thin lines to make spooky spider webs, zig-zag patterns for mummy bandages, or draw little pumpkin faces. Don’t stress about perfection; the wobbly designs are often the cutest and most charming for these Halloween Crackers!

Tips for Perfect Halloween Crackers
Making these Halloween Crackers is all about having fun, but a few little tricks can make them even more amazing. Seriously, don’t stress about getting them *perfect*. The charm is in the slightly wobbly lines and the festive colors! Choosing your candy melt colors is half the battle – think classic orange and black, or maybe a spooky white with black details. If your candy melts get too thick while you’re working, just pop them back in the microwave for 10-15 seconds to loosen them up again. And remember, a little bit of patience when letting them set before decorating goes a long way. It’s all part of the process, and the end result is totally worth it!
Color Combinations for Festive Halloween Crackers
To really make your Halloween Crackers pop, play around with color! Classic black and orange are a must. Try pairing white candy melts with black drizzle for a ghostly look, or use purple and green for a fun, eerie vibe. Even just using one color is totally fine and looks great!
Simple Design Ideas for Halloween Crackers
Beyond webs and mummies, try drawing little ghost shapes with white candy melts on orange crackers, or little bat silhouettes. You could even just do random zig-zags in contrasting colors. The goal is festive and fun, not flawless!
Frequently Asked Questions About Halloween Crackers
Got questions about making these adorable Halloween Crackers? I’ve got you covered! It’s all about keeping things simple and fun here at NoobRecipes.
Can I use different types of crackers for my Halloween Crackers?
Absolutely! While Ritz crackers are my go-to for their buttery flavor and perfect size, you can totally experiment. Graham crackers or even simple butter crackers would work. Just keep in mind that different crackers might have slightly different textures or flavors, but they’ll still be super festive!
How should I store leftover Halloween Crackers?
Storing your Halloween Crackers is a breeze. Once they’re completely set, just place them in an airtight container. They’ll stay fresh at room temperature for about a week. Try not to stack them too high, or the decorations might smudge a bit!
What is the best way to melt candy melts for Halloween Crackers?
The microwave method is usually the easiest and quickest for candy melts. Heat them in short, 30-second intervals, stirring thoroughly after each one. You want them smooth and pourable. If they start to get too thick as you work, just give them another quick zap in the microwave for about 10-15 seconds. Be careful not to overheat them, or they can seize up! For more tips on candy making, you can check out Wilton’s candy making tips.
Estimated Nutritional Information for Halloween Crackers
Just a heads-up, these numbers are estimates because brands can vary a little, and how much chocolate you dip can change things too! But this gives you a good idea of what you’re working with for each of these fun Halloween Crackers. It’s all part of making delicious treats accessible, and knowing what’s in them is a good step!
| Nutrient | Amount per Serving |
|---|---|
| Serving Size | 1 cracker |
| Calories | 150 |
| Total Fat | 8g |
| Saturated Fat | 5g |
| Unsaturated Fat | 3g |
| Trans Fat | 0g |
| Carbohydrates | 15g |
| Fiber | 1g |
| Sugar | 12g |
| Protein | 1g |
| Cholesterol | 5mg |
| Sodium | 100mg |
Share Your Spooky Halloween Crackers Creations!
I absolutely love seeing your kitchen adventures! Once you’ve whipped up your own batch of these fun Halloween Crackers, I’d be thrilled if you’d share your spooky creations. Snap a pic and tag me on social media, or leave a comment below telling me how they turned out! Seeing your festive designs and hearing about your experience makes my day and helps other beginners feel inspired to jump in and try it themselves!
Print
Spooky Halloween Crackers: 1 Easy Recipe
- Total Time: 20 minutes
- Yield: Approximately 20 crackers
- Diet: Vegetarian
Description
Easy Halloween Crackers: A simple and fun treat for beginners.
Ingredients
- 12 oz candy melts (black, orange, white)
- 20 Ritz Crackers
Instructions
- Melt candy melts according to package directions, or microwave in 30-second intervals, stirring after each.
- Dip Ritz crackers into the melted chocolate, ensuring they are fully coated. Tap off excess chocolate.
- Place the chocolate-covered crackers on wax paper and let them set.
- Melt additional candy melts. Transfer to a piping bag or a zip-top bag with a corner snipped off.
- Drizzle the melted chocolate over the set crackers to create designs like spider webs, mummies, or pumpkins.
Notes
- Use an array of colors for the candy melts for a festive look.
- You can create various Halloween-themed designs.
- Prep Time: 15 minutes
- Cook Time: 5 minutes
- Category: Dessert
- Method: No-Bake
- Cuisine: American