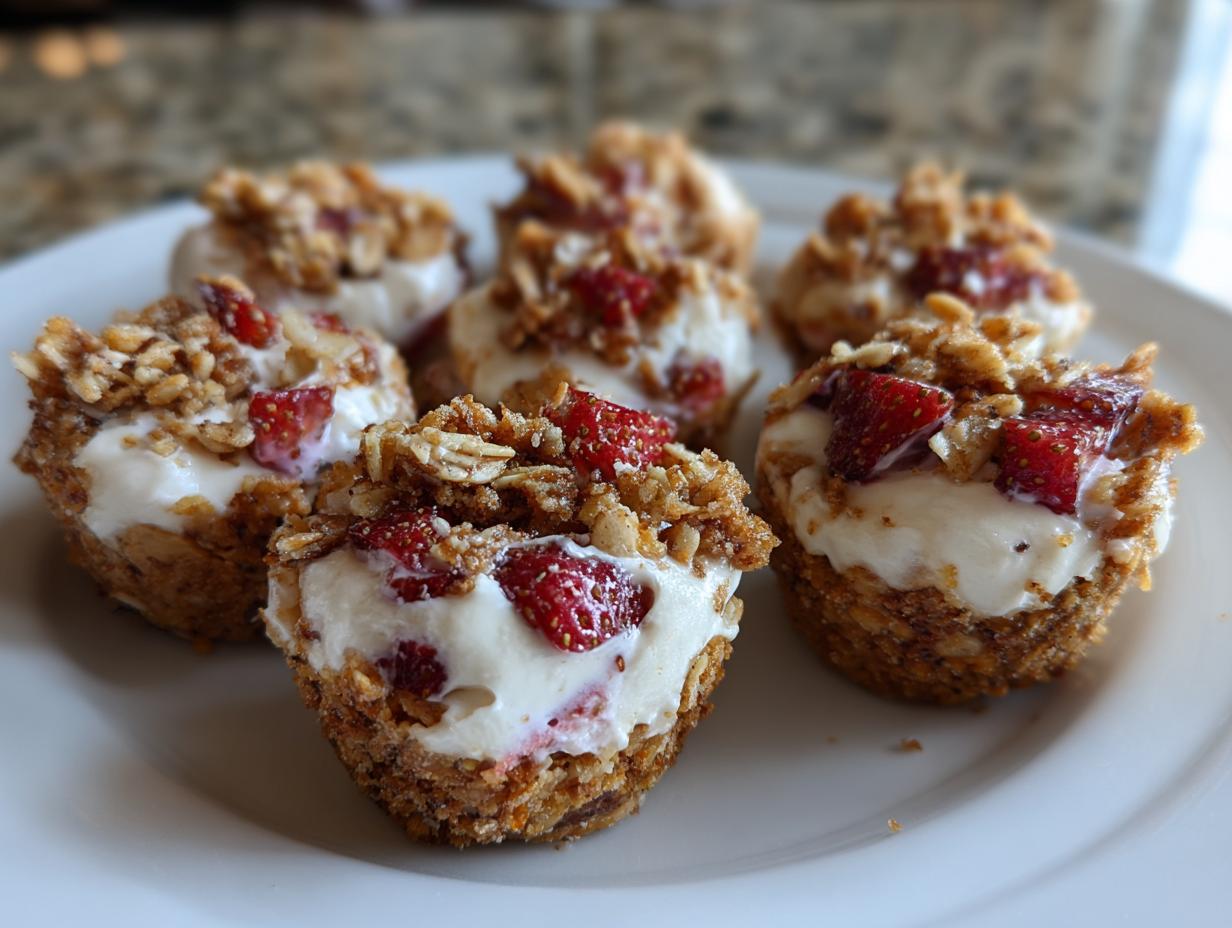
Okay, friend, if you are looking for a snack that screams “I totally have my life together” but actually takes zero brainpower, you have found your recipe! Seriously, these Frozen Strawberry Yogurt Bites are my secret weapon for busy afternoons, and they only require five things from your pantry. I swear, when I first started trying to eat healthier, everything felt so complicated—measuring obscure flours, waiting for things to proof… Ugh. But these bites? They are the ultimate beginner-friendly kitchen win.
I made my first batch last summer when the kids were home, and they were obsessed. They look fancy, right? With that little crust and the bright red strawberries peeking out? But honestly, you just mix, scoop, and freeze. That’s it! You get amazing texture from the crunchy granola crust and that cool, creamy yogurt filling. Trust me, once you see how easy it is to make perfectly portioned Frozen Strawberry Yogurt Bites, you’ll never buy those overpriced yogurt tubes again.

Essential Components for Your Frozen Strawberry Yogurt Bites
Getting the right ingredients is half the battle, especially when you’re dealing with something that needs to freeze perfectly. For these Frozen Strawberry Yogurt Bites, we are keeping things super simple, but don’t let the short list fool you—each component pulls its weight. We need that creamy base, a little sweetness, that bright fruit flavor, and, most importantly, that satisfying crunch on the bottom and top!
You’ll notice I specified Greek yogurt. That’s non-negotiable! Regular yogurt is too watery, and we need that thick, protein-packed base so our bites don’t turn into tiny yogurt puddles when they’re frozen.
Gathering Ingredients for Frozen Strawberry Yogurt Bites
Here’s the exact rundown of what you need to gather before you start scooping. Make sure your strawberries are diced small enough to fit nicely into those mini cups!
| Ingredient | Amount Needed | Prep Note |
| Vanilla Greek Yogurt | 2 cups | Must be thick! |
| Granola | \u00be cup | Your favorite crunchy kind. |
| Fresh Strawberries | 1\u00bd cups | Hulled and diced small. |
| Honey | 2 tablespoons | For natural sweetness. |
| Vanilla Extract | \u00bd teaspoon | Don’t skip this—it boosts the vanilla flavor! |
Equipment Needed for Frozen Strawberry Yogurt Bites
You don’t need fancy gadgets for this recipe, which is what makes it perfect for quick snacks. Grab your 12-cup mini muffin tin, a medium mixing bowl, a whisk or sturdy spoon, and a sharp knife for dicing those berries. That’s it!
Step-by-Step Guide to Making Frozen Strawberry Yogurt Bites
Alright, now that we have all our components ready, it’s time for the fun part—assembly! This is where we turn five simple ingredients into those gorgeous little gems. Remember, we aren’t cooking anything, so technically this whole process is fast, but you need to be organized to make it smooth.
Preparing the Muffin Tin and Granola Crust
First things first, you absolutely must prepare your vessel! Get that 12-cup mini muffin tin ready. You can use paper liners, which is easy cleanup, but if you have a good quality silicone mini muffin pan, use that! Silicone makes removal a dream later on. Once your cups are lined or ready, it’s time for the crunch foundation.
Take your granola and sprinkle just about one teaspoon right into the bottom of each cup. Now, this is important: use the back of a small spoon or your clean fingers to press that granola down firmly. You want a compact little crust layer, otherwise, it just crumbles off when you try to eat the bite. Give it a good, solid press in every single cup.
Mixing the Yogurt Base for Frozen Strawberry Yogurt Bites
Next up is creating that glorious, sweet, creamy center for our Frozen Strawberry Yogurt Bites. Grab a medium bowl—don’t use the one you mixed the fruit in unless you washed it! Pour in your two cups of Greek yogurt. Then drizzle in the honey and add that half teaspoon of vanilla extract. I like to use a whisk here, mixing it gently but thoroughly until everything is perfectly smooth and homogenous. You don’t want streaks of honey anywhere.
Now, take one cup of your diced strawberries. I like to leave mine a little chunky so you get those bursts of fresh flavor when you bite in. Gently fold those chopped strawberries into your yogurt mixture. Don’t stir aggressively! We want to keep the yogurt fluffy, not deflate all the air we just mixed in.
Assembling and Topping the Frozen Strawberry Yogurt Bites
Time to fill those crusts! Using a regular spoon, carefully scoop the strawberry yogurt mixture into each cup. You want to fill them about three-quarters of the way full. Don’t pack it down yet! We’re saving the final toppings for last.
Take your remaining strawberries—that’s the last half cup—and gently press a few pieces onto the top of the yogurt in each cup. Then, for that final layer of texture that makes these treats so addictive, sprinkle the rest of your granola right over the top. Again, press the topping slightly so it adheres to the soft yogurt before it heads to the freezer.
Freezing and Serving Your Frozen Strawberry Yogurt Bites
The hard part is over! Now, gently transfer the entire tin into your freezer. You need these to freeze solid, so plan on at least 3 to 4 hours. I usually just leave them overnight because I forget about them until I need a snack the next day! Total hands-off time, right? If you want to see more easy snack ideas, check out our snacks category.
When you are ready to eat them, this is key: don’t try to pry them out immediately if they are rock solid. Let the tin sit on the counter for about 3 to 5 minutes. This little bit of warming time helps them release cleanly from the tin or the paper liners. If they are still stuck, give the bottom of the pan a quick, gentle tap on the counter; that vibration often loosens them right up.
Tips for Creating Exceptional Frozen Strawberry Yogurt Bites
Listen, making these Frozen Strawberry Yogurt Bites is easy, but making them *perfect* requires a couple of little secrets I picked up after my first few batches looked a little sad coming out of the tin. The main goal here is texture—we want that crust to stay put and the yogurt to be creamy, not icy!
First, let’s talk removal. If you hate waiting for things to warm up, invest in silicone mini muffin pans. Seriously, it’s a game-changer. If you stick to paper liners, make sure you really press that granola crust down hard. It needs to be cemented in there so it doesn’t fall off when you take a bite. For more baking tips, you might enjoy our guide on banana bread bites.
Another thing I learned? After you spoon the yogurt in, give the whole tray a gentle tap on the counter. You’ll see tiny air bubbles pop up. Tapping them out ensures your Frozen Strawberry Yogurt Bites have smooth, even layers instead of weird pockets of air. And if you’re making a huge batch? Do double everything! They store so well between sheets of parchment paper, and you’ll be so glad you have them ready to grab. Feel free to share your creations with us on Facebook!
Frequently Asked Questions About Frozen Strawberry Yogurt Bites
I know you might have a few questions floating around after reading about these amazing treats. It’s normal! When you’re dealing with frozen snacks, people always worry about texture and substitutions. Don’t stress; I’ve got the answers to make sure your Frozen Strawberry Yogurt Bites turn out perfectly every time.
People often ask me about swapping out ingredients, especially the yogurt. Since we rely on Greek yogurt for its thickness, changing it up requires a little thought. Also, knowing how long they keep is key for making big freezer batches! If you are interested in other frozen treats, check out our frozen strawberry mocktail.
Can I Substitute the Greek Yogurt in Frozen Strawberry Yogurt Bites
You really should stick with Greek yogurt if you want the best texture for your Frozen Strawberry Yogurt Bites. It’s thick enough to hold its shape and stand up to the freezing process without getting icy. If you absolutely must substitute, try using a very thick plain yogurt and strain it overnight in cheesecloth—that’s your best bet to remove excess water. Avoid regular, thinner yogurts entirely, or you’ll end up with icy yogurt cubes instead of creamy bites!
How Long Do Frozen Strawberry Yogurt Bites Last in the Freezer
These are best eaten fresh, but they last a surprisingly long time! For the best flavor and texture—when that granola is still crunchy and the yogurt is smooth—aim to eat them within two weeks. If you store them properly between parchment paper layers in an airtight container, they’ll be safe beyond that, but the quality starts to drop off after about fourteen days.
Storing Leftovers of Your Frozen Strawberry Yogurt Bites
If you manage to have any Frozen Strawberry Yogurt Bites left over—which, let’s be honest, is a minor miracle in my house—storage is important. You can’t just throw the whole tin back in the freezer! They will freeze together into one giant strawberry-yogurt brick, and that defeats the purpose of having easy grab-and-go snacks.
The absolute key here is parchment paper. Once your bites are completely solid after those 3 to 4 hours of freezing, pop them out of the tin. Then, you need to layer them in an airtight, freezer-safe container. Place a sheet of parchment paper on the bottom, lay out a single layer of your Frozen Strawberry Yogurt Bites, put another sheet of parchment on top of them, and then add the next layer. This prevents that sticky yogurt from bonding them together forever! You can find more great storage tips on our Pinterest page.
Keep them sealed tight and back in the freezer. They should maintain their quality for up to two weeks this way. Don’t worry about reheating; these are meant to be eaten frozen solid, straight from the container!
Quick Facts: Nutritional Information for Frozen Strawberry Yogurt Bites
I always get asked about the nutrition when I share this recipe because people want to know if they can really eat these all the time. Since these Frozen Strawberry Yogurt Bites are made with Greek yogurt and real fruit, they are a fantastic way to sneak in some protein and serve a healthier treat. Now, numbers can change a little depending on exactly what brand of granola or honey you use, but this table gives you a fantastic general idea of what’s in one single, perfect bite!
It’s great knowing these are portion-controlled, too! Since they are made in a mini muffin tin, you know exactly what you’re getting. No guessing games here! If you are looking for more high-protein options, check out our high-protein breakfasts.
| Nutrient | Approximate Value (Per Bite) |
| Serving Size | 1 bite |
| Calories | 85 |
| Protein | 5g |
| Fat | 2g |
| Carbohydrates | 13g |


5 Amazing Frozen Strawberry Yogurt Bites
- Total Time: 3 hours 20 minutes
- Yield: 12 bites
- Diet: Vegetarian
Description
Easy muffin-tin frozen yogurt bites with a crunchy granola crust and fresh strawberries. A healthy, make-ahead snack ready in minutes with just 5 ingredients.
Ingredients
- 2 cups vanilla Greek yogurt
- ¾ cup granola
- 1½ cups fresh strawberries, hulled and diced
- 2 tablespoons honey
- ½ teaspoon vanilla extract
Instructions
- Line a 12-cup mini muffin tin with paper liners or use a silicone mini muffin pan for easy removal.
- Sprinkle 1 teaspoon of granola into the bottom of each muffin cup, pressing gently to form a crust layer.
- In a medium bowl, combine Greek yogurt, honey, and vanilla extract, stirring until smooth and well mixed.
- Dice 1 cup of the strawberries into small pieces and gently fold them into the yogurt mixture, leaving some small chunks for texture.
- Spoon about 1½ tablespoons of the strawberry yogurt mixture into each muffin cup, filling to about ¾ full.
- Top each bite with remaining diced strawberries, pressing them gently into the yogurt surface.
- Sprinkle remaining granola over the top of each bite for extra crunch.
- Place the muffin tin in the freezer and freeze for 3 to 4 hours or until completely solid.
- Remove from freezer and let sit at room temperature for 3 to 5 minutes before removing from the tin.
- Store any leftover bites in a freezer-safe container between layers of parchment paper to prevent sticking; keep frozen and consume within 2 weeks for best quality.
Notes
- Use silicone mini muffin pans for the easiest removal without waiting for the bites to soften.
- Tap the muffin tin gently on the counter after filling to remove air bubbles and create smooth, even layers.
- Press the granola crust firmly into the bottom of each cup so it stays intact when biting into the frozen treats.
- Make a double batch and store extras in a freezer bag for quick snacks throughout the week.
- Let bites sit at room temperature for 1 to 2 minutes if very hard to make them easier to eat.
- Prep Time: 20 minutes
- Cook Time: 0 minutes
- Category: Snack
- Method: Freezing
- Cuisine: American