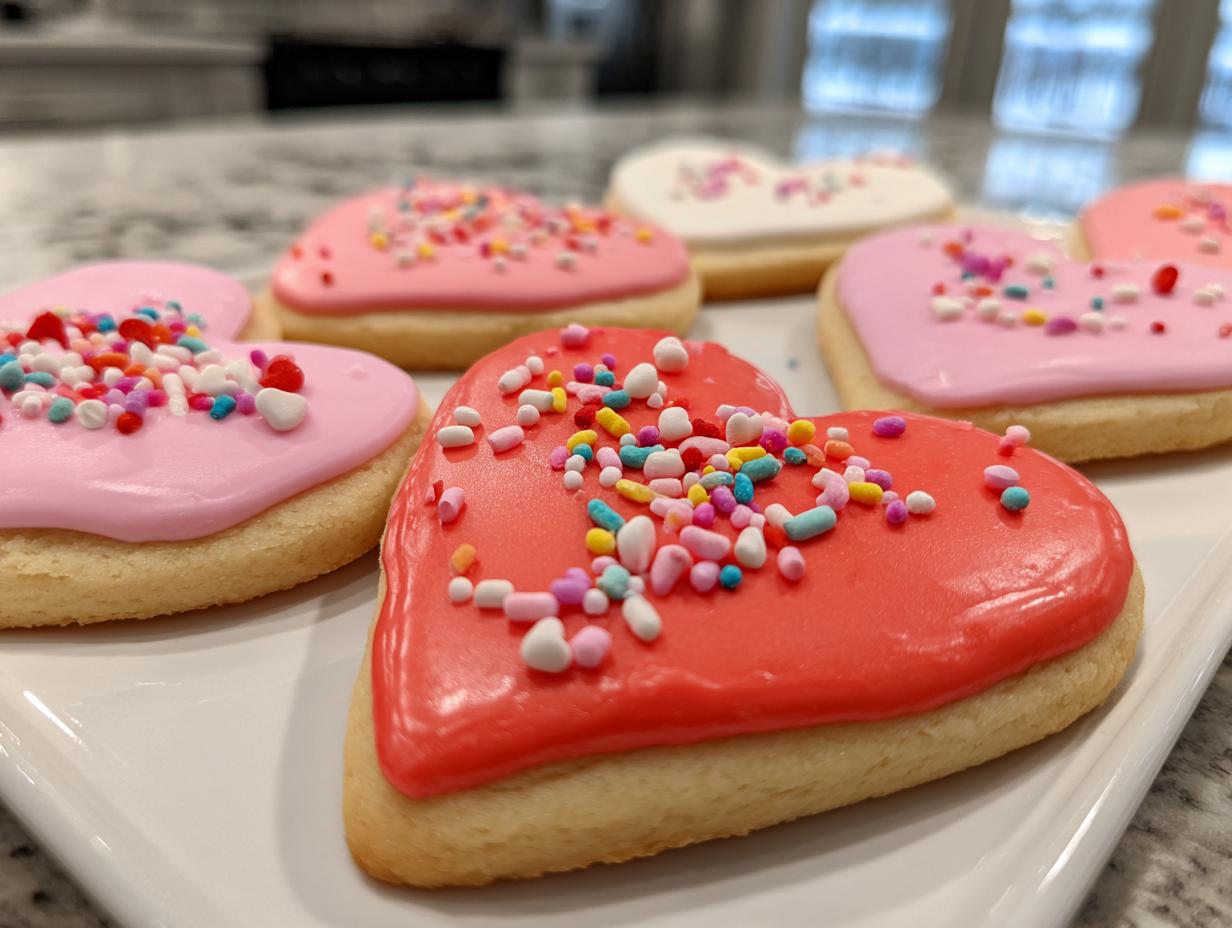
I have a confession: I love baking things that look super fancy but are secretly, ridiculously easy. If you’ve ever scrolled past those gorgeous, perfectly decorated sugar cookies and thought, “No way I can do that,” then grab your apron, friend, because I’m about to change your life! We are diving headfirst into my absolute favorite recipe for Heart Cookies. Seriously, these soft, buttery cookies topped with colorful fondant are the showstoppers of every single gathering I host.

This recipe is all about that reliable, soft sugar cookie base that never spreads too much in the oven. We’re ditching the complicated piping bags and messy royal icing. Instead, we use ready-made fondant for decoration, which gives you that unbelievably smooth, professional finish with almost zero effort. Trust me, this method is foolproof, even if you’re just starting out in the kitchen. Let’s get baking!
Why This Heart Cookies Recipe Works for Everyone
The beauty of these cookies is how forgiving the dough is. It comes together so fast—we’re talking minimal mixing time—and it chills quickly, so you aren’t waiting around all day. The dough is sturdy enough to handle rolling and cutting without tearing, which is a huge win for beginners!
But the real magic? The fondant topper. It looks like you spent hours crafting perfect little decorations, but really, you’re just cutting shapes and sticking them on with a little sugar glue. It’s the ultimate shortcut to impressive results. These Heart Cookies prove you don’t need advanced skills to wow your friends and family.
Gathering Your Ingredients for Perfect Heart Cookies
Okay, before we get into the fun part of rolling and cutting, we need to make sure our pantry is ready for action! I’ve listed everything you need below. Don’t panic if you see fondant; it’s easier to use than you think, and it’s what makes these Heart Cookies so stunningly smooth. The base dough is just your standard, reliable sugar cookie lineup.
I always like to lay everything out on the counter before I start mixing. It’s called *mise en place*, and honestly, it saves me from those frantic moments when you realize you’re out of vanilla. Here’s what you’ll need for about two dozen beautiful cookies.
| Item | Quantity |
|---|---|
| All-Purpose Flour | 2 1/2 cups |
| Baking Soda & Baking Powder | 1/2 tsp & 1/4 tsp |
| Salt | 1/4 teaspoon |
| Unsalted Butter | 1 cup, softened |
| Granulated Sugar | 3/4 cup |
| Large Egg & Vanilla Extract | 1 egg, 1 tsp vanilla |
| Powdered Sugar (for glue) | 1 cup |
| Water (for glue) | 1 tablespoon |
| Fondant (White, Pink, Red) | 6 ounces each |
| Heart Sprinkles | 1/4 cup |
Essential Baking Supplies for Heart Cookies
You don’t need a whole bakery setup for this, but a few key tools make the job so much smoother. A good electric mixer—handheld or stand—is a must for getting that butter fluffy. You’ll also need a sharp 3-inch heart-shaped cookie cutter. Don’t skimp on the rolling pin; we need that dough nice and even!
Ingredient Clarity and Preparation Notes
Let’s talk butter! It absolutely has to be softened, not melted. If it’s too warm, your cookies will spread into sad, thin pancakes. You want it soft enough that you can press a finger into it easily. For that professional look, the fondant needs to be rolled out quite thin—about 1/8 inch thick. If it’s too thick, it won’t sit nicely on the cookie.
And for the glue? It’s just powdered sugar and water, but consistency is key! You want it thin enough to brush on lightly but thick enough that it actually holds those sprinkles down. If it’s too thick, it just sits on top instead of acting like cement. Remember, these little details are what turn good Heart Cookies into *great* ones!
Equipment Needed to Create Beautiful Heart Cookies
We keep the equipment list simple because this recipe is all about ease! You won’t need any fancy piping bags or specialized molds here. Just grab your standard baking gear. Having these items ready means you can move straight from mixing to chilling without hunting around the kitchen.
- Electric Mixer (Stand or Handheld)
- Mixing Bowls
- 3-Inch Heart Cookie Cutter
- Rolling Pin
- Baking Sheets (Lined with Parchment Paper)
- Wire Cooling Racks
- Small Brush (for applying the sugar glue)
- Cornstarch (for dusting the work surface)
Step-by-Step Instructions for Soft Heart Cookies
Now for the actual fun part! We’re going to tackle this in three main phases: making the dough, baking the base, and then adding those gorgeous, colorful tops. Remember, the dough needs a little nap before it hits the oven, so don’t skip that chilling time!
Mixing and Chilling the Sugar Cookie Dough
First things first, grab a bowl and whisk together your dry stuff: the flour, baking soda, baking powder, and salt. Just give it a quick zip to make sure everything is evenly distributed. Set that aside.
In your mixer bowl, cream that softened butter and granulated sugar together. You need to beat this until it looks genuinely fluffy—pale yellow and light. This is where we trap the air! Once it looks good, beat in your egg and the vanilla extract until it’s just combined. Don’t overmix once the egg goes in.
Now, add the flour mixture gradually. I mean *gradually*. Mix it on low speed until just barely combined. As soon as you don’t see huge dry streaks anymore, stop the mixer! Overmixing the flour makes tough cookies, and we want soft ones! Scrape down the sides, form the dough into a disc, wrap it tight, and pop it in the fridge for 20 minutes. That little chill time keeps our Heart Cookies from spreading out during baking.
Baking Your Heart Cookies to Perfection
While the dough is chilling, go ahead and preheat that oven to 375 degrees Fahrenheit. Line your baking sheets with parchment paper now, so you’re ready to go the second the dough is chilled. This prevents sticking, trust me.
Dust your counter lightly with flour—or cornstarch if you have it—and roll out your dough until it’s about a quarter-inch thick (1/4-inch). Use that 3-inch heart cutter and press down firmly. Try not to wiggle the cutter once it’s pressed in! Place the cutouts on your prepared sheets about two inches apart; they need a little breathing room as they bake.

Bake them for exactly 8 minutes. You’re looking for the edges to just barely turn a light golden color. If they look pale, give them 30 more seconds, but be careful! Pull them out and let them cool on the sheet for just a moment before moving them to the wire racks to cool completely. They need to be stone cold before we decorate them!
Preparing and Applying Fondant Toppers for Heart Cookies
While the cookies are cooling, we make the magic glue. Just mix that cup of powdered sugar with the tablespoon of water. It should turn into a thin, brushable paste—if it’s too thick to drizzle, add half a teaspoon more water. It needs to be thin!
Now, take your white, pink, and red fondant. Dust your surface with cornstarch—this is vital so the fondant doesn’t stick everywhere! Roll each color out until it’s paper thin, about 1/8-inch. Use the exact same 3-inch heart cutter to cut out your fondant pieces. You should have a beautiful assortment of colored hearts.
When the cookies are totally cool, take a small brush and lightly paint the top surface of the cookie with your sugar glue. Gently place one matching fondant heart right on top, smoothing it down lightly with your fingertips. Finally, use a tiny bit more glue—just a dot—in the center of the fondant and carefully place 8 to 10 of those heart-shaped sprinkles on top. Ta-da! Instant professional-looking Heart Cookies!
Tips for Success with Your Heart Cookies
I’ve definitely learned a few tricks the hard way making these over the years, so listen close! The biggest pitfall is usually sticking. Remember that cornstarch when rolling the fondant? If you skip that, you’ll end up wrestling sticky pink goo all over your counter, and the fondant will tear when you try to lift it.
Also, when you are brushing on that sugar glue for the fondant, less is definitely more. If you glob it on, the moisture will soften the cookie underneath right away, and you’ll end up with a soggy center instead of that perfect soft bite. A thin, even coat is all you need for the fondant to stick securely.
Lastly, when cutting the hearts, make sure you press straight down and lift straight up—don’t twist the cutter! Twisting drags the dough and distorts the shape. If your dough gets too warm while you’re cutting, just pop the whole sheet back in the fridge for five minutes. A little patience here guarantees picture-perfect Heart Cookies every time.

Storage and Reheating Instructions for Heart Cookies
Since these cookies have that beautiful fondant topping, how you store them really matters to keep them looking crisp. You don’t want the fondant getting sticky or melting! I always recommend storing them in a single layer if possible, or at least separated by parchment paper if you stack them.
They are best eaten within three days, but they hold up well! You definitely don’t need to reheat Heart Cookies; in fact, heat is the enemy of the smooth fondant finish. Keep them away from humidity!
| Storage Method | Duration | Notes |
|---|---|---|
| Airtight Container (Room Temp) | Up to 4 days | Use parchment between layers to prevent sticking. |
| Freezing (Unfrosted Dough) | Up to 3 months | Wrap discs tightly before freezing. |
| Freezing (Baked Cookies) | Up to 1 month | Store frosted cookies carefully; avoid crushing. |
Frequently Asked Questions About Heart Cookies
I know you might have a few questions swirling around, especially when dealing with rolled fondant! It’s totally normal. I’ve gathered the ones I get asked most often about making these soft Heart Cookies so you can bake with total confidence. Don’t worry, we can troubleshoot any little issue!
Can I Make These Heart Cookies Ahead of Time
Yes, you absolutely can! The dough is amazing for making ahead. Once you chill it (after step 5 in the instructions), you can wrap that disc tightly in plastic wrap and keep it in the fridge for up to three days. When you’re ready to bake, just let it sit on the counter for about 10 minutes to soften up slightly before rolling. If you want to freeze the dough, that works too—just wrap it well and bake from frozen, adding a couple of minutes to your bake time.
For the finished, decorated cookies, I recommend decorating them no more than a day ahead of time. The fondant is stable, but keeping them fresh means the cookie stays soft. If you bake the base cookies and store them plain, they last great for a week, and you can decorate them right before your party!
Best Way to Cut Uniform Heart Cookies
Uniformity is key when you’re topping them with fondant, right? The biggest mistake people make when cutting Heart Cookies is twisting the cutter. You have to press straight down firmly, and then lift straight up! If you twist, even a tiny bit, the dough underneath shifts, and when you go to place it on the sheet, it’s warped.
If your dough gets too warm between cuts, stop! Put the whole batch back in the fridge for 10 minutes. A cold dough cuts cleaner edges, which means the fondant sits perfectly flat on top. Also, make sure your 3-inch cutter is sharp—a dull edge drags the floury dough instead of slicing cleanly through it.
Share Your Delicious Heart Cookies Creations
I poured my heart and soul into making sure this recipe for Heart Cookies is the easiest, prettiest recipe you’ll ever try. Now it’s your turn! I truly want to see how your colorful fondant tops turned out. If you made these, please leave me a comment below letting me know how they tasted and how quickly everyone gobbled them up! If you want to see more easy baking ideas, check out my Pinterest board!
Did you use all three colors, or did you go rogue with a fun new shade? Drop a rating below so other bakers know what you thought! You can also follow my updates on Facebook.
Print
Shocking Easy Heart Cookies Recipe Magic
- Total Time: 38 minutes
- Yield: 24 servings
- Diet: Vegetarian
Description
Festive heart-shaped cookies topped with colorful fondant for seasonal celebrations. These soft treats use simple assembly for impressive results.
Ingredients
- 2 1/2 cups all-purpose flour
- 1/2 teaspoon baking soda
- 1/4 teaspoon baking powder
- 1/4 teaspoon salt
- 1 cup unsalted butter, softened
- 3/4 cup granulated sugar
- 1 large egg
- 1 teaspoon vanilla extract
- 1 cup powdered sugar
- 1 tablespoon water
- 6 ounces white fondant
- 6 ounces pink fondant
- 6 ounces red fondant
- 1/4 cup heart-shaped sprinkles
- Cornstarch for dusting
Instructions
- Whisk flour, baking soda, baking powder, and salt in a bowl.
- Beat softened butter and sugar until fluffy.
- Add egg and vanilla, mix until combined.
- Gradually stir in flour mixture to form dough.
- Chill dough 20 minutes.
- Preheat oven to 375°F and line sheets with parchment.
- Roll dough 1/4-inch thick on a floured surface.
- Cut 3-inch hearts, place on sheets 2 inches apart.
- Bake 8 minutes until edges are lightly golden.
- Cool cookies fully on wire racks.
- Mix powdered sugar and water to make thin glue.
- Dust surface with cornstarch, roll fondants 1/8-inch thick, cut matching hearts.
- Brush cookie tops with glue, attach fondant hearts.
- Add 8 to 10 sprinkles per cookie using more glue.
Notes
- Soft sugar cookies pair well with rolled fondant cutouts.
- Ideal for family baking sessions.
- Decoration achieves professional looks without complex piping.
- Prep Time: 30 minutes
- Cook Time: 8 minutes
- Category: Dessert
- Method: Baking
- Cuisine: American