Oh my gosh, stop scrolling! If you think making a truly decadent, silky, homemade pie is beyond your skills, I want you to sit down right now. I used to be terrified of homemade custard. Seriously, I thought the slightest temperature mistake meant I’d end up with sweet scrambled eggs, and that’s why I relied on store-bought fillings for years!
But this recipe changed everything. This Classic Coconut Cream Pie With Custard Filling is the one that proved to me (and will prove to you!) that you can achieve that gorgeous, thick, creamy texture without any fancy pastry school training. My confidence soared the first time I nailed that perfect, barely-bubbling custard. It’s all about listening to the milk and moving slowly when you add the eggs. Trust me, this pie has been tested and perfected, so you can bake it without fear and serve it knowing you made something truly special from scratch.

Why You Will Love This Classic Coconut Cream Pie With Custard Filling
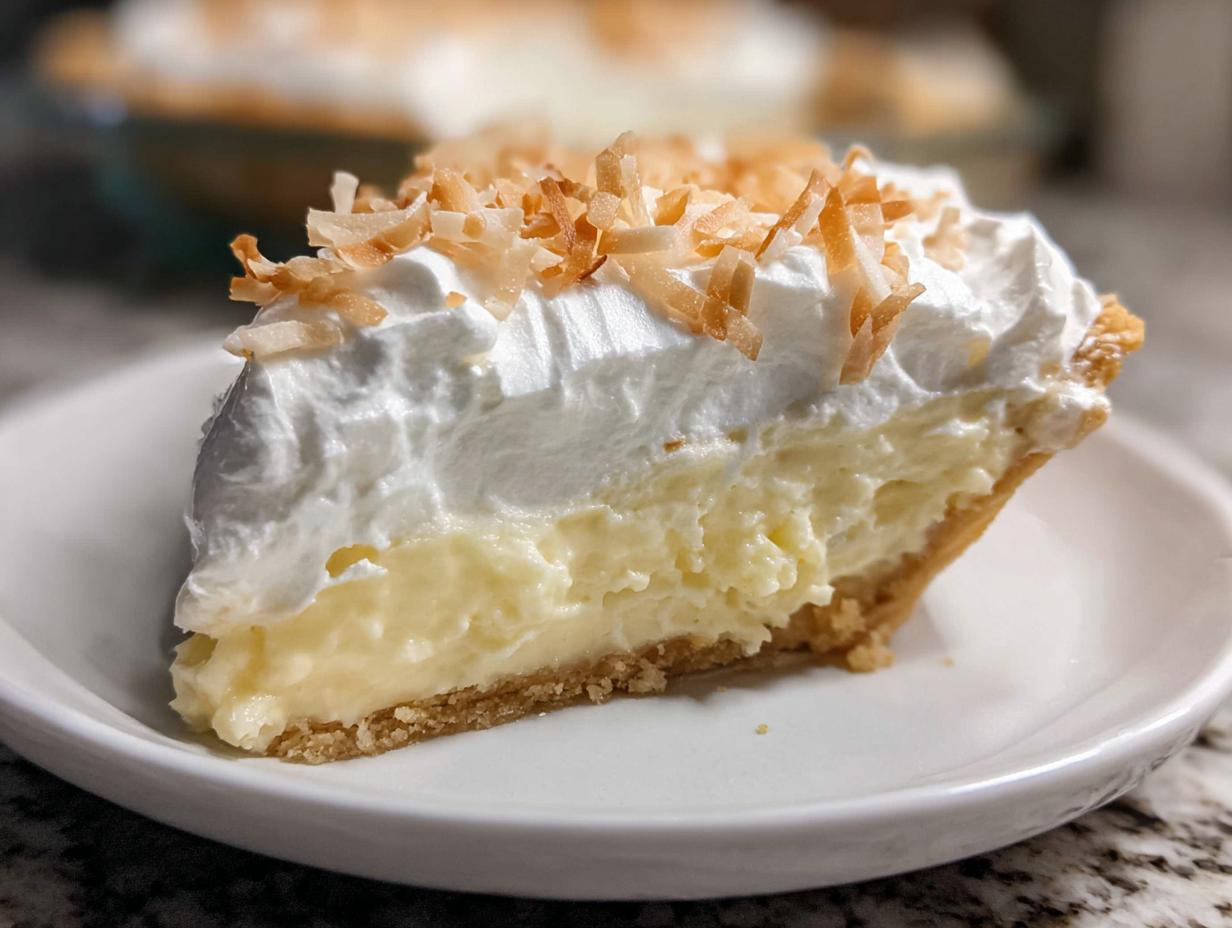
Forget those thin, watery cream pies you sometimes get at the diner. This recipe delivers on flavor and texture every single time, which is why it’s become my go-to dessert for unexpected company. It tastes like you spent all day fussing over it, even though the actual cooking time is surprisingly fast once you get the hang of it. You get that perfect harmony of sweet, rich custard, creamy topping, and crunchy toasted coconut.
- It’s surprisingly quick to cook the custard—we are talking minutes, not hours!
- The flavor profile is intensely coconutty without tasting artificial.
- It uses a simple, dependable technique that even nervous bakers can master.
Key Advantages of This Classic Coconut Cream Pie With Custard Filling
The texture is the main event here. The custard filling sets up beautifully firm—no sliding out when you slice it—thanks to that perfect blend of cornstarch and flour. The flavor depth comes from using real butter and a touch of coconut extract that really sings against the sweetness of the sweetened shredded coconut mixed right in. It’s the ultimate homemade quality without the headache.
Essential Equipment for Your Classic Coconut Cream Pie With Custard Filling
You don’t need a huge arsenal of gadgets for this pie, which is another reason why I love it so much! Having the right basic tools on hand makes the process smooth, especially when we are dealing with hot milk and eggs. You really need a good whisk because constant motion is key to avoiding lumps in that gorgeous custard base. Don’t substitute a fork if you can help it!
Tools Needed for Perfecting the Custard
- One sturdy, medium-sized saucepan for heating the milk.
- A couple of mixing bowls—one medium and one smaller one for the egg whisking.
- A reliable balloon whisk; this is your best friend for smooth custard!
- A rubber or silicone spatula for scraping down the sides.
- A pre baked 9-inch pie crust ready to go.
- A hand mixer or stand mixer for whipping up the topping later.
Gathering Ingredients for Classic Coconut Cream Pie With Custard Filling
Okay, let’s talk ingredients! Getting these measurements right is half the battle won when it comes to that dreamy custard filling. I always lay everything out on the counter first—we call that mise en place, but really, it’s just me making sure I don’t forget the salt when I’m distracted by the smell of warm milk! You need quality stuff here because the flavor is so clean and direct. Since this is a coconut pie, the coconut has to shine, but it needs that rich, creamy base to hold it all together.
Don’t try to substitute the egg yolks; they are what give the custard that deep yellow color and richness that milk alone can’t provide. We need precision here, so grab your measuring cups and get ready to measure twice!
Pie Crust Requirements
You absolutely must start with a crust that is already baked and cooled. We are not baking this crust with the wet filling, or you’ll end up with a soggy mess! For this recipe, you need:
- 1 pre baked 9 inch pie crust. Make sure it’s cooled completely before you start the filling!
Components for the Silky Coconut Custard Filling
This is where the magic happens, so pay close attention to the liquids and the thickeners. I find it helps to put the dry powders into the bowl *before* adding the cold milk so you can whisk them into a paste without lumps.
For the filling, you will need:
- 2\u00bc cups whole milk (divided, remember we use it in two steps!)
- \u00bd cup granulated sugar
- \u00bc teaspoon kosher salt
- 2 tablespoons cornstarch and 3 tablespoons all purpose flour (the dynamic duo for thickening!)
- 3 large egg yolks (don’t throw out those whites, maybe save them for meringues later!)
- 1 tablespoon unsalted butter
- 1 teaspoon coconut flavoring
- 1 cup shredded sweetened coconut
Ingredients for the Light Whipped Topping and Garnish
The topping is simple, but it needs to be cold when you start whipping it, or it just won’t get stiff enough. We want stiff peaks so the topping holds its shape beautifully over that chilled custard.
You’ll need these for the finale:
- 1 cup heavy whipping cream
- 3 tablespoons powdered sugar
- \u00bd teaspoon coconut flavoring
- Garnish: \u2153 cup shredded coconut toasted (Toasting this is non-negotiable—it adds the perfect crunch!)
I suggest using a small kitchen scale if you have one for the sugar and flour, just to be extra certain, although standard measuring cups work just fine if you level everything off correctly.
Step-by-Step Instructions for Your Classic Coconut Cream Pie With Custard Filling
Alright, deep breath! This is where we turn ingredients into dessert magic. Remember, the secret to a perfect Classic Coconut Cream Pie With Custard Filling is patience during the heating and tempering phases. Don’t rush the stovetop, and you won’t have to worry about lumps or broken eggs. I always put on some good music while doing this part because it requires my full attention, but it’s worth every minute!
Preparing the Custard Base
First things first, get that milk warming up. Pour about one and three-quarter cups of your whole milk into a medium saucepan and set it over medium heat. You want it steaming—hot—but absolutely do not let it boil! If it boils, you have to start over, so watch it closely. While that’s heating, grab a separate bowl. In that bowl, you’re going to whisk together your sugar, salt, cornstarch, and flour. Make sure they are totally incorporated before you add the remaining half-cup of cold milk. Whisk that cold milk in until you have a completely smooth, thin slurry—no dry pockets allowed!
Once the slurry is smooth, slowly, slowly whisk it into the hot milk already in the saucepan. Keep whisking constantly as you pour! Now, turn the heat down slightly and let this mixture cook. It needs to thicken up and start gently bubbling. Once it’s bubbling, keep it going for a full five minutes, stirring all the time so the bottom doesn’t scorch. This cooking time is important; it cooks out that raw starch flavor!
Tempering the Egg Yolks for Smooth Custard
This next part is crucial, so put down your phone! In a small, separate bowl, lightly whisk your three egg yolks. Now, we need to bring those yolks up to temperature gradually so they don’t seize up on us. Take about a quarter-cup of the *hot* custard mixture from the saucepan and drizzle it *very slowly* into the egg yolks while you whisk the yolks like mad. This process is called tempering, and it’s what keeps things silky smooth. Once those yolks are warmed up, pour the tempered yolk mixture right back into the main saucepan, whisking constantly as you go.
Put the heat back on low. You only need to cook this for about two minutes until it gets noticeably thick and smooth—like a really thick pudding consistency. Immediately pull the whole thing off the heat. If you cook it too long now, those yolks will turn into an omelet, and we don’t want that!
Finishing the Coconut Custard Filling
Once it’s off the heat, stir in your tablespoon of butter until it melts completely into the hot custard. Then, quickly mix in your teaspoon of coconut flavoring and that whole cup of shredded sweetened coconut. Give it a good final stir until everything looks uniform and glossy. Now, pour this hot custard right into your pre baked, cooled pie crust. Smooth the top out with your spatula. It needs to cool down a bit before going into the fridge, so let it sit on the counter for about ten minutes. Then, cover it gently—I use plastic wrap touching the surface of the custard to prevent a skin from forming—and pop it in the refrigerator for at least three hours, or until it’s completely firm.

Creating the Whipped Topping and Final Assembly
While the pie is chilling, you can make the topping! Make sure your heavy cream and your mixing bowl are nice and cold—this helps the cream whip up faster and hold its shape. Beat the heavy cream, powdered sugar, and that half-teaspoon of coconut flavoring together until you reach stiff peaks. You know it’s ready when you can lift the whisk out and the cream stands up straight without flopping over. Once the pie is totally chilled and set, spread that beautiful whipped cream generously over the top. Then, take your toasted coconut and sprinkle it all over the top for texture. Slice, serve, and prepare for applause!
Tips for Success with Your Classic Coconut Cream Pie With Custard Filling
I’ve learned a few things the hard way over the years of making this pie, so let me save you some heartache! The biggest issue people run into is weeping—that watery puddle that forms between the custard and the whipped cream. This almost always happens because the custard wasn’t fully set, or the whipped cream was applied to a warm surface. You need patience here; rushing the chill time is the enemy of a perfect cream pie!
Also, since we are using a pre baked crust, be gentle when pouring in that hot custard. If you pour too fast or miss the center, you can actually crack the bottom of your already baked shell. Pour slowly, right down the middle, and let it spread naturally to the edges.
Temperature Control and Chilling Secrets
The chilling time isn’t just a suggestion; it’s essential for structure. You must chill the pie for a minimum of three hours until the custard is rock solid. If you try to slice it early, the custard will ooze out, and your pretty layers will collapse into a puddle. Also, when covering it before chilling, press the plastic wrap directly onto the surface of the hot custard for the first ten minutes on the counter. This stops that rubbery skin from forming on top, which would ruin the smooth texture we worked so hard to achieve!
Ingredient Notes and Simple Substitutions
You asked about substitutes, and yes, I have a few notes! If you happen to be out of that specific teaspoon of coconut flavoring, a tiny splash of high-quality vanilla extract works fine, though you lose a bit of that tropical punch. It’s important to use sweetened coconut in the filling because it has the right moisture level for the custard.
If you only have unsweetened coconut, just add an extra tablespoon of sugar to the dry mix to make up the difference. And please, if you can’t toast the garnish coconut, just skip it! Un-toasted coconut is fine, but it misses that wonderful depth of flavor and crunch we are aiming for.
Storing Your Perfect Classic Coconut Cream Pie With Custard Filling
Because this pie has a fresh custard base and real whipped cream, it doesn’t love sitting out on the counter—it’s a refrigerator pie, plain and simple. Keep any leftovers covered tightly in the fridge. It stays perfectly delicious for about two to three days, but honestly, it rarely lasts that long in my house!
You should never try to freeze this pie, especially with the whipped topping. The custard gets weird, and the cream separates. Just keep it chilled!
Here’s a quick guide for leftovers:
| Component | Storage Recommendation |
|---|---|
| Whole Pie | Covered tightly in the refrigerator. |
| Slices | Store in airtight containers for up to 3 days. |
Frequently Asked Questions About Your Classic Coconut Cream Pie With Custard Filling
I get so many questions about this pie because everyone wants that perfect, sliceable custard, and I totally get it! It’s the star of the show. Don’t stress if you run into small hiccups; most issues are easily fixed with a little adjustment. Here are the things I hear most often when people are making their first homemade cream pie.
How long does the custard filling need to set?
You really need a minimum of three hours for the custard filling to set properly. If you try cutting it before then, it will absolutely weep and ooze everywhere. I usually aim for four hours just to be safe, or even better, make it the night before! A fully chilled custard holds its shape beautifully when you go to slice it.
Can I use a different type of pie crust for this Classic Coconut Cream Pie With Custard Filling?
You can! The recipe calls for a pre baked 9-inch pie crust because we don’t want to bake the filling. If you prefer a graham cracker crust or even an Oreo crust, just make sure that base is chilled and set firmly before you pour in your hot custard. The key is that the crust has to be completely cool.
How do I prevent the whipped cream from deflating?
This is all about temperature and speed! Make sure your heavy whipping cream, your mixing bowl, and even the whisk attachments are ice cold—I sometimes pop my bowl in the freezer for ten minutes beforehand. Beat it until you see stiff peaks forming, meaning when you lift the whisk, the peaks stand straight up and don’t flop over at all. Once it’s on the pie, keep the whole thing refrigerated!
Sharing Your Homemade Classic Coconut Cream Pie With Custard Filling
Well, you did it! You conquered the custard, you toasted that coconut, and now you have a show-stopping dessert. I sincerely hope you loved making this pie as much as I love sharing this recipe with you. Please come back and tell me how it went! Drop a comment below, let me know if you added extra toasted coconut, and don’t forget to give it a star rating so others know this is the real deal!
If you want to see more of my kitchen adventures, follow along on Facebook or check out my latest pins on Pinterest!