No heading needs to be written for the introduction.
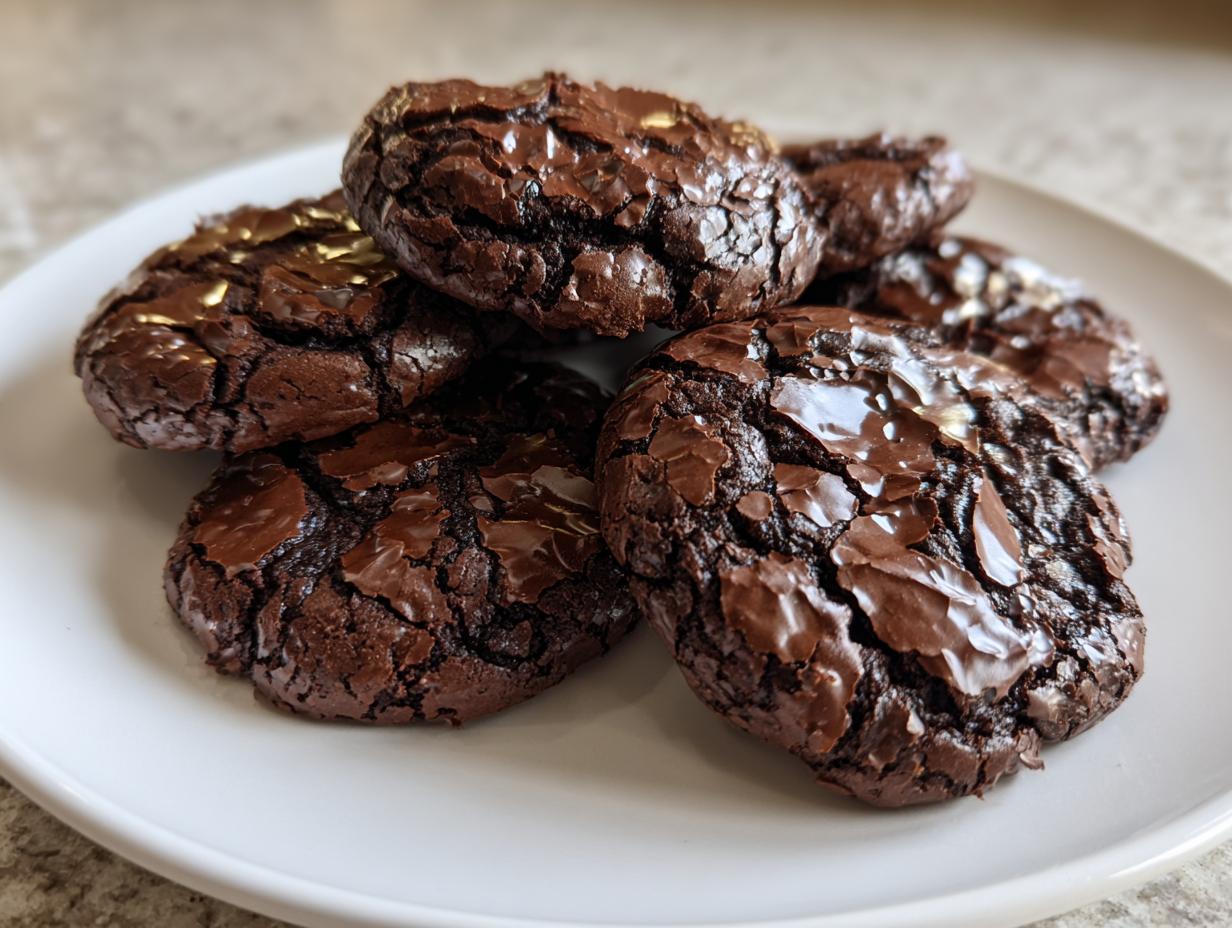
If you’ve ever stared longingly at a tray of perfect, crackly-topped brownies and wished you could eat them with your hands like a cookie, stop wishing! I finally cracked the code, and I can’t wait to share these ultimate Brownie Cookies with you. Seriously, these things are the real deal—they have that paper-thin, shiny crust that shatters when you bite it, leading straight into a center that’s pure, soft fudge.
When I first started baking, brownies felt intimidating; you always had to worry about cutting them perfectly, and they were so messy. But these cookies? They bake up beautifully and are surprisingly simple. I made my first successful batch the week before my big college final, needing a quick, satisfying chocolate fix, and I’ve been obsessed ever since.
Trust me, once you nail that five-minute egg whip, the rest is just easy folding. These Brownie Cookies are my go-to for parties because they disappear instantly. They are dense, chewy, and manage to taste richer than any standard chocolate cookie you’ve ever had. Let’s get that chocolate melting!

Gathering Your Ingredients for Perfect Brownie Cookies
Okay, before we even think about turning on the oven, we need to talk about what goes into these Brownie Cookies. This recipe is specific, and that’s because every single ingredient plays a huge role in getting that perfect truffle center and crinkly top. Don’t try to substitute things willy-nilly here; these ratios are the magic!
You’ll need to make sure everything is measured out precisely. We aren’t making a standard drop cookie here; the liquid and dry ratios are crucial for that fudgy texture we love so much. Grab your measuring cups and spoons, and let’s look at the superstars of this recipe.
Essential Components for Rich Brownie Cookies
The quality of your chocolate matters more than anything else in these Brownie Cookies. You absolutely must use good quality semi-sweet chocolate bars, roughly chopped—we’re talking about 8 ounces worth. Chips won’t melt correctly and they have stabilizers that mess up the texture. I learned that the hard way!
Also, pay attention to the eggs. They need to be at room temperature. When you whip those room-temperature eggs with the brown and white sugar for a full five minutes, you create the foam structure that results in that beautiful, thin top crust. If they’re cold, the foam won’t build up right. We need that lift!
For the dry stuff, we use a small amount of flour (only half a cup!) mixed with deep, dark Dutch-process cocoa powder. That cocoa powder is what gives the cookie its intense, almost black color and deep chocolate flavor. Don’t skip the vanilla powder if you can find it; it brings out the chocolate better than extract does in this high-heat situation.
Equipment Needed to Make Brownie Cookies
You don’t need a fancy stand mixer, though it helps! A good hand mixer is perfect for whipping those eggs into a thick foam. Make sure you have at least two large baking sheets, and definitely line them both with parchment paper before you start melting anything. You’ll also want a sturdy silicone spatula for gentle folding later on.
Step-by-Step Guide to Making Fudgy Brownie Cookies
Now for the fun part! This process moves quickly once you get going, so have everything ready before you start melting the chocolate. We are aiming for texture here, and that means paying attention to temperature and timing.
Preparing the Base and Dry Components
First things first: get the oven heating up to 350°F. You want it nice and ready. Line two big baking sheets with parchment paper; this is non-negotiable because these cookies spread a lot and they stick terribly if you skip this!
Next, let’s tackle the chocolate. Take your 8 ounces of chopped chocolate bars and the 4 tablespoons of butter and melt them together. I usually do this in the microwave in short 20-second bursts, stirring well after every blast until it’s smooth as silk. Don’t scorch it! Once melted, set that bowl aside to cool down a touch while we work on the dry stuff.
In a separate, smaller bowl, whisk together your flour, cocoa powder, baking powder, and the fine sea salt. Whisking gets rid of any sneaky lumps, especially in that cocoa powder, so take a minute to make sure it’s all uniform and ready to go.
Creating the Truffle Batter Structure
This next step is the secret sauce for that beautifully crackled top. In your big mixing bowl, combine the room-temperature eggs, the packed light brown sugar, and the granulated sugar. You need a hand mixer for this, and you must beat it on high speed for a full, solid 5 minutes. Don’t stop early! You’re looking for a mixture that gets pale, thick, and looks like it ribbons when you lift the beaters.
Once that foam is built, gently pour in your slightly cooled chocolate mixture and the vanilla powder. Whisk this on low speed, just until it’s incorporated. Then, grab your spatula. You’re going to gently fold in the dry ingredients you mixed earlier. Fold, fold, fold until you just barely see no more white flour streaks. I mean it—stop mixing as soon as the flour disappears! If you mix too much here, you lose the fudginess.
The batter is going to look much looser than a normal cookie dough—it’s going to be sloppy, almost like cake batter. That’s exactly what we want for these Brownie Cookies!

Baking and Setting Your Brownie Cookies
Use a 1.5-tablespoon scoop to drop mounds of that loose batter onto your prepared sheets. Give them tons of space—at least 2 inches apart—because they spread out wide. Bake one sheet at a time at 350°F for just 9 to 10 minutes. You want the tops to look shiny and cracked, but the very center should still look a little wet when you pull them out. They are going to finish cooking on the hot pan!
This is the hardest part: do not touch these Brownie Cookies when they come out of the oven! They are extremely fragile when hot. Let them cool completely on that baking sheet. As they cool, they firm up into that perfect, chewy, truffle-like texture. Once they are totally cool, you can carefully peel them off the parchment paper.
Tips for Achieving Expert-Level Brownie Cookies
Getting these Brownie Cookies right is all about controlling the variables, especially when it comes to heat and time. My biggest piece of advice, which I learned through many sad, flat batches, is to never, ever overbake them. That slightly underdone look when they come out of the oven is your golden ticket to that gooey, truffle center.
If you think they look done, pull them out! They firm up so much while cooling on the baking sheet. If you wait until the center looks completely baked through, you’ll end up with a chewy chocolate cookie, which is fine, but it’s not the fudgy dream we are aiming for.
Remember the egg temperature rule? I cannot stress that enough for these Brownie Cookies. Cold eggs just won’t whip up to that pale, thick ribbon stage we need. If you forget to take them out early, just set them in a bowl of warm (not hot!) water for about ten minutes before you start. That little bit of warmth makes all the difference in creating the structure needed for the perfect crinkle top. If you want more baking tips, check out our brownie mix cookies guide!
Also, stick to bar chocolate, please! Chocolate chips are designed to hold their shape, and we need ours to melt completely to blend into that glossy batter. Those small choices are what elevate these from good cookies to the best Brownie Cookies you’ll ever make. For more decadent chocolate recipes, see our guide on fudgy homemade brownies.
Storing and Keeping Your Brownie Cookies Fresh
These Brownie Cookies are so rich they actually keep surprisingly well, but you have to treat them gently. Because the center is so fudgy, they can get a little soft if you store them incorrectly. I usually try to eat them within two days, but if you have a big batch, you need a plan. You can also find great tips on our edible cookie dough bites page!
The key thing to remember is they must be completely cool before they go anywhere near an airtight container. If you seal them up warm, you’ll trap moisture and they’ll get sticky instead of staying perfectly crinkly. If you need them to last longer than a couple of days, the fridge is your best friend for these Brownie Cookies.
If they do get a little stiff from the fridge, don’t panic! A quick zap in the microwave brings that truffle center right back to life. Just a few seconds is all they need to get warm and gooey again.
Storage and Reheating Table for Brownie Cookies
| Storage Location | Duration | Reheating Method |
|---|---|---|
| Room Temperature (Airtight) | Up to 3 days | None needed, or 5 seconds microwave |
| Refrigerator | Up to 1 week | 10-15 seconds microwave |
Frequently Asked Questions About Brownie Cookies
I get so many questions about these Brownie Cookies because people want that perfect texture, and I don’t blame them! Here are the few things I hear most often:
Q1. Why are my cookies spreading too thin and becoming flat discs?
That usually means your oven wasn’t hot enough when they went in, or you didn’t whip those eggs for the full five minutes! If the egg/sugar foam isn’t thick and pale, you won’t get that signature lift and subsequent crackle top. Also, check your baking powder—if it’s old, it won’t give you the necessary lift!
Q2. Can I swap the brown sugar for all white sugar?
You really shouldn’t if you want the best Brownie Cookies. The molasses in that brown sugar is crucial for moisture and that deep, fudgy chewiness. White sugar makes things crisper, which we are actively trying to avoid here in the center of the cookie.
Q3. My centers look completely baked through. Did I leave them in too long?
Yes, most likely! That’s the number one rookie mistake. When you pull them out, the center should look visibly soft, almost wet, and definitely jiggly. They finish setting on the hot pan outside the oven. If they look done inside the oven, they will be dry cookies outside the oven.
Q4. Can I use chocolate chips instead of chopped bars?
I strongly advise against it! Chips contain stabilizers so they hold their shape during the baking process. We need the chocolate to melt completely and incorporate smoothly into the egg foam. Chopped bars give you that necessary smooth, rich base for these incredible Brownie Cookies.
Sharing Your Delicious Brownie Cookies
Now that you’ve made a batch of these incredible, fudgy treats, I really want to hear how they turned out for you! Did you get that perfect glassy crust? Did your family devour them in five minutes flat? Follow us on Facebook for more updates!
Drop a comment below and let me know your experience. Tell me if you tried any small variations, or just give me a star rating so others know how amazing these are. Happy baking! You can also save this recipe on Pinterest.
Print
Amazing 5-Minute Brownie Cookies Crave
- Total Time: 25 minutes
- Yield: 20 cookies
- Diet: Vegetarian
Description
A rich, chocolate-lover’s dream featuring a crinkly, paper-thin crust and a soft, truffle-like center, combining the best of a fudge brownie and a chewy cookie.
Ingredients
- 8 ounces semi-sweet chocolate bars, roughly chopped (do not use chips)
- 4 tablespoons unsalted butter
- 2 large eggs, room temperature
- 1/2 cup light brown sugar, packed
- 1/2 cup granulated sugar
- 1 teaspoon vanilla powder
- 1/2 cup all-purpose flour
- 2 tablespoons unsweetened Dutch-process cocoa powder
- 1/2 teaspoon baking powder
- 1/4 teaspoon fine sea salt
Instructions
- Preheat your oven to 350°F and line two large baking sheets with parchment paper.
- Melt the chopped chocolate and butter together in a heatproof bowl in the microwave in 20-second bursts, stirring constantly until smooth, then let it cool slightly.
- Whisk the flour, cocoa powder, baking powder, and salt together in a small bowl to remove any lumps.
- Beat the eggs, brown sugar, and granulated sugar in a large bowl with a hand mixer on high speed for exactly 5 minutes until pale, thick, and ribbon-like.
- Pour the slightly cooled melted chocolate mixture and vanilla powder into the egg foam and whisk gently on low speed until combined.
- Fold the dry ingredients into the wet batter using a silicone spatula just until no white flour streaks remain; the batter will be loose like cake batter.
- Scoop 1.5-tablespoon mounds of batter onto the prepared sheets, spacing them at least 2 inches apart to allow for spreading.
- Bake one sheet at a time for 9 to 10 minutes until the tops are shiny and cracked, but the centers still look slightly underdone.
- Allow the cookies to cool completely on the baking sheet, as they are extremely fragile when hot and will firm up as they set.
- Carefully peel the cooled cookies off the parchment paper to serve.
Notes
- Use room temperature eggs for best results when whipping the foam.
- Do not overbake; the centers should appear slightly underdone for a fudgy texture.
- The batter will be loose, similar to cake batter consistency.
- Allow cookies to cool fully on the baking sheet before moving them.
- Prep Time: 15 minutes
- Cook Time: 10 minutes
- Category: Dessert
- Method: Baking
- Cuisine: American