If you’re like me, sometimes 5 PM hits and you realize you forgot to thaw anything for dinner, but you’re craving something deeply savory that tastes like takeout. Seriously, this 30 Minute Mongolian Beef and Rice recipe saved me last Tuesday when I was juggling a last-minute work call and a very hungry toddler. I had flank steak thawing in the sink and hoped for the best!
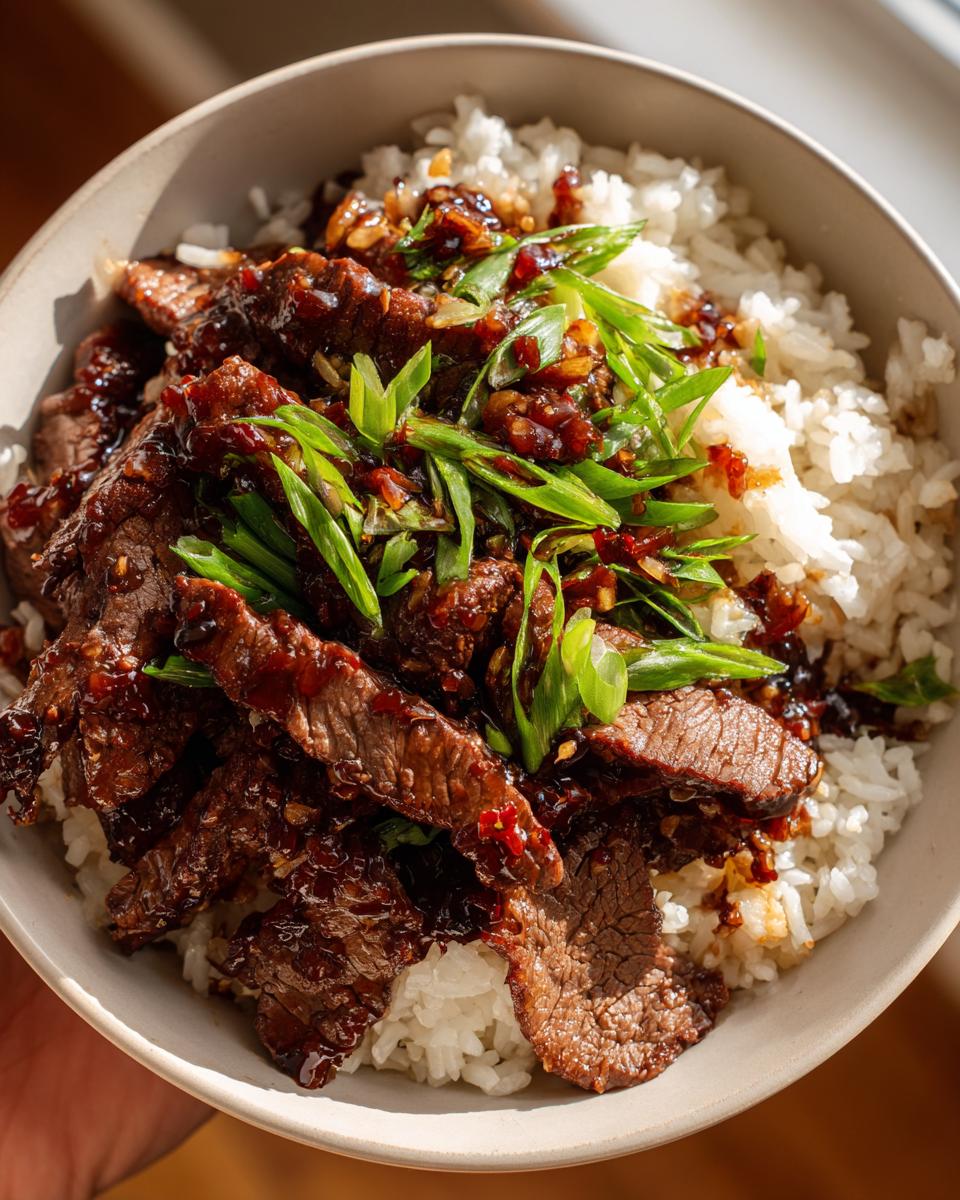
What came out of the pan was this incredible, glossy beef coated in a sticky garlic-ginger sauce. It’s shockingly low in fat but huge on flavor, and since it comes together faster than delivery can arrive, it’s become my absolute go-to for satisfying those beef stir-fry cravings. You’re going to love how simple the fresh aromatics make this dish taste gourmet.
Why This Quick Mongolian Beef and Rice Recipe Stands Out
Honestly, this recipe is a weeknight superhero. If you need dinner on the table in 30 minutes total, this is your jam. I love that I don’t have to pull out a blender or any weird specialized equipment; it’s all about quick action in one pan. For more inspiration on speedy meals that come together just as fast, check out these dinner recipes under an hour!
What came out of the pan was this incredible, glossy beef coated in a sticky garlic-ginger sauce. It’s shockingly low in fat but huge on flavor, and since it comes together faster than delivery can arrive, it’s become my absolute go-to for satisfying those beef stir-fry cravings. You’re going to love how simple the fresh aromatics make this dish taste gourmet, just like the quick dinners found here: quick weeknight hot dinners.
- It’s Fast: We’re talking 30 minutes flat from start to finish!
- Flavor First: That sauce manages to be sweet, salty, and perfectly garlicky all at once.
- Easy Cleanup: Since it’s mostly all cooked in one skillet, cleanup is a breeze, which is my favorite way to end a busy day.
Speed and Simplicity for Weeknights
Seriously, the total time is only half an hour. That sounds crazy for something that tastes this good, right? You just need about 15 minutes of prep while your rice is cooking, and then the stovetop does the heavy lifting.
Because this is all done on the stovetop, you don’t have to wait for an oven to preheat or worry about complicated layering. It moves fast, which means you’re eating sooner.
Authentic Flavor in Your Mongolian Beef and Rice
The secret weapons here, and you need to take my advice on this, are fresh minced garlic and fresh grated ginger. Do not skip these and use the jarred stuff! The flavor explosion when those aromatics hit the hot oil is unbeatable.
That combination creates that perfect, glossy, slightly sticky sauce that clings beautifully to the beef. It hits that savory-sweet spot that makes you feel like you just got amazing takeout.
Gathering Ingredients for Perfect Mongolian Beef and Rice
I always measure everything out before I start cooking because this recipe moves so fast—you won’t have time to stop and find the measuring cups once the heat is on! For the best results, make sure your beef is sliced correctly.
Getting the ingredients ready first is crucial when you’re moving this quickly, or you’ll end up with burnt garlic while you’re still trying to find the soy sauce. This isn’t a recipe you can easily pause halfway through. For more quick, healthy ideas, check out these healthy busy night dinners!
Beef Preparation and Coating
You want one pound of flank steak, and here’s the most important part: slice it thinly against the grain. This makes all the difference in tenderness; slicing with the grain leaves you with chewy bits, and nobody wants that during their quick dinner.
Once it’s sliced, toss all that beef with two tablespoons of cornstarch. Don’t be shy! The cornstarch isn’t just for texture; it actually helps tenderize the beef slightly during the first sear and it’s what makes the final sauce thick and glossy instead of watery.
Crafting the Savory Garlic Ginger Sauce
This sauce comes together with just three key liquids: half a cup of low-sodium soy sauce (we get enough salt from other places, trust me), one-third cup of brown sugar for that essential sticky sweetness, and half a cup of plain water to balance it out.
Don’t forget the aromatics that provide the real punch: you need three cloves of garlic, minced really fine, and one teaspoon of fresh ginger, grated. Those two ingredients are the soul of the Mongolian flavor, so don’t skimp on mincing them properly!
Step-by-Step Cooking Guide for Mongolian Beef and Rice
I always tell people that the key to making this dish fast is preparation—once you hit the heat, you have to move quickly. Make sure your beef is coated and your sauce ingredients are measured and placed right next to the stove before you start!
1. Toss sliced beef with cornstarch until evenly coated. Make sure every single piece gets a light dusting. This is super important for that amazing sear!
2. Heat vegetable oil in a large skillet over medium high heat. You want the skillet hot enough that the oil shimmers just slightly before you add the meat. If you don’t use high enough heat, the beef steams instead of searing.
3. Add beef in a single layer and cook for 2 to 3 minutes per side until browned. Remove and set aside. You absolutely have to cook this in batches if your pan isn’t huge, or the temperature drops, and we lose that beautiful crust. Don’t crowd the pan!
4. In the same skillet, add garlic and ginger and cook for 30 seconds until fragrant. Seriously, just 30 seconds! These burn fast, but wow, the smell when they first hit the hot pan is amazing. For more stir-fry inspiration, sometimes I even add extra veggies like broccoli using similar quick-sear techniques found in this chicken veggie stir-fry guide.
5. Stir in soy sauce, brown sugar, and water. Bring to a simmer. Whisk this mixture around the pan, scraping up any browned bits from the bottom—that’s pure flavor sticking there!
6. Return beef to the skillet and cook for 3 to 4 minutes until sauce thickens and coats the meat. This is where the magic happens. Keep stirring gently, watching that sauce transform from watery to tacky and shiny.
7. Stir in green onions and remove from heat. I love the little pop of fresh, oniony flavor the green onions add right at the end, plus the color is lovely against the brown beef. If you’re making this with chicken instead of beef, the same timing strategies apply, like you can see in my notes over on the healthy chicken stir-fry recipe.
8. Serve hot over cooked rice. Scoop that glorious beef right over two cups of your favorite cooked white rice. If you are worried about food safety, remember that the final stir in step 7 needs to get piping hot, and you must ensure the beef reaches an internal temperature of 145°F.
9. Ensure beef reaches an internal temperature of 145°F and allow a 3 minute rest before serving. That short rest time lets the juices redistribute after thickening, making every single bite perfectly tender. Don’t skip that little rest, even when you’re starving!
Serving Suggestions to Complete Your Mongolian Beef and Rice Meal
This dish is so rich and flavorful on its own, but since we are aiming for a complete, satisfying dinner, a little something extra on the side never hurts! As I mentioned in my initial notes, adding a crisp vegetable really helps cut through that perfect sweetness of the sauce.
I always have a few tricks up my sleeve to bulk this out into a really healthy family meal, especially when I’m prepping for the week. For more ideas on light additions, check out these fresh summer salad ideas!
Adding Fresh Greens for Balance
If your grocery run was light this week, don’t stress! The easiest addition is just throwing in some steamed broccoli or maybe crisp snap peas right at the very end with the green onions. This adds a fantastic bright green color contrast to the rich Mongolian Beef and Rice.
They only need about three minutes of steaming before tossing them in to eat. The slight bitterness of the broccoli stands up perfectly to the sweet and savory beef sauce, which I think is crucial for the overall balance of the meal.
Quick Sautéed Bok Choy: If you have an extra five minutes, quickly sautéing some baby bok choy with a dash of sesame oil adds a lovely, slightly crunchy texture that complements the tender beef really well.
A Sprinkle of Sesame Seeds: For a little nutty flavor and visual appeal, just top the finished bowls with a sprinkle of untoasted sesame seeds! My kids love this little finishing touch.
Storing Leftover Mongolian Beef and Rice
I rarely have leftovers because my family devours this, but when I do, storage is everything to keep that texture nice when reheating! You can definitely make this ahead, which is great for those stressful afternoons.
You can absolutely store your leftovers! The Mongolian beef mixture and the rice should be stored separately if possible, especially if you’re planning on eating them a couple of days later. I usually keep the beef mixture in its own airtight container and the rice in another one. This helps prevent the sauce from turning the rice into complete mush when it chills.
Everything stays good in the fridge for about three to four days. When you are ready to eat it, I highly recommend reheating the beef mixture gently on the stovetop or maybe the microwave for about 90 seconds until it’s steaming hot. Then, scoop the warmed beef over fresh or lightly reheated rice. For more ideas on prepping meals for the whole week ahead, you should take a look at these healthy family dinner recipes!
Frequently Asked Questions About Making Mongolian Beef and Rice
I get so many great follow-up questions on this one, especially from people trying to make it stretch for a budget week or adjusting the sugar level. I’m happy to share what I’ve learned through trial and error!
When I first started making this, I had to figure out how to make it taste amazing without breaking the bank, which is why I included some notes on making it stretch over at my guide to budget struggle meals. Here are the most common things people ask me!
Can I use a different cut of beef for this Mongolian Beef and Rice?
Absolutely! Flank steak is my favorite because it’s lean and tender when sliced correctly, but sirloin steak works really well too. If you use a thicker cut than flank steak, you might need to add an extra minute or two when you sear it in Step 3 just to make sure it browns nicely without overcooking in the final sauce step.
How do I adjust the sauce sweetness in this Mongolian Beef and Rice?
This is where personal preference comes in! The recipe calls for one-third cup of brown sugar, which gives it that classic takeout glaze. If you find you prefer a much more savory experience and less sweetness, try reducing that amount down to a quarter cup to start. You can always add a tiny pinch of sugar later if you feel it needs it, but you can’t take it out!
Enjoy Your Quick Dinner
I truly hope this 30-minute Mongolian Beef and Rice makes it onto your rotation! It’s my weeknight secret weapon for amazing taste without the wait. If you give this a go, please drop a comment below and let me know how your family liked the sticky sauce. I’m always happy to hear from you, and don’t forget to browse all my other easy spring dinner recipes!


30 Minute Mongolian Beef and Rice
- Total Time: 30 min
- Yield: 4 servings
- Diet: Low Fat
Description
Quick and flavorful Mongolian beef with tender beef slices in a savory sweet garlic ginger sauce, served over rice. This takeout-style dinner uses simple ingredients.
Ingredients
- 1 pound flank steak thinly sliced against the grain
- 2 tablespoons cornstarch
- 2 tablespoons vegetable oil
- 3 cloves garlic minced
- 1 teaspoon fresh ginger grated
- 1 half cup low sodium soy sauce
- 1 third cup brown sugar
- 1 half cup water
- 2 green onions sliced
- 2 cups cooked white rice
Instructions
- Toss sliced beef with cornstarch until evenly coated.
- Heat vegetable oil in a large skillet over medium high heat.
- Add beef in a single layer and cook for 2 to 3 minutes per side until browned. Remove and set aside.
- In the same skillet, add garlic and ginger and cook for 30 seconds until fragrant.
- Stir in soy sauce, brown sugar, and water. Bring to a simmer.
- Return beef to the skillet and cook for 3 to 4 minutes until sauce thickens and coats the meat.
- Stir in green onions and remove from heat.
- Serve hot over cooked rice.
- Ensure beef reaches an internal temperature of 145°F and allow a 3 minute rest before serving.
Notes
- For extra texture, add steamed broccoli or snap peas just before serving.
- Prep Time: 15 min
- Cook Time: 15 min
- Category: Dinner
- Method: Stovetop
- Cuisine: Asian