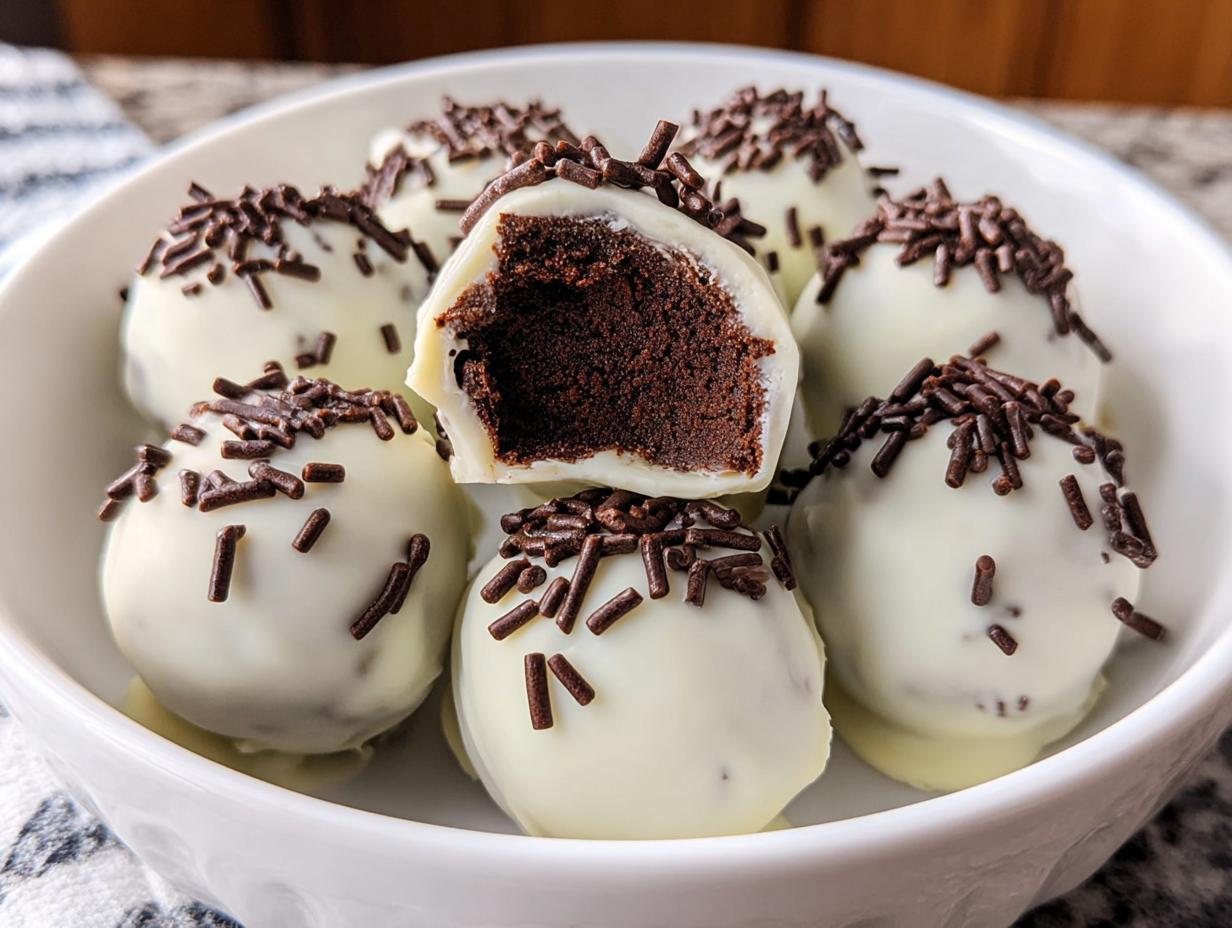
Okay, stop what you are doing. Seriously. If you’ve ever looked at those fancy bakery truffles and thought, “I could never,” then this Easy Brownie Truffles With Cream Cheese recipe is about to become your new best friend. I remember the first time I tried making these; I was terrified of dipping anything in melted chocolate! But these are truly foolproof.
The best part? They are completely no-bake! We are taking perfectly fudgy brownie centers, mixing them with just the right amount of tangy cream cheese to make them irresistible, and then coating them in a gorgeous white chocolate shell. They look incredibly impressive, but they take almost no time at all. This is my go-to dessert when company shows up unexpectedly!

Gathering Your Ingredients for Easy Brownie Truffles With Cream Cheese
Now that you’re excited—and trust me, you should be—let’s talk about getting everything ready. Because this is a no-bake recipe, the quality of what you start with really, really matters. You’re not baking away any mistakes here; you’re celebrating the flavor of the finished components!
For the best results in these Easy Brownie Truffles With Cream Cheese, you need brownies that are already fudgy, not cakey. If you use a box mix, make it the fudgiest version you can. If you trim those crispy edges off, you want the absolute softest center bits possible. That’s where the magic happens when we mix in the cream cheese!
Here is exactly what you need to pull this dessert together:
| Item | Amount | Notes |
|---|---|---|
| Baked Brownies | One 9×13 pan | Cooled completely; use only soft centers. |
| Cream Cheese | 4 ounces | Must be softened to room temperature. |
| White Chocolate Wafers | 16 ounces | Melting wafers are best for smooth dipping. |
| Chocolate Sprinkles | 2 tablespoons | For decoration right after dipping. |
Essential Components for Easy Brownie Truffles With Cream Cheese
Let’s dive into those specific components. The cream cheese is a big deal; make sure it’s fully softened! If it’s cold, you’ll get little lumps in your truffle mixture, and we want perfectly smooth, decadent bites. You need exactly 4 ounces, which is usually half of a standard block.
For the coating, I always insist on using white chocolate *melting wafers* rather than regular white chocolate chips. Chips have stabilizers in them that make them seize up or get grainy when melted, especially for coating. Wafers melt down beautifully smooth, giving you that professional, glossy finish on your Easy Brownie Truffles With Cream Cheese. Don’t skip that step! And the sprinkles? They need to be ready to go right next to your dipping station.
Necessary Equipment for Making Truffles
You don’t need a fancy stand mixer for this, which is another reason I love it! Grab a large mixing bowl—big enough to really get in there and mash things with a spoon or spatula. You’ll also need a smaller bowl for melting the chocolate. Parchment paper is absolutely non-negotiable; line a baking sheet so the truffles don’t stick while they freeze and set. Finally, you’ll need a small cookie scoop or just a measuring spoon to keep your 1-inch portions consistent. Consistency is key for even freezing and a nice presentation!
Step-by-Step Guide to Perfect Easy Brownie Truffles With Cream Cheese
Alright, let’s get messy! This is where the magic happens, and honestly, it’s more assembly than actual cooking. I like to put on some good music while I work through these steps. Remember, we are not aiming for perfection on the first try; we are aiming for deliciousness!
Preparing the Brownie Base and Cream Cheese Mixture
First things first: your brownies need to be completely cool. If they are even slightly warm, the cream cheese will melt into soup, and we won’t get that perfect truffle texture. Take your 9×13 pan and trim off all the edges—those crispy bits are great for snacking, but they don’t mix well into the smooth center.
Take only the soft, fudgy center portions and crumble them right into your big mixing bowl. You want fine crumbs, so use your hands or a fork to break them down as much as possible before adding the cream cheese. Next, drop in your 4 ounces of softened cream cheese. Now, you need to mix this really well! Use a sturdy spoon or spatula and press down firmly. Keep mixing until you can’t see any more streaks of white cream cheese and the mixture looks uniform—it should look like dark, moist dough.
Shaping and Freezing Your Easy Brownie Truffles With Cream Cheese
This is the secret step that makes rolling so easy! Use a small cookie scoop or a tablespoon to portion out the brownie mixture into roughly 1-inch balls. Try to keep them the same size so they freeze evenly. Place all these little mounds onto your parchment-lined baking sheet. Don’t crowd them too much!
Now, we freeze them! Pop that sheet into the freezer for a solid 20 minutes. This initial chill firms up the dough so it doesn’t stick to your hands when you roll it. After 20 minutes, take the sheet out and quickly roll each portion into a smooth, tight ball. Seriously, work fast here! Once they are all rolled, back into the freezer they go for another 10 minutes. This second chill makes them solid enough to handle the hot chocolate dip without falling apart. This step is crucial for beautiful Easy Brownie Truffles With Cream Cheese.

Mastering the White Chocolate Coating for Your Truffles
While those truffles are getting chilly for the second time, it’s chocolate melting time. Put your 16 ounces of white chocolate wafers into a microwave-safe bowl. The trick here is patience—absolutely no high heat! Microwave them in 30-second intervals. Stir thoroughly after every 30 seconds, even if it doesn’t look melted yet. Keep going until it’s almost completely smooth, and then just keep stirring until the residual heat takes care of the last few lumps.
You want the chocolate liquid and flowing, not thick. If it looks too thick, you can stir in just a tiny bit of vegetable oil—maybe a teaspoon—to loosen it up, but usually, the wafers do great on their own. Have your sprinkle sheet nearby; timing is everything!
Finishing and Setting the Easy Brownie Truffles With Cream Cheese
Take your firm, cold truffles out of the freezer. Use a fork or a dipping tool to drop one truffle into the melted white chocolate. Gently roll it around to coat every surface. Lift it out, letting the excess chocolate drip back into the bowl—gently tap the fork against the side of the bowl to help gravity do its job.
As soon as it’s back on the parchment paper, shower it immediately with your chocolate sprinkles! If you wait even thirty seconds, the chocolate coating will start to set, and the sprinkles won’t stick. Repeat this process until all your fudgy centers are coated and decorated. Don’t worry about messy bottoms; they’ll be facing down anyway! Then, pop the whole sheet back into the fridge until that white chocolate shell is completely hard and set. That’s it! You made incredible Easy Brownie Truffles With Cream Cheese!
Expert Tips for Making the Best Easy Brownie Truffles With Cream Cheese
I’ve definitely had a few batches go slightly wrong over the years, so let me share the hard-won wisdom for your Easy Brownie Truffles With Cream Cheese. If your chocolate coating is seizing up and getting grainy halfway through, it usually means there was a tiny drop of water in your bowl or on your utensil. Water is the enemy of melted chocolate! Make sure everything is bone dry before you start melting.
If your truffles are too soft to roll even after the first 20-minute freeze, it probably means your original brownies were too moist or you used too much cream cheese. Don’t panic! Just pop them back in the freezer for another 15 minutes. They need to be cold enough to hold their shape when you squeeze them lightly. If you are looking for other quick dessert ideas, check out my 3 Ingredient Banana Bark recipe.
Another thing I learned: when dipping, work in small batches. Only take out about six to eight frozen truffles at a time. If you take out the whole tray, the ones sitting on the counter will start to soften while you’re coating the first few. Keep the rest frozen until you need them. Following these little tricks ensures your Easy Brownie Truffles With Cream Cheese look and taste like they came from a professional kitchen! You can also find more baking inspiration on my Pinterest page.
Ingredient Notes and Simple Substitutions
So, what if you don’t have that exact 9×13 pan of fudgy goodness lying around? Don’t worry, we can work with what you have! If you have leftover store-bought brownies, use them! Just make sure you are scraping out the softest parts only. If your brownies are inherently cakey, you might need to add just a tiny bit more cream cheese—maybe an extra half ounce—to help bind the mixture together properly.
When it comes to the white chocolate, if you absolutely cannot find melting wafers, you can use good quality white chocolate bars, but you must add about a teaspoon of coconut oil or vegetable shortening when melting. This helps mimic the stabilizers found in the wafers and keeps your coating liquid and dippable. If you’re feeling brave, dark chocolate or milk chocolate works just as well for the coating, too! Just remember to switch those sprinkles out for something more colorful or maybe some chopped nuts! For more simple baking ideas, take a look at my Almond Flour Banana Bread recipe.
Storing and Serving Your Delicious Truffles
Since these are no-bake and rely on the cream cheese center, storage is key to keeping that perfect fudgy texture. You absolutely must keep these chilled! If you leave them out on the counter for too long, that center starts to soften up, and they lose their delightful bite. I usually store mine in an airtight container right in the refrigerator.
They are best served cold, but not rock-hard frozen. If you pull them straight from the fridge, let them sit on the counter for about 10 minutes before serving. This lets the cream cheese warm up just slightly so you get that wonderful contrast between the snappy white chocolate shell and the soft, rich center. Here’s a quick guide for keeping them perfect:
| Storage Method | Duration | Notes |
|---|---|---|
| Refrigerator | Up to 1 week | Airtight container is essential. |
| Freezer | Up to 2 months | Wrap tightly first, then store in a container. |
If you freeze them, let them thaw in the fridge overnight before taking them out to soften for that 10-minute serving window. They reheat beautifully! If you want to follow along with my latest posts, you can check out my Medium page.
Frequently Asked Questions About This No-Bake Dessert
I get so many questions about these fudgy brownie bites because everyone wants them to turn out perfectly the first time. Here are the most common things folks ask me about the prep time and texture!
Q1. How long does it really take to make these no-bake truffles?
The active time is super fast! You’re looking at about 30 minutes of hands-on work, mostly crumbling, mixing, and rolling. However, you have to factor in the chilling time. You need at least 40 minutes of freezing time total before they are ready to dip and set. So, plan for about an hour total before you can serve them, but most of that is hands-off waiting time!
Q2. My white chocolate coating looks thick and won’t cover the brownie ball evenly. What went wrong?
This almost always means there was a tiny bit of moisture introduced to the chocolate while melting, or you didn’t stir enough during the 30-second intervals. If it’s salvageable, stir in a tiny bit of coconut oil—like half a teaspoon—and try again. Next time, double-check that your bowl and spoon are totally dry!
Q3. Can I skip the freezing steps and just chill the truffles in the fridge?
You can try, but I really don’t recommend it, especially if you want those smooth, round shapes. The freezing step makes the cream cheese mixture firm enough to roll tightly without smearing. If you skip the freeze, your balls will be soft and sticky, and they’ll probably flatten out when you try to dip them in the chocolate coating. Trust me, 20 minutes in the freezer goes a long way!
Q4. Can I use a different flavor of chocolate coating instead of white chocolate?
Absolutely! These fudgy brownie bites are delicious dipped in milk chocolate or even dark chocolate. Just follow the same melting instructions. If you use dark chocolate, maybe swap out the chocolate sprinkles for some chopped pecans or sea salt flakes for a nice crunch!
Share Your Experience Making Easy Brownie Truffles With Cream Cheese
I put my whole heart into making sure this recipe is the easiest and tastiest dessert you’ll ever whip up. Now it’s your turn! Tell me how they turned out in the comments below. Did you stick with the white chocolate, or did you try a fun dip? Drop a rating and let me know how your Easy Brownie Truffles With Cream Cheese turned out for your family! You can also connect with me on Facebook.
Print
Shocking 1 tip for Easy Brownie Truffles With Cream Cheese
- Total Time: 30 minutes plus chilling
- Yield: 30 truffles
- Diet: Vegetarian
Description
Rich, fudgy brownie truffles coated in smooth white chocolate. This is an easy no-bake dessert perfect for sharing.
Ingredients
- 1 baked 9 by 13 inch pan of brownies cooled completely
- 4 ounces cream cheese softened
- 16 ounces white chocolate melting wafers
- 2 tablespoons chocolate sprinkles
Instructions
- Trim firm or crisp edges from the baked brownies. Keep only the soft center portions.
- Place the brownies in a large bowl and crumble finely.
- Add the softened cream cheese and mix until the mixture is smooth and fully combined.
- Scoop the mixture into 1 inch portions and place on a parchment lined baking sheet.
- Freeze for 20 minutes until firm enough to roll.
- Roll each portion into a smooth ball and return to the freezer for 10 minutes.
- Melt the white chocolate wafers in a microwave safe bowl in 30 second intervals, stirring until smooth.
- Dip each truffle into the melted chocolate, allowing excess to drip off.
- Place back on the parchment and immediately add sprinkles before the coating sets.
- Chill until the coating is firm, then serve slightly softened.
Notes
- Keep truffles chilled until serving for the best texture.
- Prep Time: 30 minutes
- Cook Time: 0 minutes
- Category: Dessert
- Method: No-Bake
- Cuisine: American