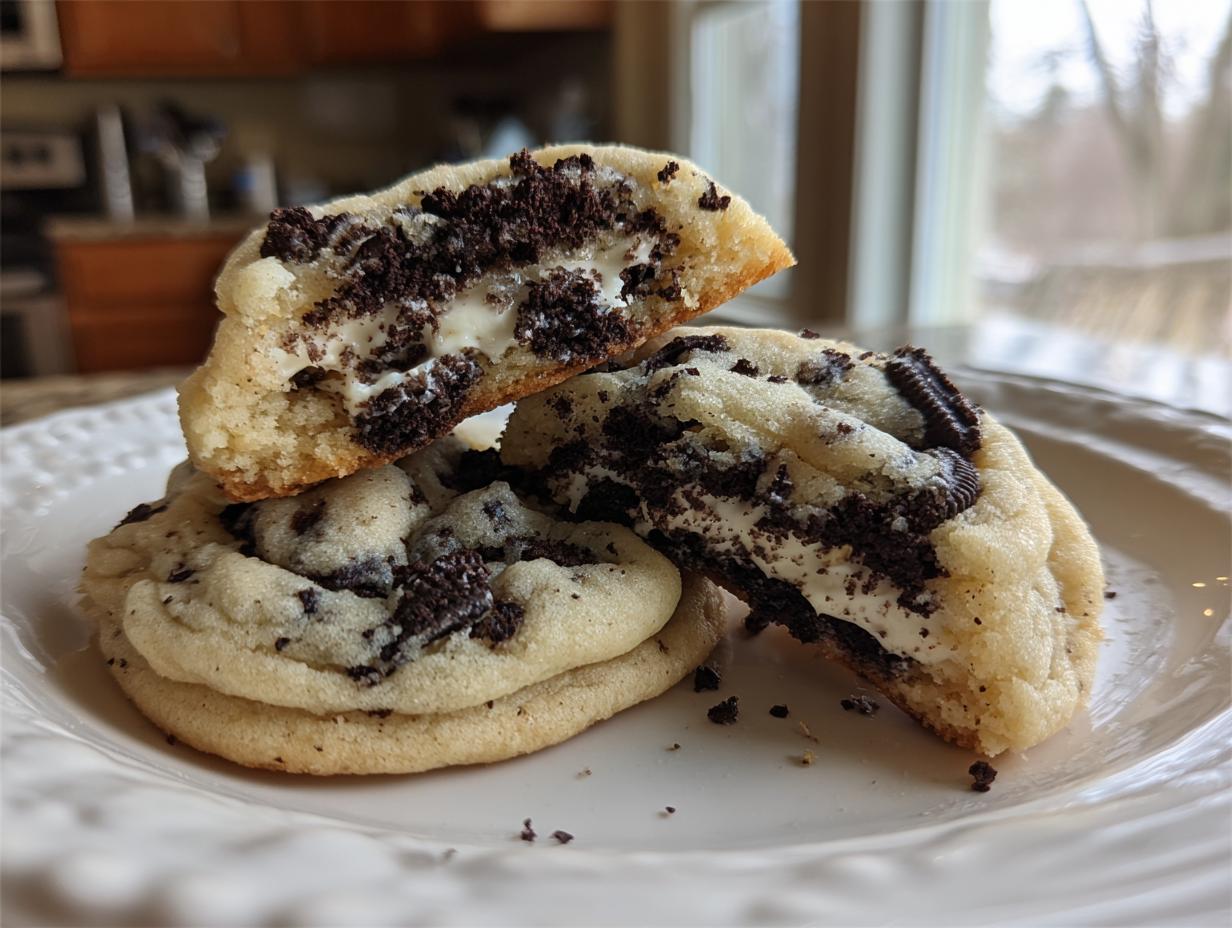
I have tried a million cookie recipes, you know, the ones that promise chewy centers but turn out flat and crispy? Ugh, the worst! But I finally cracked the code on these cookies and cream cookies, and honestly, they taste exactly like what you’d buy from that fancy little bakery downtown. I’m talking soft, thick, and absolutely loaded with those dark chocolate sandwich cookies.
When I first started baking seriously, I thought cookies were supposed to be easy—just mix and bake, right? Wrong! My early attempts were always too crumbly. This recipe changed everything for me because it focuses on getting that perfect texture first. It’s all about respecting the butter and sugar stage. Trust me, once you nail this base, making incredible, bakery-style cookies and cream cookies every single time becomes second nature. They are seriously addictive!

Essential Components for Perfect cookies and cream cookies
You can’t make show-stopping cookies and cream cookies if you skimp on the quality of your inputs. This recipe is simple, which means every single ingredient needs to be exactly what the recipe calls for. We aren’t looking for shortcuts here; we are looking for that perfect, thick, bakery lift!
The chocolate sandwich cookies are obviously the star, but how you treat them matters just as much as the dough itself. Don’t just toss them in whole! We need texture, not giant chunks that make the cookie fall apart. Get ready to crush them up!
Gathering Your cookies and cream cookies Ingredients
When you pull everything out, make sure you measure precisely. I’m serious about this part—especially the flour. Spoon the flour into your measuring cup and level it off with a knife. Don’t scoop it straight from the bag, or your cookies will be dry!
- 1 cup unsalted butter, softened (It needs to be truly soft, leave it out for an hour!)
- 1 cup granulated sugar
- 1 large egg
- 1 teaspoon vanilla extract
- 2 cups plus 2 tablespoons all-purpose flour, spooned and leveled
- 1/2 teaspoon baking soda
- 1/2 teaspoon baking powder
- 1/4 teaspoon salt
- 12 chocolate sandwich cookies, crushed into small pieces (Use your favorite brand, but make sure they are the cream-filled kind!)
Necessary Equipment for Baking
You don’t need a ton of fancy gadgets, but having the right basics ready makes the process so much smoother. Trust me, trying to cream butter by hand for four minutes is a workout you don’t want!
- Electric mixer (handheld or stand mixer) for creaming
- Two large mixing bowls (one for wet, one for dry)
- Whisk for the dry ingredients
- Rubber spatula for folding
- Rolling pin for crushing cookies
- Two large baking sheets
- Parchment paper (You absolutely need this!)
- Cookie scoop or tablespoon measure
Step-by-Step Guide to Making cookies and cream cookies
Okay, it’s time to get messy! This is where the magic happens, and I promise if you follow these steps exactly, you’ll have the best cookies and cream cookies you’ve ever made. Don’t rush the creaming step—that’s your foundation!
Preparing the Dough Base
First things first, get that oven preheated to 350 degrees Fahrenheit and line those baking sheets with parchment paper. If you skip the paper, you’ll be scraping cookies off the pan later, and trust me, that’s never fun.
Grab your mixer and get that softened butter and granulated sugar going. You need to cream them together on medium speed for a solid 3 to 4 minutes. This isn’t just mixing; you’re incorporating air. When it looks pale yellow and fluffy, like whipped clouds, *then* you add your egg and that teaspoon of vanilla. Mix until it’s just combined. If you overmix here, you deflate the air we just worked so hard to build!
Combining Dry Elements and Folding
While your wet mixture is chilling slightly, grab a separate bowl. Whisk together your flour, baking soda, baking powder, and salt. Whisking is important because it acts like a light sifting, making sure the leavening agents are evenly spread out.
Now, add the dry stuff to the wet stuff gradually. I like to do it in three additions, mixing on low speed until most of the flour streaks disappear. Stop the mixer! This is crucial: use your rubber spatula to gently fold in those crushed chocolate sandwich cookies. You want them evenly dotted throughout, so fold until you see them everywhere, but stop right there. Overmixing the flour after the liquid is added makes tough cookies, and we want soft ones!
Shaping and Finishing Your cookies and cream cookies
Time to scoop! I use a standard 3-tablespoon scoop because these cookies need height. Place them about 2 inches apart on your parchment-lined sheets. If you want that gorgeous bakery look, take a few of those reserved crushed cookie bits and gently press them right onto the top of each dough ball. It looks professional and gives you those little pops of chocolate right away.
Bake them for 10 to 12 minutes. Watch them closely! The edges should look set, but the very center should still look a little soft and underbaked when you pull them out. They finish cooking on the hot pan, which guarantees you get those perfectly chewy cookies and cream cookies.

Tips for Achieving Bakery-Style cookies and cream cookies
Getting that perfect, thick, bakery-style look for your cookies and cream cookies isn’t luck; it’s about controlling temperature and motion. If you want them to spread just right and stay soft, you have to pay attention to the details we talked about earlier, especially when it comes to handling the dough.
Avoiding Common Baking Mistakes
The number one way people ruin cookies is by overbaking them. Seriously, pull those cookies out when you think they look slightly too soon! If you wait until the center looks completely baked through, you’ll end up with flat, crispy discs instead of the soft, chewy cookies and cream cookies we are aiming for. The residual heat on the pan will finish the job.
Another huge mistake is skipping the chilling time if your dough feels too warm, though this recipe usually doesn’t require it since we aren’t using loads of butter. If you feel like your dough is greasy or spreading way too fast in the oven, pop the whole tray in the fridge for 15 minutes before baking. That cold fat slows the spread, keeping your cookies thick and lofty.
Ingredient Substitutions for cookies and cream cookies
While I just love using the classic chocolate sandwich cookies, don’t stress if you only have a different brand on hand. Any good quality chocolate wafer cookie works beautifully in these cookies and cream cookies. The key is making sure they are dry enough to crush well.
If you absolutely must substitute the butter, know that it will change the texture slightly. Margarine doesn’t emulsify the same way, so the cookies might spread a bit more. I’ve never tried it, but I hear using half whole wheat pastry flour instead of all-purpose flour can give them a nice nutty depth without sacrificing too much softness. Just don’t mess with the leavening agents; the baking soda and powder balance is critical for that soft texture!
Serving and Storing Your Freshly Baked Treats
Honestly, the very best way to eat these cookies and cream cookies is warm, about five minutes after they come out of the oven. That moment when the chocolate bits are still slightly gooey and the center is perfectly soft? Unbeatable! I usually sneak two before I even put the rest on the cooling rack. If you want more dessert ideas, check out our sweet potato pie cookies!
But let’s be real, you probably won’t eat all 18 in one sitting—though I wouldn’t judge you if you tried! Storing them correctly is key if you want them to stay chewy and not turn into hard little hockey pucks by the next day. They don’t last long because they are so tender.
How to Store Leftover cookies and cream cookies
The main enemy of a soft cookie is air. If you leave them out on a plate, they dry out fast. You need an airtight container to trap that remaining moisture inside. If you have room in the container, try this trick: place one slice of white bread in there with the cookies. The cookies will steal the moisture from the bread, keeping them softer for longer! You can also find other great tips on our Medium page.
Make sure they are completely cool before you seal them up. Putting warm cookies into a sealed container traps steam, which leads to sogginess, and that’s not what we want for our beautiful cookies and cream cookies.
Here’s a quick guide for keeping them perfect:
| Storage Method | Timeframe | Best For |
|---|---|---|
| Airtight Container (Room Temp) | 3-4 days | Maximum softness |
| Freezing Dough Balls | Up to 3 months | Baking fresh batches later |
| Airtight Container with Bread Slice | Up to 5 days | Extending freshness |
Frequently Asked Questions About cookies and cream cookies
I get asked about these cookies all the time! They seem simple, but people always have questions about getting that perfect texture. Here are the most common things folks want to know about making truly soft cookies and cream cookies.
Q1. Why did my cookies spread out flat instead of staying thick?
That usually means your butter was too warm when you started creaming, or you skipped creaming it long enough to whip in air. If the butter melts too fast in the oven, the cookie spreads right out. Next time, make sure your butter is soft but still cool to the touch!
Q2. Can I use Oreos instead of the generic chocolate sandwich cookies?
Absolutely! I mentioned it in the tips, but yes, you can use any brand of chocolate wafer cookie you like. The flavor profile is very similar, and they crush up just as nicely. So yes, classic Oreos make fantastic cookies and cream cookies! For more baking inspiration, follow us on Facebook.
Q3. How do I make sure the crushed cookies don’t make the dough soggy?
That’s a great question about moisture control! The trick is to make sure the cookies are crushed into small, dry pieces, not wet crumbs. Also, don’t overmix them into the dough. You want to fold them in right at the very end, just until they are incorporated. If you mix them too long, the cream filling can start to break down and make your dough greasy.
Q4. Are these cookies good for shipping or packing in lunches?
They are best eaten fresh, like within the first 24 hours, for maximum softness. If you need to pack them for school or a picnic, they hold up fine for a day or two in an airtight container. For longer storage, freezing the dough balls before baking is your best bet to keep that chewy quality! If you are looking for savory options, try our caramelized onion grilled cheese recipe.
Understanding the Nutritional Profile
Since these are homemade, the exact numbers can wiggle around based on the brand of cookie you use, but I wanted to give you a rough idea of what you’re getting into with these amazing cookies and cream cookies. They are a treat, for sure, but knowing the basics helps!
Estimated Nutritional Values for cookies and cream cookies
Please remember these are just estimates based on the ingredients listed. I always say, if you’re eating a homemade cookie, you should enjoy it without worrying too much about the details!
| Nutrient | Estimated Amount (Per Cookie) |
|---|---|
| Calories | 210 |
| Fat | 10g |
| Carbohydrates | 28g |
| Protein | 2g |
Share Your Soft and Chewy Baking Results
I’ve shared all my secrets for making these incredible, thick cookies and cream cookies, and now I want to see yours! Did they turn out perfectly soft? Did you manage to press those extra cookie bits on top for that bakery look? Don’t be shy! Check out our Pinterest for more visual inspiration.
Let me know how they turned out in the comments below. I love hearing your baking stories, and seeing pictures of your beautiful cookies makes my day. Happy baking, friends!
Print
Perfect cookies and cream cookies: 1 amazing trick
- Total Time: 32 minutes
- Yield: 18 cookies
- Diet: Omnivore
Description
Make bakery-style cookies and cream cookies that are soft, chewy, and packed with crushed chocolate cookies. This is an easy dessert for any occasion.
Ingredients
- 1 cup unsalted butter, softened
- 1 cup granulated sugar
- 1 large egg
- 1 teaspoon vanilla extract
- 2 cups plus 2 tablespoons all-purpose flour, spooned and leveled
- 1/2 teaspoon baking soda
- 1/2 teaspoon baking powder
- 1/4 teaspoon salt
- 12 chocolate sandwich cookies, crushed into small pieces
Instructions
- Preheat oven to 350°F and line two baking sheets with parchment paper.
- Place the chocolate sandwich cookies in a resealable bag and crush them with a rolling pin until small pieces remain. Set aside.
- In a large mixing bowl, cream butter and sugar together using an electric mixer on medium speed until light and fluffy, about 3–4 minutes.
- Add the egg and vanilla extract and mix until well combined.
- In a separate bowl, whisk together the flour, baking soda, baking powder, and salt.
- Gradually add the dry ingredients to the wet mixture, stirring until a soft dough forms.
- Fold in the crushed chocolate cookie pieces until evenly distributed.
- Scoop about 3 tablespoons of dough for each cookie and place them 2 inches apart on the prepared baking sheets.
- Press a few extra crushed cookie bits onto the tops for a bakery-style look.
- Bake for 10–12 minutes or until the edges are set and the bottoms are lightly golden. The centers will still look soft.
- Let cookies cool on the baking sheet for 5 minutes, then transfer to a wire rack to cool completely.
Notes
- These cookies are best eaten the day they are made for maximum softness.
- You can substitute any brand of chocolate sandwich cookies.
- Do not overbake; slightly underbaked centers result in a chewier cookie.
- Prep Time: 20 minutes
- Cook Time: 12 minutes
- Category: Dessert
- Method: Baking
- Cuisine: American