Chocolate Toffee Cake is proof that you don’t need three years of culinary school to bake something truly show-stopping. When I first started NoobRecipes, I was terrified of anything that involved more than three ingredients. I remember trying to make a simple sheet cake once, and it came out looking like a dense, sugary frisbee. That’s why I’m so passionate about recipes like this one! This Chocolate Toffee Cake, with its decadent layers of chocolate, sweet condensed milk, and crunchy toffee, uses a box mix base, which takes away all the scary measuring and mixing that trips up new bakers.
Seriously, if you’ve ever wanted to impress someone but thought baking was too complicated, this is your secret weapon. We’re talking about a dessert that looks like it took hours of careful layering but comes together faster than ordering takeout. It’s rich, it’s gooey, and it’s practically foolproof. I guarantee that once you master the simple poking technique here, you’ll feel like you’ve unlocked a major baking secret. Trust me, this cake is going to be your new go-to for potlucks and lazy Sunday baking sessions.

Why You Need This Chocolate Toffee Cake Recipe
Look, I get it. You want dessert, but you don’t want the fuss. That’s exactly why this Chocolate Toffee Cake lives rent-free in my recipe rotation. It delivers maximum flavor payoff for minimum effort. You don’t need fancy techniques; you just need a wooden spoon for poking and some patience while it chills. It’s the perfect introduction to layered, no-fuss desserts for any beginner baker out there.
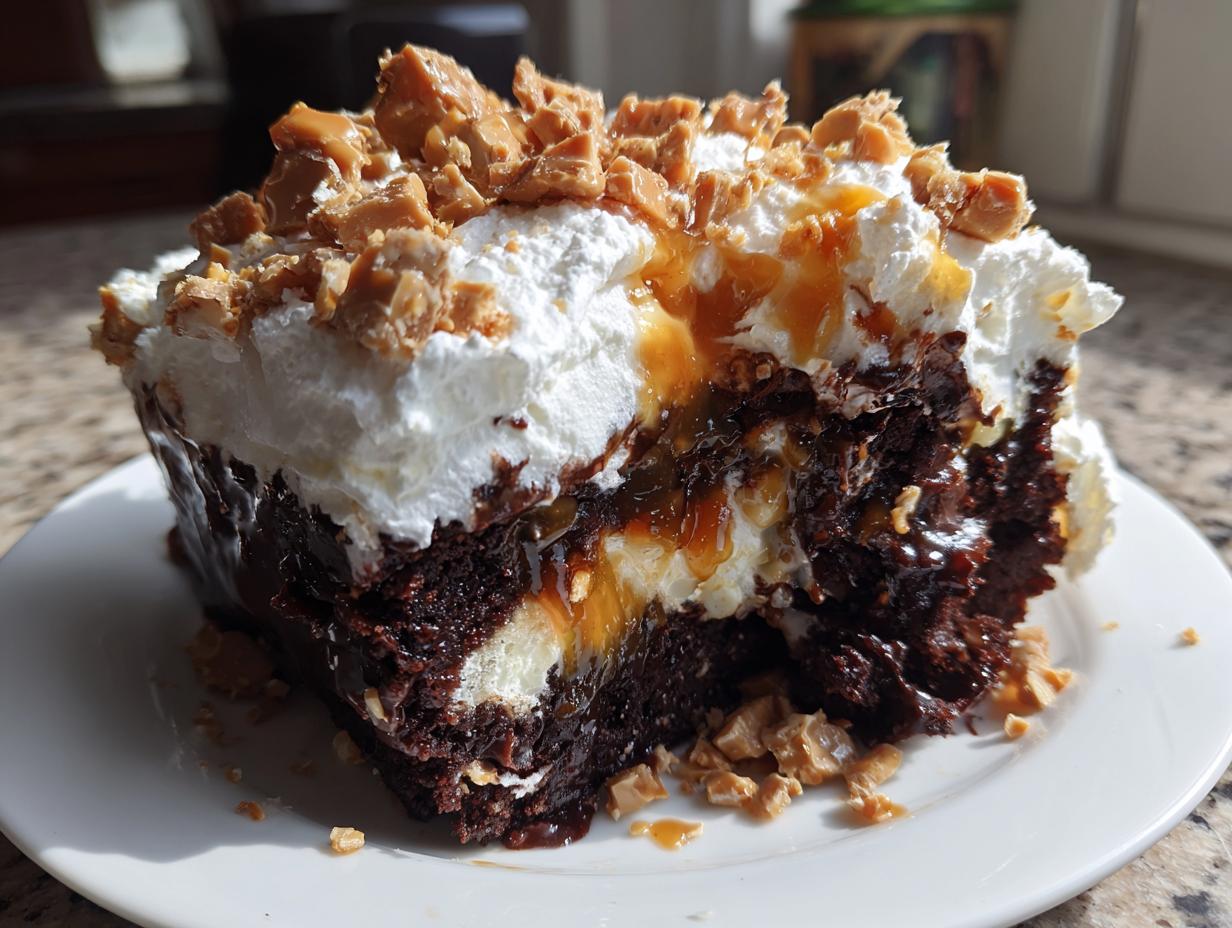
This cake is all about those amazing textures working together. You get the soft, soaked chocolate cake, the smooth caramel sauce filling all the tiny holes, and then that incredible crunch from the toffee on top. It’s a winner every single time, and nobody needs to know how easy it was! If you enjoy easy, decadent desserts, you might also love our recipe for decadent chocolate lava pudding cake.
- It’s unbelievably fast to assemble—seriously, under 20 minutes of active work.
- It relies on simple, readily available ingredients, mostly from the baking aisle.
- The flavor profile is pure decadence: deep chocolate meets salty, buttery caramel.
Quick Facts About This Chocolate Toffee Cake
We keep things quick here at NoobRecipes. You’ll love how fast this comes together. Prep work is a breeze.
Prep Time: Just 15 minutes. You can do this while the coffee brews!
Cook Time: About 30 minutes in the oven. Keep an eye on it.
Yield: It makes 12 generous servings. Perfect for sharing or having seconds!
Ingredients for Your Chocolate Toffee Cake
Since we are relying on a cake mix here, measuring is mostly about pouring and opening cans, which is exactly how I like it! When you’re starting out, precision matters most when dealing with the liquids and the add-ins. We need to make sure we get all that gooey goodness poured evenly over the cake so it soaks down into those holes we make later. Don’t skip the chilling step—that’s when the magic happens and the cake sets up properly before the toppings go on. Have everything measured out and ready to go before you even turn the oven on; it makes the assembly feel super smooth.
Required Components
Here is exactly what you need to gather for this easy, decadent treat. Remember, the toffee bars need to be chopped up before we sprinkle them on at the very end! If you are looking for other easy dessert ideas, check out our ooey gooey brown butter chocolate chip cookies.
- Devil’s Food Chocolate cake mix, plus the eggs, oil, and water required on the box
- 14 ounces sweetened condensed milk
- 16 ounces caramel sauce
- 8 ounces Cool Whip (or a similar whipped topping)
- 4 toffee bars, chopped into small, crunchy pieces
Step-by-Step Instructions to Make Chocolate Toffee Cake
Okay, this is the fun part where we turn simple ingredients into something unbelievably rich. Don’t feel intimidated by the steps; they are mostly waiting! We are going to build this cake layer by delicious layer. Make sure your 9×13 dish is ready to go before you even start mixing the batter because timing is key for the next step.
Baking and Soaking the Cake Base
First things first: get that oven heating up to 350°F. While it’s warming, spray your 9×13 dish really well with nonstick spray. I like to give it a good coating, maybe even a light dusting of cocoa powder instead of flour, just to be safe with chocolate cakes.
Now, mix up your Devil’s Food cake according to the box directions—usually eggs, oil, and water. Pour that batter into your prepared dish and pop it into the preheated oven. It should bake for about 30 minutes, but keep an eye on it, as box mixes can vary! Once it’s done—meaning a toothpick inserted near the center comes out clean—we move to the most important step.
Take the cake out, but don’t let it cool completely! You want it still quite warm, but not piping hot, or it will just crumble when you poke it. Grab the round, smooth end of a wooden spoon—not a sharp fork—and gently poke holes all over the surface. You want lots and lots of little craters, reaching almost to the bottom, but don’t break through the base! This is how the cake drinks up all that amazing flavor.
Chilling and Finishing the Chocolate Toffee Cake
Once the cake is nicely pocked, grab your sweetened condensed milk. Pour it slowly and evenly over the entire warm surface. You’ll see it start to seep down into those holes immediately. If you notice any spots where the milk isn’t going in, tap the side of the pan gently. This tapping helps settle the liquid and pushes out any trapped air bubbles, ensuring maximum soakage. Wipe up any drips on the side of the pan.
Next up is the caramel sauce! Pour that right over the condensed milk layer and spread it out gently so you don’t disturb the milk layer underneath. Now, this is the hardest part: you have to walk away. Cover the dish tightly with plastic wrap and slide it into the refrigerator for at least two hours. This chilling time is crucial for letting the cake absorb all that sweetness and firm up so the topping doesn’t slide off.
When you’re ready to serve, take the chilled cake out. Spread the 8 ounces of Cool Whip evenly over the top. It should glide on easily over the cold, set layers. Finally, sprinkle those chopped toffee bars all over the top for that perfect salty crunch. Slice it up and get ready for the compliments!

Tips for Perfect Chocolate Toffee Cake Results
This cake is ridiculously forgiving, which is why I love it for my NoobRecipes crowd, but there are two moments where you really need to pay attention to temperature. If you get these right, you’ll have a perfectly moist, decadent slice every time. Don’t rush the process, especially when adding the liquids!
The biggest beginner pitfall is waiting too long to pour the milk and caramel. If the cake cools down completely before you poke the holes and pour, the liquids just sit on top instead of soaking in. That warm cake acts like a sponge, drawing all that sweet condensed milk deep into the crumb, making the whole thing incredibly moist. If you wait too long, you end up with a soupy top layer, which isn’t what we want.
The second key temperature point is the chilling phase. You absolutely must let the cake chill for those two hours minimum. If you try to spread the Cool Whip over a room-temperature or slightly warm cake, it will melt right into a puddle. A cold, set surface is what gives you that beautiful, fluffy white layer contrasting with the dark, gooey cake underneath.
Achieving the Best Texture
Remember, the holes need to be made while the cake is warm, but the topping needs a cold foundation. When poking, use the round end of your spoon handle or even a thick straw—whatever is smooth and won’t tear the cake too much. We need those little pockets to drink up the milk and caramel.
Also, don’t forget to gently tap the pan after pouring the liquids. I know it feels silly, but tapping helps the liquids find their way down into those deep holes you made. If you see any air pockets floating on top, a gentle tap helps them release. This ensures you get that signature deeply saturated crumb we are aiming for in this easy dessert! For more easy baking tips, follow us on Pinterest.
Storage and Reheating Instructions for Chocolate Toffee Cake
Even though this Chocolate Toffee Cake is so good you’ll probably want to eat it all in one sitting, sometimes we end up with leftovers. Since this recipe has whipped topping and dairy, we have to be a little careful about how we store it so it stays fresh and safe. The good news is that because the cake base is soaked in condensed milk, it holds its moisture really well, even after a few days in the fridge!
You absolutely must keep this cake covered and chilled. If you leave it on the counter, the Cool Whip will start to weep and the whole thing will get messy fast. Don’t worry about reheating it, though; this cake is actually better served cold or just slightly cool. It’s designed to be a chilled dessert! If you are interested in other chilled desserts, check out our recipe for no-bake churro cheesecake bars.
Storing Leftover Chocolate Toffee Cake
Here’s a quick guide so you know exactly how long you can keep those amazing slices around. Always use an airtight container or cover the dish very tightly with plastic wrap before refrigerating.
| Storage Method | Duration | Notes |
|---|---|---|
| Refrigerator | Up to 4 days | Keep tightly covered to prevent the topping from drying out. |
| Freezer | Up to 1 month | Wrap tightly in plastic wrap, then foil. Thaw overnight in the fridge. |
Frequently Asked Questions About This Easy Dessert
I get so many questions about this recipe because people are always worried they’ll mess up the soaking part! Don’t stress; those initial steps are designed to be super easy, even if you’re brand new to baking. Knowing a few things ahead of time can save you time and guarantee a perfect result. Remember, this is an easy dessert, and we want to keep it that way!
We used a boxed mix for a reason—to eliminate the risk of tough cake layers. However, the liquids and chilling are where the real flavor builds, so pay attention to those steps. If you follow the warm-cake poking rule, you’ve already won half the battle with this decadent cake. If you want to see more of our beginner-friendly content, check out our About page.
Can I Make This Chocolate Toffee Cake Ahead of Time?
Yes, you absolutely can! In fact, I encourage it. This Chocolate Toffee Cake tastes even better the next day because the condensed milk and caramel have more time to soak deep into the chocolate crumb. You should complete the entire recipe—baking, soaking, chilling, and topping—and then store it covered in the fridge. It’s perfect for making the day before a party. Just make sure you wait until the very last minute to put the Cool Whip and toffee on if you are making it more than 12 hours ahead, just so the topping stays perfectly fluffy.
Substitution Ideas for the Toffee
If you can’t find toffee bars, or maybe you just want a different kind of crunch, don’t panic! You don’t have to skip the topping. A fantastic substitute would be chopped peanut butter cups or even crushed pretzels if you want to lean into a salty-sweet vibe. If you want to keep it purely chocolate and caramel, crushed Heath bars work perfectly, or even just some good quality chopped pecans mixed with a little sprinkle of sea salt will give you that necessary texture contrast against the smooth whipped topping.
Share Your Chocolate Toffee Cake Experience
I really hope you give this recipe a try the next time you need a quick, show-stopping dessert. Seriously, this is the only way I let my friends attempt layered cakes when they first start baking—it’s that simple and that delicious! If you try this recipe, please share a photo on Facebook.
I’m always working to make sure my NoobRecipes are solid gold for beginners, and your feedback helps me know if I’m hitting the mark. Did you try the trick of tapping the pan to help the milk settle? Did you use toffee, or did you try one of those substitutes like peanut butter cups?
I want to hear all about it! Head down to the comments below and let me know how your first Chocolate Toffee Cake turned out. And if you loved it as much as I do, please give the recipe a rating right under the instructions. Happy baking, everyone!
Print
Chocolate Toffee Cake: 1 Amazing Secret
- Total Time: 2 hours 45 minutes
- Yield: 12 servings
- Diet: Omnivore
Description
This Chocolate Toffee Cake is a rich, decadent dessert that is surprisingly simple to make, perfect for any beginner baker. It features a moist chocolate cake base soaked in sweet condensed milk and caramel, topped with whipped topping and crunchy toffee pieces.
Ingredients
- Devil’s Food Chocolate cake mix, plus ingredients listed on the cake box
- 14 ounces sweetened condensed milk
- 16 ounces caramel sauce
- 8 ounces Cool Whip
- 4 toffee bars, chopped
Instructions
- Preheat your oven to 350°F. Spray a 9×13 dish with nonstick spray.
- Prepare the cake according to the package directions for a 9×13 cake.
- When the cake finishes baking, use the round handle end of a wooden spoon to poke holes all over the cake.
- Pour the sweetened condensed milk over the top of the cake and spread it evenly.
- Pour the caramel sauce over the top of the cake and spread it evenly.
- Refrigerate the cake for a minimum of two hours.
- Spread the Cool Whip on top of the cooled cake. Sprinkle with chopped toffee bars.
Notes
- Make the holes while the cake is still slightly warm to prevent crumbling.
- When adding the cream, tap the pan gently to remove air bubbles and make sure the mixture fills the holes completely.
- Prep Time: 15 minutes
- Cook Time: 30 minutes
- Category: Dessert
- Method: Baking and Chilling
- Cuisine: American