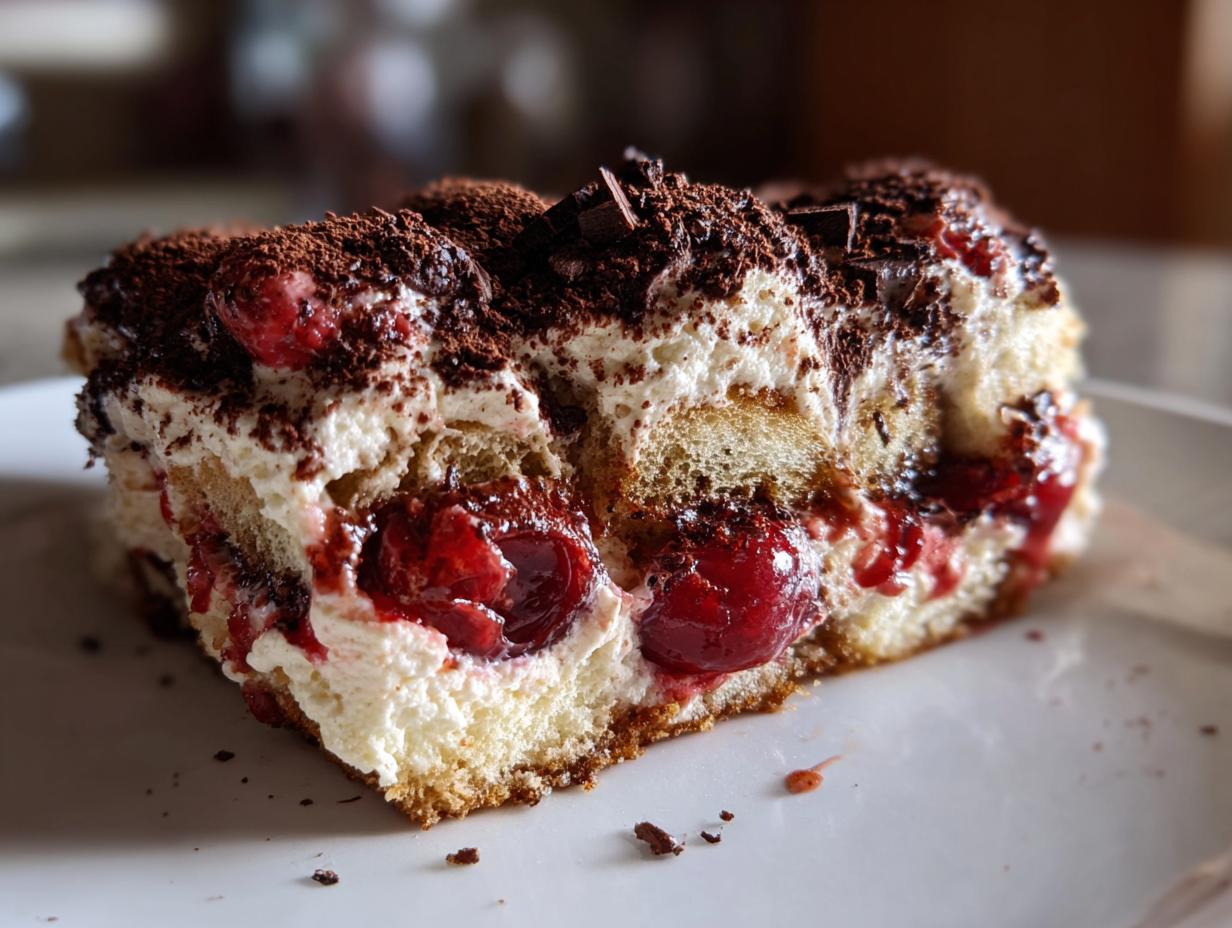
Oh my gosh, you absolutely HAVE to try this twist on the Italian classic! I’m talking about my famous Cherry tiramisu. Forget the usual coffee soak; we’re trading espresso for bright, tangy cherry syrup, and honestly, it changes everything. It tastes like a fancy bakery dessert, but I promise you, it’s one of the easiest things you’ll ever whip up.

I perfected this recipe over years of holiday dinners. Every time I bring this layered dessert out, people ask for the recipe immediately! It’s completely no-bake, which means you don’t even have to turn on the oven. If you’re new to making desserts, this is your moment to shine. The secret is letting it chill long enough so those creamy layers truly set up. Trust me, your family gatherings are about to get a serious upgrade!
Why You Will Love This Cherry Tiramisu Recipe
Seriously, this isn’t just another dessert; it’s a showstopper that requires almost zero effort. If you need a stunning make-ahead option for a party, this is it. I keep coming back to this recipe because it’s unbelievably simple but tastes incredibly complex.
Here’s why this Cherry tiramisu needs to be on your next dessert menu:
- Incredibly Quick Prep: You’re looking at maybe 20 minutes of active work before it goes into the fridge.
- No Oven Needed: Zero baking required! This keeps the kitchen cool, which is always a win in my book.
- Rich Flavor Profile: That almond extract paired with the cherry syrup is just heavenly—it’s bright, creamy, and decadent all at once.
- Perfect Make-Ahead Dessert: It actually tastes *better* the next day, so you can knock it out before any big event.
Essential Equipment for Your Cherry Tiramisu
When you’re making a layered, no-bake treat like this, having the right gear makes the whole process smoother. I’m not talking about fancy gadgets here; we’re sticking to the basics that everyone who loves to cook has lying around. Getting your tools ready first means you can focus entirely on dipping those ladyfingers without panicking later!
Tools You Need
- A 9×13-inch baking dish. This is perfect for getting those nice, even layers.
- A medium saucepan for simmering down that gorgeous cherry syrup.
- A hand mixer or a stand mixer for whipping up the cream and getting that mascarpone light and fluffy.
- A couple of good mixing bowls—one for the cream and one for the mascarpone base.
- A fine-mesh sieve or sifter for dusting that beautiful cocoa powder on top.
Gathering Ingredients for Authentic Cherry Tiramisu
Okay, let’s talk about what you need to pull off this spectacular Cherry tiramisu. Getting the right ingredients here is key to nailing that balance between tart fruit and rich cream. Don’t stress about finding anything too obscure, though! Most of this is standard stuff, but we need to be precise with the dairy and the fruit components.
The quality of your mascarpone matters a bunch, and you absolutely must use real heavy whipping cream—no substitutes if you want that airy texture we talked about. Also, make sure your cherry juice is concentrated enough to create a good syrup when simmered; you don’t want watery dipping liquid!
Ingredient Breakdown and Preparation Notes
The syrup step is where a lot of the flavor develops, so pay attention there. We use cherry preserves alongside the juice to give the syrup some body and deep flavor. And hey, if you can’t find fresh cherries, frozen ones work perfectly fine, just make sure they are pitted before you chop them up!
The extracts—almond and vanilla—are non-negotiable! The almond extract is what really makes this taste special and complements the cherries so beautifully. Don’t skip it, or it just becomes ‘cherry cream’ instead of *tiramisu*.
Ingredient List Table
Here is what you need to pull together for the whole dish:
| Ingredient | Amount | Notes |
|---|---|---|
| Mascarpone Cheese | 2 cups | Must be full-fat and chilled. |
| Heavy Whipping Cream | 1 cup | For whipping to soft peaks. |
| Cherry Juice | 1 cup | For the soaking syrup. |
| Fresh or Frozen Cherries | 1 cup | Pitted and roughly chopped. |
| Granulated Sugar | 1/4 cup | For sweetening the syrup. |
| Cherry Preserves | 2 tablespoons | Adds depth to the syrup. |
| Pure Almond Extract | 1 teaspoon | This is the secret flavor booster! |
| Vanilla Extract | 1 teaspoon | For general cream flavoring. |
| Ladyfingers | 1 package | Standard store-bought size. |
| Unsweetened Cocoa Powder | 1/4 cup | For dusting the top layer. |
| Dark Chocolate | 1/4 cup | Finely shaved for garnish. |
Step-by-Step Instructions for Perfect Cherry Tiramisu
Now we get to the fun part! Putting this amazing Cherry tiramisu together is just like building a beautiful, edible tower. Since this is a no-bake dessert, the order of operations is super important. We need one component to be cool before we mix it with another, so just follow these steps closely, and you’ll have a masterpiece ready for the fridge.
Creating the Flavorful Cherry Syrup
This syrup is your espresso replacement, so it needs to be concentrated and, crucially, cool before you use it. Grab a medium saucepan—nothing fancy needed. Pour in your cherry juice, the granulated sugar, and those two tablespoons of cherry preserves. Set it over medium heat.
You only need to let this simmer gently for about three or four minutes. You’ll notice it just thickens up a tiny bit. It shouldn’t be jammy, just slightly syrupy. Once it starts bubbling nicely, take it off the heat right away. This is critical: You must let this syrup cool down completely before you even look at the ladyfingers. If it’s warm, it will turn your ladyfingers into mush—and we want them moist, not soggy!
Preparing the Creamy Mascarpone Layer
While that syrup is chilling, let’s handle the cream. In a big bowl, take your mascarpone cheese and beat it until it’s smooth and silky. Add in both the almond extract and the vanilla extract now. Mix them in well so that flavor gets distributed everywhere.
Next, switch bowls! Take your heavy whipping cream and beat it until you get soft peaks. You know it’s ready when you lift the whisk and the cream holds its shape but the tip flops over gently. Now, gently fold that whipped cream into your mascarpone base. Don’t use the mixer here; use a spatula and fold it carefully until it’s just combined and looks airy. Finally, gently fold in those chopped cherries. You want them spread out, not clumped in one spot!
Assembling and Layering the Cherry Tiramisu
Time to build! Get your 9×13 dish ready. Take your cooled cherry syrup. This part requires speed and a gentle touch. Dip each ladyfinger into the syrup quickly—literally a one-second dip on each side. They should absorb some liquid but still feel firm. If they soak too long, your dessert will leak liquid later!
Lay down half of those dipped ladyfingers in a single layer across the bottom of the dish. Then, spread half of your creamy mascarpone-cherry mixture right over the top. Smooth it out gently so it’s even. Repeat everything: the second layer of quick-dipped ladyfingers, followed by the rest of the creamy topping. Make sure the top layer is as smooth as you can get it.

The Crucial Chilling Time
This is the hardest part, but you absolutely cannot skip it if you want a firm, beautiful slice of Cherry tiramisu. Cover the dish tightly with plastic wrap. It needs to go into the refrigerator for a minimum of four hours. Honestly, overnight is always better! This time allows the ladyfingers to fully soften into cake-like layers, and the flavors really meld together perfectly. When you pull it out, it will be firm enough to slice cleanly.
Tips for Success Making Cherry Tiramisu
Even though this dessert is super easy, there are a few little secrets that separate a good Cherry tiramisu from an absolutely legendary one. I learned these the hard way through trial and error, so you can benefit from my mistakes! A little attention to detail here saves you from a sloppy, runny mess later.
Don’t rush the chilling process—that’s rule number one. But beyond that, focusing on the texture of your cream and the moisture level of your biscuits makes all the difference in the final presentation.
Mastering the Ladyfinger Dip
This is where most people go wrong! If you soak the ladyfingers for too long, the final dessert will turn into a soupy mess at the bottom of the pan. Remember, they are like little sponges, and they will continue to absorb moisture even after you layer them.
Here’s my technique: Hold the ladyfinger with two fingers, dip the bottom side into the cooled cherry syrup for just one second. Flip it over, dip the other side for one second. That’s it! They should still feel slightly firm when you place them in the dish. They will soften up perfectly during the required chilling time, giving you that beautiful, cake-like texture without turning into mush.
Frequently Asked Questions about Cherry Tiramisu
I get so many questions about this recipe, which just tells me everyone is excited to try it! It’s really flexible, but there are a few key points you need to nail down for the best results. Don’t worry if you need to make small swaps; we can usually work around things. This Cherry tiramisu is tough to ruin, but these tips will ensure yours is perfect.
Here are the things I hear most often when people are prepping this layered dessert.
Can I make this Cherry Tiramisu ahead of time?
Yes, you absolutely should! This is one of the best make-ahead desserts out there. In fact, it tastes significantly better on day two. The minimum chilling time is four hours, but if you can let it rest overnight in the fridge, the ladyfingers absorb the cherry syrup beautifully, and the mascarpone cream firms up perfectly. Just cover it tightly before you put it away!
What is the best way to substitute the cherries?
If you can’t find fresh or frozen cherries, or maybe you just don’t have them on hand, you have a couple of great options. You can use high-quality canned dark sweet cherries, but you need to drain them really well and maybe even pat them dry slightly before chopping them and folding them in. Another wonderful substitute is raspberries! They pair beautifully with the almond extract, too, though you might want to reduce the sugar in the syrup slightly since raspberries can be tarter.
Storing and Serving Your Chilled Cherry Tiramisu
The best part about this recipe is that it’s basically designed for leftovers—if you even have any! Since this Cherry tiramisu is assembled cold and relies on chilling to set, you always want to serve it straight from the refrigerator. Never try to heat this up; it would just melt into a sweet, soupy puddle!
When it comes to storage, keeping it tightly covered is key. The mascarpone cream is delicate, and you don’t want it absorbing any weird fridge smells. Honestly, the longer it sits (up to a point), the better the texture gets because those ladyfingers just keep melding with the cream.
Storage and Leftovers Table
Here’s a quick guide for keeping your dessert perfect after that initial chill:
| Storage Method | Duration | Serving Note |
|---|---|---|
| Airtight Container in Fridge | Up to 3 days | Serve immediately when pulled out. |
| Freezing | Up to 1 month | Thaw overnight in the fridge before serving. |
| Room Temperature | Max 1 hour | Don’t leave it out too long, especially in summer! |
Share Your Experience with This Cherry Tiramisu
I’m always so thrilled when people try my family’s recipes! I hope this Cherry tiramisu becomes a new favorite for your household too. Once you’ve made it and let it chill properly, come back and tell me what you thought! Did the almond flavor shine through? How long did you actually manage to wait before digging in? Drop a comment below and let me know! You can also follow us on Facebook for more updates.
Share Your Experience with This Cherry Tiramisu
I’m always so thrilled when people try my family’s recipes! I hope this Cherry tiramisu becomes a new favorite for your household too. Once you’ve made it and let it chill properly, come back and tell me what you thought! Did the almond flavor shine through? How long did you actually manage to wait before digging in? Drop a comment below and let me know! If you want to save this recipe for later, be sure to pin it on Pinterest.
Print
Divine 4-step Cherry tiramisu recipe
- Total Time: 4 hours 20 minutes
- Yield: 8 servings
- Diet: Vegetarian
Description
This cherry tiramisu layers creamy mascarpone with cherry syrup and cocoa for a fruity twist on the classic Italian dessert. Chill and serve cold.
Ingredients
- 2 cups mascarpone cheese
- 1 cup heavy whipping cream
- 1 cup cherry juice
- 1 cup fresh or frozen cherries, pitted and chopped
- 1/4 cup granulated sugar
- 2 tablespoons cherry preserves
- 1 teaspoon pure almond extract
- 1 teaspoon vanilla extract
- 1 package ladyfingers
- 1/4 cup unsweetened cocoa powder
- 1/4 cup dark chocolate, finely shaved
Instructions
- Combine the cherry juice, sugar, and cherry preserves in a medium saucepan. Bring to a simmer over medium heat and cook for 3 to 4 minutes until slightly thickened. Remove from heat and let cool completely.
- Beat mascarpone cheese with almond and vanilla extracts in a large bowl until smooth.
- Whip heavy cream to soft peaks in a separate bowl. Gently fold the whipped cream into the mascarpone mixture until fully blended and airy.
- Fold in the chopped cherries to distribute evenly.
- Quickly dip each ladyfinger into the cooled cherry syrup, turning once so both sides are moistened but not soggy.
- Arrange half of the dipped ladyfingers in a single layer in the bottom of a 9×13-inch dish.
- Spread half of the mascarpone cherry mixture evenly over the layer.
- Repeat with another layer of dipped ladyfingers and the remaining mascarpone mixture. Smooth the top.
- Cover with plastic wrap and refrigerate for at least 4 hours or overnight to firm up and allow the flavors to develop.
- Before serving, dust the top with cocoa powder and sprinkle with shaved dark chocolate.
- Serve chilled for the best texture and flavor.
Notes
- Resting time is necessary for the dessert to set properly.
- Do not over-soak the ladyfingers in the syrup.
- Prep Time: 20 minutes
- Cook Time: 0 minutes
- Category: Dessert
- Method: No-bake, Chilling
- Cuisine: Italian