If you’re like me and sometimes you just need a treat without turning on the oven—or even just waiting for things to cool down—then you are going to absolutely fall in love with these no bake peanut butter oat cups. Seriously, they are the answer to those 3 PM cravings!
These cups hit that perfect sweet spot: they taste incredibly decadent thanks to the rich chocolate layer, but they sneak in whole rolled oats and real peanut butter, so I feel good about grabbing one (or two!). My whole family loves them, and honestly, the fact that they take about ten minutes of active work makes them a staple in my kitchen rotation. Trust me, they pack a satisfying, wholesome punch.

My Journey to the Perfect No Bake Peanut Butter Oat Cups
I used to think making anything that tasted this good required a complicated process with multiple bowls and maybe even a stand mixer. I’d skip baking altogether if I was short on time or energy. When I first started playing around with simple snacks, I needed something that was truly foolproof.
That’s where these cups shine. There’s no complicated creaming, no worrying about over-mixing flour, and absolutely zero oven time needed. It’s just mixing, pressing, melting, and chilling. It’s the perfect recipe for those days when you want a homemade dessert but don’t want to commit to an hour in the kitchen. This recipe proves you don’t need heat to create something amazing!
Gathering Your No Bake Peanut Butter Oat Cups Ingredients
Okay, this is the best part because you probably have most of this stuff sitting in your pantry right now! When making these no bake peanut butter oat cups, the quality of what you use definitely matters, even though it’s so simple. We are aiming for creamy, sweet, and rich, so pay attention to the details on those labels.
We need three main components: the base, the sweetener/binder, and the glorious chocolate top. Don’t skimp on the peanut butter—we need the creamy kind here for that smooth texture we are aiming for. Also, make sure you grab rolled oats, not instant ones, because we are going to process those ourselves!
Essential Components for No Bake Peanut Butter Oat Cups
Here’s the exact list you need to gather before you start your ten minutes of active work:
- One and a half cups of creamy peanut butter—no chunky stuff allowed for the base!
- One and a half cups of good old-fashioned rolled oats.
- A quarter cup of pure maple syrup. This is our primary binder and sweetener.
- One full cup of semisweet chocolate chips.
- One tiny teaspoon of coconut oil—this is crucial for that shiny, smooth chocolate top.
- Optional, but highly recommended: a sprinkle of flaky sea salt or some extra mini chocolate chips for decoration.
Ingredient Notes and Substitutions
Listen closely, because this is where people sometimes go wrong. If you use natural peanut butter, especially the kind that separates, your base mixture might feel crumbly or too dry at first. That’s totally normal!
If the oat mixture isn’t coming together into a dough that holds when you press it, just add a teaspoon of extra maple syrup at a time until it molds nicely. Don’t panic and dump in too much liquid, though; a little dryness is better than a soupy mess. Also, make sure those oats get processed until they look like real flour—it makes a huge difference in the final texture!
Simple Equipment for Your No Bake Peanut Butter Oat Cups
You don’t need a fancy kitchen for these babies, which is why I love them so much! We are keeping the tools simple and straightforward. Forget the stand mixer; we are mostly using things you already have.
You absolutely must have a 12-cup muffin pan, and you’ll need liners—paper or silicone works great. The real workhorse here is a food processor because we need to turn those oats into flour. If you don’t have one, you can try a high-powered blender, but the processor handles the dry oats much better.
Step-by-Step Instructions for No Bake Peanut Butter Oat Cups
Now for the fun part! Making these no bake peanut butter oat cups is honestly faster than ordering takeout. Since we aren’t baking, there’s no fiddling with oven temperatures or waiting for preheating—you can start mixing almost immediately. Just make sure you clear a little space in your fridge or freezer for the chilling time later on.
I always set up my muffin tin first, because once the peanut butter mixture is ready, you need to work fairly quickly to press it into the bottoms before it gets too stiff. Remember, patience is key during the chilling phase, but not during the mixing phase!
Preparing the Base Layer of No Bake Peanut Butter Oat Cups
First things first: line up your 12 muffin cups with paper or silicone liners. Paper cups are easier to peel off later, but silicone molds are great because they never stick! Next, grab your food processor. Toss in the rolled oats and pulse them until they look like coarse, fine flour. Don’t leave them chunky, or your base will be gritty instead of smooth.
In a separate, microwave-safe bowl—I use a glass measuring cup—combine the creamy peanut butter and the maple syrup. Pop that into the microwave for just 40 seconds. It won’t be fully melted, but that heat helps everything combine beautifully. Stir it really well until it’s smooth and glossy.
Now, dump those freshly processed oats right into the peanut butter mixture. Mix everything vigorously. It will feel stiff and thick, almost like cookie dough, but you should be able to press it together easily between your fingers. If it seems too dry and won’t form a ball, add another teaspoon of maple syrup, but stop as soon as it’s moldable. Divide this base evenly among your 12 lined cups. Press it down firmly with the back of a spoon or your fingers to create a nice, even layer. Get those bases set!
Creating the Smooth Chocolate Topping
Time for the payoff layer! Grab a new, clean microwave-safe bowl. Combine your chocolate chips and that tiny teaspoon of coconut oil. The coconut oil is our secret weapon here; it helps the chocolate set up beautifully and gives it a gorgeous shine. Melt this in 30-second bursts, stirring thoroughly after *every* interval. It’s tempting to go for a full minute, but you risk burning the chocolate! Stop when it’s just smooth enough to stir the last few unmelted chips into the warm liquid. It should be pourable but thick.
Assembling and Chilling Your No Bake Peanut Butter Oat Cups
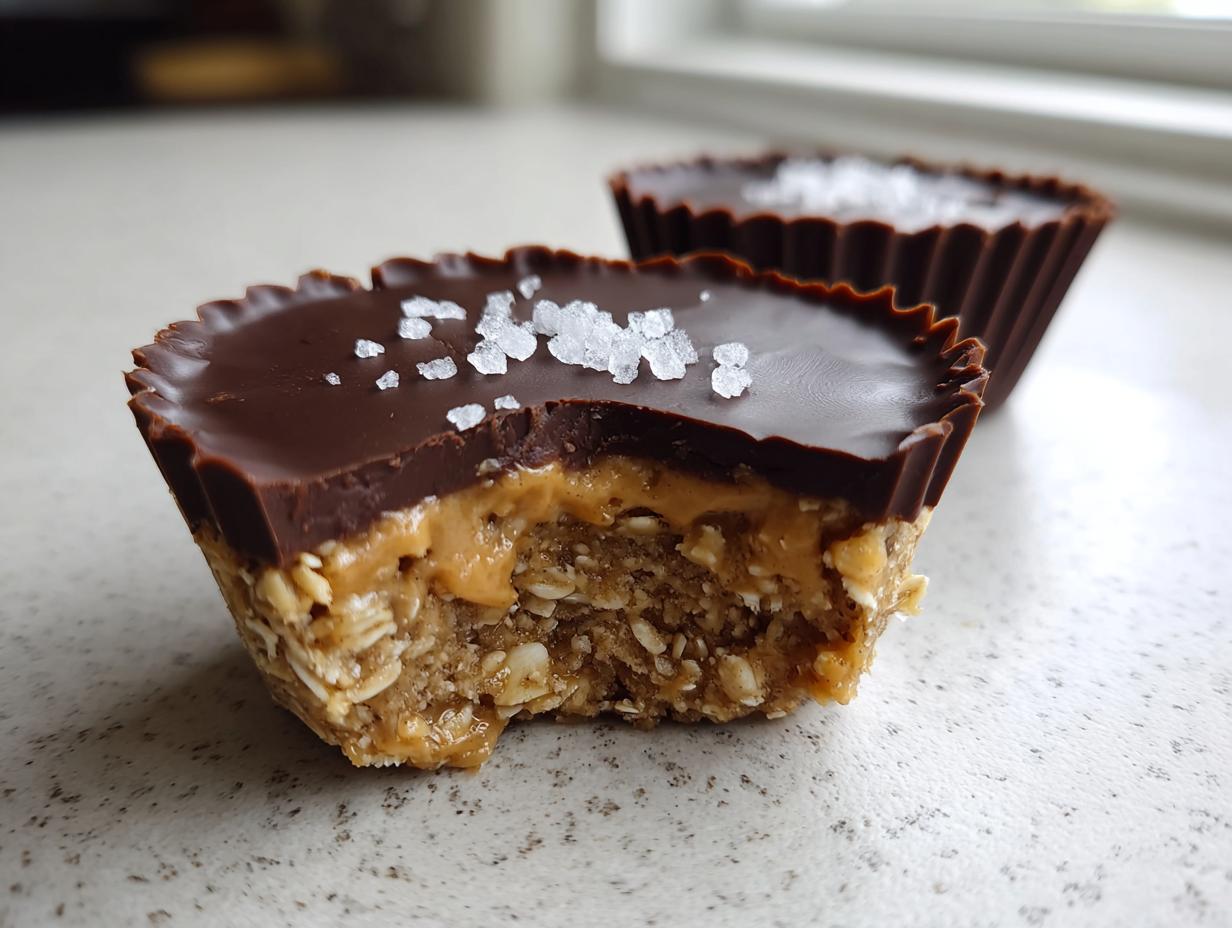
Carefully spoon that melted chocolate mixture over each of the peanut butter oat bases. I try to use the back of the spoon or a small offset spatula to smooth the tops out so they look neat. If you’re feeling fancy, now is the time to sprinkle on that flaky sea salt or a few extra mini chocolate chips. They look so professional that way!
This is the hardest part: you have to wait! Place the entire muffin pan into the refrigerator. They need a good two to three hours to chill completely. You want that chocolate layer to be rock hard so the cups hold their shape when you peel the liner away. Don’t rush this chilling time, or you’ll end up with sticky messes. Once they are firm, pop them out of the liners and enjoy!

Tips for Success Making No Bake Peanut Butter Oat Cups
Making these no bake peanut butter oat cups is easy, but getting that perfect texture—smooth base, snappy chocolate top—takes just a tiny bit of attention. My biggest piece of advice, learned through trial and error, is all about the oats.
You absolutely must process those rolled oats until they are fine, like real flour. If you leave them too coarse, the base will crumble apart when you try to eat it. It’s worth the extra minute in the food processor! Also, remember that peanut butter consistency varies wildly from jar to jar.
If your base mixture feels crumbly after mixing, don’t panic. Just stir in maple syrup one teaspoon at a time until it finally holds together when squeezed. It’s a small step, but it ensures every single cup is perfectly moldable and delicious. Trust me on this; following these little tricks will make your cups taste like they came from a professional bakery!
Serving Suggestions for Your No Bake Peanut Butter Oat Cups
These little treats are so versatile! They are perfect straight out of the fridge when you need a quick energy boost. I love pairing my no bake peanut butter oat cups with a hot cup of black coffee in the morning—it cuts right through the sweetness of the chocolate and peanut butter.
If you are serving them as a dessert, try setting them out next to a bowl of fresh raspberries or sliced strawberries. The slight tartness of the berries is a fantastic contrast to the richness of the cup. Honestly, they are wonderful on their own too, but having a little fresh fruit nearby makes them feel extra special without adding any extra work!
Frequently Asked Questions About No Bake Peanut Butter Oat Cups
I get so many questions about these cups because everyone wants them to turn out perfectly! Since they are so simple, people often wonder if they can skip a step, but I’m here to guide you. These no bake peanut butter oat cups are super forgiving, but a few tips make them absolutely perfect every time. Here are the things I get asked most often!
Can I use natural peanut butter in these No Bake Peanut Butter Oat Cups
Yes, you absolutely can use natural peanut butter, but you need to be ready to adjust the liquid! Natural peanut butter tends to be runnier or sometimes much drier than the standard creamy kind. If your base mixture feels too dry and crumbly after mixing the oats in, you’ll need to stir in an extra teaspoon or two of maple syrup until it finally holds together like a dough. Don’t add too much, just enough to make it workable!
How long do No Bake Peanut Butter Oat Cups last
Because these are no bake and full of good fats, they need to stay cold to keep their shape. You should store your finished no bake peanut butter oat cups in a sealed, airtight container in the refrigerator. They are good for up to five days stored this way. They taste great the next day, too!
Storing and Reheating Your No Bake Peanut Butter Oat Cups
Since these are so quick to make, they usually don’t last long in my house! But if you manage to save some of your wonderful no bake peanut butter oat cups, storage is really straightforward. The most important thing to remember is that they must stay chilled. If they sit out on the counter for too long, that lovely chocolate layer gets soft and messy, and the peanut butter base can start to soften too.
You generally won’t need to reheat these at all! They are designed to be eaten cold, straight from the fridge. If you happen to freeze them for a longer storage period—which works surprisingly well—just let them thaw on the counter for about 15 minutes before eating. Otherwise, grab them, peel back the liner, and enjoy that perfect chilled texture.
Storage Table for No Bake Peanut Butter Oat Cups
Here’s a quick cheat sheet for keeping your treats fresh:
| Storage Method | Duration |
|---|---|
| Airtight Container in Refrigerator | Up to 5 Days |
| Freezer (Wrapped Individually) | Up to 2 Months |
Sharing Your Delicious No Bake Peanut Butter Oat Cups Experience
And that’s it! You’ve managed to whip up a batch of incredible, wholesome, no bake peanut butter oat cups in minutes. I really hope you love these as much as my family does. They are the perfect little bite of happiness.
If you try these out, please come back and let me know what you thought! Drop a rating below or share a picture in the comments—I just love seeing how everyone’s chocolate tops turn out! You can also follow along for more quick recipes on Facebook or save this recipe on Pinterest.
Print
Amazing 10 Minute No Bake Peanut Butter Oat Cups
- Total Time: 10 minutes (plus 2-3 hours chilling)
- Yield: 12 servings
- Diet: Vegetarian
Description
These no bake peanut butter oat cups combine creamy nut butter, oats, and rich chocolate for an easy, wholesome treat everyone loves. They are a quick snack using simple pantry ingredients.
Ingredients
- 1 ½ cups creamy peanut butter
- 1 ½ cups rolled oats
- ¼ cup pure maple syrup
- 1 cup semisweet chocolate chips
- 1 teaspoon coconut oil
- Optional topping: flaky sea salt or mini chocolate chips
Instructions
- Line a 12-cup muffin pan with paper or silicone liners.
- Place rolled oats in a food processor and blend until fine like flour.
- In a microwave-safe bowl, combine peanut butter and maple syrup. Microwave for 40 seconds, then stir until smooth and combined.
- Add the processed oats to the peanut butter mixture and mix until thick and dough-like. If too dry, add 1 teaspoon of maple syrup at a time until moldable.
- Divide the mixture evenly among the muffin liners and press firmly to form an even base layer.
- In another microwave-safe bowl, combine chocolate chips and coconut oil. Melt in 30-second intervals, stirring each time, until smooth.
- Spoon melted chocolate over each peanut butter oat base and smooth the tops.
- Sprinkle flaky sea salt or mini chocolate chips if desired.
- Refrigerate for 2 to 3 hours until the chocolate is firm.
- Remove cups from liners and store in an airtight container in the refrigerator for up to 5 days.
Notes
- The mixture might need extra maple syrup if your peanut butter is very thick.
- Process the oats until they reach a flour-like consistency for the best texture.
- Store finished cups in an airtight container in the refrigerator.
- Prep Time: 10 minutes
- Cook Time: 0 minutes
- Category: Dessert
- Method: No Bake
- Cuisine: American