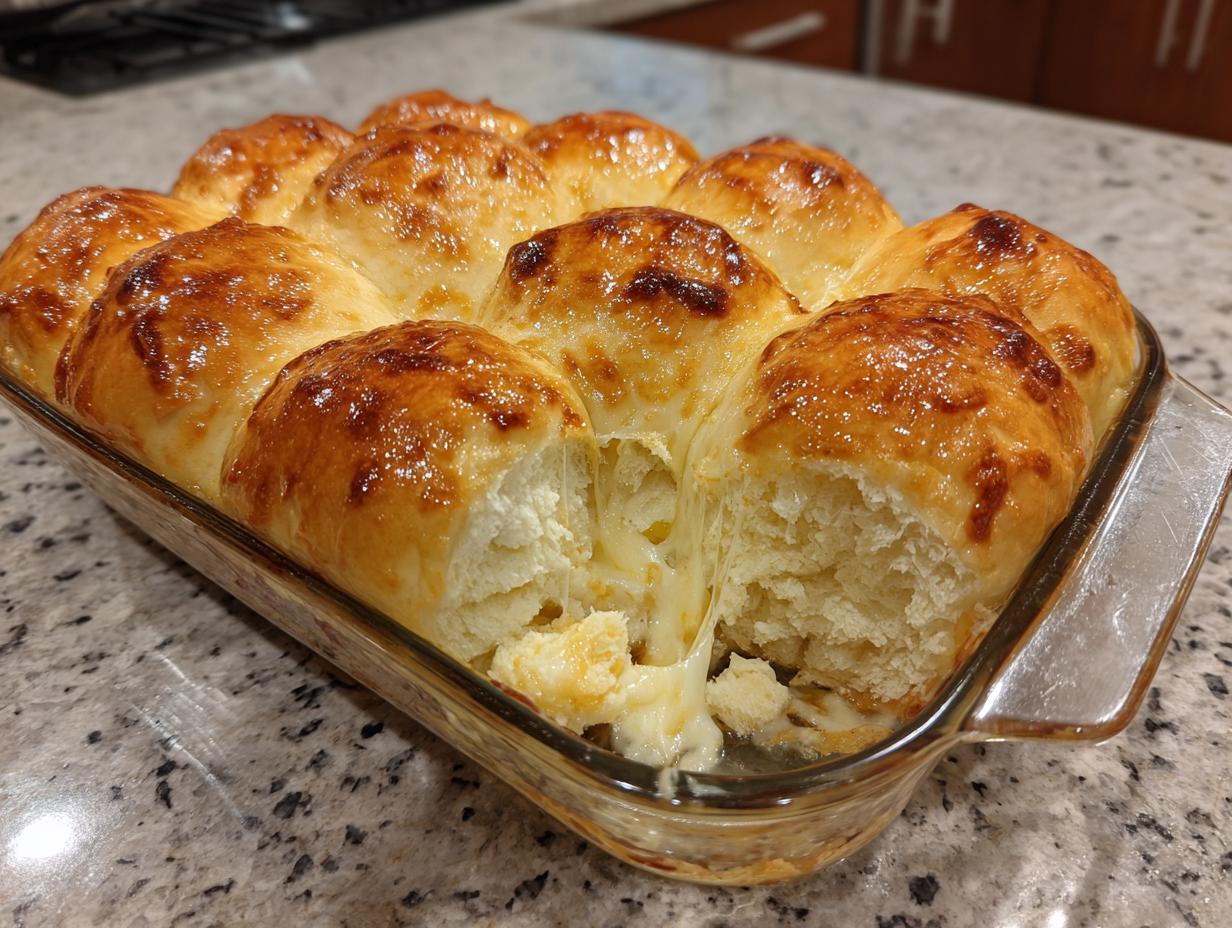
I am so excited to share this one with you because, honestly, it’s the perfect recipe for when you need something warm, comforting, and unbelievably cheesy in under an hour. Forget fussy bread-making; these Cheesy Baked Dough Balls are the definition of easy weeknight magic. They come out of the oven fluffy, golden, and absolutely loaded with that stringy, melty mozzarella center we all dream about!

I’ve tried every shortcut out there, and what makes my method stand out is how much I focus on making sure you succeed, even if you think yeast is scary. This recipe uses baking powder, so it’s quick, reliable, and requires zero rise time. Trust me, if you can mix ingredients in a bowl, you can nail these. My goal here is always to deliver simple, trustworthy results, and these cheesy bites prove that home-baked goodness doesn’t need to be complicated.
Why This Cheesy Baked Dough Balls Recipe Works for Everyone
This recipe is my go-to recommendation for absolute beginners. There’s no kneading marathon, no complicated folding techniques, and zero fear of the dough not rising. We’re talking about mixing, stuffing, and baking—that’s it! The beauty of these Cheesy Baked Dough Balls is that they are forgiving. If you accidentally mix the dry ingredients for an extra thirty seconds, guess what? They still turn out amazing. That’s the spirit of this blog: great food made simple, fast, and reliably delicious every single time.
Gathering Your Ingredients for Cheesy Baked Dough Balls
Okay, let’s get our station set up! The best part about these savory little treats is that you probably have most of this in your pantry right now. We are keeping things super straightforward here, which is why this recipe is such a winner. You don’t need fancy bread flour or obscure ingredients to create these incredible Cheesy Baked Dough Balls.
Ingredient Clarity and Preparation
Accuracy matters most with the dry stuff, so please use dry measuring cups for the flour, sugar, salt, and baking powder. We need three full cups of all-purpose flour, a teaspoon of salt, and just a tablespoon of sugar—don’t skip that sugar; it helps feed the baking powder!
For the liquids, use one and a quarter cups of plain whole milk—no fancy flavored milks here, just the standard stuff. And for the cheese? You absolutely must use pre-shredded mozzarella, about a cup and a half. If you grate it yourself from a block, it tends to melt too quickly and might leak out. We want that gooey center protected!
Equipment Needed for Your Cheesy Baked Dough Balls
You don’t need a stand mixer for this, which is a huge plus in my book! Grab a large mixing bowl—seriously, large, because this dough expands a bit—and a sturdy whisk for combining the dry ingredients. You’ll also need a smaller bowl for your melted butter topping.
The essential piece of equipment is your baking dish; a standard 9 by 13 inch dish works perfectly to hold all 16 of your Cheesy Baked Dough Balls snugly together so they can puff up beautifully against each other while baking.
Step-by-Step Guide to Making Cheesy Baked Dough Balls
This is where the magic happens, and I promise you, it’s fast! We’re going from mixing bowl to oven in about twenty minutes flat. Just follow these steps closely, and you’ll have the best soft dough balls you’ve ever made.
Preparing the Dough Base
First things first: get that oven heated up to 375 degrees Fahrenheit right now. Preheat time is wasted time! While it’s heating, take your 9 by 13 inch baking dish and grease it well. I use a little olive oil on a paper towel—it works better than non-stick spray sometimes.
In your big bowl, whisk together your flour, baking powder, salt, and sugar. Whisking is important because it acts like a quick sift, making sure the baking powder is perfectly distributed so every ball rises evenly. Now, make a little well in the center of your dry ingredients. Pour in the milk and the olive oil. Mix it all together with a wooden spoon or a spatula until it just comes together into a shaggy, soft dough. Don’t overmix it yet!
Next, you have to knead it, but don’t panic! Turn the dough out into the bowl—I like to keep it in the bowl because it’s already got a little flour dust in there—and gently knead it right there for just one to two minutes. You’re just looking to smooth out the texture slightly, not develop heavy gluten. It should feel soft, pliable, and not sticky at all.
Forming and Stuffing the Cheesy Baked Dough Balls
This is the fun, slightly messy part. You need to divide that dough evenly into 16 pieces. I usually eyeball it, but if you want perfect uniformity, a kitchen scale helps! Once you have your 16 portions, take one piece and flatten it gently in the palm of your hand into a small disc. Don’t make it too thin, or the cheese will burst through.
Now for the filling: measure out just about one tablespoon of that shredded mozzarella cheese—seriously, don’t overstuff them, or you’ll have a cheese explosion on your hands. Place the cheese right in the middle of the flattened dough circle. You need to bring all the edges up and over the cheese, pinching them together very tightly at the top to seal it completely.
Once you’ve pinched it shut, roll it gently between your palms to form a nice, round ball. If you skip the tight pinch, these Cheesy Baked Dough Balls will leak their goodness all over the pan during baking, and we want the cheese *inside*!
The Final Bake
Take your perfectly sealed cheese balls and arrange them seam side down in the greased 9 by 13 inch dish. Place them close together. Placing them seam-side down ensures the smooth top gets the full blast of butter and bakes up beautifully golden. They should fit snugly!
Take your two tablespoons of melted butter and brush it evenly over the tops of all the dough balls. This gives them that gorgeous, slightly crisp, golden exterior. Pop the dish into your preheated 375-degree oven. They need about 22 to 25 minutes. You’ll know they are done when they look puffed up, deeply golden brown, and cooked all the way through when you check the bottom. The smell alone will tell you they’re ready!

Tips for Perfect Cheesy Baked Dough Balls Success
Even though this recipe is wonderfully simple, there are just a couple of little things you can watch out for to ensure your baked dough is absolutely restaurant-quality. We all want that soft, pillowy texture without any sneaky cheese leaks, right? A few quick checks make all the difference.
Achieving Optimal Dough Texture
When you are mixing the dough, remember that flour absorbs liquid differently depending on the humidity that day. If your dough seems crumbly and won’t come together after mixing in the milk and oil, add another tablespoon of milk—just one! Mix it in gently, and it should come together. If it feels super sticky when you go to knead it, sprinkle just a tiny bit of flour onto your surface, but resist the urge to add too much, or you’ll end up with dry dough.
During that short one-to-two-minute knead, you’re aiming for smooth, not elastic. If you knead for too long, the gluten develops too much, and your finished dough balls will taste chewy instead of tender. Stop as soon as the dough looks cohesive!
Preventing Cheese Escape During Baking
This is the biggest hurdle for new bakers making stuffed dough, but it’s so easy to fix. The key to keeping the cheese inside your Cheesy Baked Dough Balls is the seal. When you pinch the dough closed around that tablespoon of mozzarella, really work that dough between your fingers. You want a thick, secure seam.
If you have any weak spots or thin areas where the cheese is peeking through before you bake, pinch them closed again and maybe even roll that specific spot a tiny bit more to reinforce it. When you place them in the pan, make sure that pinched seam is facing down against the buttered dish. Gravity helps keep the seal intact while the dough puffs up around it!
Serving Suggestions for Your Oven Snack
These savory bites are so versatile! They are fantastic served hot right out of the oven as a side dish for almost any weeknight dinner—think spaghetti or a big salad. Because they are already so cheesy and buttery, they don’t need much added fanfare.
However, if you are serving these Cheesy Baked Dough Balls as an appetizer, having a couple of simple dipping sauces on the side really elevates the experience. A warm marinara sauce is a classic pairing, of course. You could also whip up a quick garlic butter sauce by melting a little butter with some dried parsley and garlic powder. They are perfect for dipping and sharing, which is why they disappear so fast at parties! If you’re looking for other easy appetizer ideas, check out our whipped ricotta dip.
Storing and Refreshing Your Cheesy Baked Dough Balls
If you happen to have any leftovers—which is rare in my house—storing them is simple. Once they’ve cooled completely, place the dough balls in an airtight container. They will keep well on the counter for about a day, but for longer storage, pop them in the refrigerator for up to four days. Because they are yeast-free, they don’t dry out quite as fast as traditional bread.
If you want to keep them longer, freezing is your best bet! Place the cooled balls on a baking sheet until they are frozen solid, then transfer them to a freezer-safe bag. They can last for about two months this way. The best part is how easy they are to revive!
Best Practices for Reheating
For the absolute best texture, I always recommend reheating them in the oven. Preheat your oven to 350 degrees Fahrenheit. Place the cooled or frozen dough balls on a small, lined baking sheet. If they are refrigerated, warm them for about 8 to 10 minutes. If they are frozen solid, give them about 15 to 20 minutes until they are hot all the way through and the cheese is melty again. This method brings back that lovely golden crust.
If you are in a real rush, the microwave works, but be careful! Microwave them for 20 to 30 seconds, checking frequently. They will be soft, but they won’t have that lovely crisp exterior the oven gives them. It’s a trade-off for speed!
Frequently Asked Questions About Baked Dough
I get so many questions about these easy baked treats because people can’t believe how simple they are. Here are a few things I hear often when people are gathering their ingredients.
Can I use different types of cheese?
You certainly can experiment! While mozzarella is the king here because of its superior melt and mild flavor, you can try a blend. Maybe half mozzarella and half Monterey Jack for a slightly sharper taste. If you use a harder cheese like Parmesan, make sure you don’t use too much, or it won’t melt into that beautiful gooey center we are aiming for.
How can I make this recipe faster?
Honestly, this recipe is already extremely fast—prep is only about 20 minutes! The main time consumer is the 25-minute bake. If you were in a huge rush, you could skip greasing the pan and just line it with parchment paper, saving about two minutes of scrubbing oil around. But honestly, the hands-on time is already so minimal, I don’t recommend cutting corners on the mixing!
Q3. Why do you brush the tops with butter?
Brushing the tops ensures they don’t dry out in the oven and gives them that signature golden color and slight crispness on the outside. It really adds to the flavor profile!
Q4. Can I add herbs to the dough?
Yes, that’s a great idea! A teaspoon of dried Italian seasoning mixed in with your dry ingredients adds a lovely savory note without changing the texture at all. I sometimes add a little dried oregano. For more savory baking inspiration, check out our recipe for garlic parmesan knots.
Share Your Experience with This Recipe
I truly hope you give these a try soon! They are such a crowd-pleaser. Once you’ve made your batch of cheesy baked dough balls, please come back and let me know how they turned out for you. Rate the recipe below and tell me what you served them with! You can also share your creations with us on Facebook.
Tips for Perfect Cheesy Baked Dough Balls Success
Even though this recipe is wonderfully simple, there are just a couple of little things you can watch out for to ensure your baked dough is absolutely restaurant-quality. We all want that soft, pillowy texture without any sneaky cheese leaks, right? A few quick checks make all the difference.
Achieving Optimal Dough Texture
When you are mixing the dough, remember that flour absorbs liquid differently depending on the humidity that day. If your dough seems crumbly and won’t come together after mixing in the milk and oil, add another tablespoon of milk—just one! Mix it in gently, and it should come together. If it feels super sticky when you go to knead it, sprinkle just a tiny bit of flour onto your surface, but resist the urge to add too much, or you’ll end up with dry dough.
During that short one-to-two-minute knead, you’re aiming for smooth, not elastic. If you knead for too long, the gluten develops too much, and your finished dough balls will taste chewy instead of tender. Stop as soon as the dough looks cohesive!
Preventing Cheese Escape During Baking
This is the biggest hurdle for new bakers making stuffed dough, but it’s so easy to fix. The key to keeping the cheese inside your Cheesy Baked Dough Balls is the seal. When you pinch the dough closed around that tablespoon of mozzarella, really work that dough between your fingers. You want a thick, secure seam.
If you have any weak spots or thin areas where the cheese is peeking through before you bake, pinch them closed again and maybe even roll that specific spot a tiny bit more to reinforce it. When you place them in the pan, make sure that pinched seam is facing down against the buttered dish. Gravity helps keep the seal intact while the dough puffs up around it!
Serving Suggestions for Your Oven Snack
These savory bites are so versatile! They are fantastic served hot right out of the oven as a side dish for almost any weeknight dinner—think spaghetti or a big salad. Because they are already so cheesy and buttery, they don’t need much added fanfare.
However, if you are serving these Cheesy Baked Dough Balls as an appetizer, having a couple of simple dipping sauces on the side really elevates the experience. A warm marinara sauce is a classic pairing, of course. You could also whip up a quick garlic butter sauce by melting a little butter with some dried parsley and garlic powder. They are perfect for dipping and sharing, which is why they disappear so fast at parties!
Storing and Refreshing Your Cheesy Baked Dough Balls
If you happen to have any leftovers—which is rare in my house!—storing them is simple. Once they’ve cooled completely, place the dough balls in an airtight container. They will keep well on the counter for about a day, but for longer storage, pop them in the refrigerator for up to four days. Because they are yeast-free, they don’t dry out quite as fast as traditional bread.
If you want to keep them longer, freezing is your best bet! Place the cooled balls on a baking sheet until they are frozen solid, then transfer them to a freezer-safe bag. They can last for about two months this way. The best part is how easy they are to revive!
Best Practices for Reheating
For the absolute best texture, I always recommend reheating them in the oven. Preheat your oven to 350 degrees Fahrenheit. Place the cooled or frozen dough balls on a small, lined baking sheet. If they are refrigerated, warm them for about 8 to 10 minutes. If they are frozen solid, give them about 15 to 20 minutes until they are hot all the way through and the cheese is melty again. This method brings back that lovely golden crust.
If you are in a real rush, the microwave works, but be careful! Microwave them for 20 to 30 seconds, checking frequently. They will be soft, but they won’t have that lovely crisp exterior the oven gives them. It’s a trade-off for speed!
Frequently Asked Questions About Baked Dough
I get so many questions about these easy baked treats because people can’t believe how simple they are. Here are a few things I hear often when people are gathering their ingredients.
Can I use different types of cheese?
You certainly can experiment! While mozzarella is the king here because of its superior melt and mild flavor, you can try a blend. Maybe half mozzarella and half Monterey Jack for a slightly sharper taste. If you use a harder cheese like Parmesan, make sure you don’t use too much, or it won’t melt into that beautiful gooey center we are aiming for. Stick to about one and a half cups total, though, so the dough seals correctly.
How can I make this recipe faster?
Honestly, this recipe is already extremely fast—prep is only about 20 minutes! The main time consumer is the 25-minute bake. If you were in a huge rush, you could skip greasing the pan and just line it with parchment paper, saving about two minutes of scrubbing oil around. But honestly, the hands-on time is already so minimal, I don’t recommend cutting corners on the mixing!
Q3. Why do you brush the tops with butter?
Brushing the tops ensures they don’t dry out in the oven and gives them that signature golden color and slight crispness on the outside. It really adds to the flavor profile!
Q4. Can I add herbs to the dough?
Yes, that’s a great idea! A teaspoon of dried Italian seasoning mixed in with your dry ingredients adds a lovely savory note without changing the texture at all. I sometimes add a little dried oregano.
Share Your Experience with This Recipe
I truly hope you give these a try soon! They are such a crowd-pleaser. Once you’ve made your batch of cheesy baked dough balls, please come back and let me know how they turned out for you. Rate the recipe below and tell me what you served them with! You can also find us on Pinterest for more great ideas.
Tips for Perfect Cheesy Baked Dough Balls Success
Even though this recipe is wonderfully simple, there are just a couple of little things you can watch out for to ensure your baked dough is absolutely restaurant-quality. We all want that soft, pillowy texture without any sneaky cheese leaks, right? A few quick checks make all the difference.
Achieving Optimal Dough Texture
When you are mixing the dough, remember that flour absorbs liquid differently depending on the humidity that day. If your dough seems crumbly and won’t come together after mixing in the milk and oil, add another tablespoon of milk—just one! Mix it in gently, and it should come together. If it feels super sticky when you go to knead it, sprinkle just a tiny bit of flour onto your surface, but resist the urge to add too much, or you’ll end up with dry dough.
During that short one-to-two-minute knead, you’re aiming for smooth, not elastic. If you knead for too long, the gluten develops too much, and your finished dough balls will taste chewy instead of tender. Stop as soon as the dough looks cohesive!
Preventing Cheese Escape During Baking
This is the biggest hurdle for new bakers making stuffed dough, but it’s so easy to fix. The key to keeping the cheese inside your Cheesy Baked Dough Balls is the seal. When you pinch the dough closed around that tablespoon of mozzarella, really work that dough between your fingers. You want a thick, secure seam.
If you have any weak spots or thin areas where the cheese is peeking through before you bake, pinch them closed again and maybe even roll that specific spot a tiny bit more to reinforce it. When you place them in the pan, make sure that pinched seam is facing down against the buttered dish. Gravity helps keep the seal intact while the dough puffs up around it!
Serving Suggestions for Your Oven Snack
These savory bites are so versatile! They are fantastic served hot right out of the oven as a side dish for almost any weeknight dinner—think spaghetti or a big salad. Because they are already so cheesy and buttery, they don’t need much added fanfare.
However, if you are serving these Cheesy Baked Dough Balls as an appetizer, having a couple of simple dipping sauces on the side really elevates the experience. A warm marinara sauce is a classic pairing, of course. You could also whip up a quick garlic butter sauce by melting a little butter with some dried parsley and garlic powder. They are perfect for dipping and sharing, which is why they disappear so fast at parties!
Storing and Refreshing Your Cheesy Baked Dough Balls
If you happen to have any leftovers—which is rare in my house!—storing them is simple. Once they’ve cooled completely, place the dough balls in an airtight container. They will keep well on the counter for about a day, but for longer storage, pop them in the refrigerator for up to four days. Because they are yeast-free, they don’t dry out quite as fast as traditional bread.
If you want to keep them longer, freezing is your best bet! Place the cooled balls on a baking sheet until they are frozen solid, then transfer them to a freezer-safe bag. They can last for about two months this way. The best part is how easy they are to revive!
Best Practices for Reheating
For the absolute best texture, I always recommend reheating them in the oven. Preheat your oven to 350 degrees Fahrenheit. Place the cooled or frozen dough balls on a small, lined baking sheet. If they are refrigerated, warm them for about 8 to 10 minutes. If they are frozen solid, give them about 15 to 20 minutes until they are hot all the way through and the cheese is melty again. This method brings back that lovely golden crust.
If you are in a real rush, the microwave works, but be careful! Microwave them for 20 to 30 seconds, checking frequently. They will be soft, but they won’t have that lovely crisp exterior the oven gives them. It’s a trade-off for speed!
Frequently Asked Questions About Baked Dough
I get so many questions about these easy baked treats because people can’t believe how simple they are. Here are a few things I hear often when people are gathering their ingredients.
Can I use different types of cheese?
You certainly can experiment! While mozzarella is the king here because of its superior melt and mild flavor, you can try a blend. Maybe half mozzarella and half Monterey Jack for a slightly sharper taste. If you use a harder cheese like Parmesan, make sure you don’t use too much, or it won’t melt into that beautiful gooey center we are aiming for. Stick to about one and a half cups total, though, so the dough seals correctly.
How can I make this recipe faster?
Honestly, this recipe is already extremely fast—prep is only about 20 minutes! The main time consumer is the 25-minute bake. If you were in a huge rush, you could skip greasing the pan and just line it with parchment paper, saving about two minutes of scrubbing oil around. But honestly, the hands-on time is already so minimal, I don’t recommend cutting corners on the mixing!
Q3. Why do you brush the tops with butter?
Brushing the tops ensures they don’t dry out in the oven and gives them that signature golden color and slight crispness on the outside. It really adds to the flavor profile!
Q4. Can I add herbs to the dough?
Yes, that’s a great idea! A teaspoon of dried Italian seasoning mixed in with your dry ingredients adds a lovely savory note without changing the texture at all. I sometimes add a little dried oregano.
Share Your Experience with This Recipe
I truly hope you give these a try soon! They are such a crowd-pleaser. Once you’ve made your batch of cheesy baked dough balls, please come back and let me know how they turned out for you. Rate the recipe below and tell me what you served them with! You can also read more of our thoughts on food and cooking on Medium.
Print
16 Amazing Cheesy Baked Dough Balls Now
- Total Time: 45 minutes
- Yield: 16 dough balls
- Diet: Vegetarian
Description
Cheesy baked dough balls are soft, fluffy, and filled with melty cheese. This is an easy oven-baked snack or side made with simple ingredients.
Ingredients
- 3 cups all-purpose flour
- 1 tablespoon baking powder
- 1 teaspoon salt
- 1 tablespoon sugar
- 1 and one quarter cups plain whole milk
- 1 third cup olive oil
- 1 and one half cups shredded mozzarella cheese
- 2 tablespoons melted butter
Instructions
- Heat the oven to 375°F and grease a 9 by 13 inch baking dish.
- Whisk the flour, baking powder, salt, and sugar in a large bowl.
- Add the milk and olive oil and mix until a soft dough forms.
- Knead the dough in the bowl for 1 to 2 minutes until smooth.
- Divide the dough into 16 equal pieces.
- Flatten each piece slightly and place about 1 tablespoon of mozzarella in the center.
- Fold the dough around the cheese and pinch to seal into a ball.
- Arrange the dough balls seam side down in the prepared dish.
- Brush the tops evenly with melted butter.
- Bake for 22 to 25 minutes until puffed, golden, and cooked through.
Notes
- These dough balls are tender inside with a lightly crisp exterior and gooey cheese.
- They are simple to prepare and perfect for sharing.
- Prep Time: 20 minutes
- Cook Time: 25 minutes
- Category: Snack, Side Dish
- Method: Baking
- Cuisine: American