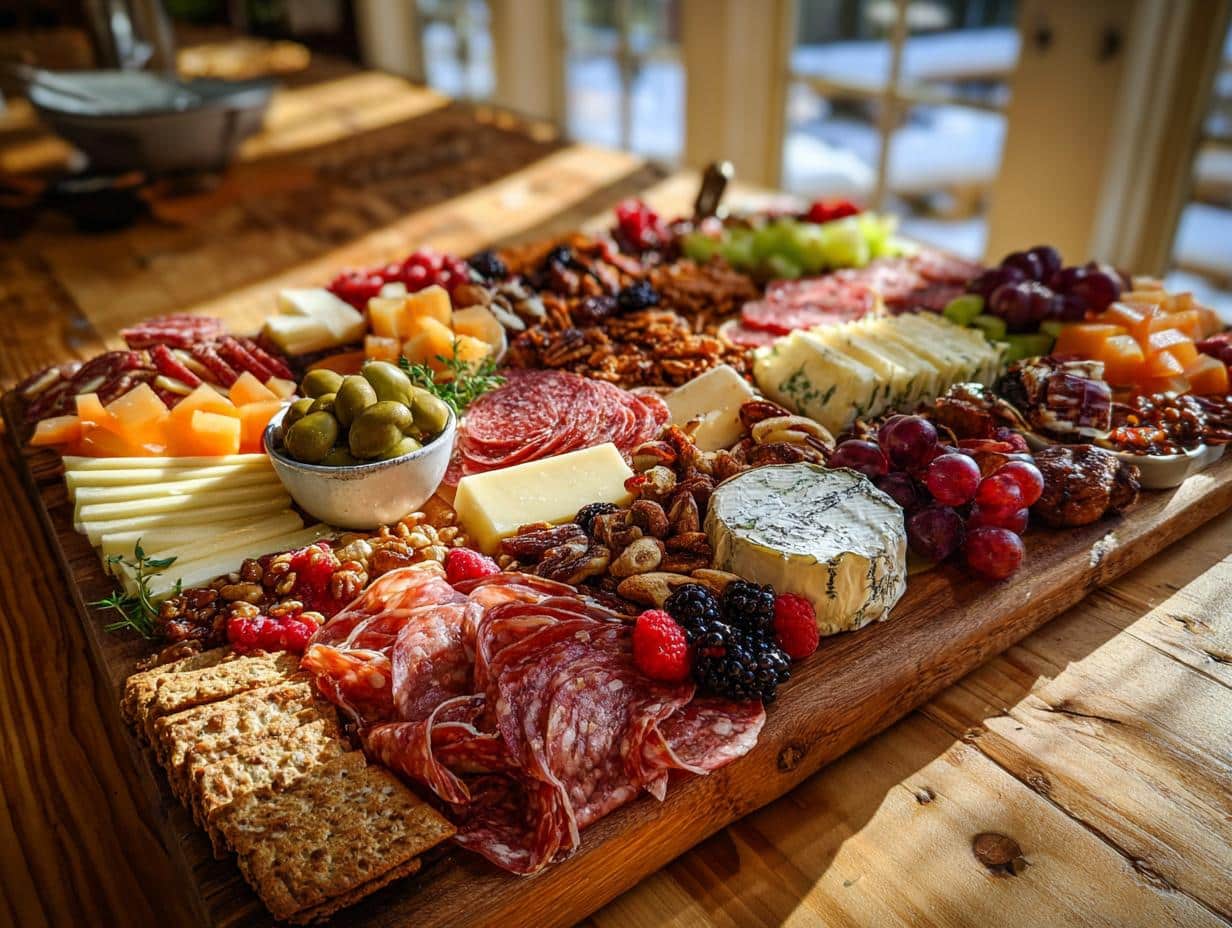
Charcuterie board
Okay, let’s talk about the ultimate crowd-pleaser: the charcuterie board! As Adam from NoobRecipes, my whole jam is making delicious, homemade food super approachable, and this appetizer is *exactly* that. Forget feeling intimidated; creating a stunning and seriously tasty board is easier than you think. It’s all about bringing together a bunch of awesome flavors and textures that just *work* together. Seriously, who doesn’t love a beautiful spread of meats, cheeses, and all the yummy fixings? It looks impressive, tastes amazing, and honestly, it’s mostly just arranging things. So, get ready to wow your friends and family without breaking a sweat!
Why You’ll Love This Charcuterie Board
Seriously, this charcuterie board is a game-changer for any get-together. It’s my go-to because it hits all the right notes:
- Super Easy Assembly: You don’t need to be a chef! It’s mostly just about arranging things beautifully, which is way more fun than complicated cooking.
- Looks Impressive, Tastes Even Better: Get ready for the compliments! It’s a feast for the eyes and packed with so many delicious flavors and textures.
- Totally Customizable: This isn’t a stuffy, rigid recipe. You can swap things out based on what you love, what’s in season, or even your budget. It’s perfect for any occasion!
- A Little Something for Everyone: With a mix of savory cured meats, creamy cheeses, crunchy nuts, fresh fruits, and tasty dips, there’s a perfect bite for every single guest.
Assembling Your Perfect Charcuterie Board
Alright, let’s get down to the fun part: putting it all together! Building a charcuterie board is like creating a delicious edible landscape. It’s all about balance – so you’ve got your rich, savory meats and cheeses, then you need those crunchy bits, something fresh, and maybe a little sweet surprise. The goal is to have a little bit of everything that tastes amazing on its own, but even better when you combine bites. Think of it as a puzzle where every piece is delicious! When I’m putting one together, I’m always thinking about how the flavors and textures will play off each other. It’s not just throwing things on a board; it’s about making thoughtful choices so that every single bite is a winner.
Choosing Your Foundation: The Board
First things first, you need something to build on! The size and type of board really matter. For a small get-together, a nice wooden cutting board or a slate platter works great. If you’re hosting a bigger crowd, you might need a larger serving platter or even a clean baking sheet covered with parchment paper. It’s important to pick something that’s big enough to hold all your goodies without looking too cramped, but not so huge that it looks sparse. Think about what you have in your kitchen – a large pizza peel can even work in a pinch!
Selecting Your Charcuterie Board Stars: Cheeses
You can’t have a charcuterie board without cheese, right? My rule of thumb is to go for an odd number of cheeses, maybe three, five, or even seven if you’re feeling fancy. This just seems to look better visually. Aim for variety! I like to pick at least one soft cheese, like a creamy Brie or a tangy goat cheese, and then something harder, like a sharp cheddar or a nutty Gruyère. A semi-soft cheese like Gouda or Havarti is a great bridge. Having different textures and flavors makes the whole board more interesting. Don’t be afraid to try something new, but always include a crowd-pleaser or two!
The Savory Companions: Cured Meats
Now for the “charcuterie” part! Cured meats are the savory backbone of your board. You want a good mix here too. Prosciutto is always a winner because it’s so delicate and flavorful. Salami is another must-have, and I love having a spicy option like chorizo or soppressata for a little kick. You can buy them pre-sliced, which is super convenient. My favorite trick is to fold them or roll them into little ribbons. It makes them easier to grab and looks so much prettier than just laying them flat. Think about different shapes and colors to add visual interest.
Adding Texture and Crunch: Crackers and Nuts
Every great bite needs a little crunch, and that’s where crackers and nuts come in! I like to offer a few different kinds of crackers – maybe some sturdy whole-grain ones, some thin croccantini, and even some toasted baguette slices. Variety is key! For nuts, think beyond the basic peanuts. Candied pecans add a lovely sweetness, Marcona almonds are a little fancy, and pistachios bring awesome color. I usually scatter them in little bowls or directly onto the board in gaps. They add a great texture contrast and are perfect for people to snack on while they’re figuring out their perfect cheese and meat pairing.
Bringing in Freshness: Fruits and Vegetables
This is where we add some color and balance out all that richness! Fresh fruits are essential. Grapes are a classic because they’re easy to eat and look great. Sliced apples and pears add a nice crispness, and berries like raspberries and blueberries bring vibrant color and a touch of sweetness. For veggies, think about things that are good raw and offer a nice crunch, like carrot sticks, snap peas, or even some colorful bell pepper strips. Olives and pickles are also fantastic here – they add a briny, tangy punch that cuts through the fattiness of the cheese and meat.
The Flavor Boosters: Dips and Spreads
Don’t forget the dips and spreads! These little additions can really elevate your board. Hummus is always a good, healthy option. A creamy ranch or a zesty balsamic dip can be great too. If you want something a little more adventurous, romesco sauce or a whole-grain mustard can add a fantastic flavor dimension. I usually put these in small bowls with little spoons or spreaders. They’re perfect for dipping crackers or giving a bit of extra flavor to your cheese and meat.
Sweet Touches and Surprises
To really round out the board, a few sweet elements are a must. Dried fruits like figs, apricots, or even mango slices add a chewy sweetness that pairs wonderfully with cheese. Fig butter or a nice blackberry jam are fantastic with Brie or goat cheese. And if you want to go all out, a few squares of good quality dark chocolate or some chocolate-covered nuts can be a delightful surprise, especially if you have guests with a sweet tooth. These little extras make your board feel extra special and thoughtful.
Step-by-Step Charcuterie Board Assembly
Okay, now that we’ve picked out all our goodies, let’s actually build this masterpiece! Putting it all together is the fun part, and honestly, it’s more about arranging than actual cooking. It’s like playing with your food, but with delicious results. I always start with the bigger items to sort of map out my board. Then, I layer in the meats, and finally, I fill in all the little nooks and crannies with the smaller bits and bobs. The key is to make it look abundant and inviting, so no one feels shy about digging in!
Preparing Your Board Layout
First up, let’s get those cheeses placed. Think of them as the anchors for your board. I like to space them out evenly across the board to create a nice visual balance. If you have a whole wheel of soft cheese, place it first. For wedges or blocks, position them so they look appealing. Don’t worry too much about perfect placement just yet; this is just to get a general idea of where everything will go. These are your main attractions, so give them a little breathing room.
Arranging Your Meats Artfully
This is where we add that signature charcuterie flair! Instead of just laying out slices, try folding your meats. For things like salami or soppressata, you can fold them in half, then in half again to create little ruffled shapes. For prosciutto or ham, you can gently fold them into loose ribbons or even drape them artfully. I love to fan them out or create little piles near the cheeses they’ll pair well with. This makes them super easy for guests to grab and adds a ton of visual texture to the board.
Filling the Gaps: Accompaniments Placement
Now for the really fun part – filling in all those empty spaces! This is where your board goes from looking good to looking *amazing*. I grab my nuts and scatter them in little piles or small bowls. Then come the olives, pickles, and other briny bits – tuck these in around the cheeses and meats. Next, I add the fresh fruits and veggies. Grapes can be draped, berries can be clustered, and sliced fruits can be fanned out. Think about color contrast here! Aim to fill every little gap so the board looks lush and overflowing. This is also a great place to add your dips or jams in small ramekins.
Adding the Final Touches
We’re almost there! Just a few little things to make it perfect. If you have any small, sweet items like dried figs or chocolates, tuck them in wherever there’s a little space. Sometimes, a sprig of fresh rosemary or thyme can add a lovely pop of green and a subtle aroma. Don’t overthink it; just look at your board and see where it feels a little empty or could use a final flourish. The goal is a beautiful, abundant spread that’s ready for guests!
Tips for a Perfect Charcuterie Board
Alright, let’s talk about making your charcuterie board truly shine! It’s not just about throwing stuff on a board; a little bit of thought goes a long way. First off, balance is key. You want a good mix of savory, salty, sweet, and tangy. Think about how the flavors will play together – a sharp cheese pairs wonderfully with a sweet fig jam, and salty prosciutto is great with a briny olive. Don’t be afraid to group complementary items near each other; it makes assembly and eating so much easier.
Presentation-wise, abundance is your friend! Fill up those gaps. If your board looks a little sparse, tuck in some extra crackers, nuts, or berries. It makes it look more appealing and like you’ve really gone all out. And remember, variety in texture is just as important as variety in flavor. You want creamy, crunchy, chewy, and crisp all in one bite. If you need to transport your board, assemble it right before you leave or pack your components separately and build it at your destination. Trust me, a little planning makes all the difference for that perfect, impressive board!
Creating Themed Charcuterie Boards
One of the best things about a charcuterie board is how totally customizable it is! You can totally switch things up to fit any occasion or theme. Think about holidays – a festive board with red and green grapes for Christmas, or maybe some pumpkin-shaped crackers for Halloween. For a summer backyard BBQ, you could load it up with grilled veggies, cornichons, and maybe some spicy soppressata. Or how about a “Taste of Italy” board with Italian cured meats, olives, mozzarella balls, and bruschetta? You can even do a “Dessert Board” with chocolates, cookies, fruit dips, and sweet spreads. It’s all about having fun with it and making it special for your guests!
Frequently Asked Questions about Charcuterie Boards
Q1. How many items should I include on my charcuterie board?
For a good variety, aim for an odd number of cheese types, like three or five. Then, include a few different cured meats, a couple of cracker options, a handful of nuts, some fresh fruit, and maybe one or two dips or spreads. It’s better to have a few well-chosen items that offer great flavor and texture than too many things that just clutter the board. Think quality over quantity!
Q2. Can I make a charcuterie board ahead of time?
Yes, you totally can! It’s a lifesaver for entertaining. You can assemble most of the board a few hours in advance. Place the cheeses, meats, nuts, and any dips or spreads on the board, cover it tightly with plastic wrap, and keep it in the fridge. Add the crackers and any delicate fruits (like berries or sliced apples) right before serving so they stay fresh and crunchy. This way, you’re not scrambling when guests arrive!
Q3. What are some good non-pork meat options for a charcuterie board?
Absolutely! There are tons of delicious options if you’re avoiding pork. Look for cured beef options like Bresaola, or try some turkey or chicken-based cured sausages. Hard salami can often be found made from beef or a mix. Another great idea is to include some high-quality summer sausage, which can be beef or a blend. Just check the labels, and you’ll find plenty of savory choices to round out your board!
Q4. How do I keep my charcuterie board fresh if serving for a long time?
The best way to keep things fresh is to serve the board chilled. Assemble it and keep it in the fridge until about 15-20 minutes before guests arrive. For longer serving times, especially in warmer weather, consider keeping any particularly perishable items (like soft cheeses or dips) on a separate chilled tray or replenishing them from the fridge as needed. You can also use small ice packs under a serving platter if you’re outdoors.
Ingredient Notes and Substitutions for Your Charcuterie Board
Let’s chat about making sure your charcuterie board is not only delicious but also works for everyone!
Cheeses: You really can’t go wrong here, but variety is key. If you’re not a fan of blue cheese, swap it for another semi-soft like Havarti or a creamy pepper jack for a little kick. For a healthier twist, consider adding a fresh mozzarella or burrata – they’re lighter but still super creamy.
Cured Meats: If pork isn’t your thing, no worries! Bresaola (cured beef) is fantastic, or you can find delicious cured turkey or chicken options. For a vegetarian board, you can skip the meats altogether and load up on extra cheeses, veggies, and dips, or even add some plant-based “meats” if you like.
Nuts: Nuts are great for crunch, but if you have allergies, just skip them or use seeds like sunflower or pumpkin seeds instead. Candied nuts add a lovely sweetness, but plain roasted nuts are great too if you want to keep things a bit lighter.
Fruits: Fresh fruits add brightness. If berries aren’t in season or you don’t love them, sliced oranges or melon work beautifully. Dried fruits are awesome for chewy sweetness, but don’t go overboard – a little goes a long way!
Dips and Spreads: Hummus is a fantastic, healthy choice that pairs with almost everything. If you want something lighter than ranch, try a Greek yogurt-based dip or even a simple olive tapenade. The goal is to add flavor without too much heaviness.
Storing and Reheating Your Charcuterie Board
So, you’ve got some delicious leftovers – lucky you! The best way to handle them is to keep things separate so they stay fresh. It’s pretty simple, and you’ll get to enjoy those amazing flavors again. Don’t worry, it’s not complicated at all!
Storage Guidelines
| Component | Storage Method |
| Cheeses | Wrap tightly in plastic wrap or cheese paper; store in the coldest part of your fridge. |
| Cured Meats | Re-wrap tightly in plastic wrap or butcher paper; store in the fridge. |
| Crackers & Nuts | Store in airtight containers or bags at room temperature to keep them crunchy. |
| Fruits & Vegetables | Store in separate airtight containers in the fridge. |
| Dips & Spreads | Transfer to airtight containers and refrigerate. |
Reheating and Serving Leftovers
Honestly, most charcuterie board items are best served cold or at room temperature. For cheeses, just take them out of the fridge about 30 minutes before serving. Crackers and nuts don’t need reheating at all – just make sure they’re dry. If you have any dips that were served warm, you can gently reheat them according to their original instructions. Otherwise, it’s basically just a mini charcuterie board redo!
Nutritional Information for This Charcuterie Board
Okay, so figuring out the exact nutrition for a charcuterie board is a bit like nailing jelly to a wall – it really depends on what you put on it! Since everyone builds their own masterpiece, these numbers are just a super rough estimate per serving (like, if you divide the whole board into 8 parts). Things like the specific brands of cheese and meats, how much you drizzle of that jam, or how many olives you pile on will change things quite a bit. But this gives you a general idea:
| Serving Size | Approx. 1/8th of board |
| Calories | ~400-600 kcal |
| Fat | ~25-40g |
| Saturated Fat | ~10-15g |
| Carbohydrates | ~20-30g |
| Protein | ~15-25g |
Share Your Charcuterie Board Creations!
I absolutely LOVE seeing what you all come up with! Once you’ve built your amazing charcuterie board, please share a photo with me! Tag me on [Social Media Handle] or drop a comment below telling me about your favorite pairings and what made your board extra special. I can’t wait to see your delicious creations!
Print
Astonishing Charcuterie Board: 5 Easy Steps
- Total Time: 20 minutes
- Yield: Serves 6-8
- Diet: Vegetarian
Description
Assemble a stunning and delicious charcuterie board with a variety of meats, cheeses, fruits, and accompaniments. Perfect for any gathering, this guide helps you create a visually appealing and flavorful appetizer board.
Ingredients
- Cheeses (3, 5, or 7 varieties): Manchego, goat cheese, Gouda, cream cheese with jalapeño jelly, cheddar, Gruyère, Brie, triple cream, Havarti, Burrata, blue cheese, Gorgonzola, Parmesan
- Meats: prosciutto, ham, salami, cured chorizo, soppressata, capricola, summer sausage
- Nuts: candied pecans, pistachios, cashews, macadamia nuts, almonds (e.g. Marcona almonds)
- Pickled/marinated/briny: olives, cocktail onions, dill pickles, pepperoncini, cornichons, olive tapenade, bruschetta
- Dips/spreads: hummus, ranch, balsamic dip, romesco, whole ground mustard
- Vegetables: carrots, broccoli, snap peas, cold cut veggies
- Fresh fruits: apples, pears, oranges, grapes, raspberries, blueberries, blackberries, strawberries
- Dried fruits: mango, pineapple, figs, cherries, apricots
- Sweet spreads: fig butter, orange marmalade, blackberry jam
- Chocolate: dark chocolate, chocolate-covered nuts
- Crackers: pita crackers, whole grain crackers, croccantini, toasted baguette slices, mini toasts
Instructions
- Choose a board size appropriate for your guest count.
- Arrange your selected cheeses (3, 5, or 7 types) spaced evenly across the board.
- Fold meats into ribbons or halves and fan them out for easy access.
- Group savory accompaniments by color and flavor, placing complementary items together (e.g., nuts near cheeses).
- Arrange sweet accompaniments near cheeses and meats they pair well with.
- Fill any remaining spaces with crackers, nuts, and fruits to create a full look.
- Consider themed decorations or arrangements for special occasions.
- Keep ingredients chilled if serving for an extended period.
Notes
- Aim for an odd number of cheese varieties for visual appeal.
- Fold meats to make them easier to grab.
- Group items with similar or complementary flavors together.
- Ensure the board is visually appealing by filling all gaps.
- Consider the occasion when decorating or arranging your board.
- Keep food fresh by maintaining a chilled temperature.
- Prep Time: 20 minutes
- Cook Time: 0 minutes
- Category: Appetizer
- Method: Assembly
- Cuisine: International