Okay, listen up, because I have found the dessert that saves every single potluck, backyard BBQ, and last-minute sweet craving: the Banana Split Dump Cake. Seriously, if you thought making something that tastes like a nostalgic, dripping-with-syrup ice cream sundae was complicated, you were wrong! This recipe is pure magic disguised as the easiest thing you’ll ever bake.
I came up with this idea when I was trying to impress my new neighbors but realized my oven was occupied with sourdough starter that morning. I needed something fast, something that used pantry staples, and something that tasted totally decadent. That’s when the lightbulb went off! You just layer, sprinkle, pour, and bake. No mixing bowls, no creaming butter—zero fuss.
This Banana Split Dump Cake is proof that you don’t need fancy skills to create a showstopper. It’s fruit-forward, perfectly spiced by the cake mix, and has that wonderful crunchy butter topping. Trust me, once you pull this golden beauty out of the oven, you’ll never look at a complicated layered cake the same way again.

Gathering Your Ingredients for Banana Split Dump Cake
I love that for this recipe, we aren’t even dirtying a mixing bowl! That’s the beauty of a dump cake—everything goes right into the pan. But you do need to make sure your fruit prep is spot on, especially draining that pineapple. If you skip draining, you’ll end up with a soupy mess instead of a perfectly set base.
Gather everything before you even think about preheating the oven. Lay it all out on the counter. It makes the whole process so much faster, and honestly, it’s just satisfying to see all those colorful components waiting to become dessert.
Essential Components for Your Banana Split Dump Cake
Here is exactly what you’ll need. Remember, the cake mix goes in dry—don’t try to mix it with milk or eggs! That’s the whole trick here, so keep it powdery until the butter hits it.
| Ingredient | Preparation Detail |
|---|---|
| Crushed Pineapple | 1 can (20 oz), must be drained well |
| Fresh Strawberries | 3 cups, hulled and sliced |
| Ripe Bananas | 3 large, sliced into coins |
| Yellow Cake Mix | 1 box (15.25 oz), dry mix only |
| Unsalted Butter | 1/2 cup, melted |
| Chopped Nuts (Walnuts/Pecans) | 1/2 cup, chopped |
| Semi-Sweet Chocolate Chips | 1/2 cup, melted for drizzling |
| Maraschino Cherries | Drained and patted dry |
Why This Banana Split Dump Cake is Your New Favorite Dessert
Seriously, this is the ultimate set-it-and-forget-it dessert. You get all the complex, beloved flavors of a classic ice cream parlor treat without any of the fuss of making whipped cream or slicing bananas *after* dinner. It’s just pure, baked goodness.
I encourage everyone, especially new bakers, to try this first. If you can layer things in a pan, you can master this recipe. It’s practically foolproof!
- Speed Demon: Prep time is under 15 minutes. You can have this in the oven before your guests even arrive.
- Flavor Explosion: It hits every nostalgic note—sweet pineapple, tangy strawberry, creamy banana, and that buttery, crunchy top layer.
- Potluck Perfection: It travels beautifully in the 9×13 dish and feeds a crowd easily. People always ask me for the recipe!
- Minimal Cleanup: Since we skip the mixing bowl, cleanup is just one casserole dish and a few measuring cups. Win-win!
Equipment Needed for Making Banana Split Dump Cake
Don’t stress about specialized gear here; this recipe keeps things really simple, which is why I love it for weeknights. You really only need three main items to get this done right. Remember, we aren’t using any fancy electric mixers!
- A standard 9×13 inch baking dish.
- Nonstick cooking spray—don’t skip this, or the bottom layer will stick!
- A small bowl for melting your butter and chocolate chips (microwave safe is easiest).
- A wire cooling rack for when it comes out of the oven.
Step-by-Step Instructions for Making Banana Split Dump Cake
This is where the magic happens, and I mean it when I say this is practically foolproof. Just follow the order, and you’re golden. Set your oven to 350°F right now so it has time to get nice and hot while you layer the fruit.
Preparing the Base Layers
First things first, grab that 9×13 dish and give it a really good coating of nonstick spray. I spray until I can see a nice sheen across the bottom and up the sides. This fruit layer is sticky, so don’t skimp!
Now, we build the sundae foundation. Scoop that drained crushed pineapple right onto the bottom. Spread it out until it mostly covers the base—it’s okay if it isn’t perfect. Next, we gently layer on your sliced strawberries. Try to keep them even so you don’t end up with one side that’s just mush. Finally, arrange those beautiful banana coins on top of the strawberries. That’s your fruit layer done!
Assembling the Dry Mix and Butter Top
This next part is crucial for that perfect dump cake crust. Take your dry yellow cake mix and sprinkle it over the fruit. You want to cover every single piece of fruit you can see. Don’t pat it down or try to press it in; just let it rest lightly on top. If you see a few little fruit spots peeking through, that’s fine, but aim for full coverage.
Next, grab that melted butter. Slowly drizzle it over the entire surface of the dry cake mix. Try to hit as much of that powder as possible because the butter is what turns that dry mix into that gorgeous, crisp topping. After the butter, scatter your chopped nuts (pecans are my favorite here) right over the buttered surface. That’s it for assembly!
Baking and Finishing Your Banana Split Dump Cake
Slide that dish into the preheated oven. You are looking for about 45 to 50 minutes. Keep an eye on it—you want the edges to be bubbling like crazy, and the top should be a nice, deep golden brown. You’ll know it’s done when you see that bubbling fruit juice pushing up through the crust.
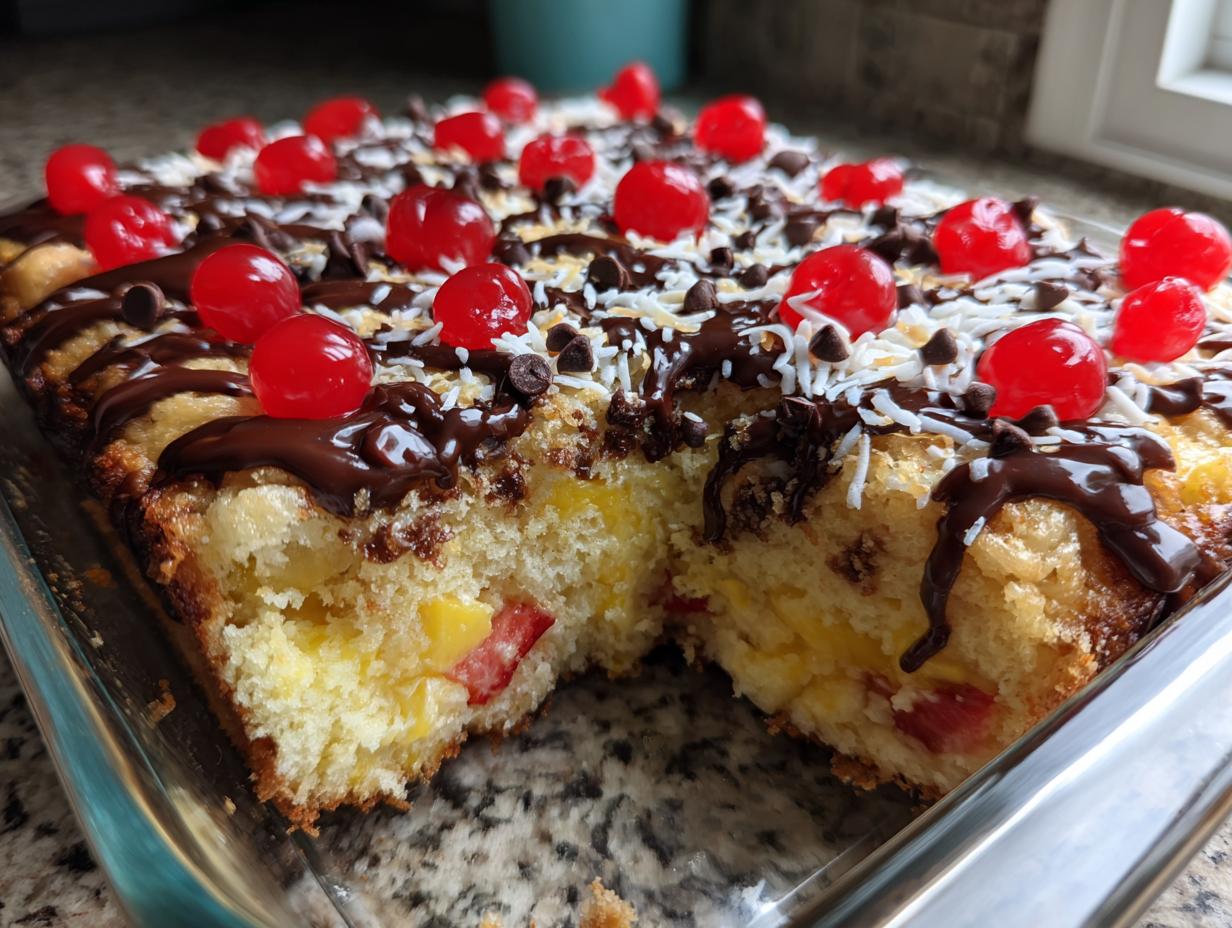
When it comes out, you *must* let it cool on a wire rack for at least 20 minutes. This time allows the filling to set up properly. If you cut into it immediately, it will run everywhere. While it’s cooling, melt your chocolate chips. Once the cooling time is up, drizzle that melted chocolate zig-zag style over the top. Finally, dot it with those bright red maraschino cherries. If you’re feeling fancy, add a dollop of fresh whipped cream right before serving. Enjoy your amazing Banana Split Dump Cake!

Tips for Perfecting Your Banana Split Dump Cake
Even though this recipe is super simple, there are two little things that can trip you up if you aren’t careful. Pay attention to these, and you’ll get the perfect texture every time you make this fruit cake.
First, that dry cake mix layer is the key to the crust. I know you want to pack it down gently, but please, resist the urge! If you press it into the fruit, it will turn dense and gummy instead of light and crispy. Just sprinkle it on lightly and let it be. The melted butter will do all the heavy lifting when it soaks through.
Second, make sure those bananas aren’t too green. They won’t soften up enough during the short bake time. You want them ripe—a few brown spots on the peel are actually perfect because they are sweeter and mushier, which is what you want in the filling. If you notice the edges of the cake are done but the center still looks a little wet, just tent it loosely with foil for the last 10 minutes. This keeps the top from burning while the middle finishes setting up.
Storing and Reheating Your Banana Split Dump Cake
This dessert is so good you might have leftovers, which is a treat! Because we are dealing with fresh fruit, you absolutely must keep this cake covered tightly in the refrigerator. It stays great for about three days, though honestly, it rarely lasts that long in my house. Don’t leave it on the counter once it cools down.
Reheating is optional, but I think it tastes best slightly warmed up so the fruit softens again. Just be careful not to overheat it, or the bottom gets too soggy.
| Method | Instructions |
|---|---|
| Storage | Cover tightly and refrigerate for up to 3 days. |
| Reheating (Single Serving) | Microwave for 15-20 seconds until warm. (Omit fresh whipped cream topping). |
Frequently Asked Questions About Banana Split Dump Cake
I get so many questions when I bring this dessert to gatherings! People are always amazed by how simple it is. Here are the most common things folks ask me about making this easy dessert.
Q1. Can I use frozen fruit instead of fresh strawberries and bananas?
You certainly can, but you need to be very careful with the moisture! If you use frozen fruit, you must thaw it completely and drain off every drop of liquid before layering it in the pan. If you don’t drain the melted ice crystals, your bottom layer will be way too watery. I always prefer fresh for the best texture in this fruit cake.
Q2. My cake mix topping didn’t get crispy on top. What went wrong?
That usually means one of two things. Either you didn’t use enough melted butter to cover the dry powder, or you pressed the cake mix down when you added it. The butter needs to soak into the powder to create that crunchy crust! Don’t pack it down at all; just let it sit loosely on top of the fruit.
Q3. Can this be made ahead of time?
It’s best served the day it’s made, but you can certainly assemble the fruit layers and the dry cake mix the night before. Cover the pan tightly and keep it in the fridge. When you are ready to bake, just melt your butter, pour it over, add your nuts, and bake as directed. Don’t add the chocolate drizzle until it’s cooled slightly after baking.
Q4. What kind of cake mix works best?
Yellow cake mix is the classic choice because it perfectly mimics the vanilla ice cream base of a real banana split. You could try white cake mix in a pinch, but I wouldn’t recommend chocolate cake mix since it tends to overpower the subtle fruit flavors we are going for here.
Understanding the Nutrition in Banana Split Dump Cake
Now, I know this is a dessert, so we aren’t aiming for light salad territory here! But I always like to give you a ballpark idea of what you’re serving up. Since this recipe is so flexible—you might use more chocolate or skip the nuts—these numbers are just good estimates based on the standard ingredients listed.
It’s definitely a rich treat, mostly coming from that buttery topping and the cake mix, but wow, is it worth it! This table gives you a general idea for one generous serving size.
| Nutrient | Estimate Per Serving |
|---|---|
| Calories | 340 |
| Fat | 14g |
| Carbohydrates | 52g |
| Protein | 3g |
Just remember, these figures are estimates based on the recipe as written, so they can shift a little depending on how generous you are with the chocolate drizzle!
Share Your Banana Split Dump Cake Success
Now that you know how easy it is to whip up this incredible fruit dessert, I really want to know what you think! Did you use pecans or walnuts on top? Did you add extra cherries?
Drop a comment below and let me know how your Banana Split Dump Cake turned out. Ratings are always appreciated too—it helps other hesitant bakers take the plunge! You can also follow our latest recipes on Facebook.
Print
Amazing 1-pan Banana Split Dump Cake magic
- Total Time: 1 hour 0 minutes
- Yield: 12 servings
- Diet: Vegetarian
Description
This easy banana split dump cake features layers of pineapple, strawberries, and nuts. A perfect crowd-pleasing dessert ready in under an hour. It mimics the flavors of a nostalgic ice cream sundae without the mess.
Ingredients
- 1 can (20 ounces) crushed pineapple, drained
- 3 cups fresh strawberries, hulled and sliced
- 3 large ripe bananas, sliced into coins
- 1 box (15.25 ounces) yellow cake mix
- 1/2 cup unsalted butter, melted
- 1/2 cup chopped walnuts or pecans
- 1/2 cup semi-sweet chocolate chips, melted
- 1/4 cup maraschino cherries, drained and patted dry
- Fresh whipped cream (optional)
Instructions
- Preheat your oven to 350°F. Spray a standard 9×13 inch baking dish with nonstick cooking spray.
- Spread the drained crushed pineapple evenly across the bottom of the prepared baking dish.
- Layer the sliced strawberries over the pineapple, ensuring they are distributed evenly.
- Arrange the banana coins in a single layer on top of the strawberries.
- Sprinkle the dry yellow cake mix over the fruit layers, covering the fruit completely.
- Pour the melted butter slowly over the dry cake mix, trying to moisten as much of the powder as possible.
- Scatter the chopped walnuts or pecans over the top of the buttered cake mix.
- Bake for 45 to 50 minutes until the top is golden brown and the fruit filling bubbles vigorously around the edges.
- Remove the cake from the oven and place it on a wire rack to cool for at least 20 minutes to set.
- Drizzle the melted semi-sweet chocolate chips over the warm cake.
- Top with maraschino cherries and optional fresh whipped cream just before serving.
Notes
- Store any leftovers in the refrigerator for up to 3 days.
- Prep Time: 10 minutes
- Cook Time: 50 minutes
- Category: Dessert
- Method: Baking
- Cuisine: American