Autumn Harvest Apple Cider Donuts—oh, these are the treats that truly make me feel like fall has officially arrived! When I first started NoobRecipes, I promised myself we’d tackle the classics, but only if we could make them totally foolproof. I remember trying to make donuts years ago, ending up with greasy messes that tasted like fried flour. It was a disaster! But I kept going because I knew that cozy, spiced flavor was worth the effort.
That’s why I spent three whole weekends perfecting this recipe just for you beginners out there. These aren’t the fussy, yeasted kind; these are the quick, cake-style donuts that come together faster than you can drive to the local farm stand. The magic is in the reduced cider, which concentrates that sharp, sweet apple flavor right into the dough. Trust me, once you see how easy it is to get that perfect, golden ring coated in spicy sugar, you’ll realize you’re not a beginner anymore—you’re a donut master!
We’re using simple pantry spices and just a little bit of chilling time to guarantee success. Forget the intimidation factor; we’re making the best homemade donuts you’ve ever tasted, and you’re going to nail it on the first try!

Gathering What You Need for Autumn Harvest Apple Cider Donuts
Before we dive into the fun part—the mixing!—let’s make sure your station is set up. Making these Autumn Harvest Apple Cider Donuts is all about organization, especially since we move quickly once the dough is chilled. Think of this as setting up your own little baking assembly line. You want everything measured out and ready to go before you even turn on the stove for the oil. It prevents that frantic search for the nutmeg when you should be whisking your wet ingredients!
We’ve broken the list down into the dry side and the wet side. It keeps things clean, and honestly, it makes the whole process feel less overwhelming for us new bakers. You’ve got this!
Essential Dry Ingredients for Your Autumn Harvest Apple Cider Donuts
This is where all that wonderful autumnal flavor starts building up! You’ll notice we’re using both white and brown sugar here. The light brown sugar is crucial because it brings a little hint of molasses that compliments the spices beautifully. Don’t skip the spices; the combination of cinnamon, nutmeg, and just a tiny pinch of clove is what gives these Autumn Harvest Apple Cider Donuts that signature warm hug of a flavor. Whisk these dry components together really well in your big bowl. We want those leaveners—the baking powder and soda—evenly distributed so your donuts puff up nicely and don’t end up dense little hockey pucks!
Mixing the Wet Flavor Base
On the wet side, the star, naturally, is the apple cider. It needs to be unsweetened so we can control the sugar level ourselves. Whisk that cider with the buttermilk, the egg, the melted butter, and the vanilla. The buttermilk makes these cake donuts tender, so don’t swap it out if you can help it! Once this mixture is smooth and uniform, set it aside. It’s ready to meet its dry match soon enough.
Equipment Required for Perfect Frying
Since we are frying these treats, having the right gear is important for safety and success. You absolutely need a large, heavy-bottomed pot—a Dutch oven is my favorite because it holds heat so evenly. You must have a candy or deep-fry thermometer; guessing the oil temperature is a recipe for disaster, trust me on this one. Finally, grab a slotted spoon for lifting them out and a couple of wire racks ready for draining the excess oil before they hit the sugar.
Crafting the Dough for Autumn Harvest Apple Cider Donuts
Okay, this is where we bring it all together, and I need you to listen to your inner Noob Baker here: gentle is the name of the game! We are making cake donuts, not bread. Overmixing develops gluten, and gluten means tough donuts. Nobody wants a tough donut, especially when you’re aiming for that light, airy texture these Autumn Harvest Apple Cider Donuts promise.
Combining Wet and Dry Components
Take your bowl of spiced dry ingredients and pour all those lovely wet ingredients right into the middle. Now, grab your spatula—put the electric mixer away! We are folding this together slowly. You just want to stir until you see no more big streaks of dry flour. Seriously, stop stirring when it looks *just* combined. It’s going to look shaggy, maybe a little lumpy, and definitely sticky. That’s perfect! If you stir until it’s perfectly smooth, you’ve gone too far, and your donuts will be chewy instead of tender.
The Importance of Chilling Your Dough
Now for the step that separates the good donuts from the *great* donuts: the chill time. Cover that sticky dough and tuck it into the fridge for at least 30 minutes. Why? Because that sticky dough is hard to handle and will smear everywhere when you try to cut shapes. Chilling firms up the fats and makes the dough much easier to roll out evenly to that half-inch thickness we need. Plus, cold dough hitting hot oil fries up cleaner and holds its shape better, giving you those beautiful, professional-looking rings. It’s a small wait, but it makes all the difference for achieving that signature texture in our Autumn Harvest Apple Cider Donuts.

Frying and Finishing Your Autumn Harvest Apple Cider Donuts
The moment of truth! Frying can feel intimidating, but once you nail the temperature, these Autumn Harvest Apple Cider Donuts practically make themselves. Remember, we are looking for a quick, hot bath for these dough rings. Too cool, and they soak up oil and become greasy sponges. Too hot, and they burn on the outside before the middle cooks through. We need that sweet spot!
Achieving the Right Oil Temperature
Get your oil heating up in that heavy pot—we’re aiming for a steady 350°F (175°C). Use your thermometer! Seriously, this is the most non-negotiable part of making homemade donuts. Once you drop a tiny scrap of dough in, it should immediately sizzle happily, not violently explode or just sit there sadly. Keep the temperature consistent by adjusting the heat slightly as you go. If you crowd the pot by dropping in too many donuts at once, the oil temperature will drop fast, and that’s when they get oily. Fry in small batches, usually 3 or 4 at a time, depending on the size of your pot.
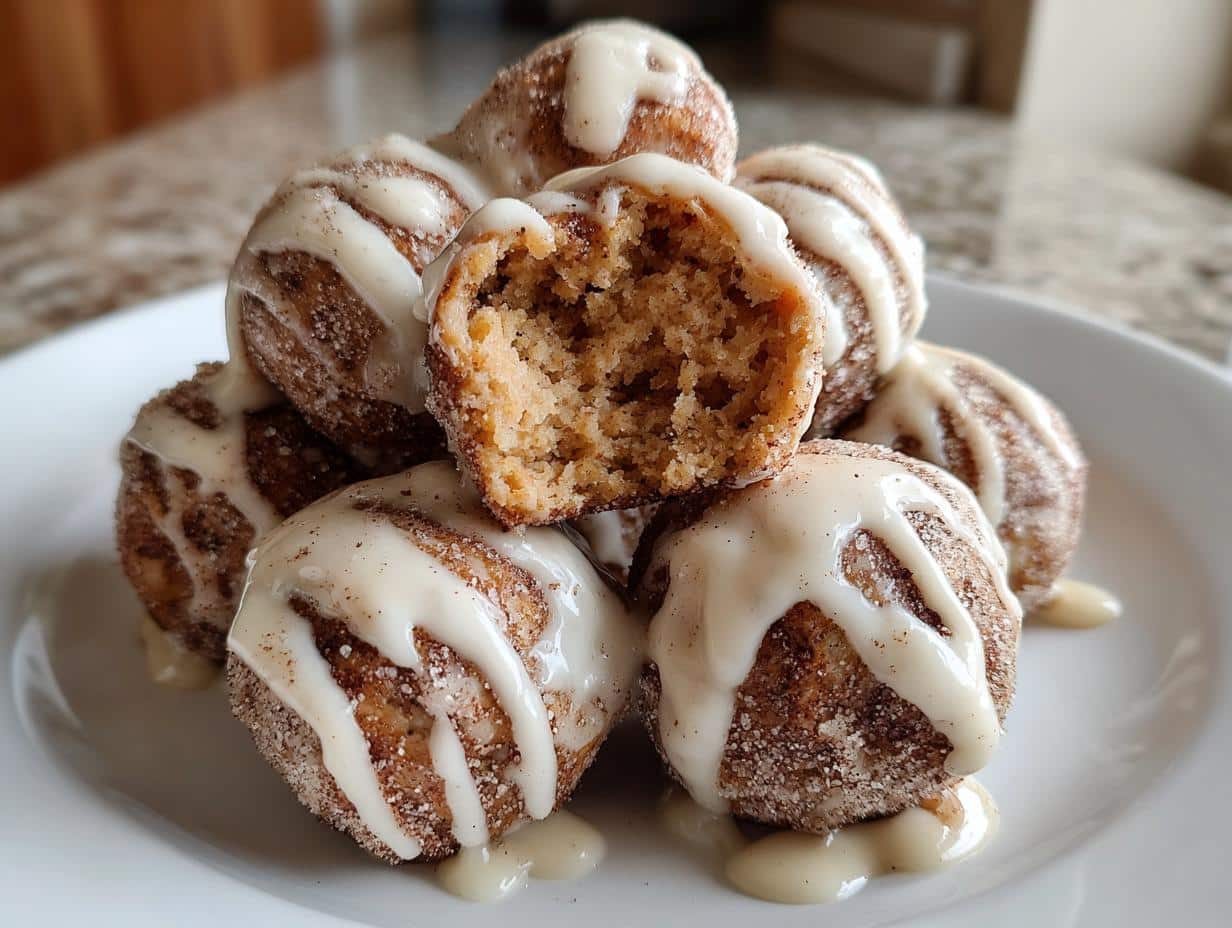
Coating Warm Donuts in Cinnamon Sugar
This part is so much fun! While the first batch is frying, mix your topping sugar and cinnamon in a shallow dish—make sure you have plenty of it ready. As soon as you pull those golden brown rings out of the oil using your slotted spoon, let them drain on the rack for just a quick second, maybe 10 seconds tops. They need to be warm—not piping hot, but definitely warm—when they hit that cinnamon sugar. If they are too cool, the sugar won’t stick! Gently toss them in the mixture until they are completely coated. The warmth helps the sugar adhere perfectly, making these Autumn Harvest Apple Cider Donuts absolutely irresistible right out of the fryer.
Tips for Making Excellent Autumn Harvest Apple Cider Donuts
Even though this recipe is designed to be super easy for beginners, sometimes things still go a little sideways, right? That’s okay! That’s just part of learning how to make truly great Autumn Harvest Apple Cider Donuts. Having made these dozens of times now, I’ve learned a few tricks that help avoid the common fryer mistakes. My biggest piece of advice, which I can’t stress enough, is temperature control. It dictates everything about the final texture of your donut.
Also, don’t be afraid of the dough being sticky before chilling. I see so many new bakers panic and add extra flour to make rolling easier, but that just ruins the tender crumb we worked so hard to achieve in the mixing stage. Stick to the plan, let it chill, and you’ll be rewarded with the best seasonal treat! If you want to see more of our foolproof baking tips, check out our Pinterest page for visual guides.
Troubleshooting Common Frying Issues
If your donuts come out dark brown on the outside but look pale or doughy in the center, your oil was way too hot. They burned before the heat could penetrate. Next time, drop the temperature down by 15 to 20 degrees. Conversely, if your Autumn Harvest Apple Cider Donuts look pale and feel heavy or greasy after cooling, the oil was too cold. They absorbed too much oil instead of puffing up quickly. Keep checking that thermometer! Also, make sure you aren’t stuffing too many donuts into the pot at once. They need space to swim freely! If you want to see how we handle other tricky frying techniques, follow us on Facebook.
Frequently Asked Questions About Your Autumn Harvest Apple Cider Donuts
I get so many emails asking clarifying questions when people first try frying at home, and I love hearing from you all! Don’t worry if you’re nervous about the frying part; we’ll get you sorted out so your Autumn Harvest Apple Cider Donuts turn out perfectly golden every time. Here are some of the most common things folks ask me. If you are looking for other quick dessert ideas, check out our guide on air fryer churro bites.
Q1. Can I bake these instead of frying them?
While you can bake cake donuts, it’s just not the same! These are distinctly cake-style donuts, meaning they rely on that quick, hot oil bath to get that signature light interior and crisp exterior. Baking them tends to make them dry out faster. If you absolutely must avoid frying, you can try baking them in a donut pan, but know that the texture will be closer to a muffin top than a true homemade donut.
Q2. What kind of cider should I use?
You must use real, unsweetened apple cider, not apple juice. Apple juice has too much added sugar already, which throws off the balance with our brown sugar. The rich flavor we want in these Autumn Harvest Apple Cider Donuts comes from reducing the natural, slightly tart cider down before we add it to the batter.
Q3. Can I make these ahead of time?
You can mix the dough the day before and keep it chilled, which is a great time-saver! However, for the absolute best flavor—that warm, spicy aroma—they really need to be fried and coated right before serving. The cinnamon sugar coating sticks best when they are warm.
Q4. My donuts are coming out too small. What did I do wrong?
Usually, this means your oil wasn’t hot enough, or you didn’t roll the dough thick enough. Aim for that half-inch thickness, and make sure that 350°F is steady. If the oil is too cool, the dough spreads out before it sets!
Storing and Enjoying Leftover Autumn Harvest Apple Cider Donuts
Look, I know these Autumn Harvest Apple Cider Donuts are best eaten immediately—that warm cinnamon sugar coating is just heavenly right out of the fryer! But let’s be real, sometimes you make too many, or you just want a quick treat the next morning. Don’t worry, they store pretty well, though they lose a tiny bit of that fresh-fried crispness.
The key is keeping the coating from getting soggy. If you plan on having leftovers, it’s actually better to wait until they are completely cool before tossing them in the sugar mixture, though I know that’s tough to wait for! Store them in an airtight container. If you just can’t resist coating them warm, you might need to refresh them slightly later. For more seasonal baking inspiration, check out our recipe for salted caramel apple pie bars.
Storage Guidelines Table
Here’s my little cheat sheet for how long you can keep these seasonal beauties around. Remember, they are always best on Day One!
| Storage Location | Recommended Timeframe | Best Way to Reheat |
|---|---|---|
| Room Temperature (Airtight) | Up to 2 days | Quick 10-second zap in the microwave |
| Refrigerator (Airtight) | Up to 5 days | Warm slightly in a 300°F oven for 5 minutes |

Amazing 3 Step Autumn Harvest Apple Cider Donuts
- Total Time: 1 hour
- Yield: 12-15 donuts
- Diet: Vegetarian
Description
These Autumn Harvest Apple Cider Donuts are a delightful treat perfect for fall. Easy to make, they bring the cozy flavors of the season right into your kitchen. Ideal for beginner bakers.
Ingredients
- 2 cups all-purpose flour
- 1/2 cup granulated sugar
- 1/4 cup packed light brown sugar
- 1 1/2 teaspoons baking powder
- 1/2 teaspoon baking soda
- 1 teaspoon ground cinnamon
- 1/2 teaspoon ground nutmeg
- A pinch of ground cloves
- 1/2 teaspoon salt
- 1/2 cup unsweetened apple cider
- 1/4 cup buttermilk
- 1 large egg
- 2 tablespoons unsalted butter, melted
- 1 teaspoon vanilla extract
- Vegetable oil, for frying
- For the Topping:
- 1/2 cup granulated sugar
- 1 tablespoon ground cinnamon
Instructions
- In a large bowl, whisk together the flour, granulated sugar, brown sugar, baking powder, baking soda, cinnamon, nutmeg, cloves, and salt.
- In a separate medium bowl, whisk together the apple cider, buttermilk, egg, melted butter, and vanilla extract.
- Pour the wet ingredients into the dry ingredients and stir with a spatula until just combined. Do not overmix. The dough will be a bit sticky.
- Cover the bowl with plastic wrap and refrigerate for at least 30 minutes to firm up.
- On a lightly floured surface, roll out the chilled dough to about 1/2-inch thickness. Use a donut cutter to cut out the donuts and donut holes.
- In a large, heavy-bottomed pot or Dutch oven, heat about 2-3 inches of vegetable oil to 350°F (175°C).
- While the oil is heating, prepare the topping by combining the sugar and cinnamon in a shallow dish.
- Carefully place a few donuts at a time into the hot oil, being sure not to overcrowd the pot. Fry for about 60–90 seconds on each side, until golden brown.
- Use a slotted spoon to remove the donuts from the oil and place them on a wire rack to drain for a moment.
- While the donuts are still warm, toss them in the cinnamon-sugar mixture until they are fully coated.
- Serve immediately and enjoy the warm, seasonal flavors.
Notes
- Ensure oil temperature is consistent for even frying.
- Do not overcrowd the pot when frying.
- Serve warm for the best texture and flavor.
- Prep Time: 45 minutes
- Cook Time: 15 minutes
- Category: Dessert
- Method: Frying
- Cuisine: American