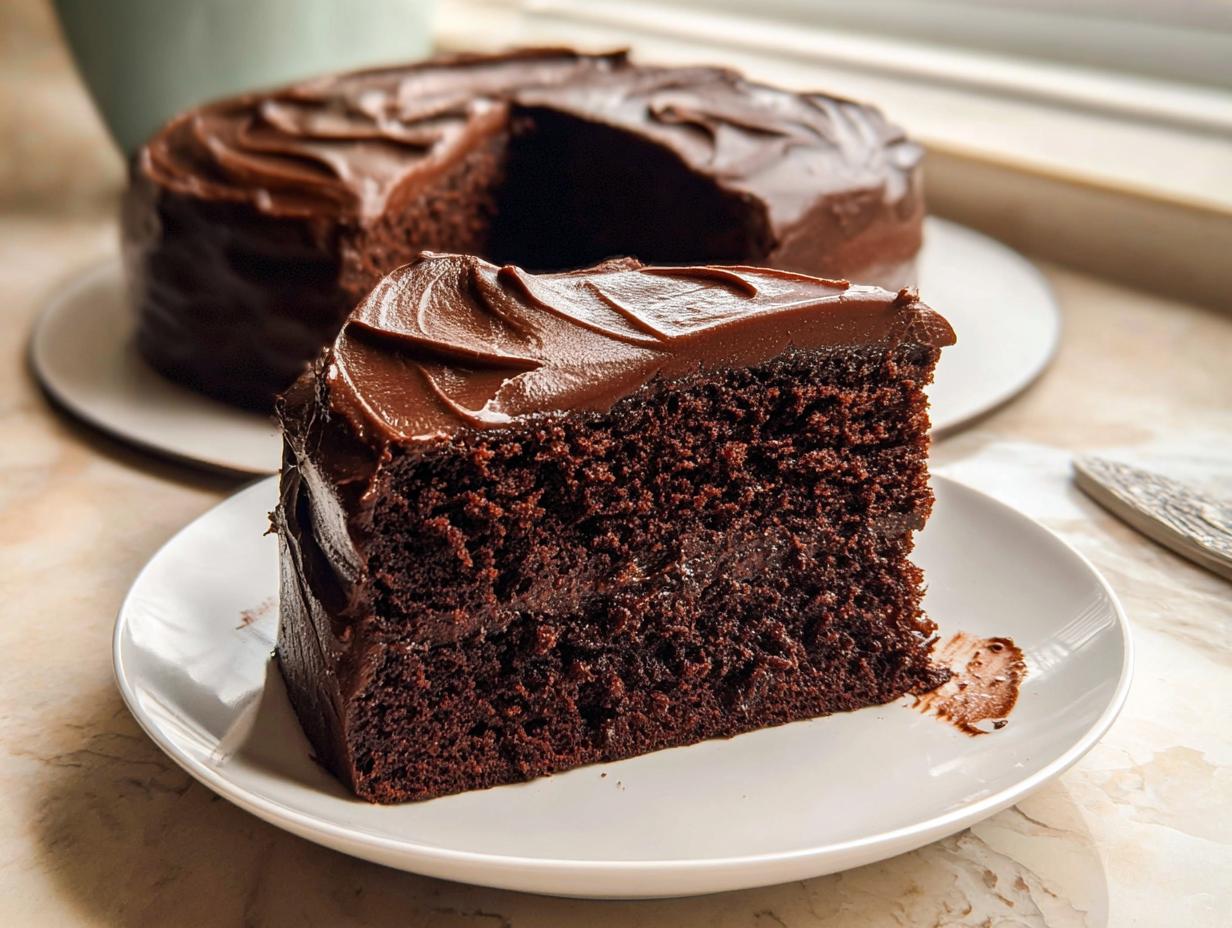
Best Matilda’s Chocolate Cake. I remember the first time I tried to make a truly decadent layer cake. It was for my roommate’s birthday, and I was convinced I needed professional tools and years of experience. I ended up with something that looked like a leaning tower of slightly burnt cocoa bricks. Honestly, that failure is why I started NoobRecipes!
When I finally cracked this recipe—the one everyone calls the Best Matilda’s Chocolate Cake—I realized the secret wasn’t complicated technique; it was using the right combination of simple ingredients. This cake is my proof that you don’t need fancy pastry school training to achieve that melt-in-your-mouth, fudgy texture.

What makes this recipe so good for beginners is how forgiving the batter is, thanks to that hot coffee trick. It’s designed to be mixed quickly and still come out moist and rich every single time. Forget dry, crumbly chocolate cakes; this one delivers pure, dark, fudgy satisfaction. Trust me, after you master this, you’ll feel like a baking pro!
Why You’ll Love This Best Matilda’s Chocolate Cake
I designed this recipe specifically because I know what it’s like to look at a complicated dessert and feel totally overwhelmed. This cake cuts out all the fuss but keeps all the amazing flavor. You won’t believe how easy it is!
- It’s incredibly moist—that hot coffee really does the trick!
- The chocolate fudge frosting is rich but actually simple to make on the stovetop.
- It’s very forgiving; you really can’t mess up the mixing sequence too badly.
- It bakes up beautifully level, meaning less trimming for you later.
- It tastes like a bakery cake but takes less than an hour of active time.
Simple Steps for the Best Matilda’s Chocolate Cake
My biggest goal here was clarity. We start by mixing the dry stuff, then adding the wet, and finishing with the coffee. That sequence prevents lumps and keeps the batter thin and manageable. Don’t worry about the thin batter; that’s exactly how it should look before it goes into the oven. We cool completely before frosting, which is the only mandatory waiting period!
Equipment Needed for the Best Matilda’s Chocolate Cake
You don’t need a fancy stand mixer for this one, which is great news for new bakers! Just make sure you have your standard bowls ready. You’ll want two 8-inch round cake pans, parchment paper for lining, a good whisk, and a medium saucepan for the frosting. Oh, and don’t forget your measuring cups and spoons—accuracy matters here!
Gathering Ingredients for the Best Matilda’s Chocolate Cake
Okay, let’s talk ingredients. For this Best Matilda’s Chocolate Cake to turn out perfectly fudgy, measuring is key. Don’t eyeball the flour or cocoa powder—that’s how cakes go wrong fast! Also, make sure your butter, eggs, and buttermilk are at room temperature before you start mixing the batter.
Cake Layer Ingredients
- 2 ½ cups Flour
- 1 ¾ cups Granulated sugar
- 2 teaspoons Baking powder
- 1 teaspoon Baking soda
- ½ teaspoon Kosher salt
- ½ cup Cocoa powder
- ¾ cup Vegetable oil
- 1 teaspoon Vanilla extract
- 3 Eggs
- ¾ cup Buttermilk
- 1 cup Coffee hot
Measuring Dry Ingredients Accurately
When you measure the flour and the cocoa powder for the cake layers, please use the “spoon and level” method, or better yet, use a kitchen scale if you have one. Too much flour makes a dense cake, and too much cocoa powder can make it taste bitter. This is where we set the stage for success!
Decadent Fudge Frosting Ingredients
For the frosting, we need the good stuff—real dark chocolate. Don’t skimp here because it makes all the difference in that rich flavor. Make sure your heavy cream is cold when you start the melting process, even though the final product will be heated.
- 11.11 oz Butter unsalted
- 14.1 oz Dark chocolate (60%-70%)
- ⅓ cup Cocoa powder (for frosting)
- 1 ⅓ cups Heavy cream
- 1 ⅓ cups Powdered sugar
- ½ teaspoon Kosher salt (for frosting)
- 1 teaspoon Vanilla extract (for frosting)
Step-by-Step Instructions for the Best Matilda’s Chocolate Cake
This is where we turn simple measurements into pure chocolate magic! Don’t rush these steps, especially the cooling parts, and you’ll have a stunning layer cake that looks like you spent all day on it. Remember, we are keeping things straightforward.
Preparing the Cake Batter
First things first: crank that oven up to 180°C (350°F) and get those two 8-inch pans lined with parchment paper on the bottom. Don’t skip the liner—it makes cleanup a breeze!
In your biggest bowl, grab your whisk and combine all the dry ingredients: flour, sugar, baking powder, baking soda, salt, and the cocoa powder. Whisk them together really well—this acts like a quick sifting step, which is perfect for us. Now, make a little well in the center and add your wet ingredients: the oil, vanilla, buttermilk, and those room temperature eggs. Mix it gently until it’s *almost* combined. You’ll still see a few streaks of flour, and that’s okay!
Here comes the secret weapon: pour in that hot coffee all at once. Be careful, it’s hot! Mix it on low speed or with your whisk until everything is just combined. I mean it—stop mixing the second you don’t see any dry flour spots anymore. If you overmix this batter, it gets tough, and we want fudgy, not tough! The batter will look super thin, almost like chocolate milk. That’s exactly right for this recipe!

Baking and Cooling the Layers
Pour that thin batter evenly into your prepared pans. If you have cake strips, soak them and wrap them around the outside; they help keep the edges from baking too fast. Pop them into the preheated oven for about 25 to 30 minutes. You’ll know they are done when a toothpick inserted right into the center comes out clean, or maybe with just a few moist crumbs clinging to it. If it comes out wet, give it three more minutes.
This next part is crucial, so listen up! Take the cakes out and let them cool in the pans for about 15 minutes. Then, flip them out onto a cooling rack to cool completely. You cannot rush this. If you try to frost a warm cake, you’ll end up with a melted, soupy mess. Let them sit until they are totally cool to the touch—give them at least an hour, or do them the day before!
Crafting the Rich Chocolate Fudge Frosting
While the cakes cool, let’s make that incredible frosting. Get a medium saucepan and combine the butter, heavy cream, the rest of your sifted cocoa powder, powdered sugar, and salt. Heat this over medium-high heat, but you have to stir it constantly. We want everything to melt together until it’s silky smooth and glossy.
Once it’s all melted and gorgeous, immediately strain that hot mixture into a large, clean bowl. Straining gets rid of any little lumps that the sugar or cocoa might have formed. Now, cover the surface directly with plastic wrap—this stops that weird skin from forming on top while it cools. Let it sit on the counter for 30 minutes, then stick it in the fridge for about an hour or two until it’s firm enough to hold a shape but still spreadable. If it gets too hard, just let it sit on the counter for 15 minutes before using.
Assembling Your Best Matilda’s Chocolate Cake
Time to build! Grab your serving plate or cake stand. Put a tiny dab of frosting right in the center—this is my little trick to keep the first layer from sliding around while you work. Place your first cooled cake layer right onto that frosting dot.
Take about a third of your chilled, firm frosting and spread it evenly over that bottom layer. Don’t press too hard! Then, gently place your second cake layer on top. Now, use the rest of the frosting to cover the top and sides. I like to use my offset spatula to create those soft, wavy peaks on top—it looks professional without needing perfect smoothing skills. If you have extra frosting left over after covering the sides, scoop it off and save it; we don’t want a giant mound on top!
Tips for Perfecting Your Best Matilda’s Chocolate Cake
Even though this is an easy recipe, a couple of small details can take your cake from great to absolutely incredible. The biggest mistake I see beginners make is rushing the cooling process. You absolutely must let those layers cool completely before you even think about frosting them, otherwise, you’ll end up with chocolate soup!
Another thing to watch out for is the mixing stage. When you add that hot coffee, stop mixing the second the flour disappears. Overmixing develops gluten, and that makes the cake tough, which defeats the purpose of getting that fudgy texture. Also, make sure your baking powder and soda are fresh; old leaveners mean a flat cake, and nobody wants that when they’re expecting the Best Matilda’s Chocolate Cake!
Finally, serve it at room temperature. Storing it in the fridge is fine, but right before serving, let it sit out for about 30 minutes. That lets the butter in the frosting soften up just enough for that perfect, smooth mouthfeel.
Storing and Reheating Your Best Matilda’s Chocolate Cake
This cake is so rich that sometimes you just can’t eat it all in one sitting, which is a good problem to have! Because of that fudgy frosting, storage is pretty straightforward, but you need to treat it right so the cake doesn’t dry out.
You can keep your assembled Best Matilda’s Chocolate Cake covered loosely at room temperature for up to two days. The high fat content in the chocolate frosting acts as a nice seal. If you need to keep it longer, pop it into the fridge, but remember that chilling makes the cake layers firm up.
Here’s the key: if you refrigerate it, you absolutely must let it come back to room temperature before serving. Taking it out about an hour before you plan to eat it lets the frosting soften back to that perfect, creamy texture we worked so hard for. Never try to microwave slices to warm them up—it dries out the cake part instantly! Just let it sit on the counter.
If you want to see more of our easy baking adventures, check out our Pinterest page for more inspiration!
Here’s a quick guide for keeping it fresh:
| Storage Location | Maximum Duration | Serving Tip |
|---|---|---|
| Countertop (Airtight) | 2 Days | Serve at room temperature. |
| Refrigerator | 5 Days | Remove 1 hour before serving. |
| Freezer (Unfrosted Layers) | Up to 3 Months | Thaw overnight in the fridge, then frost. |
Frequently Asked Questions About the Best Matilda’s Chocolate Cake
I always get a ton of questions when I post this recipe because people are nervous about making their first layer cake. Don’t be! Most issues are easy to fix, and I’ve gathered the most common ones right here to make your baking journey smoother. If you are looking for more baking tips, check out our chocolate cake guide.
This cake is so rich and fudgy, it really shines when you follow the details. If you’re using high-quality dark chocolate, you’ll get that deep flavor that makes this the Best Matilda’s Chocolate Cake everyone raves about. Keep reading for the quick fixes!
Can I substitute the coffee in the Best Matilda’s Chocolate Cake recipe?
That’s a great question! The hot coffee isn’t there to make the cake taste like a latte; it’s there to bloom the cocoa powder, which deepens the chocolate flavor immensely. If you absolutely can’t use coffee, use hot water instead. Just know that the chocolate won’t be quite as intense, but the cake structure will still be perfect!
How do I know if my chocolate fudge frosting is the right consistency?
The texture of this fudge frosting is all about temperature. If it seems too soft or runny after chilling, put it back in the fridge for another 30 minutes. If it gets too stiff or hard after chilling, just leave the bowl out on the counter for about 15 to 20 minutes, stirring it every few minutes until it’s spreadable again. You want it firm enough to hold its shape but soft enough to glide easily over the cake layers without tearing them.
Final Thoughts on Baking With NoobRecipes
There you have it—the recipe that proved to me that anyone can bake an amazing, fudgy chocolate cake. I truly hope tackling the Best Matilda’s Chocolate Cake gives you a huge confidence boost in the kitchen! Please snap a picture of your masterpiece and share it with me. I love seeing your successes, and don’t forget to leave a rating so other new bakers know they can master this too! You can also follow our updates on Facebook.
Print
Best Matilda’s Chocolate Cake: 1 Moist Proof
- Total Time: 3 hours 55 minutes
- Yield: 1 two-layer 8-inch cake
- Diet: Omnivore
Description
This is the Best Matilda’s Chocolate Cake recipe, designed to deliver a rich, fudgy chocolate experience perfect for beginner bakers. Follow these clear steps for a moist cake and a decadent chocolate fudge frosting.
Ingredients
- 2 ½ cups Flour
- 1 ¾ cups Granulated sugar
- 2 teaspoons Baking powder
- 1 teaspoon Baking soda
- ½ teaspoon Kosher salt
- ½ cup Cocoa powder
- ⅕ cup Vegetable oil
- 1 teaspoon Vanilla extract
- 3 Eggs
- ⅕ cup Buttermilk
- 1 cup Coffee hot
- 11.11 oz Butter unsalted
- 14.1 oz Dark chocolate (60%-70%)
- ⅓ cup Cocoa powder (for frosting)
- 1 ⅓ cups Heavy cream
- 1 ⅓ cups Powdered sugar
- ½ teaspoon Kosher salt (for frosting)
- 1 teaspoon Vanilla extract (for frosting)
Instructions
- Preheat your oven to 180°C (350°F). Prepare two 8-inch baking pans with parchment paper.
- In a large bowl, whisk together the flour, granulated sugar, kosher salt, baking powder, and baking soda. Sift in the cocoa powder and mix.
- Add the buttermilk, vegetable oil, vanilla extract, and eggs. Mix until they are almost combined.
- Pour in the hot coffee. Mix until the batter is just combined and you see no flour lumps. The batter will be thin.
- Divide the batter evenly between the two 8-inch pans. Use cake strips for even baking. Bake for 25-30 minutes, or until a toothpick inserted comes out clean. (You can use a 9-inch pan instead.)
- Allow the cake layers to cool completely before you attempt to frost them.
- Make the chocolate fudge frosting. Combine the butter, heavy cream, and dark chocolate in a saucepan. Sift in the cocoa powder, powdered sugar, and kosher salt.
- Heat the mixture over medium-high heat, stirring constantly until everything is melted and smooth.
- Strain the melted mixture into a large bowl to help it cool faster.
- Cover the surface directly with plastic wrap to stop a skin from forming.
- Let it cool at room temperature for 30 minutes, then move it to the fridge for 1 to 2 hours until chilled.
- Remove the frosting from the fridge. Place a small amount of frosting on your serving plate. Lay the first cake layer on top of the frosting dot.
- Spread about one-third of the frosting evenly over the first cake layer using a spatula.
- Place the second cake layer on top. Frost the entire cake with the remaining frosting. Use an offset spatula to create a wave pattern. Remove extra frosting if needed and save it for later.
Notes
- Use room temperature ingredients for the best cake texture.
- Check that your baking soda and baking powder are fresh.
- Measure your flour accurately.
- Avoid overmixing the batter to keep the cake moist.
- If the frosting is too soft, chill it further to firm it up.
- Always cool cakes fully before frosting to prevent melting.
- Serve the cake at room temperature for the smoothest, fudgiest texture.
- Prep Time: 25 minutes
- Cook Time: 30 minutes
- Category: Dessert
- Method: Baking
- Cuisine: American