Oh my gosh, stop what you are doing and listen up! If you think you need a deep fryer to get wings that actually snap when you bite into them, you are so wrong. I spent years dealing with soggy oven skins, and I finally cracked the code. Seriously, I’ve tested every trick out there, from resting them on cooling racks to using cornstarch.
But this recipe for crispy baked chicken wings? It’s the real deal. We’re talking about achieving that perfect, shatteringly crisp skin using nothing more than your standard oven and a little bit of kitchen magic that I’ll share with you in a minute. It’s totally foolproof, even if you’ve never successfully baked wings before.
The best part is that we skip the mess and the danger of deep frying entirely. We’re sticking to simple ingredients—lots of garlic butter, of course—but the technique is what makes these shine. Trust me, once you see how easy this oven method is, you’ll never go back to the messy frying pan again. Let’s get cooking!

Why This Crispy Baked Chicken Wings Recipe Works So Well
Okay, so why are these oven wings so unbelievably crunchy? It’s all down to two non-negotiable steps that make all the difference when you’re trying to achieve crispy baked chicken wings without oil splattering everywhere. If you skip these, you’re probably going back to sad, rubbery wings, and we can’t have that!
The first part is physics, I swear! We are drawing every single bit of surface moisture out of the skin before it even sees the oven. Secondly, we rely on a little chemical reaction to help that skin puff up and dehydrate perfectly while baking.
The Secret to Truly Crispy Baked Chicken Wings
The real game-changer here is the baking powder. I know, it sounds weird, right? But trust me when I say this is my biggest secret. That little bit of baking powder (make sure it’s aluminum-free, please!) raises the pH level of the chicken skin. This encourages the Maillard reaction—that browning process—to happen much faster and more aggressively. It essentially dries out the skin beautifully while it bakes. You absolutely have to pat the wings bone-dry first, though. If they’re damp when you toss them in the powder, you’ll just end up with a sticky paste instead of that light, crisp coating we are aiming for on our crispy baked chicken wings.
Quick Overview of Time and Yield
This recipe is perfect for a weeknight meal because it’s so fast. You won’t be tied up in the kitchen forever, which is why I love it so much. Here’s the quick rundown:
- Prep Time: 10 minutes
- Cook Time: 45 minutes
- Total Time: 55 minutes
- Yield: 4 servings
Essential Ingredients for Your Crispy Baked Chicken Wings
Alright, let’s talk about what goes into these amazing crispy baked chicken wings. While the technique is what gets them crunchy, the ingredients are what make them taste like they came straight from a fancy sports bar. Don’t skimp on the quality here; a few simple things make all the difference in the final flavor profile.
You’ll notice we don’t need a ton of wet ingredients before the bake, which is another key to getting that skin dry enough to crisp up in the oven. Everything is measured out simply, so you can get this mixed up in under ten minutes!
Ingredient Clarity and Preparation Notes
Pay close attention to the baking powder—it absolutely must be aluminum-free. That stuff without aluminum tends to leave a slightly metallic taste when you use it in high heat like this, and we want pure garlic butter flavor, not metal flavor! Also, make sure your butcher splits the wings into flats and drumettes if they haven’t already. Having uniform pieces helps them cook evenly.
As for the garlic, fresh minced garlic is the only way to go for that sauce at the end. Powder is fine for the initial dry rub, but the fresh stuff blooms beautifully in that melted butter.
Ingredient Table Display
| Ingredient | Amount | Preparation Note |
|---|---|---|
| Chicken wings (flats and drumettes) | 2 pounds | Split |
| Baking powder | 1 tablespoon | Aluminum-free |
| Kosher salt | 1 teaspoon | |
| Paprika | 1 teaspoon | |
| Black pepper | 1 teaspoon | |
| Garlic powder | 1 teaspoon | |
| Unsalted butter | 4 tablespoons | |
| Garlic | 3 cloves | Minced |
| Fresh parsley | 1 tablespoon | Chopped |
Step-by-Step Instructions for Perfect Crispy Baked Chicken Wings
Now we get down to business! This is where the magic happens to turn standard wings into the best crispy baked chicken wings you’ve ever made in your oven. Don’t rush the setup; a good foundation means a crispy finish. I always put on some good music while I do this part, it makes the 45 minutes fly by! Garlic butter is key here!
Preparing the Oven and Wings for Crispy Baked Chicken Wings
First things first, we need heat! Get that oven cranked up to 425 degrees Fahrenheit. While it’s warming up, you need to set up your baking station. Line a large rimmed sheet pan with foil—this makes cleanup a breeze, trust me. Then, you absolutely must place a wire rack on top of that foil. This rack is non-negotiable because it lifts the wings so the air can circulate underneath, which is how we avoid soggy bottoms!
Next, the second most important step: drying the wings. Grab a big stack of paper towels and pat every single flat and drumette until they feel dry to the touch. I mean really dry—like you’re trying to dry water off a countertop. Any moisture left over will steam the skin instead of letting it crisp up.
Seasoning Technique for Maximum Flavor
Time for the dry rub! Grab your biggest mixing bowl—you need room to toss these without making a huge mess. Dump in all your seasonings: the kosher salt, paprika, black pepper, garlic powder, and, of course, that vital aluminum-free baking powder. Give that dry mix a quick whisk with your fingers to make sure the baking powder is evenly distributed. Now, toss those dry wings right into that bowl. Toss them really well until every piece has a light, even coating. You want to see that pale powdery coating everywhere!
The Baking Process for Crispy Results
Carefully arrange the seasoned wings onto your oiled wire rack. This is another crucial point: lay them out in a single layer, and make sure there’s some space between each wing. If they are touching, they will steam each other, and we lose that crispiness! Pop the whole setup into that hot 425°F oven and set your timer for 40 minutes. About halfway through, maybe around the 20-minute mark, you need to flip every single wing over. This ensures both sides get that gorgeous, deep golden color.
Whipping Up the Rich Garlic Butter Finish
While those beauties are baking away, let’s make the sauce that makes these wings irresistible. Melt your four tablespoons of butter gently in a small saucepan over low heat. We are not trying to fry the garlic; we just want to wake it up! Add your three cloves of minced fresh garlic and cook it for just about 30 seconds until you can really smell it—don’t let it burn or it’ll taste bitter! Pull the pan right off the heat source immediately and stir in that fresh chopped parsley.
Tossing and Serving Your Finished Crispy Baked Chicken Wings
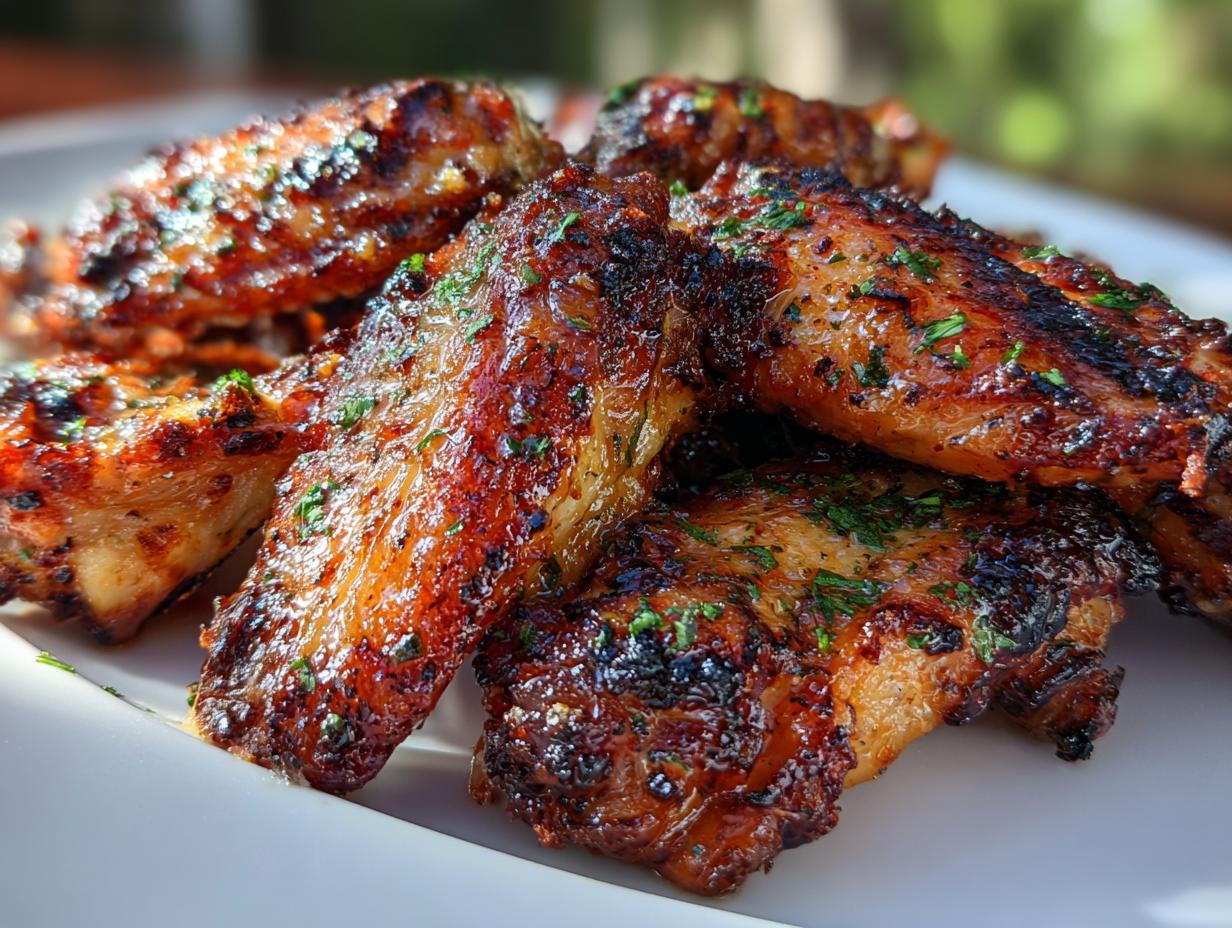
When the timer goes off and those wings look perfectly golden and crispy, pull them out. Transfer them quickly into a clean, large bowl. Pour that fragrant garlic butter right over the top. Now, toss them immediately and vigorously! You want every piece coated in that glossy, garlicky goodness while they are still piping hot. Serve these right away for the best experience. If you’re worried about safety, just check the thickest part of a drumette—it needs to hit 165°F internally, but honestly, they are usually way past that point when they look this good!

Tips for Guaranteed Crispy Baked Chicken Wings Success
Even with the best recipe, sometimes things go sideways in the oven, right? Don’t stress! I’ve gathered the most common mistakes people make when aiming for crispy baked chicken wings in the oven, and how to avoid them so you get perfect results every single time. It all comes down to managing moisture and air flow.
Remember, the main goal here is to dry out the skin aggressively before the wings even start roasting. If you follow these key tips, you’ll be rewarded with wings that rival any deep-fried version! You can find more great tips on our Medium page.
Preventing Soggy Skin: Pan Spacing Matters
This is where most people mess up, and it’s why we stressed the wire rack so much earlier. If you crowd your wings together on that rack, what happens? They steam! The moisture that cooks out of the skin gets trapped between the pieces, and instead of crisping, they just stew in their own juices. Seriously, give them some breathing room. They need space on all sides so that hot air can circulate freely. If you have too many wings for one pan, just grab a second rack and use a separate sheet pan. It’s worth the extra dishwashing, I promise!
Choosing the Right Baking Powder
We mentioned this in the ingredients, but it bears repeating because it’s a flavor safety issue. Please, please use aluminum-free baking powder here. When you bake at a high temperature like 425°F, regular baking powder can sometimes leave behind a slight soapy or metallic aftertaste. Since the baking powder is one of the few chemical agents doing heavy lifting for our crispy baked chicken wings, we need it to be clean-tasting. You want that pure, salty, garlicky flavor to shine through, not a weird chemical note!
Ingredient Substitutions for Your Crispy Baked Chicken Wings
While I think this exact combination of spices makes the best crispy baked chicken wings, I totally get it—sometimes you’re missing one little thing in the pantry. Luckily, most of the seasonings here are interchangeable because the real crispiness comes from the baking powder and the drying process, not the spice blend itself.
If you don’t have kosher salt, regular table salt works fine, just use a little less since it’s finer and saltier. For the paprika, smoked paprika is a fantastic swap if you want an extra layer of depth. And if you run out of fresh parsley for the butter toss? Dried parsley works in a pinch, but use about half the amount since it’s more concentrated.
The butter for the glaze is harder to swap since fat is flavor, but you can use a high-quality, neutral oil like avocado oil in a pinch, though you’ll lose that rich dairy taste. Stick to fresh garlic, though—that’s one element I really wouldn’t compromise on for the final coating!
Storing and Reheating Leftover Crispy Baked Chicken Wings
It’s rare that we have leftovers of these beauties, but when we do, the crucial thing is making sure they are still crispy the next day. The enemy here is moisture, so we have to treat them right immediately after cooling down. Don’t just toss them in any old container!
The key to saving your leftover crispy baked chicken wings is letting them cool completely first, but not for too long—you want to lock in that texture before they sit out too long. Store them in an airtight container, but here’s my little trick: I place a paper towel at the bottom of the container before adding the cooled wings. This absorbs any residual moisture that tries to sneak out overnight.
Storage and Reheating Table
| Storage Duration | Reheating Method | Approximate Time |
|---|---|---|
| Up to 3 days in the refrigerator | Oven or Toaster Oven | 5-8 minutes at 375°F |
| Up to 2 months frozen | Air Fryer | 6-10 minutes at 375°F |
When it comes to reheating, forget the microwave! Microwaves are the absolute death of crispiness; they just turn everything rubbery. Your best bet is getting that heat high and dry again. The oven works great for a small batch; just put them back on the wire rack and heat them up until they are sizzling hot again. If you have an air fryer, even better! It blasts the skin back into shape faster than anything else and really revives that crunch we worked so hard to achieve.
Frequently Asked Questions About Crispy Baked Chicken Wings
I get so many questions about these wings because everyone wants that perfect crunch! It’s totally understandable, and I’m happy to share the answers to the things I hear most often about making these crispy baked chicken wings.
Can I make these wings ahead of time?
You absolutely *can* make them ahead, but you have to manage expectations about the crispiness. They won’t be quite as shatteringly crisp as when they come straight out of the oven, no matter how well you reheat them. If you need to prep ahead, bake them completely, let them cool totally, and store them following the refrigerator tips above. Then, reheat them using the oven or air fryer method described. If you cook them but don’t toss them in the garlic butter yet, they tend to hold their crisp better until you are ready to serve them.
What if I don’t have a wire rack?
Oh, the dreaded missing equipment! Don’t panic if you don’t have a wire rack—that rack is essential for letting the air flow under the wings, but we can improvise. If you have heavy-duty aluminum foil, you can create a makeshift rack. Take a large piece of foil, crinkle it up lengthwise into a few tight logs, and then bend those logs into a wavy shape—like a very low, wide accordion. Place that foil “rack” on your sheet pan, and then place the wings on top. It’s not as good as a real rack, but it lifts the wings off the pan surface enough to prevent that awful soggy bottom. Just make sure the foil is sturdy enough to hold the weight! For more recipe ideas, check out our Facebook page.
Share Your Experience Making These Crispy Baked Chicken Wings
I truly hope you love these easy, no-fry wings as much as my family does! They are ridiculously fast—less than an hour total—and the flavor payoff is HUGE. Seriously, I want to hear all about it! You can also follow us on Pinterest for more inspiration.
Did they turn out perfectly crispy? How did you like that punch of garlic butter? Please leave a rating and tell me what you thought in the comments below so I know how they worked out in your kitchen!
Print
Amazing crispy baked chicken wings in 55 min
- Total Time: 55 minutes
- Yield: 4 servings
- Diet: Omnivore
Description
Extra crispy baked chicken wings tossed in rich garlic butter. This easy oven recipe delivers bold flavor without frying.
Ingredients
- 2 pounds chicken wings split flats and drumettes
- 1 tablespoon baking powder aluminum free
- 1 teaspoon kosher salt
- 1 teaspoon paprika
- 1 teaspoon black pepper
- 1 teaspoon garlic powder
- 4 tablespoons unsalted butter
- 3 cloves garlic minced
- 1 tablespoon chopped fresh parsley
Instructions
- Heat the oven to 425°F. Line a large rimmed sheet pan with foil. Set a wire rack on top and lightly oil it.
- Pat the chicken wings very dry with paper towels.
- In a large bowl, toss wings with baking powder, salt, paprika, black pepper, and garlic powder until evenly coated.
- Arrange wings in a single layer on the rack with space between each piece.
- Bake for 40 to 45 minutes, flipping halfway, until the skin is deeply golden and crispy.
- While wings bake, melt butter in a small saucepan over low heat. Add garlic and cook 30 seconds until fragrant. Remove from heat and stir in parsley.
- Transfer hot wings to a large bowl and pour garlic butter over them. Toss to coat evenly.
- Serve immediately. Chicken is safe to eat when the internal temperature reaches 165°F in the thickest part.
Notes
- Use aluminum-free baking powder for best results.
- Ensure wings are very dry before seasoning for maximum crispiness.
- Do not overcrowd the pan; this allows the skin to crisp properly.
- Prep Time: 10 minutes
- Cook Time: 45 minutes
- Category: Main Course
- Method: Baking
- Cuisine: American