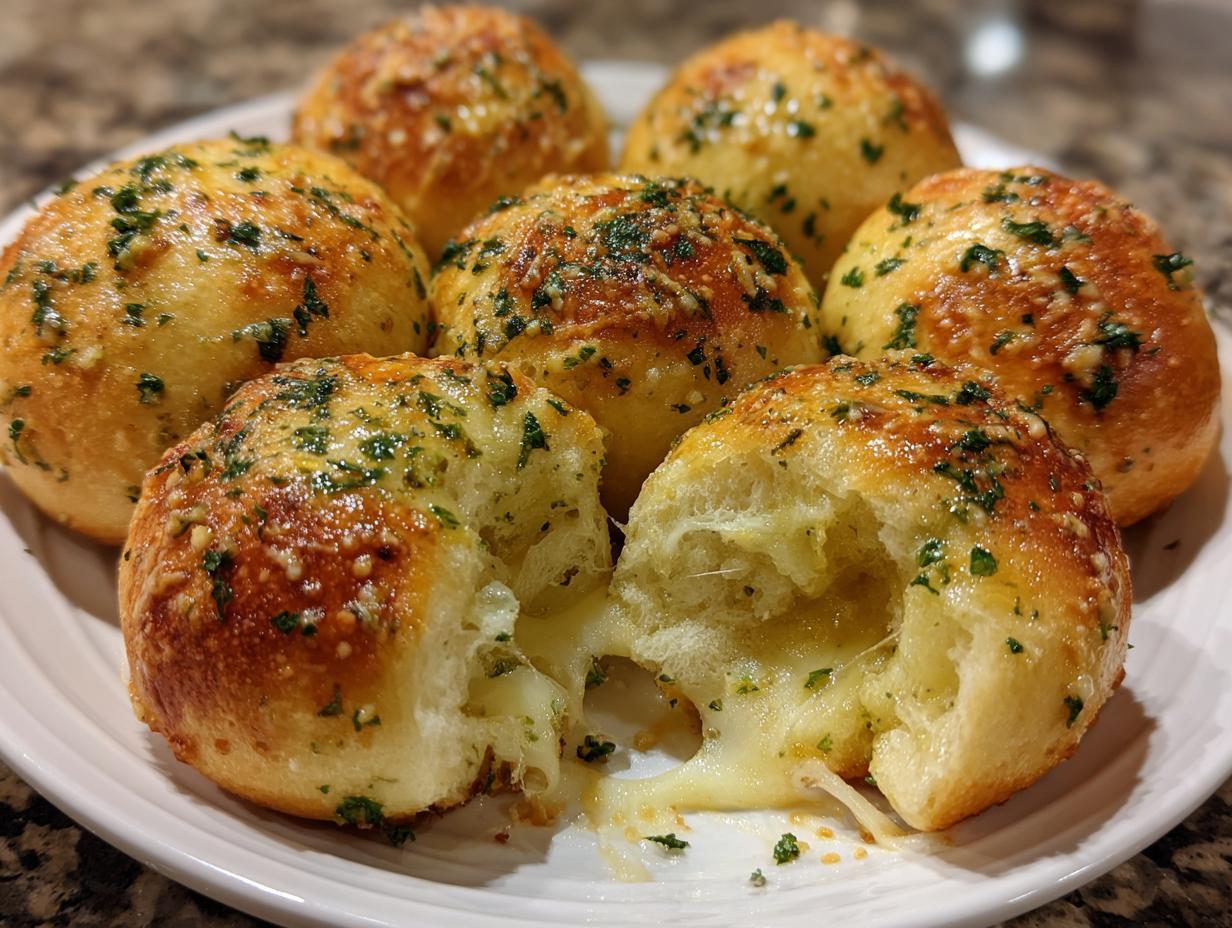
Oh my gosh, you are going to absolutely flip for these! Sometimes you need a showstopper appetizer that doesn’t require you to spend an entire afternoon wrestling with yeast dough, and trust me, I have cracked the code. I’ve tested plenty of complicated party snacks, but nothing beats the sheer joy of pulling these Garlic Butter Cheese Bombs out of the oven. They are soft, they are gooey, and they are ridiculously fast.
The magic here is relying on that trusty can of refrigerator biscuits—don’t let anyone tell you that using shortcuts means you aren’t a real cook! I’ve managed to mess up dough from scratch more times than I care to admit, but these always turn out perfectly golden and chewy every single time. Seriously, this recipe is my go-to when I need something impressive fast. You get that incredible explosion of melted mozzarella encased in buttery, garlicky perfection in under 30 minutes total. You won’t believe how easy these Garlic Butter Cheese Bombs are!

Why You Will Make These Garlic Butter Cheese Bombs Again and Again
I know, I know, you’ve seen a million “easy” appetizers, but these cheese bombs are different. They hit that sweet spot where minimal effort meets maximum flavor payoff. Honestly, I keep the ingredients on hand just in case guests drop by unexpectedly. They are truly addicting, and the texture is what sells it every single time.
You are getting that perfect contrast—a soft, golden, slightly chewy exterior giving way to that glorious, hot, stringy mozzarella center. It’s pure comfort food in one bite!
Quick Assembly Time
- Prep time clocks in at just 15 minutes, which is insane for how good they taste.
- Since we’re using the pre-made biscuit dough, there’s no waiting, no kneading, and zero yeast drama.
Irresistible Flavor Profile
- That garlic butter isn’t subtle; it’s savory, herby, and coats every inch of the baked biscuit.
- The combination of the salty Parmesan crust and the mild, melted mozzarella is just heaven.
Gathering Your Ingredients for Garlic Butter Cheese Bombs
The best part about this recipe for Garlic Butter Cheese Bombs is that you likely have most of this stuff in your fridge or pantry right now! We’re keeping it super simple because we want to spend our time eating them, not shopping for specialty items. This recipe is built on reliable, easy-to-find ingredients that come together beautifully.
You only need a handful of things to get these ready for the oven. Just make sure you grab that block of cheese, not the pre-shredded bag—that’s important, trust me! Everything else is straightforward measuring, and we’ll mix up that incredible garlic butter right before we bake.
Essential Components for Garlic Butter Cheese Bombs
For the body of these little beauties, we rely on refrigerated dough. It does all the heavy lifting for us! You absolutely need the following:
- 1 tube (16 oz) refrigerated buttermilk biscuits, the 8-count size is perfect. We’re going to cut these down to make 16 pieces total.
- 16 cubes mozzarella cheese. This is crucial: they must be about 1-inch cubes, cut from a block. Keep these cold until the last second!
- 1 egg, beaten. This is just for a quick egg wash to help the topping stick and get that golden sheen on top of your Garlic Butter Cheese Bombs.
Crafting the Savory Garlic Butter Topping
This topping is what takes these incredible bites from “good” to “I need ten more right now.” Get your melted butter ready, and mix in:
- 4 tablespoons unsalted butter, melted.
- 2 cloves garlic, minced. Don’t skimp here, the flavor needs that punch!
- 1 teaspoon dried parsley (or if you have fresh, use about 1 tablespoon finely chopped).
- \u00bd teaspoon Italian seasoning.
- 2 tablespoons grated Parmesan cheese (this goes on top with the first layer of butter).
- A tiny pinch of salt to round it all out.
Step-by-Step: Mastering the Garlic Butter Cheese Bombs Method
Okay, now we get down to the fun part! This is where we turn simple ingredients into those amazing, gooey pockets of joy. Don’t stress about perfection here; the goal is just to seal that cheese in tight. I always set up my station like an assembly line—it really speeds things up when you’re making the full 16 Garlic Butter Cheese Bombs. If you love stuffed bread, you’ll love this!”
First things first, get that oven going! You want it hot and ready before you even start stuffing. Set your oven rack to the middle position and preheat your oven to 400\u00b0F (200\u00b0C). Line a standard baking sheet with parchment paper. If you skip the parchment, clean up is going to be a nightmare when that cheese inevitably tries to escape!
Preparing the Dough and Stuffing the Cheese
Open up your biscuit can—you should have 8 lovely, soft rounds. Take one biscuit round and carefully slice it horizontally right through the middle. Now you have two thinner circles. Gently take one circle and use your palm—or if you’re feeling fancy, a tiny rolling pin—to flatten it out a little bit until it’s about a 3-inch circle. It doesn’t need to be perfect, just wide enough to wrap around your filling.
Grab one of those cold mozzarella cubes you kept chilling—seriously, keeping the cheese cold is key to preventing leaks later! Place that cube right in the center of your flattened dough circle. Now comes the most important part for successful Garlic Butter Cheese Bombs: you need to gather all the edges up and over the cheese. Pinch those seams together really tightly! You want to make sure there are absolutely no gaps. Once sealed, gently roll the ball between your palms to smooth out any weird lumps and make a nice round shape. Place the finished ball seam-side down on your prepared baking sheet.
Repeat this process until you’ve used up all 16 dough pieces and 16 cheese cubes. Try to space them out a little bit on the pan because they will puff up!
Applying the Garlic Butter Compound
While you were busy stuffing, you should have quickly whisked together your butter mixture: the melted butter, garlic, parsley, Italian seasoning, and salt. Give it a good stir to make sure that garlic is totally coated in that good fat.
Now, take your beaten egg and quickly brush the tops of all your unbaked cheese bombs with that egg wash. This helps the topping brown nicely. Next, take about half of that gorgeous garlic butter mixture and brush it generously over the tops. Sprinkle that grated Parmesan evenly over everything. We save the rest of the butter for the grand finale!
Achieving Golden Perfection in the Oven
Slide that tray into the preheated 400\u00b0F oven. You are looking for them to bake for about 10 to 12 minutes. Honestly, keep an eye on them around the 10-minute mark. You want the tops to be nicely golden brown, and you want the biscuit dough to look cooked all the way through, not pale or doughy. If you see cheese bubbling out the side too aggressively, pull them out immediately—overbaking leads to exploding cheese!
The second they come out of the oven—and I mean the second—grab that remaining garlic butter mixture and brush it all over the hot tops again. That hot bread will soak up the fresh, aromatic butter instantly, making these Garlic Butter Cheese Bombs absolutely irresistible. Serve them right away while they are piping hot and gooey!

Tips for Perfect Garlic Butter Cheese Bombs Every Time
Even with such an easy recipe for Garlic Butter Cheese Bombs, there are a few little secrets I’ve learned over the years that guarantee success. These tips are the difference between a little cheese leak and a perfect, contained, gooey center. It’s all about mastering those small details!
I always check my work twice before they even hit the oven, and it has saved me so much cleanup time. Remember, these are supposed to be bombs of flavor, not messy puddles on the pan! You can find more great tips on our blog.”
Sealing Secrets for Maximum Gooeyness
- You absolutely must pinch those seams tight! If you don’t seal them completely shut, the mozzarella is going to find the exit route as soon as it hits that 400-degree heat.
- If you see any weak spots, just pinch them again or even use a tiny bit of water on your finger to help the dough stick together before you roll it smooth.
Cheese Choice Matters for These Garlic Butter Cheese Bombs
This is probably the number one thing I stress to people making these Garlic Butter Cheese Bombs for the first time. Don’t even think about using pre-shredded mozzarella! Shredded cheese melts too fast and it often contains anti-caking agents that prevent it from getting that beautiful, long cheese pull we want.
Always buy a block of good quality mozzarella and cut it into cubes yourself—about 1 inch is perfect. Keeping those cubes in the fridge, or even the freezer for five minutes before stuffing, means they hold their shape longer in the dough, giving you a better chance to seal them up perfectly before baking. For more appetizer ideas, check out our snacks section.
Frequently Asked Questions About Garlic Butter Cheese Bombs
I get so many messages about these little bites, and it’s usually the same few things people wonder about before they dive in. Since these Garlic Butter Cheese Bombs are so popular for parties, people always want to know how to streamline the process or fix little hiccups. I’ve tried to answer the biggest questions I always get right here!
Can I Make These Ahead of Time?
Yes, you absolutely can assemble them ahead of time, which is a lifesaver for parties! You can assemble the stuffed bombs, place them on the baking sheet, cover them tightly with plastic wrap, and keep them in the refrigerator for up to 24 hours. Just remember, since they are cold, you might need to add an extra minute or two to the baking time. Don’t apply the butter topping until they are baking, though!
What If My Cheese Leaks Out?
Oops! If you find yourself with a puddle of mozzarella instead of a perfect sphere, it almost always comes down to two things: either you didn’t pinch the dough seams tight enough, or the cheese wasn’t cold enough when you started stuffing. If you catch it while they are baking, just pull that batch out a minute early. For the next batch, focus hard on sealing those edges like your life depends on it!
What to Serve with These Easy Cheese Bombs?
These are so rich and savory on their own, but you definitely need some dipping sauces! My favorite dipping sauce for these Garlic Butter Cheese Bombs is a warm, slightly sweet marinara sauce—it’s like mini pizza bites. But honestly, a good quality ranch dressing is also amazing, especially if you’re serving them during football season. A little spicy honey drizzle is also a fun, modern twist! You can see how we use similar flavor profiles in our hot honey glazed chicken.
Storing and Reheating Your Delicious Garlic Butter Cheese Bombs
Even though these Garlic Butter Cheese Bombs disappear like magic at parties, you might actually end up with leftovers—and that’s a win! The key to enjoying them the next day is reheating them correctly so you don’t end up with soggy bread. We want that soft interior and slightly crisp exterior back!
The method you use for storage really affects how well they reheat, especially since the garlic butter soaks in so much flavor. Thankfully, they freeze beautifully too, making them an excellent make-ahead option for busy weeks. Be sure to follow us on Pinterest for more make-ahead tips!
Storage Guidelines for Leftover Garlic Butter Cheese Bombs
If you have any of these incredible Garlic Butter Cheese Bombs left over, seal them up right away. They last well in the refrigerator for up to three days if stored in an airtight container. Don’t leave them out on the counter, or they’ll get stale fast!
If you want to save them longer, I recommend freezing them after they have cooled completely. They hold up great in the freezer for about two months. Just make sure they are in a sealed freezer bag or container so they don’t pick up any freezer smells.
Reheating Instructions for Best Texture
Forget the microwave if you want them to taste fresh! The microwave will just make them rubbery. For the best texture on your leftover Garlic Butter Cheese Bombs, you want to use the oven. Pop them onto a baking sheet and heat them up at 350\u00b0F for about 5 to 7 minutes. This gives the crust just enough time to crisp up again while the cheese melts back into that perfect, gooey state.
If you are reheating from frozen, just make sure you thaw them in the fridge first, then follow that same oven reheating instruction. It makes life so much easier!
| Storage Method | Duration | Reheat Instructions |
|---|---|---|
| Airtight Container (Fridge) | Up to 3 days | 350\u00b0F for 5-7 minutes |
| Freezer (Baked) | Up to 2 months | Thaw in fridge, then bake at 350\u00b0F for 5-7 minutes |
Share Your Garlic Butter Cheese Bombs Experience
I truly hope you loved making and eating these as much as I do! Now it’s your turn. Did they turn out golden? Did that cheese pull stretch for miles? I want to hear all about it! Please leave a rating below and tell me in the comments how your batch of Garlic Butter Cheese Bombs turned out. Happy baking to you! Feel free to share your results on Facebook too!”
Print
Amazing 16 Garlic Butter Cheese Bombs Today
- Total Time: 27 minutes
- Yield: 16 cheese bombs
- Diet: Omnivore
Description
These irresistible Garlic Butter Cheese Bombs feature soft, golden dough exploding with a gooey mozzarella center. They are quick to assemble using refrigerator biscuits and brushed generously with savory garlic-parsley butter.
Ingredients
- 1 tube (16 oz) refrigerated buttermilk biscuits (Grand’s style, 8 count)
- 16 cubes mozzarella cheese (about 1-inch cubes, from a block)
- 1 egg, beaten (for egg wash)
- 4 tablespoons unsalted butter, melted
- 2 cloves garlic, minced
- 1 teaspoon dried parsley (or 1 tbsp fresh, finely chopped)
- ½ teaspoon Italian seasoning
- 2 tablespoons grated Parmesan cheese
- Pinch of salt
Instructions
- Preheat your oven to 400°F (200°C) and line a baking sheet with parchment paper.
- Open the can of biscuits and separate the 8 dough rounds; cut each biscuit in half horizontally to create 16 thinner rounds.
- Gently flatten each piece of dough with your palm or a rolling pin into a 3-inch circle.
- Place a cube of mozzarella cheese in the center of each dough circle.
- Pull the edges of the dough up and around the cheese, pinching the seams tightly together to seal the ball completely.
- Roll the sealed ball gently in your hands to smooth out the shape, then place it seam-side down on the prepared baking sheet.
- In a small bowl, mix the melted butter, minced garlic, parsley, Italian seasoning, and salt.
- Brush half of the garlic butter mixture over the tops of the unbaked bombs and sprinkle with Parmesan cheese.
- Bake for 10–12 minutes, or until the tops are golden brown and the dough is cooked through.
- Remove from the oven and immediately brush with the remaining garlic butter while they are hot.
- Serve warm immediately for the best gooey cheese texture.
Notes
- If the seams are not pinched tight, the melting cheese will leak out onto the pan. Double-check every seam before baking.
- Use block cheese cut into cubes rather than shredded cheese; cubes melt slower and stay contained better than shreds.
- Keep your cheese cubes in the fridge (or even freezer) until the moment you stuff them.
- Watch closely near the end; if baked too long, the cheese may explode out of the buns.
- Store leftovers in an airtight container in the refrigerator for up to 3 days.
- To reheat, place them in a 350°F oven for 5-7 minutes.
- Freeze baked bombs for up to 2 months; thaw in the fridge before reheating in the oven.
- Prep Time: 15 minutes
- Cook Time: 12 minutes
- Category: Appetizer
- Method: Baking
- Cuisine: American