If you’re like me, sometimes you need a showstopper appetizer that takes virtually zero effort. I mean, who has hours to spend slaving over a hot stove when guests are already knocking on the door? That’s why I am absolutely thrilled to share my secret for the Cheese Stuffed Mini Peppers recipe. Seriously, this is my go-to for everything from game days to last-minute potlucks.
The magic here is the speed. We are talking five minutes, tops, from fridge to platter. This recipe proves you don’t need complicated techniques or hours of baking to create something that tastes incredibly fresh and satisfying. As someone who started cooking out of necessity, I know how important reliable, quick recipes are. I’ve tested this combination of sharp cheddar, creamy cheese, and fresh herbs until it was absolutely perfect—that’s how you build true cooking expertise, right?
These crunchy, sweet peppers filled with that creamy herbed cheese? They disappear first, every single time. Trust me, you are going to want to bookmark this one! 
Why This Cheese Stuffed Mini Peppers Recipe Works for Everyone
Honestly, the best part about these little bites is how much they deliver for so little work. You get that fantastic crunchy texture from the fresh peppers, and the filling is packed with protein, making it a perfect low-carb snack when you need something savory fast. Since there’s no baking involved, you skip the oven preheat and cleanup, which is a huge win in my book! I always turn to these Cheese Stuffed Mini Peppers when I need an impressive appetizer without any stress.
Quick Prep Time and Simple Assembly for Cheese Stuffed Mini Peppers
Five minutes! That’s the selling point, right there. You really can have these ready to go before the kettle even boils. Because we aren’t cooking anything, the assembly is incredibly straightforward. You just mix, scoop, and arrange. I tell everyone, if you can chop a couple of herbs and stir a bowl, you can master these stuffed peppers. It’s pure, simple assembly magic.
Gathering Your Ingredients for Cheese Stuffed Mini Peppers
Okay, let’s talk about the lineup. Because these are no-bake, the quality of your ingredients really shines through, especially the cheese and the peppers themselves. When you’re making Cheese Stuffed Mini Peppers, you can’t skimp on the fresh stuff. I always buy the brightest, firmest mini peppers I can find because their crunch is essential to the final texture.
The filling is where we build the flavor profile. We need cream cheese that’s actually soft—I mean truly room temperature pliable—so we don’t end up with lumpy filling. Everything else is just seasoning to make that cheese taste incredible. You want specific measurements here so your flavor balance is spot on! You can find more quick snack ideas here.
Detailed Ingredient Breakdown
| Ingredient | Quantity | Preparation Note |
| Mini Sweet Bell Peppers | 12 | Mixed colors preferred |
| Cream Cheese | 8 ounces | Must be softened to room temperature |
| Sharp Cheddar Cheese | \u00bd cup | Shredded |
| Parmesan Cheese | \u00bc cup | Grated |
| Fresh Chives | 2 tablespoons | Finely chopped |
| Fresh Parsley | 1 tablespoon | Finely chopped |
| Garlic Powder | 1 teaspoon | |
| Onion Powder | \u00bd teaspoon | |
| Black Pepper | \u00bc teaspoon | Freshly ground is best |
| Salt | \u215d teaspoon | |
| Garnish (Optional) | Extra chives, red pepper flakes | For topping |
Step-by-Step Instructions for Perfect Cheese Stuffed Mini Peppers
This is where the magic happens, and I promise, it’s so fast you’ll wonder if you did it right! Since we aren’t turning on the oven, the entire process is about careful assembly. Follow these steps closely, especially regarding the cheese temperature, and you’ll have the best Cheese Stuffed Mini Peppers on the block.
Preparing the Sweet Peppers
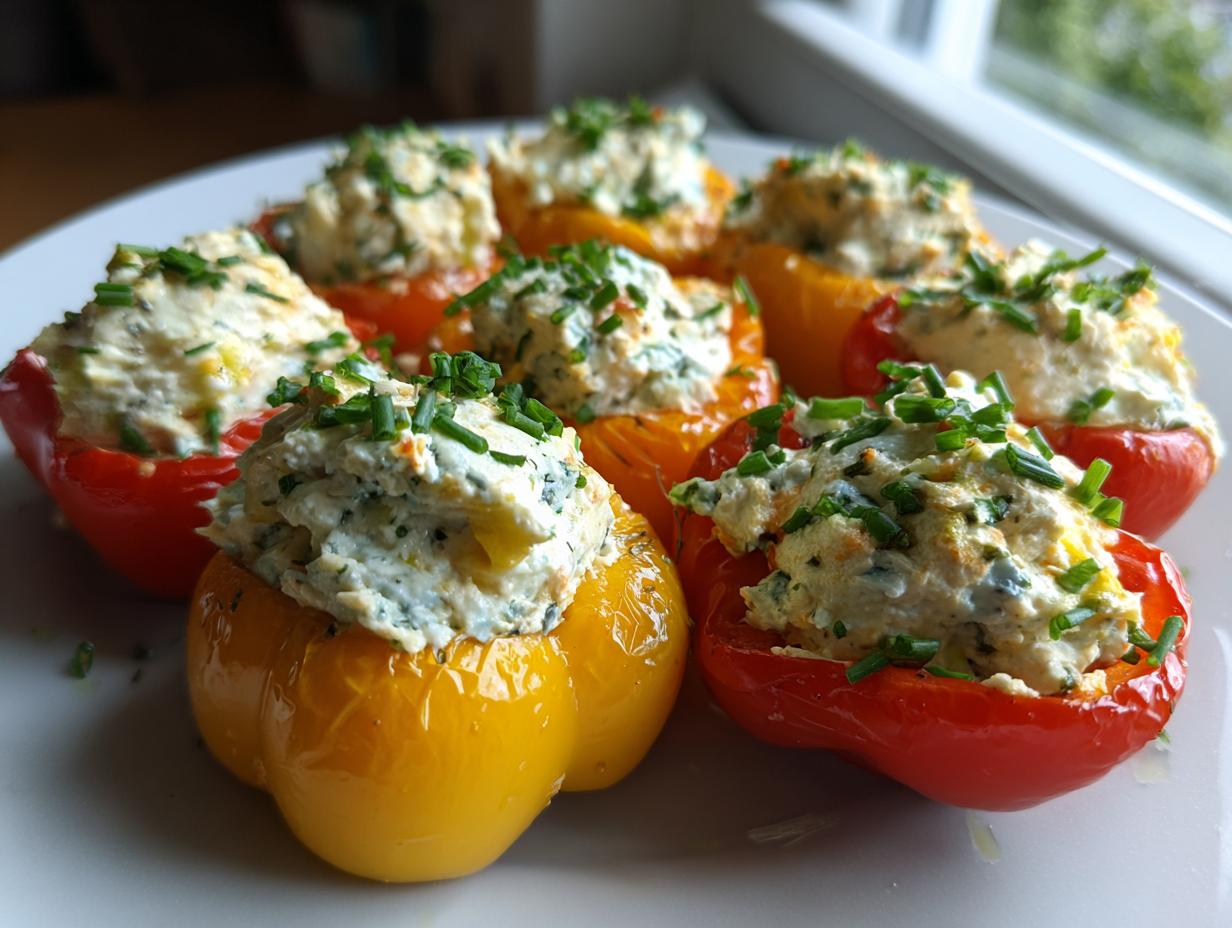
First things first: the canvas! Grab your 12 mini peppers. You need to slice each one right down the middle, lengthwise. Think of slicing a hot dog bun, but for a pepper. Be gentle here! Once they are halved, use a small spoon—a tiny teaspoon works perfectly—to scoop out all the seeds and the white membrane inside. You want those little boats to be nice and clean inside. If you leave any white bits, they can taste bitter, and we want pure, sweet crunch here. Set your cleaned pepper halves aside on your serving platter or a clean cutting board while you whip up the filling.
Creating the Creamy Herbed Cheese Filling
Now for the star of the show! Grab that bowl where you have your softened cream cheese—remember, it needs to be super soft so we don’t get lumps! Add in your shredded cheddar and grated Parmesan. Dump in all those lovely fresh herbs—the parsley and chives—along with the garlic powder, onion powder, pepper, and salt. I usually start stirring this with a sturdy spatula. You need to make sure everything is fully incorporated. If you’re impatient like me, you can use an electric hand mixer for about 30 seconds, but honestly, a good stir works great if the cream cheese is truly soft. Keep mixing until it’s completely smooth, uniform in color, and smells wonderfully savory. That’s your perfect filling ready to go! Check out more dinner ideas.
Assembling Your Cheese Stuffed Mini Peppers
Time to fill those pepper boats! This is the fun part. Take a small spoon—again, small is good—and scoop a nice dollop of the herbed cheese mixture into each pepper half. Don’t be shy! I like to push the filling down just a little bit and then pile it up high, creating a little mound or peak in the center. This generous portioning makes them look impressive and ensures every bite gets plenty of that creamy filling. Once they are all filled, arrange them nicely on your platter. I always save a few extra chopped chives to sprinkle right on top of the mounds for a professional finish. That’s it! Your Cheese Stuffed Mini Peppers are done and ready to wow everyone. 
Tips for Making the Best Cheese Stuffed Mini Peppers
Even though this recipe is super simple, a few little tricks really elevate these Cheese Stuffed Mini Peppers from good to absolutely addictive. These tips are hard-won knowledge I picked up over testing batches for parties! It’s all about focusing on texture and how the finished appetizer looks on the table.
Ingredient Temperature and Texture Secrets
Listen to me on this one point: the cream cheese absolutely must be at room temperature. If it’s cold, you’ll end up fighting it with your spatula, and your filling will look crumbly instead of beautifully smooth. I usually pull mine out at least half an hour before I plan to mix. If you’re in a huge rush, you can microwave it for about 5–10 seconds, but watch it carefully—we want soft, not melted!
Another pro tip from my notes is about the filling itself: you can make it ahead of time! Mix up that herbed cheese filling, pop it in an airtight container, and keep it in the fridge for up to two days. Then, when your guests arrive, you just stuff the peppers. This keeps the peppers super crunchy, which is essential for great Cheese Stuffed Mini Peppers.
Presentation Tips for Your Cheese Stuffed Mini Peppers
Presentation truly matters when you’re serving something this simple. Before you even start stuffing, look at your peppers. Choose the halves that sit nice and flat on the plate—nothing is sadder than a stuffed pepper that immediately tips over! You want them lined up neatly.
For that final flourish, don’t skip the garnish. A sprinkle of extra fresh chives adds such a bright green pop against the red, yellow, and orange. And if you want a tiny kick? A few crushed red pepper flakes on top of the cheese mound just adds that visual interest and a little bit of heat that people love in their Cheese Stuffed Mini Peppers.
Storage and Reheating Instructions for Cheese Stuffed Mini Peppers
What if you have leftovers? Or maybe you want to prep these Cheese Stuffed Mini Peppers the day before a big party? I’ve got you covered on storage because we want to keep that pepper crunch intact!
If you only made the filling ahead of time—which I highly recommend for maximum freshness—just keep that herbed cheese mixture airtight in the fridge for up to three days. Stuff the peppers right before serving, that’s the golden rule for these! If you want to see how I handle dessert storage, check out my cake guides!
If you have leftovers that are already stuffed, it’s best to cover them tightly and keep them chilled. They hold up well for about a day. If you absolutely must reheat them, I have instructions for that, but honestly, they are best served cold or at room temperature.
Storage Details for Cheese Stuffed Mini Peppers
| Component | Storage Time | Notes |
| Unstuffed Peppers | Up to 3 days | Store halves and filling separately |
| Stuffed Peppers (Chilled) | Up to 1 day | Cover tightly to prevent drying |
| Filling Only | Up to 3 days | Airtight container in the fridge |
If you decide you want warm Cheese Stuffed Mini Peppers—maybe it’s a cold evening—bake them at 400 degrees F for about 8 to 10 minutes until the pepper softens just slightly. Then, pop them under the broiler for just a minute or two to get those cheese tops bubbly. Watch them like a hawk under the broiler, though, or you’ll burn the tops!
Frequently Asked Questions About Cheese Stuffed Mini Peppers
I always get so many questions when people try this recipe for the first time! It’s so popular because it’s versatile, but sometimes you just need a quick yes or no answer. Here are the things folks ask me most often about making the very best Cheese Stuffed Mini Peppers.
Q1. Can I use different kinds of cheese in the filling?
Absolutely! While my recipe calls for cheddar and Parmesan mixed with the cream cheese, feel free to experiment. Monterey Jack melts beautifully, or if you want a little tang, try adding some crumbled feta. Just make sure whatever you add is well combined with the softened cream cheese.
Q2. Do I have to use fresh herbs? I only have dried on hand.
You *can* use dried herbs, but honestly, the fresh ones make these Cheese Stuffed Mini Peppers taste so much brighter! If you must use dried, remember the rule of thumb: use about one-third the amount of dried herbs compared to fresh. So, maybe just half a teaspoon of dried chives instead of the two tablespoons called for.
Q3. What makes these peppers a good low-carb or protein snack?
That’s the beauty of it! The peppers are mostly water and fiber, and the filling is almost entirely high-protein dairy. There’s very little sugar or starch involved, making these perfect for anyone watching their carbs. They are a satisfying, savory bite!
Q4. Can I use jalapeños instead of mini sweet peppers?
You certainly can if you love heat, but remember that jalapeños have a much stronger flavor and you’ll need to be extra careful scraping out all those seeds and membranes unless you want serious spice in your Cheese Stuffed Mini Peppers!
Final Thoughts on Your Quick Appetizer
Seriously, I hope you give these Cheese Stuffed Mini Peppers a try the next time you need something fast and delicious. They are such a crowd-pleaser, and they barely count as cooking! Let me know down in the comments how yours turned out, and don’t forget to leave a star rating if you loved this quick appetizer! You can also share your creations with us on Facebook or save this recipe on Pinterest.
Print
5 Min Cheese Stuffed Mini Peppers Recipe
- Total Time: 5 minutes
- Yield: 24 pieces (12 peppers, halved)
- Diet: Low Fat
Description
Quick cheese-stuffed mini peppers ready in 5 minutes. Crunchy sweet peppers filled with creamy herbed cheese make the perfect high-protein snack.
Ingredients
- 12 mini sweet bell peppers (mixed colors)
- 8 ounces cream cheese, softened to room temperature
- ½ cup shredded sharp cheddar cheese
- ¼ cup grated Parmesan cheese
- 2 tablespoons fresh chives, finely chopped
- 1 tablespoon fresh parsley, finely chopped
- 1 teaspoon garlic powder
- ½ teaspoon onion powder
- ¼ teaspoon black pepper
- ⅝ teaspoon salt
- Extra chopped chives (for garnish)
- Crushed red pepper flakes (optional, for garnish)
Instructions
- Slice each mini pepper in half lengthwise and carefully remove all seeds and membranes with a small spoon.
- Combine softened cream cheese, cheddar cheese, and Parmesan cheese in a medium mixing bowl.
- Add chopped chives, parsley, garlic powder, onion powder, black pepper, and salt to the cheese mixture.
- Stir the filling ingredients together with a spatula or beat with an electric mixer until completely smooth and well combined.
- Use a small spoon or piping bag to fill each pepper half generously with the herbed cheese mixture, creating a slight mound.
- Arrange the stuffed peppers on a serving platter and garnish with extra chopped chives or a sprinkle of crushed red pepper flakes if desired.
Notes
- Bring cream cheese to room temperature for at least 30 minutes before mixing to ensure a smooth, lump-free filling.
- Choose peppers that sit flat when halved so they do not tip over on the serving platter.
- Use a piping bag fitted with a large round tip for neater, faster filling and a more professional presentation.
- Make the filling up to 2 days ahead and store refrigerated; stuff peppers just before serving for maximum crunch.
- For variety, use a mix of red, yellow, and orange mini peppers to create a colorful display.
- Serve immediately or refrigerate covered for up to 2 hours before serving.
- Store unfilled pepper halves and cheese filling separately in airtight containers for up to 3 days.
- If warming, bake filled peppers at 400°F for 8 to 10 minutes, then broil for 1 to 2 minutes.
- Prep Time: 5 minutes
- Cook Time: 0 minutes
- Category: Appetizer/Snack
- Method: No-Bake/Assembly
- Cuisine: American