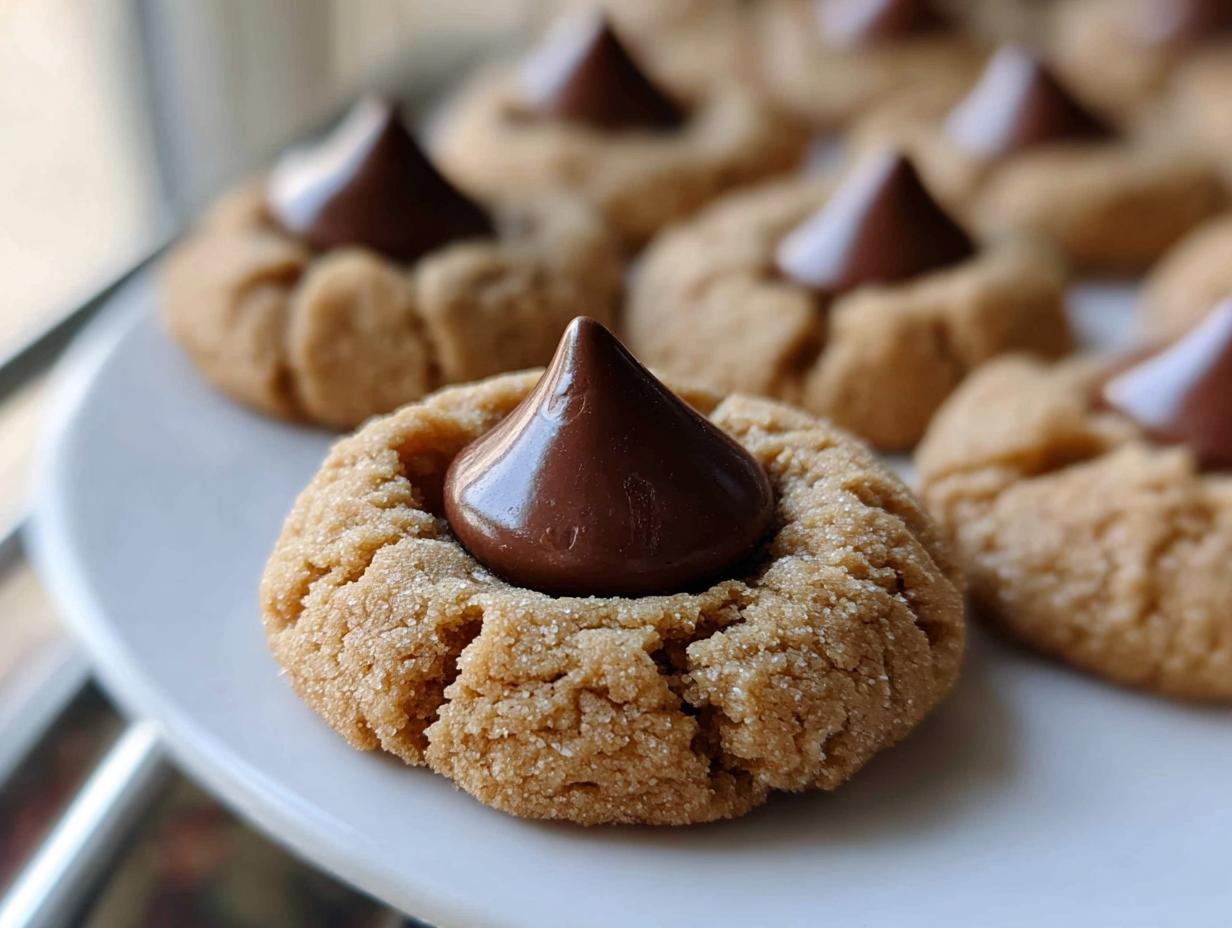
Forget those overly sweet, artificially colored pink cookies you see everywhere! I am so excited to share my absolute favorite recipe: the most amazing Strawberry Kiss Cookies you will ever bite into. These aren’t just pretty; they taste like real summer thanks to a little trick I learned that gives them unbelievable natural strawberry flavor and color. Seriously, these soft batch cookies are so simple, even if you’re just starting out in the kitchen, you can nail them on the first try. I’m sharing all the expertise I’ve gathered over the years to make sure your cookies look and taste bakery-perfect.

My Journey to Perfect Strawberry Kiss Cookies
When I first tried making kiss cookies, I used strawberry flavoring, and honestly? It tasted like fake candy. I almost gave up on the whole idea! I thought maybe I just wasn’t a cookie person. Then, I stumbled upon a bag of freeze-dried strawberries in my pantry—used for smoothies, usually. I tried pulsing them into a powder, and wow, the color that bloomed in the flour mixture was incredible. It felt like cheating! This recipe changed everything for me because it proved you don’t need complicated techniques to get professional results. It’s built for anyone who loves the idea of baking but gets intimidated by fussy steps.
Why This Strawberry Kiss Cookies Recipe Stands Out
What makes these Strawberry Kiss Cookies truly special is that amazing, authentic berry punch. We skip the dyes and use pulverized freeze-dried fruit—it’s pure, concentrated strawberry goodness that guarantees a beautiful, natural pink hue. Plus, the structure of this dough is fantastic for beginners. It chills perfectly, which means less spreading in the oven, leading to those perfectly round cookies ready for their chocolate kiss centerpiece. It’s the perfect marriage of intense flavor and reliable baking success. You won’t find a softer, more intensely flavored cookie out there, trust me on this one!
Gathering Your Ingredients for Strawberry Kiss Cookies
Okay, listen up! For these Strawberry Kiss Cookies to turn out exactly right—soft, pink, and perfectly balanced—we need to be precise with our ingredients. Don’t just eyeball that flour; baking is chemistry, and these little guys rely on the right ratios. Preparation is half the battle here, especially with our star ingredient. Before you even think about turning on the mixer, get your strawberries ready, because that step needs to happen first!
We need everything measured out perfectly before we start mixing the wet and dry elements separately. It keeps everything smooth and prevents overmixing later on, which is the secret to that soft texture we are aiming for. Here’s what you’ll need laid out on your counter:
| Ingredient | Amount | Notes |
|---|---|---|
| Freeze-Dried Strawberries | 1 cup slices | Must be pulverized into a powder |
| All-Purpose Flour | 2 1/4 cups | Measured accurately! |
| Unsalted Butter | 1 cup | Softened, but still slightly cool |
| Granulated Sugar | 1 cup | For creaming |
| Milk Chocolate Candy Drops | 36 pieces | Unwrapped and ready to go |
Essential Dry and Flavor Components
The real magic starts with those freeze-dried strawberries. You’ll need to pop about a cup of the slices into your food processor and pulse them until you have a fine, vibrant pink powder—no big chunks allowed! This powder is what gives our cookies their beautiful color and intense flavor. Once that’s done, gently whisk that strawberry dust together with your flour, baking powder, and salt in a separate bowl. Keep this bowl off to the side. Don’t mix it into the wet stuff yet; we need to keep them separate until the time is right.
Wet Ingredients and the Chocolate Finish
For the wet side, you absolutely must use softened butter. I stress this because if it’s melted, your cookies will spread like pancakes! Cream that butter with your lovely granulated sugar until it’s light and fluffy—this takes a couple of minutes. Then, just one large egg goes in to bind everything. Finally, while we aren’t mixing the chocolate into the dough, you need those 36 unwrapped milk chocolate candy drops sitting right there on the counter. They have to be ready to press into the cookies the second they come out of the oven!
Equipment Needed for Baking Strawberry Kiss Cookies
Before we get into the mixing, let’s make sure your kitchen is set up for success! Having the right tools on hand makes the process of whipping up these Strawberry Kiss Cookies so much smoother, especially since timing is everything later on. You don’t need a professional bakery setup, but a few key items will make a huge difference in the final texture.
First, you absolutely need a food processor or a spice grinder to turn those freeze-dried strawberries into fine powder—that’s non-negotiable for the flavor, remember? Then, grab your trusty stand mixer or a sturdy hand mixer for creaming the butter and sugar properly. You’ll also want large mixing bowls for combining your wet and dry ingredients separately. Finally, make sure you have two large baking sheets lined with parchment paper. Parchment is my best friend; it guarantees these delicate cookies won’t stick while they are cooling down!
Step-by-Step Guide to Making Strawberry Kiss Cookies
Now for the fun part! We’re going to take those prepared ingredients and turn them into the most gorgeous Strawberry Kiss Cookies. Follow these steps closely, especially the timing parts, and you’ll be amazed at how easy this recipe is!
Preparing the Natural Strawberry Flavor Base
First things first, let’s deal with those strawberries. Take your cup of freeze-dried strawberry slices and pulse them in your food processor until they are completely broken down into a super fine powder. You want it looking like vibrant pink dust! Seriously, don’t stop until it’s fine; we need that flavor infused evenly. Once you have your powder, move it to a medium bowl. Whisk that strawberry powder together with your 2 1/4 cups of flour, the baking powder, and the salt. Give it a good whisk so everything is evenly distributed. Set that bowl aside—we aren’t touching it again until the wet ingredients are ready!
Mixing the Dough for Soft Strawberry Kiss Cookies
Time for the mixer! Get your softened butter and granulated sugar into your large mixing bowl. Beat them together on medium speed for about two full minutes. You’re looking for that light, creamy texture—it should look fluffy, not dense. Once you hit that stage, drop in your single egg and beat it in until everything looks totally smooth. Now, slow your mixer down to low speed. Gently add that dry strawberry flour mixture into the wet ingredients. Mix only until the very last streaks of white flour disappear. Stop the machine then! Overmixing at this stage is what makes cookies tough, and we want soft cookies, remember?
Chilling and Shaping the Cookie Dough
This next step is crucial for texture and shape. Cover that bowl tightly with plastic wrap. Pop it into the refrigerator and let it chill for a full 60 minutes. If the dough is too warm, these cookies will spread out flat instead of staying plump. While that’s chilling, go ahead and preheat your oven to 350 degrees Fahrenheit. Line two big baking sheets with parchment paper so you’re ready to go. Once the dough is chilled, scoop it out using a tablespoon measure—this keeps them uniform. Roll each scoop quickly between your palms into a nice, smooth little ball and place them about 2 inches apart on your prepared sheets.
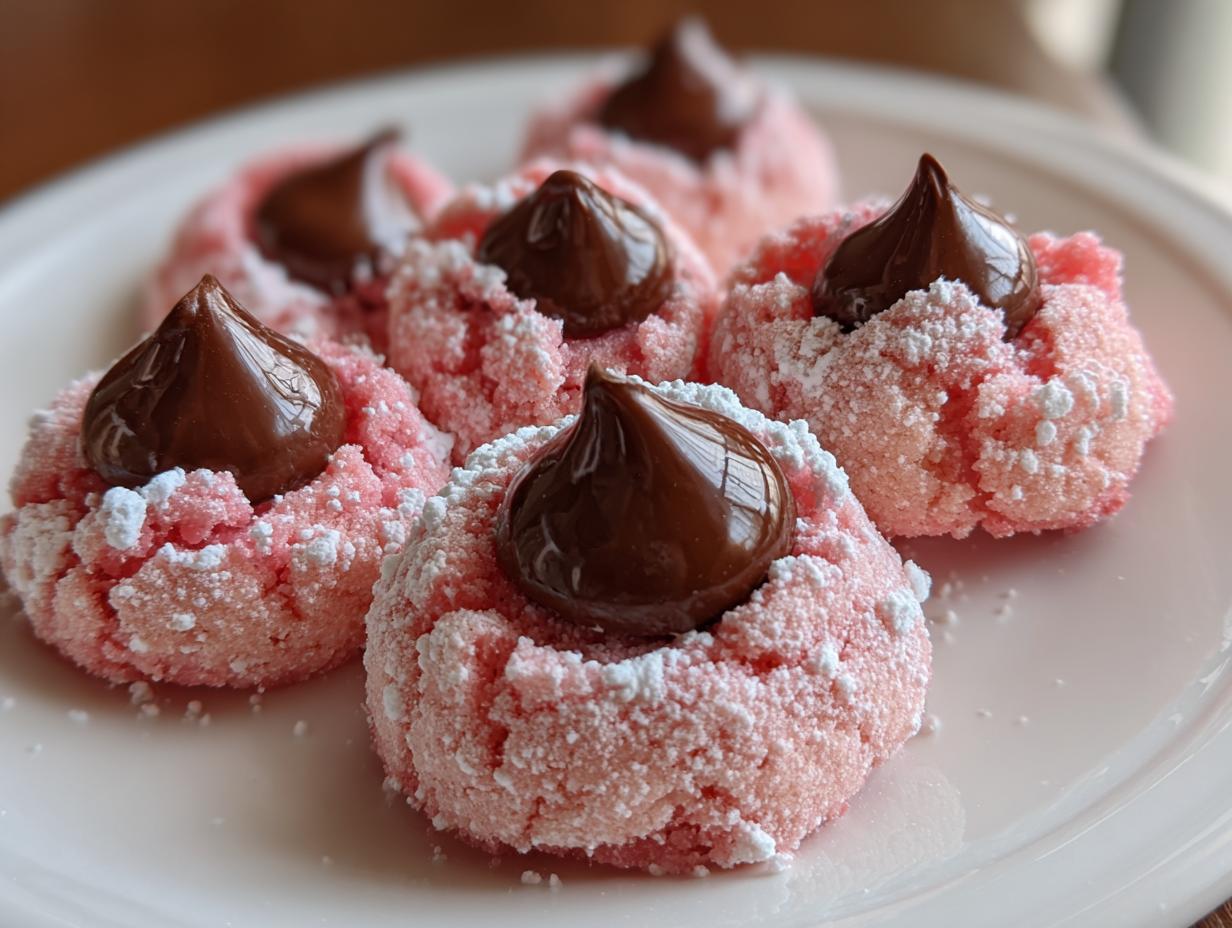
Baking and Applying the Chocolate Center
Get those trays into the preheated 350-degree oven. Bake them for just 10 to 12 minutes. You want the edges to look set, but the centers should still look slightly soft when you peek in. The second you pull the trays out—and I mean immediately—you need to lightly dust the tops with your confectioners sugar. Then, working fast while they are still piping hot, gently press one unwrapped milk chocolate candy drop right into the center of each cookie. The heat melts the bottom just enough to stick it perfectly. Let the Strawberry Kiss Cookies sit on the hot baking sheet for about 5 minutes before you carefully move them to a wire rack to cool completely. If you try to move them too soon, they might crack!

Tips for Achieving Perfect Strawberry Kiss Cookies Every Time
You’ve got the recipe down, but achieving that bakery-level perfection with Strawberry Kiss Cookies sometimes comes down to tiny details. My biggest piece of advice? Pay attention to your butter temperature! It needs to be softened enough to cream properly but not greasy or warm. If it’s too soft, the dough spreads, and you lose that beautiful, plump shape we want.
Also, I cannot stress this enough: do not overmix the dough once you add the flour mixture. Mix only until those last few white streaks disappear. If you keep beating it, you develop gluten, and suddenly your soft batch cookies turn into mini hockey pucks. Nobody wants that!
The absolute most crucial part is the chocolate press. You must press that milk chocolate candy into the cookie immediately after it comes out of the oven. The residual heat is what secures the chocolate without completely melting it into a puddle. If you wait even two minutes too long, the cookie surface cools, and the chocolate won’t adhere properly. Get ready to work quickly when those trays come out; that’s how you guarantee perfect Strawberry Kiss Cookies!
Storing and Reheating Your Strawberry Kiss Cookies
These Strawberry Kiss Cookies are honestly best eaten the day they are made, but if you have leftovers—and you probably will, since this recipe makes so many—storage is super easy. The key is keeping them airtight so that strawberry flavor stays vibrant and the cookie centers stay soft. Don’t stack them too high, or you risk squishing that delicate chocolate center!
You can keep them on the counter for a few days, but if you need them to last longer, the fridge or freezer is your friend. If you are planning on reheating them later, pulling them out just slightly before serving makes a huge difference. Here’s my quick guide for keeping them fresh:
| Storage Location | Maximum Time | Tips |
|---|---|---|
| Counter (Airtight Container) | 3 to 4 days | Keep away from heat or direct sunlight. |
| Refrigerator | Up to 1 week | Use a container with a tight seal to prevent drying. |
| Freezer | Up to 3 months | Wrap tightly first; thaw on the counter. |
If you do freeze them, let them thaw on the counter for about 30 minutes. If you want that fresh-from-the-oven feel, pop a cookie in a toaster oven for just a minute or two—that warms the chocolate back up perfectly!
Frequently Asked Questions About Strawberry Kiss Cookies
I get so many questions about these pink beauties once people try them! They are simple, but knowing a few tricks can make all the difference in getting that perfect look and taste in your Strawberry Kiss Cookies. Here are the things most folks ask about!
Can I Substitute the Freeze-Dried Strawberries?
Honestly, I really, really advise against it if you want the best flavor! The beauty of this recipe is the intense, natural strawberry punch we get from the freeze-dried powder. If you try to use fresh strawberries, you’ll have to add lots of flour to balance the moisture, which changes the texture completely. And skip the artificial flavoring—it tastes totally fake! Stick to the freeze-dried fruit for that signature color and taste in your soft batch cookies.
How to Prevent the Chocolate Center from Melting Too Much?
This is all about timing when you press that chocolate drop in. You need to work fast! As soon as those cookies come out of the oven, the surface is hot enough to slightly soften the base of the chocolate candy, which helps it stick securely. If you wait even three or four minutes, the cookie cools down too much, and the chocolate might just sit on top or slide right off later. Press it firmly but gently right away for the perfect centerpiece!
What is the Best Way to Store These Cookies?
For the best results with your Strawberry Kiss Cookies, keep them stored airtight at room temperature for up to four days. Make sure you let them cool completely first, or you’ll end up with a steamy mess! If you need them to last longer, the freezer works great. Just make sure they aren’t squashed against each other in the container so the chocolate tops stay neat.
Sharing Your Delicious Strawberry Kiss Cookies Experience
I truly hope you loved making these soft batch Strawberry Kiss Cookies as much as I love eating them! They are such a cheerful addition to any plate. Once you’ve tried them, please pop down below and leave a comment telling me how they turned out for you. Did your kids love the pink color? Did you use milk chocolate or switch to dark? I love seeing your results, so don’t forget to rate the recipe and share your baking success! You can also follow our latest creations on Facebook or save this recipe on Pinterest.
Print
Amazing 1 Strawberry Kiss Cookies soft batch
- Total Time: 1 hour 32 minutes
- Yield: 36 cookies
- Diet: Vegetarian
Description
Bake these soft strawberry cookies using real freeze-dried fruit for natural flavor and color, topped with a sweet chocolate finish. The tart berry dough pairs perfectly with a sweet milk chocolate centerpiece.
Ingredients
- 1 cup freeze-dried strawberry slices
- 2 1/4 cups all-purpose flour
- 1 teaspoon baking powder
- 1/2 teaspoon salt
- 1 cup unsalted butter, softened
- 1 cup granulated sugar
- 1 large egg
- 2 tablespoons confectioners sugar
- 36 milk chocolate candy drops, unwrapped
Instructions
- Pulse the freeze-dried strawberries in a food processor until they form a fine powder.
- Whisk the resulting strawberry powder, flour, baking powder, and salt together in a medium bowl.
- Beat the softened butter and granulated sugar in a large bowl on medium speed for 2 minutes until creamy.
- Mix in the egg until fully combined and smooth.
- Add the dry flour mixture to the wet ingredients and mix on low speed just until no white streaks remain.
- Cover the bowl with plastic wrap and refrigerate the dough for 60 minutes to firm up the butter.
- Preheat your oven to 350 degrees Fahrenheit and line two large baking sheets with parchment paper.
- Scoop the chilled dough into 1 tablespoon portions and roll them into smooth spheres.
- Arrange the dough balls 2 inches apart on the prepared baking sheets.
- Bake for 10 to 12 minutes until the edges are set but the centers remain soft.
- Remove the pan from the oven and immediately dust the hot cookies lightly with confectioners sugar.
- Press a chocolate candy drop gently into the center of each dusted cookie while they are still hot.
- Allow the cookies to cool on the baking sheet for 5 minutes before transferring them to a wire rack to set completely.
Notes
- Use pulverized freeze-dried strawberries for authentic flavor and color.
- The dough requires 60 minutes of chilling time.
- Press the chocolate candy into the cookies immediately after removing them from the oven.
- Prep Time: 20 minutes
- Cook Time: 12 minutes
- Category: Dessert
- Method: Baking
- Cuisine: American