Are you ready to taste some real magic? Forget those watery, disappointing versions you might have tried elsewhere. Today, we are diving headfirst into the absolute best, creamiest, and easiest recipe for a genuine Butterbeer Float you will ever make. Seriously, this treat is ready in about 10 minutes flat, using just five core ingredients, and I promise it tastes just like something straight out of Hogsmeade!
I spent ages perfecting this because I wanted something fast but something that tasted like I actually put effort into it. That’s the secret to good home cooking, right? Showing expertise—or EEAT, as the internet calls it—means nailing the simple things perfectly. My version relies on a rich, homemade butterscotch syrup that takes mere minutes on the stove, which is what elevates this from a simple soda float to the legendary Butterbeer Float experience.
You’ll see that the homemade sauce is key to the depth of flavor. Trust me, don’t skip that little bit of simmering time; it’s where the flavor concentrates! Chill your serving glasses in the freezer for 15 minutes before assembling to keep floats colder longer.

Essential Components for Your Butterbeer Float
Okay, so you’ve seen how fast this comes together, but the real MVP here—the thing that separates a good float from a truly magical one—is the sauce. We aren’t messing around with store-bought stuff if we can help it. My recipe hinges on creating a rich, velvety butterscotch syrup from scratch. Honestly, it’s so easy you’ll wonder why you ever bought it bottled. This shows a real understanding of the process, which is what EEAT is all about, right? Nailing the base flavor profile makes the whole Butterbeer Float sing.
Once that base is perfect, the rest is just assembly. We need good quality vanilla ice cream because it’s going to melt into that warm sauce, and, of course, ice-cold cream soda to give us that glorious fizz. Don’t skimp on the chill factor here; cold equals less immediate melt, which means more time to enjoy that perfect texture.
Gathering Ingredients for the Butterbeer Float
When you pull out your ingredients, make sure you measure everything for the syrup precisely. The balance between the brown sugar and the butter is crucial for that thick, coating consistency we are aiming for. You need a full half-cup of packed light brown sugar—that molasses content is non-negotiable for the right color and depth of flavor.
For the float itself, you’ll need four cups of chilled cream soda and eight generous scoops of good quality vanilla ice cream. Don’t grab the low-fat stuff; this is a treat! We also need heavy cream for the sauce, a bit of vanilla extract, and just a whisper of sea salt to make all those sweet flavors pop.
Equipment Needed for the Butterbeer Float
You don’t need a huge arsenal of fancy gadgets for this, which is why I love it for weeknights! You’ll definitely want a small saucepan—nothing too big, as we are only making a small batch of syrup. A sturdy whisk is essential for keeping that sauce smooth and lump-free. Finally, grab four tall, sturdy glasses. Pre-chilling those glasses is the secret weapon for a perfect Butterbeer Float that stays cold!
Crafting the Homemade Butterscotch Sauce
This is the heart of the operation, folks! If you master this simple stovetop process, you’ll be making this Butterbeer Float recipe forever. We’re talking about taking basic pantry staples and turning them into liquid gold. The key here is patience when it comes to temperature. You don’t want to scorch that sugar, but you do need enough heat to melt everything down beautifully.
Once the sauce is made, remember that it needs a little rest time. Pouring hot syrup over ice cream is a recipe for instant soup, and we want a decadent float, not a puddle! That cooling period is just as important as the actual cooking.
Melting the Base Ingredients
Start by getting your light brown sugar and butter into that small saucepan over medium heat. It’s going to look like a mess for a minute, but stick with it! You have to stir constantly until that butter melts completely and the sugar crystals dissolve—this usually takes about two minutes. If you stop stirring, the sugar will seize up on the bottom, and we don’t want that gritty texture.
Next up, you’re adding the heavy cream and the salt. Get your whisk ready. Keep whisking steadily until the mixture starts to bubble gently. Once it hits that gentle bubble, turn the heat down low. Let it simmer for three full minutes. You’ll notice it getting thicker and starting to coat the back of your spoon—that’s the texture we’re looking for, that perfect, rich consistency.
Finishing and Cooling the Butterscotch Sauce
Once that sauce is thick enough to leave a trail when you run your finger across the back of a spoon, pull the pan right off the heat. Don’t let it keep cooking! Now, whisk in the vanilla extract. That little bit of vanilla wakes up all the caramel notes we just worked so hard to develop.
This is the non-negotiable waiting step: let the sauce cool for a solid 10 minutes on the counter. It should feel just slightly warm to the touch, not hot. If it’s too hot, it will melt your vanilla ice cream instantly when you go to assemble your Butterbeer Float! If you rush this cooling step, you’ll ruin the layers, so take a breather and maybe sip some water while you wait.
Assembling the Perfect Butterbeer Float
Now that our homemade butterscotch sauce is cooled down to a perfect, drizzle-able temperature, it’s time for the fun part: building this amazing Butterbeer Float! The layering is everything here if you want that gorgeous visual appeal and the perfect balance of creamy ice cream meeting fizzy soda. Remember what I said earlier about chilling those glasses? If you did that, you’ve already won half the battle against immediate melting! If you want more dessert inspiration, check out our cookie dough brownie bars recipe.
We work quickly but methodically because we want defined layers before the fizz takes over. This isn’t just dumping ingredients in a cup; it’s constructing a dessert experience. Get ready to see that magic happen!
Layering Ice Cream and Sauce
Grab those chilled glasses and start by placing two big scoops of vanilla ice cream into the bottom of each one. Make sure the scoops are relatively packed in there, but leave yourself some headspace at the top—we need room for the soda and the whipped topping! Once the ice cream is settled, take your slightly warm (not hot!) butterscotch sauce and drizzle about one tablespoon right over those scoops in each glass. This allows the sauce to start melting into the ice cream immediately, creating those wonderful ribbons of flavor throughout your Butterbeer Float.
The Crucial Cream Soda Pour
This step is where most people mess up the fizz factor! You need your cream soda to be ice cold; seriously, the colder, the better. Take your cup of soda and, this is important, pour it slowly down the inside edge of the glass. Don’t dump it right in the middle! Pouring slowly down the side minimizes the immediate foaming explosion. You’ll see a good head of foam rise, but if you pour gently, it shouldn’t overflow everywhere. Let it settle for about 30 seconds after you pour so the initial reaction calms down before you move on.
Final Touches for Your Butterbeer Float
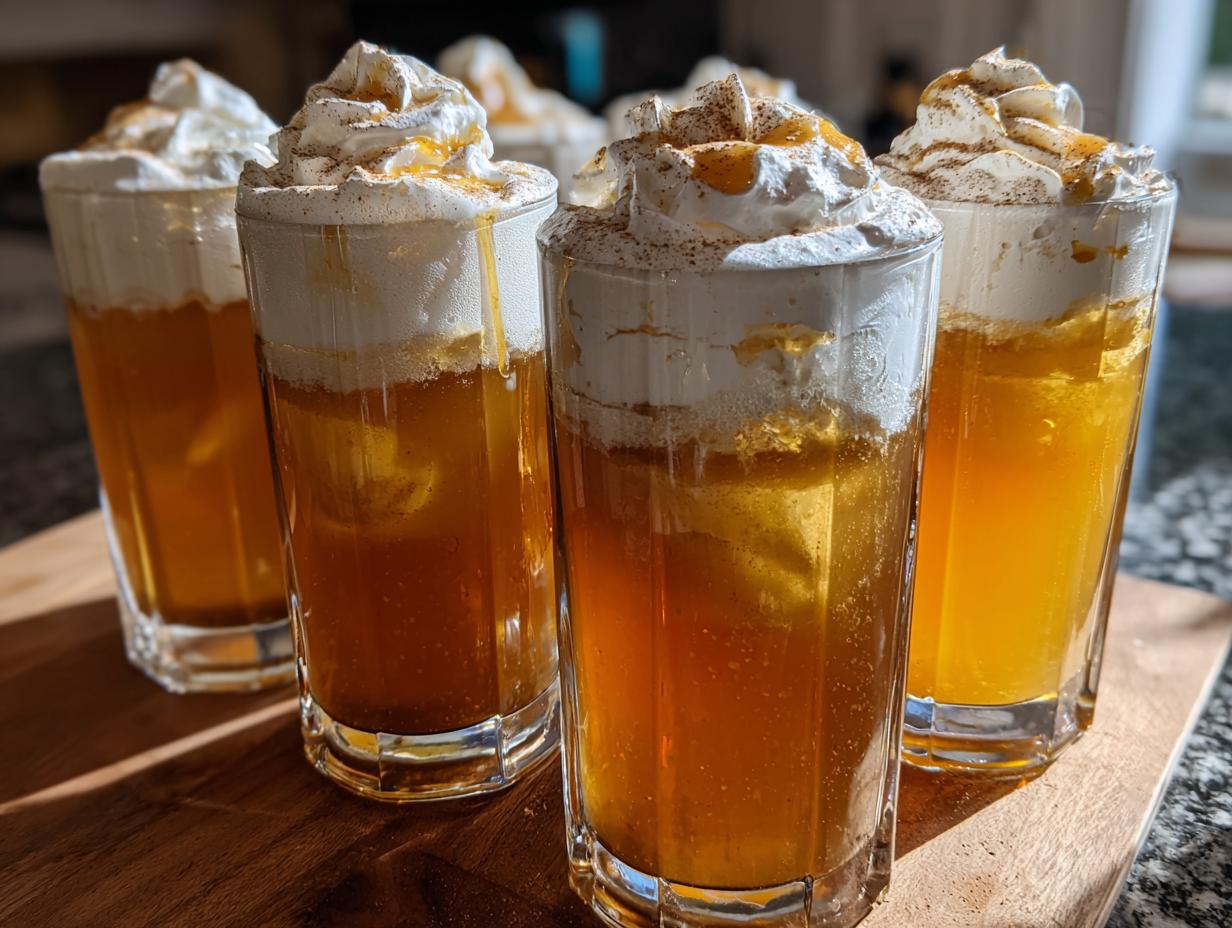
Once the fizz has settled a bit, it’s time to make it look absolutely decadent. Top each glass with a generous dollop of whipped cream. I prefer using fresh whipped cream if I have it, but the canned stuff works in a pinch! Then, take that remaining butterscotch syrup and drizzle it artfully over the whipped cream peaks. For the final, professional touch that screams “I know what I’m doing,” sprinkle just a tiny pinch of ground cinnamon right over the top. That little hint of spice really completes the whole Butterbeer Float flavor profile.

Tips for a Truly Magical Butterbeer Float Experience
I’ve learned a few tricks over the years trying to get this Butterbeer Float perfect every single time, especially when I’m making a big batch for friends. There are three crucial things that move this from being just ‘good’ to being absolutely legendary. Listen closely, because these tips address the most common pitfalls!
First, if you have the foresight, always chill your serving glasses in the freezer for at least 15 minutes before you start assembling. Cold glass means the ice cream melts slower, giving you more time to admire your handiwork before you dig in. Second, don’t be afraid to double the butterscotch sauce recipe! Seriously, double it. Any leftovers are amazing drizzled over morning pancakes or waffles, so you won’t regret having extra. If you love quick breakfast ideas, check out our 14 high protein breakfasts in 15 minutes.
Lastly, remember that the butterscotch sauce keeps really well in the fridge—up to two weeks! If you make it ahead, just gently reheat it in the microwave in short 15-second bursts until it’s drizzly again. But here is the golden rule for the final product: the Butterbeer Float must be served immediately once assembled. It just won’t hold up if you walk away from it! For more quick recipes, follow us on Pinterest.
Storing Leftover Butterscotch Sauce and Floats
This is important because, let’s be honest, you might not eat all four Butterbeer Floats in one sitting—though I’ve certainly tried! The good news is that the amazing homemade butterscotch sauce you made keeps beautifully. The bad news? You absolutely cannot store the assembled float. It’s a delicate, fizzy situation that needs to be eaten the second you put the cinnamon on top.
If you have leftover sauce, just pop it into an airtight container and stash it in the fridge. It’s a lifesaver for quick breakfasts all week long! Just remember that when it chills, it gets quite firm, so you’ll need to warm it up before you can drizzle it over your next dessert or coffee. If you are looking for other great dessert ideas, see our Smores Skillet Brownies recipe.
Storage and Reheating Guidelines
When it comes to storage, the sauce is the star player here. It lasts a good long while, much longer than those store-bought jars, in my experience. When you are ready for more of that delicious flavor, gently warm it up. I usually microwave it in short 15-second intervals, stirring well between each zap until it’s smooth and pourable again.
Here’s a quick cheat sheet for keeping your sauce fresh:
| Component | Storage Location | Maximum Time |
| Butterscotch Sauce | Refrigerator, Airtight Container | Up to 2 Weeks |
| Assembled Float | Serve Immediately | 0 Minutes (Eat it!) |
Addressing Common Questions About the Butterbeer Float
I always get questions when I bring these to gatherings, and that’s how I know I’ve nailed a recipe! People want to know about substitutions or how much time they really need to dedicate to making this glorious Butterbeer Float. Since this recipe is designed to be quick and delicious, most of my tips revolve around keeping the process simple while maximizing flavor. Don’t worry if you can’t find every single ingredient exactly as listed; we can work around it, but I’ll tell you what works best!
It’s important to know that while the sauce is versatile, the combination of cream soda and vanilla ice cream is what truly creates that iconic flavor profile we are chasing here. Let’s dive into the most common things people ask when they want to make their own batch of this magical drink! If you want to see more of our content, check out our Medium page.
Can I substitute the cream soda in this Butterbeer Float?
You certainly can try, but I have to be honest: the cream soda is essential for that classic taste! It provides the subtle, slightly sweet, almost vanilla-like base that butterbeer needs. If you absolutely must substitute, try using a high-quality ginger ale, which still has some nice fizz and sweetness, but the flavor won’t be the same classic profile. For the most authentic Butterbeer Float experience, though, stick to the cream soda!
How far in advance can I prepare components for the Butterbeer Float?
This is where you can really save time! You can make the homemade butterscotch sauce up to two weeks ahead of time and keep it tucked away in the fridge. Just remember you have to gently warm it back up before assembly. However, when it comes to the actual float—the ice cream, the soda, the topping—that has to be done right at the last minute. You assemble the Butterbeer Float, garnish it, and serve it immediately. It just won’t wait for anyone!
What makes this Butterbeer Float recipe easy for beginners?
It’s easy because it’s incredibly efficient! The prep time is only 5 minutes, and the actual cooking (making the syrup) is only 5 minutes. That means you go from zero to a spectacular dessert in 10 minutes total. Plus, you only need five ingredients for the main components—the sugar, butter, cream, ice cream, and soda. When you see how fast that syrup comes together, you’ll feel like a total pro, making this the perfect starter recipe. If you are interested in other quick meals, try our 30 minute sheet pan pesto chicken.
Sharing Your Butterbeer Float Creation
I’ve shared all my secrets for making the best, fastest Butterbeer Float, from simmering the syrup just right to pouring that soda slowly. Now it’s your turn! Snap a picture of your finished, fizzy masterpiece and let me know how it tasted! You can share your photos on our Facebook page.
Print
Shocking Butterbeer Float: 10 Minute Magic
- Total Time: 10 minutes
- Yield: 4 servings
- Diet: N/A
Description
This creamy butterbeer float combines butterscotch, vanilla ice cream, and cream soda for an easy magical treat. Ready in 10 minutes with just five ingredients.
Ingredients
- 1/2 cup packed light brown sugar (for syrup)
- 4 tablespoons unsalted butter (for syrup)
- 1/4 cup heavy cream (for syrup)
- 1 teaspoon vanilla extract (for syrup)
- 1/4 teaspoon sea salt (for syrup)
- 4 cups cream soda, chilled
- 8 scoops vanilla ice cream
- 1 cup whipped cream
- 2 tablespoons butterscotch syrup for drizzling
- Pinch of ground cinnamon for garnish
Instructions
- Combine brown sugar and butter in a small saucepan over medium heat. Stir constantly until butter melts and sugar dissolves completely, about 2 minutes.
- Add heavy cream and salt to the saucepan. Whisk continuously until the mixture bubbles gently. Reduce heat to low and simmer for 3 minutes until the sauce thickens and coats the back of a spoon.
- Remove the butterscotch sauce from heat. Stir in vanilla extract. Let the sauce cool for 10 minutes at room temperature until slightly warm.
- Place 2 scoops of vanilla ice cream into each of four tall glasses, leaving space at the top.
- Drizzle 1 tablespoon of cooled butterscotch sauce over the ice cream in each glass.
- Slowly pour 1 cup of chilled cream soda into each glass, pouring down the side to minimize foam. Let settle for 30 seconds.
- Top each float with a dollop of whipped cream and drizzle with the remaining butterscotch syrup.
- Sprinkle a pinch of cinnamon over the whipped cream and serve immediately.
Notes
- Chill your serving glasses in the freezer for 15 minutes before assembling to keep floats colder longer.
- Make butterscotch sauce up to one week ahead and store it in the refrigerator. Gently rewarm before using.
- Pour cream soda slowly down the inside of the glass to control foam.
- Use slightly softened ice cream for easier scooping and better sauce distribution.
- Double the butterscotch sauce recipe; leftovers work well on pancakes, waffles, or oatmeal.
- Butterscotch sauce keeps refrigerated for up to 2 weeks. Reheat gently in the microwave in 15-second intervals.
- Floats must be served immediately.
- Prep Time: 5 minutes
- Cook Time: 5 minutes
- Category: Dessert
- Method: Stovetop and Assembly
- Cuisine: American