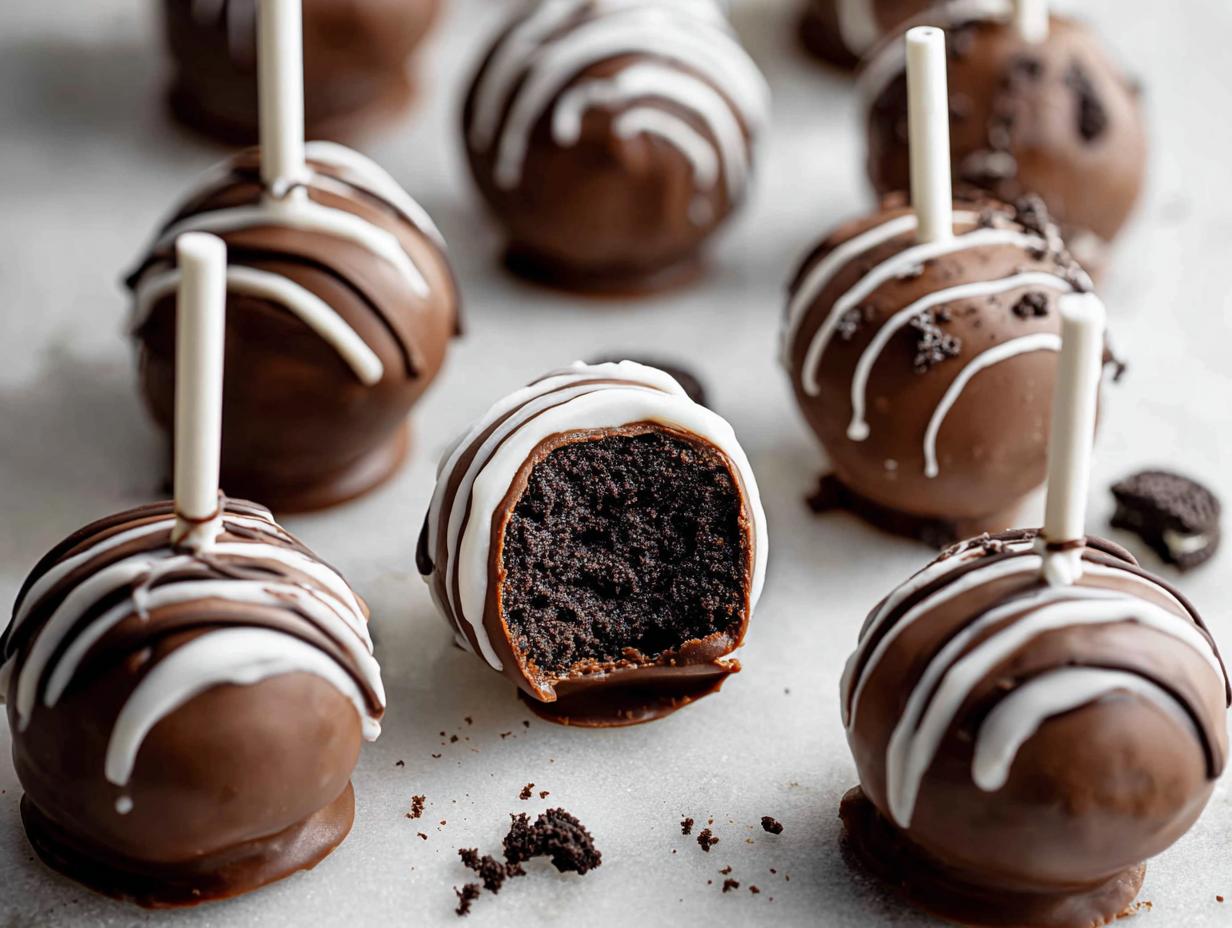
Oreo Cake Pops are seriously one of those recipes that make me so happy to run NoobRecipes. When I first started dabbling in the kitchen, the idea of making anything “cake-like” felt so intimidating! So when I discovered you could basically mash up Oreos with cream cheese, roll ’em into balls, and dip them in chocolate – well, it was a game-changer. These no-bake wonders are proof that delicious, impressive-looking treats don’t need a culinary degree. They’re ridiculously easy, totally fun to make (even for the most nervous beginner!), and they always disappear in a flash. Trust me, if you’re looking for a fail-proof party hit or just a sweet little pick-me-up, these Oreo cake pops are IT!

Why You’ll Love These Oreo Cake Pops
Seriously, these little guys are a total win-win. They look super fancy, but let me tell you, they are ridiculously easy to whip up. That’s exactly why I love them and why I knew they had to be on NoobRecipes!
Effortlessly Easy Preparation
The best part? You barely need any baking skills. We’re talking about crushing cookies and mixing them with cream cheese – that’s it for the base! Then it’s just rolling, freezing, and dipping. No complicated steps, no fancy techniques. You can totally nail these on your first try, even if your kitchen experience is limited to making toast.
A No-Bake Wonder
Forget about preheating the oven and hoping for the best! These Oreo cake pops are completely no-bake. This means you can make them any time of year, no matter the weather, and you don’t have to worry about burning them. Plus, less mess means more fun!
Crowd-Pleasing Flavor
Oh my goodness, the taste! It’s that perfect combo of rich, chocolatey Oreos all mashed up with creamy cream cheese, then coated in smooth, sweet candy melts. Each bite is like a little explosion of pure happiness. They’re sweet, they’re decadent, and everyone, I mean *everyone*, goes crazy for them!
Gathering Your Oreo Cake Pops Ingredients
Alright, let’s talk about what you’ll need to make these ridiculously easy Oreo cake pops! The great thing is, you probably already have most of this stuff in your pantry or can grab it easily from any grocery store. I’ve tried to keep the ingredient list super simple because, you know, that’s what NoobRecipes is all about. No obscure items here!
Essential Ingredients for Oreo Cake Pops
- 42 regular or Double Stuf Oreos
- 8 oz cream cheese, softened
- 3 cups candy melts (about 18 oz)
- 1/2 cup semi sweet chocolate chips, melted (optional for decorating)
Ingredient Notes and Substitutions
So, about those ingredients! Using regular Oreos is classic, but hey, if you’re a Double Stuf fan, go for it – you’ll just get a slightly richer flavor. The cream cheese really needs to be softened, so don’t skip that step; it helps everything mix together so smoothly. For the candy melts, they’re the easiest way to get that smooth, shiny coating. If you can’t find them, you could try using regular chocolate chips, but you might need to add a bit of vegetable oil to thin them out, and they might not set quite as firm. And for decorating? Totally optional, but a little drizzle of melted chocolate or some fun sprinkles always makes them extra special!
Step-by-Step Guide to Making Oreo Cake Pops
Alright, let’s get down to business and make these amazing Oreo cake pops! Don’t worry, I’ll walk you through every single step. I promise it’s way easier than it looks, and the results are SO worth it. Just follow along, and you’ll have a tray full of deliciousness in no time!
Preparing the Oreo Mixture
First things first, we need to get our Oreos all crumbly. If you have a food processor, just toss your Oreos in there and pulse until they’re fine crumbs. If you don’t have one, no sweat! You can totally do this by putting the Oreos in a sturdy zip-top bag and crushing them with a rolling pin or even a heavy can. Once they’re all crumbly, dump them into a bowl. Now, add your softened cream cheese. I like to use my hands for this part – it really helps to get everything mixed in evenly. Just squish and mix until it all comes together into a thick, dough-like consistency. It should hold its shape!
Shaping and Freezing the Cake Pops
Grab a baking sheet and line it with wax paper or parchment paper. This stops them from sticking. Now, take your Oreo mixture and start rolling it into balls. I find using a cookie scoop (about 1.5 tablespoons is perfect!) helps make them all the same size, which is nice for even baking and looks professional. Just scoop, roll gently between your palms to form a nice, smooth ball, and place them on your prepared baking sheet. Once all your balls are rolled, pop the whole sheet into the freezer for about 15 minutes. This part is key – it firms them up so they don’t fall apart!

Attaching the Sticks
While those little guys are chilling, let’s get our candy melts ready. Follow the package directions to melt them until smooth – usually, this is done in the microwave in short bursts or over a double boiler. Carefully take your chilled Oreo balls out of the freezer. Dip one end of a lollipop stick about halfway into the melted candy melts. This is our “glue”! Then, gently insert that chocolate-dipped end about halfway into an Oreo ball. Repeat this for all your Oreo balls. Stick them back on the baking sheet and pop them back into the freezer for another 5-10 minutes to let that candy melt “glue” set.
Dipping and Decorating Your Oreo Cake Pops
Okay, time for the fun part – dipping! Reheat your candy melts if they’ve started to set. Take one of your chilled Oreo pops (with the stick firmly in place!) and carefully submerge it into the melted candy. Give it a gentle swirl and lift it out. Let any excess coating drip back into the bowl for a few seconds. You can use a spoon or a toothpick to help smooth out any drips if you like. If you’re adding sprinkles or a chocolate drizzle, do it *immediately* after dipping, while the coating is still wet. Otherwise, they won’t stick!
Setting and Finishing Touches
Once your cake pop is dipped and decorated, you need to let it set. The easiest way is to stick the pop upright into a piece of Styrofoam or even a cardboard box you’ve poked holes in. You can also just place them upright on the wax paper-lined baking sheet if you don’t have anything to stand them up in, but make sure you don’t touch them until they’re fully set. Let them sit at room temperature until the candy melts are completely hard. And voilà! You’ve got yourself some incredible Oreo cake pops!
Tips for Perfect Oreo Cake Pops Every Time
Okay, so making these Oreo cake pops is pretty straightforward, but like anything in the kitchen, a few little tricks can make a HUGE difference. I’ve definitely had my share of oops moments when I was starting out, so I want to share some things I learned that will help you get perfect pops every single time. You got this!
Achieving the Right Consistency
The most important thing for the base mixture is getting that “dough” consistency just right. If your Oreo and cream cheese mix feels too dry and crumbly, and won’t hold together when you try to roll it, just add a tiny bit more softened cream cheese, like a teaspoon at a time, and mix it in really well. If it feels too wet and sticky, it’s likely because the cream cheese wasn’t soft enough or you added too much. In that case, pop it in the fridge for about 10-15 minutes to firm up a bit before rolling. It makes a big difference!
Melting Candy Melts Like a Pro
Melting candy melts is super easy, but you have to be a little careful. The biggest no-no is getting any water in them, or overheating them. I usually do it in the microwave, using a microwave-safe bowl. Heat them for 30 seconds, stir, then heat for another 20-30 seconds, stir again, and keep going in short bursts, stirring each time, until they’re smooth. If you overdo it, they can seize up and get clumpy. A double boiler works great too if you’re worried about the microwave. Just make sure the water doesn’t touch the bottom of your bowl!
Decoration Ideas for Your Oreo Cake Pops
Once you’ve got that perfect coating on, you can have SO much fun decorating! Besides the simple drizzle of semi-sweet chocolate, try using different colors of candy melts for contrasting stripes. You can also get creative with sprinkles – jimmies, nonpareils, even edible glitter! For a super simple but fun look, just roll the wet dipped pop in some colorful sprinkles before they set. You can even use a toothpick to draw little designs or swirls right on top. It doesn’t have to be complicated to look amazing!
Frequently Asked Questions about Oreo Cake Pops
Got questions about these little Oreo delights? I totally get it! When I first started making them, I had a ton of them too. Here are some of the most common things people ask, and I’m happy to share what I’ve learned to make sure your Oreo cake pops turn out perfectly!
Can I make Oreo Cake Pops ahead of time?
Absolutely! This is one of the best things about them. You can totally make these a day or two in advance. Just make sure they are fully set, then store them in an airtight container at room temperature. They hold up really well, which is perfect for party planning!
What’s the best way to store leftover Oreo Cake Pops?
The key is an airtight container. If you have any left (which is rare in my house!), just pop them into a container with a tight-fitting lid. Keep them at cool room temperature. Avoid the fridge if you can, as sometimes the condensation can make the coating a bit dull or sticky. They should stay delicious for a good few days!
Are there alternative coatings for Oreo Cake Pops?
Yes, for sure! While candy melts are super easy to work with and give that nice, firm coating, you can definitely use other things. Good quality melting wafers work well. You could also try melting down regular chocolate chips (milk, semi-sweet, or dark) with a little bit of coconut oil or vegetable shortening – about a teaspoon per cup of chocolate – to help them get a smoother consistency for dipping. Just know that regular chocolate might not set as hard as candy melts.
How do I prevent my Oreo Cake Pops from falling off the sticks?
This is a common issue, and it’s usually about getting that “glue” right. Make sure you’re using enough melted candy melt to dip the stick before inserting it into the ball. Then, let that “glue” set in the freezer for those crucial 5-10 minutes. This firms up the candy melt, so when you dip the whole pop, the stick has a really solid anchor. If your pops are falling off, it usually means the base mixture wasn’t firm enough, or the candy melt “glue” didn’t set properly before the final dip.
Storing and Reheating Your Oreo Cake Pops
Alright, you’ve made these gorgeous Oreo cake pops, and you want them to stay perfect, right? I’ve got you covered! Since these are no-bake, they’re pretty forgiving, but a little bit of care goes a long way to keep them tasting and looking amazing.
Best Practices for Storing Oreo Cake Pops
The absolute best way to store your finished Oreo cake pops is in an airtight container. This is super important to keep them from drying out or picking up any funky smells from your fridge or pantry. I like to arrange them in a single layer if I can, maybe with a little parchment paper between layers if they’re stacked. Keep them at cool room temperature, away from direct sunlight or heat. Honestly, they’re usually gone before I even need to think about long-term storage, but if you do have leftovers, they’ll keep well for a few days this way!
Can Oreo Cake Pops be frozen?
You bet! If you want to make them even further in advance, freezing is a great option. Once they’re fully set, you can carefully place them in a freezer-safe container. Again, try to keep them in a single layer or use parchment paper to prevent sticking. When you’re ready to enjoy them, just take them out of the freezer and let them thaw slowly in the refrigerator for a few hours, or on the counter for about an hour. This helps prevent condensation, which can mess with the coating. They’ll be just as delicious!
Estimated Nutritional Information for Oreo Cake Pops
Now, I’m Adam from NoobRecipes, and while we love making delicious treats accessible, it’s also good to have a general idea of what you’re snacking on. These numbers are estimates, of course, because everyone’s pantry staples are a little different! But this should give you a good ballpark figure for one of these yummy little Oreo cake pops.
Nutritional Breakdown Per Serving
| Serving Size | 1 cake pop |
| Calories | Approximately 150-200 |
| Fat | Approximately 10-15g |
| Saturated Fat | Approximately 5-8g |
| Carbohydrates | Approximately 20-25g |
| Sugar | Approximately 15-20g |
| Fiber | Approximately 1g |
| Protein | Approximately 2g |
| Sodium | Approximately 20-30mg |
| Cholesterol | Approximately 5-10mg |
Share Your Delicious Oreo Cake Pops!
Alright, now it’s YOUR turn! I absolutely love seeing what you all create in your kitchens. Did you whip up these Oreo cake pops for a party, or just for a sweet afternoon treat? I’d be thrilled if you dropped a comment below to share how they turned out! And if you snapped some photos, tag me on Instagram (@NoobRecipes – maybe!) – I’d love to see your masterpieces. Happy baking (or, well, no-baking!)!
Print
10 Amazing Oreo Cake Pops Indeed
- Total Time: 35 minutes
- Yield: 30-35 cake pops
- Diet: Vegetarian
Description
Easy Oreo Cake Pops are a fun no-bake treat perfect for parties or a sweet snack. They require minimal effort and deliver maximum deliciousness.
Ingredients
- 42 regular or double stuf Oreos
- 8 oz cream cheese, softened
- 3 cups candy melts (about 18 oz)
- 1/2 cup semi sweet chocolate chips, melted (optional for decorating)
Instructions
- Process Oreos into fine crumbs. Add softened cream cheese and mix until combined.
- Line a baking sheet with wax paper. Portion mixture into balls using a cookie scoop. Place balls on the lined sheet and freeze for 15 minutes.
- Melt candy melts. Remove Oreo balls from freezer. Dip one end of a lollipop stick into melted chocolate and insert halfway into an Oreo ball. Repeat for all balls. Freeze for 5-10 minutes.
- Reheat candy melts if necessary. Submerge each Oreo pop into the melted candy melts, tap off excess. Place pops upright in a Styrofoam board or on the baking sheet to set.
- Decorate with melted semi-sweet chocolate drizzle or sprinkles immediately after dipping, if desired.
Notes
- Crush Oreos by hand if you don’t have a food processor. Mix with cream cheese using your hands for best results.
- Golden Oreos can also be used.
- Decorate with sprinkles or use various candy melt colors.
- Follow candy melt package instructions for melting.
- This recipe yields approximately 30-35 cake pops with a 1.5 tablespoon scoop.
- Prep Time: 25 minutes
- Cook Time: 10 minutes
- Category: Dessert
- Method: No-Bake
- Cuisine: American