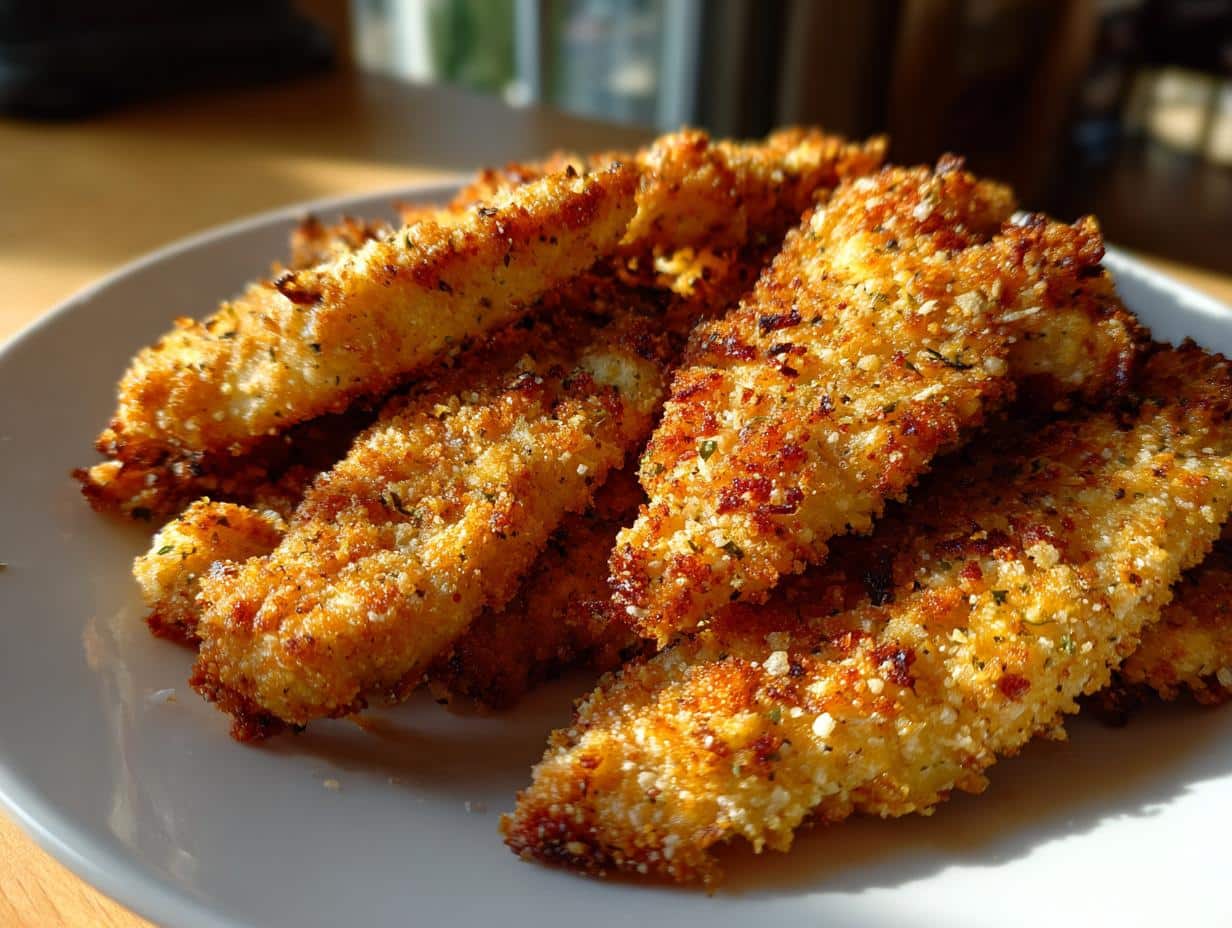
Okay, so let me tell you about these Ranch Chicken Tenders. Honestly, the first time I made these, I was a little nervous because my kids can be SO picky, but they absolutely devoured them! It was a weeknight miracle, I tell you. They’re just ridiculously easy to whip up, and the flavor? Oh my gosh, it’s that perfect ranchy, cheesy goodness everyone loves. Plus, they come out so perfectly crispy, you’d swear they were fried, but nope! We baked these bad boys.

Why You’ll Love These Ranch Chicken Tenders
Seriously, what’s not to adore about these?
- Super Simple: You can have them ready in under an hour, perfect for busy weeknights.
- Flavor Explosion: That ranch and Parmesan combo is just *chef’s kiss*.
- Seriously Crispy: The panko and baking method give you that amazing crunch without the mess of frying.
- Healthier Swap: It’s a great way to get that crispy chicken fix without all the oil.
Gathering Your Ingredients for Perfect Ranch Chicken Tenders
Alright, let’s get down to business! To make these totally addictive Ranch Chicken Tenders, you just need a few simple things. Don’t worry, nothing too fancy or hard to find. I always make sure to grab good quality chicken, and you’ll see why in a sec. Having everything ready to go makes the whole process so much smoother, trust me. It’s all about getting that perfect crispy coating and amazing ranch flavor!
Essential Ingredients for Ranch Chicken Tenders
Here’s what you’ll want to have on hand:
- About 1.5 pounds of boneless, skinless chicken tenders. Make sure to trim off any extra bits of fat – it just makes for a cleaner bite.
- 1 cup of panko breadcrumbs. These are key for that super crispy texture, way better than regular fine breadcrumbs!
- 1 packet (that’s about 1 ounce or 28 grams) of dry Ranch seasoning mix. This is where all the magic flavor comes from!
- 1 cup of grated Parmesan cheese. I like to grate it myself because it melts a bit better and has more flavor than the pre-shredded stuff.
- 1/2 cup of either plain Greek yogurt or mayonnaise. Both work like a charm!
- 1/2 teaspoon of garlic powder and 1/2 teaspoon of paprika. These just add a little extra oomph to the coating.
- A pinch of salt and some freshly ground black pepper to taste. You know, the usual suspects!
- And if you’re feeling fancy, about 2 tablespoons of fresh parsley, chopped up, for a nice little garnish. It makes them look extra special!
Ingredient Notes and Substitutions
So, about those panko breadcrumbs – seriously, don’t skip them! They’re larger and airier than regular breadcrumbs, which means they get way crispier when they bake. If you absolutely can’t find them, regular breadcrumbs will work in a pinch, but you won’t get quite the same crunch. And for the coating binder, I often use mayonnaise because it’s got a little more fat and richness, but Greek yogurt is a fantastic lighter option. It still holds the coating beautifully and gives you that tangy ranch flavor. You honestly can’t go wrong with either choice!
Step-by-Step Guide to Making Ranch Chicken Tenders
Alright, let’s get these delicious Ranch Chicken Tenders made! It really is as simple as it sounds, and before you know it, you’ll have a pan full of crispy, golden goodness. I love doing this with my kids because they can totally help with the dipping and coating part – just be prepared for a little bit of a mess, but it’s totally worth it!
Preparing the Coating and Chicken
First things first, get your oven preheating to 400°F (that’s 200°C). While it’s heating up, grab a baking sheet and line it with parchment paper. Trust me, this is a lifesaver for easy cleanup! Now, you’ll need two shallow bowls. In one, mix up your ½ cup of mayonnaise (or Greek yogurt, if you’re going that route) with the entire packet of dry Ranch seasoning mix. Stir it until it’s all combined and creamy. In the second bowl, combine your 1 cup of panko breadcrumbs, 1 cup of grated Parmesan cheese, ½ teaspoon of garlic powder, ½ teaspoon of paprika, and a little salt and pepper. Give that a good stir. Then, take each chicken tender, dip it into the Ranch mixture so it’s coated all over, and then press it firmly into the panko-Parmesan mixture. Make sure it’s really covered well on all sides!
Baking Your Crispy Ranch Chicken Tenders
Once all your chicken tenders are coated and looking fabulous, lay them out on that prepared baking sheet. Try not to let them touch too much; give them a little space so the air can circulate. This is super important for getting them nice and crispy! Pop them into your preheated oven for about 20-25 minutes. About halfway through, usually around the 10-12 minute mark, carefully flip each tender over. This helps them brown evenly on both sides. You’re looking for them to be a beautiful golden brown and really crispy. When they look like they’re perfectly done, take them out of the oven. If you’ve got some fresh parsley, sprinkle a little on top – it looks so pretty! Serve these hot with your favorite dipping sauce and watch them disappear!

Tips for Perfectly Baked Ranch Chicken Tenders
Okay, so you’ve got the basic recipe down, but let me give you a few of my little secrets for taking these Ranch Chicken Tenders from good to absolutely AMAZING. It’s all about those little details that make a big difference in the final crunch and flavor. These are the things I’ve learned over the years that really make them shine!
Achieving Maximum Crispiness
Want that super satisfying crunch? My biggest tip is don’t overcrowd the pan! Give those tenders space to breathe so the heat can get all around them. Also, really press that chicken into the panko-Parmesan mixture. The panko is your best friend here for crispiness, and the Parmesan adds this incredible nutty flavor and helps it all get golden brown and yummy. It’s the dream team for a crispy coating!
Ensuring Even Cooking
To make sure every single one of these Ranch Chicken Tenders cooks up perfectly, try to cut your chicken tenders into roughly the same size if you can. It really helps them cook evenly. And that flip halfway through? It’s non-negotiable! It ensures both sides get that gorgeous golden color and crispy texture. If you happen to have a wire rack that fits inside your baking sheet, popping those tenders on that instead of directly on the parchment can give you even *better* air circulation underneath, leading to an all-around crispier bite.
Frequently Asked Questions About Ranch Chicken Tenders
I get asked about these Ranch Chicken Tenders all the time, and it’s usually because people want to know if they can switch things up or prep ahead. It’s totally normal to wonder, so let’s dive into some common questions!
Can I make these Ranch Chicken Tenders ahead of time?
You can definitely prep these ahead, which is a lifesaver! You can coat the chicken tenders and store them raw on the baking sheet (covered tightly with plastic wrap) in the fridge for up to a few hours before baking. Just make sure they’re well-covered so they don’t dry out. If you’ve already baked them, let them cool completely, then store them in an airtight container in the fridge for 2-3 days. For reheating, the oven or an air fryer is best to bring back that crispiness!
What are the best dipping sauces for Ranch Chicken Tenders?
Oh, the dipping sauce possibilities are endless! Besides the classic ranch (which is always a winner, obviously!), I love serving these with honey mustard for that sweet and tangy kick. BBQ sauce is another great option. For something a little different, a spicy sriracha mayo or even a simple ketchup works wonderfully. Whatever your favorite is, it’s going to be delicious!
Are there healthier variations of Ranch Chicken Tenders?
Absolutely! While these are already baked and healthier than fried, you can totally tweak them. Using Greek yogurt instead of mayo is a great start for a lighter coating. You could also try whole wheat panko breadcrumbs for a bit more fiber, or even swap out some of the panko for crushed whole-grain cereal if you’re feeling adventurous! Just remember, any substitutions might slightly change the final texture, but they’ll still be super yummy.
Storing and Reheating Your Ranch Chicken Tenders
Okay, so sometimes you make a batch of these Ranch Chicken Tenders and… well, you just can’t eat them all! Which is fine, but the real trick is storing and reheating them so they’re still amazing. Nobody likes a soggy tender, right? Here’s how I handle leftovers to keep them tasting almost as good as the first time.
Storing Leftover Ranch Chicken Tenders
Once your delicious Ranch Chicken Tenders have cooled down completely, you’ll want to get them into an airtight container. Pop them in the fridge, and they should be good for about 2 to 3 days. Just make sure they’re sealed up tight so they don’t pick up any weird smells from other things in the fridge!
Reheating for Optimal Texture
Now, for reheating, I really, really recommend using your oven or an air fryer. This is the secret to getting them crispy again! If you use the oven, just spread them out on a baking sheet at around 350°F (175°C) for about 5-10 minutes, until they’re heated through and crispy again. An air fryer is even faster – just a few minutes at 375°F (190°C) usually does the trick. Please, please, please avoid the microwave if you can help it. It tends to make things a little… well, chewy. And we don’t want that!
Storage and Reheating Table
Here’s a quick little guide:
- Refrigerator Storage: 2-3 days
- Reheating (Oven): 350°F (175°C) for 5-10 minutes
- Reheating (Air Fryer): 375°F (190°C) for 3-5 minutes
- Freezer Storage: Up to 1 month (wrap tightly first)
- Reheating (from frozen): Add a few extra minutes to oven/air fryer time.
Nutritional Information for Ranch Chicken Tenders
Now, I always like to give you a little heads-up about the nutritional side of things, because while these Ranch Chicken Tenders are totally delicious, it’s good to have an idea of what you’re working with. Keep in mind these numbers are just estimates, okay? They can totally change depending on the exact brands you use, how much you eat (guilty!), or if you make any little tweaks. But this should give you a good ballpark figure!
Estimated Nutritional Breakdown
Here’s a rough idea of what you’re looking at per serving (which is usually about 3-4 tenders, depending on how big they are):
| Serving Size | Approx. 3-4 tenders |
| Calories | 450 |
| Fat | 25g |
| Saturated Fat | 7g |
| Unsaturated Fat | 18g |
| Trans Fat | 0g |
| Carbohydrates | 20g |
| Fiber | 2g |
| Sugar | 3g |
| Protein | 35g |
| Cholesterol | 120mg |
| Sodium | 700mg |
Share Your Delicious Ranch Chicken Tenders!
I just LOVE hearing from you all! If you whip up these amazing Ranch Chicken Tenders, please, please share your experience! Did your kids love them? Did you try a fun new dipping sauce? Snap a pic and tag me or leave a comment below – I can’t wait to see your creations!
Print
Baked Ranch Chicken Tenders: 10 Crispy Bites
- Total Time: 40 minutes
- Yield: 4-6 servings
- Diet: Vegetarian
Description
Crispy baked ranch chicken tenders coated in a Parmesan-panko mixture. Easy to make and family-approved.
Ingredients
- 1½ lbs chicken tenders
- ½ cup mayonnaise (or Greek yogurt)
- 1 packet (1 oz) dry Ranch seasoning mix
- 1 cup grated Parmesan cheese
- 1 cup panko breadcrumbs
- ½ teaspoon garlic powder
- ½ teaspoon paprika
- Salt and pepper to taste
- Chopped fresh parsley for garnish (optional)
Instructions
- Preheat oven to 400°F (200°C). Line a baking sheet with parchment paper. Mix mayonnaise and Ranch seasoning in one bowl. Combine Parmesan cheese, panko breadcrumbs, garlic powder, paprika, salt, and pepper in a second bowl.
- Dip each chicken tender into the Ranch-mayo mixture, ensuring full coverage. Press into the breadcrumb mixture, coating all sides.
- Place coated tenders on the prepared baking sheet. Bake for 20–25 minutes, flipping halfway, until golden brown and crispy. Garnish with parsley if desired and serve hot.
Notes
- Greek yogurt can be used as a substitute for mayonnaise.
- Fresh parsley is optional for garnish.
- Serve with your favorite dipping sauce.
- Prep Time: 15 minutes
- Cook Time: 25 minutes
- Category: Main Course
- Method: Baking
- Cuisine: American