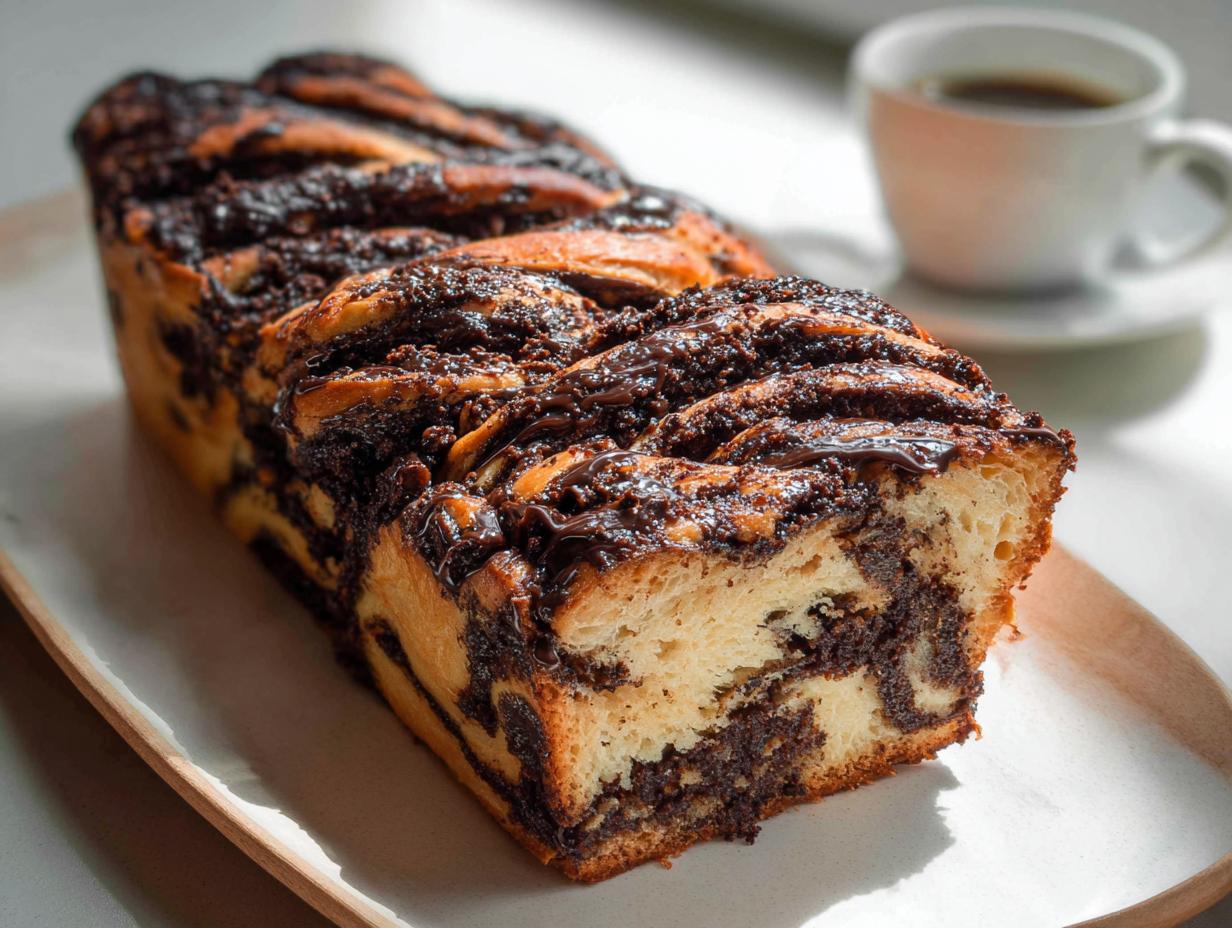
Winter Chocolate Babka seemed like something only professional bakers made, right? When I first saw pictures of those gorgeous, glossy swirls, I thought, “Nope. Too fancy. Too much yeast work.” I actually tried a store-bought version once, and honestly, it was dry and sad. That’s when I knew I had to crack the code for my ‘Noob Recipes’ crew because everyone deserves this level of cozy, chocolatey joy in the cold months.
The secret, I discovered after ruining three attempts involving way too much kneading, is patience with the chilling time. My first few tries were disasters because I rushed the dough rest. I finally figured out that letting the dough hang out in the fridge overnight made the rolling and twisting part feel like playing with playdough instead of sticky cement! This recipe isn’t about brute strength; it’s about smart resting periods. Trust me, if you can follow simple mixing instructions and own a loaf pan, you are totally equipped to make the most incredible, decadent Winter Chocolate Babka you’ve ever tasted.

Why You Will Master This Winter Chocolate Babka
I know baking bread feels intimidating, but I promise you, this recipe strips away all the scary parts. We’ve simplified the yeast steps and made the filling foolproof. You don’t need to be a pastry chef to get those amazing, defined swirls in your finished loaf. This Winter Chocolate Babka is designed for success right out of the gate!
Quick Benefits for the Home Baker
- The overnight chill time does most of the hard work for you, meaning less active kneading time on baking day.
- The flavor payoff is enormous! It tastes like you spent all day in a fancy European bakery, but the actual hands-on time is surprisingly short.
- That glossy syrup finish is mandatory, but it’s just a quick boil and brush—instant professional look with zero stress.
- It freezes beautifully, so you can bake one loaf now and save the winter joy for later!
Equipment Needed for Your Winter Chocolate Babka
You don’t need a ton of fancy gear for this, which is why I love it for beginners. Most of this stuff is already in your kitchen, I bet!
- A stand mixer with a dough hook attachment (though you can totally do this by hand if you have strong arms!).
- A 9-inch loaf pan.
- Parchment paper—don’t skip this, it makes life so much easier.
- A small saucepan for making that essential syrup.
- A sharp knife or bench scraper for cutting the dough log in half.
- Measuring cups and spoons, naturally.
The Ingredient List for Perfect Winter Chocolate Babka
Okay, let’s look at what you need to gather for this spectacular Winter Chocolate Babka. Don’t let the list scare you; it breaks down into three simple parts: the dough, the mind-blowing filling, and the shiny syrup that seals the deal. I always lay everything out on the counter first. It makes the process so much smoother, especially when the dough is ready to be worked.
We rely heavily on good quality chocolate for the filling because that’s where 90% of the flavor comes from. Everything else is pretty standard pantry stuff. If you’re organized, you can have everything measured out in little bowls before you even start mixing the yeast!
| Component | Ingredient | Amount Needed |
|---|---|---|
| Dough Base | Active Dry Yeast | 2 teaspoons |
| Dough Base | Milk (slightly warmed) | Scant 1/2 cup |
| Dough Base | Unsalted Butter (cubed, room temp) | 3 ounces (6 tablespoons) |
| Dough Base | All-Purpose Flour | 2 cups |
| Filling | Unsalted Butter (cubed) | 3 1/2 ounces (7 tablespoons) |
| Filling | Granulated Sugar | 3/4 cup |
| Filling | Bittersweet Chocolate (chopped) | 3 ounces |
| Filling | Unsweetened Cocoa Powder | 5 tablespoons |
| Filling | Chopped Nuts (your choice!) | 1/2 cup |
| Syrup | Sugar, Water, Honey | 1/2 cup, 1/2 cup, 1 tablespoon |
Notes on Key Ingredients and Substitutions
A few little things make a huge difference here. First, your butter and egg for the dough absolutely must be at room temperature. If they are cold, the dough won’t incorporate them properly, and you’ll end up with a tough texture. Seriously, pull those out an hour before you start.
For the nuts in the filling, use whatever you love! Hazelnuts are traditional, but walnuts are my personal go-to because they have a nice earthy flavor that stands up to the dark chocolate. If you have a nut allergy, swap them out completely for an extra half cup of those crumbled brownie bits—more chocolate never hurt anyone!
When melting the butter for the filling, make sure you remove it from the heat *before* adding the chopped chocolate. The residual heat is plenty to get that chocolate smooth and glossy without burning it. That’s a common beginner mistake, so watch out for that!
Step-by-Step Instructions for Winter Chocolate Babka
This is where the magic happens! Don’t let the number of steps overwhelm you. We are just following a clear roadmap to create the most amazing Winter Chocolate Babka loaf. I’ve broken it down so you can tackle each part without rushing. Remember the biggest trick: chill the dough!
Preparing the Yeast Dough Base
First things first, we wake up the yeast. In your stand mixer bowl—no need to clean it from the ingredient staging—mix that yeast, the slightly warm milk (it should feel just barely warm to the touch, not hot!), and one teaspoon of sugar, plus about a third of your flour. Give it a quick stir and just let it sit on the counter for about 10 to 15 minutes. If it gets foamy and bubbly on top, your yeast is alive and happy! If nothing happens, toss it and start over with fresh yeast.
Now, attach that dough hook—this is where the mixer earns its keep. On low speed, mix in your room-temperature butter cubes, one by one. Once they are mostly incorporated, add the egg and the salt. Keep the mixer running low, and slowly start raining in the rest of your flour. Once it all comes together, crank the speed up to medium-high. You need to knead this dough for a solid 5 minutes until it looks smooth and elastic. It should pull away from the sides of the bowl nicely. Now, cover that bowl up tight and stick it in the fridge for at least 6 hours, but honestly, overnight is better. This rest period is crucial for easy rolling later.
Creating and Layering the Chocolate Filling
While the dough is chilling, or just before you roll it out, make the filling. This part is faster than you think! In a small saucepan over low heat, melt those 3 1/2 ounces of butter. Once it’s liquid, stir in the filling sugar until it mostly dissolves. Take the pan completely off the heat. Now, drop in your chopped bittersweet chocolate. Let it sit there for a full minute without stirring—this lets the residual heat do the work. After 60 seconds, stir it until it’s a glossy, smooth sauce. Stir in your cocoa powder and cinnamon until there are no dry pockets left. Set this aside to cool slightly while you prep your dough.
Shaping and Proofing the Winter Chocolate Babka
Take your chilled dough out—it will be firm, which is perfect. Lightly flour your counter and roll that dough into a big rectangle, aiming for about 12 by 20 inches. If it snaps back at you, just let it sit for five minutes to relax before pushing it out further. Once you have your rectangle, spread that gorgeous chocolate filling evenly over the entire surface, right out to the edges. Sprinkle your chopped nuts and any brownie bits you’re using over the chocolate layer.
Starting on one of the long sides, roll that dough up super tightly into a long log, like you’re rolling up a yoga mat. Now for the signature look: take a very sharp knife—or a bench scraper if you have one—and slice that log right down the middle lengthwise. You need to expose the layers! Place the two cut halves side-by-side, making sure those cut, filling-side-up halves are facing the ceiling. Gently twist the two halves together, just like braiding hair, keeping the cut sides visible. Carefully lift this twisted beauty and tuck it into your prepared, parchment-lined loaf pan. Cover it loosely with plastic wrap and let it rise in a warm spot for about 2 hours until it looks puffy and happy.

Baking and Syrupping for Maximum Flavor
About 15 minutes before the rise is done, preheat your oven to 375ºF (190ºC). Pop the babka onto the middle rack and bake for about 30 minutes. You want to check for doneness by inserting a skewer into a doughy spot—not a big swirl of filling—and make sure it comes out clean. When it’s done, get it out immediately. This next step is non-negotiable for the best Winter Chocolate Babka: while it’s still piping hot, take your cooled syrup (we made that while it was rising!) and immediately spoon or brush it all over the top. The hot bread soaks up that sweet moisture, locking in flavor and shine. Let it cool completely in the pan before you try to slice it, or you’ll tear up those beautiful swirls!
Tips for Absolute Success with Your Winter Chocolate Babka
I learned the hard way what makes the difference between a good babka and a show-stopping Winter Chocolate Babka. These aren’t just suggestions; they are the lessons I learned after my first few sticky, under-baked attempts!
- Don’t Over-Knead Before the Chill: When you knead the dough initially, stop as soon as it’s smooth. If you over-develop the gluten before chilling, it can become too tough to roll thinly later. Trust the long, cold rest to develop structure.
- The Syrup Must Be Cool: This is a huge one! If your syrup is hot when you pour it over the hot babka, it just runs off or dissolves the top crust. Make the syrup early, let it cool completely to room temperature, and then apply it to the hot bread. It absorbs perfectly then!
- Handle the Twist Gently: When you slice the log lengthwise, try to keep the cut sides facing up the whole time. If you flip them over, the bottom layer of chocolate gets stuck to the counter instead of becoming part of the beautiful swirl inside your loaf.
- Parchment is Your Best Friend: Seriously, use the parchment sling in the loaf pan. This bread is rich, and trying to pry a sticky, sweet loaf out of a bare pan is a recipe for tears. The overhang lets you lift the whole thing out safely.
Storing Your Homemade Winter Chocolate Babka
This bread is so rich that it actually stays really good for several days! Since this Winter Chocolate Babka is dense and moist thanks to that syrup, it holds up well on the counter. You don’t want to refrigerate it unless you absolutely have to, because cold air dries out bread quickly. Here is how I manage the leftovers:
| Storage Method | Duration | Reheating Tip |
|---|---|---|
| Room Temperature | Up to 4 days | Microwave a slice for about 10 seconds to bring back the softness. |
| Freezing | Up to 2 months | Wrap tightly in plastic wrap, then foil. Thaw overnight on the counter. |
Frequently Asked Questions About Winter Chocolate Babka
I get so many questions about the dough since so many people are new to working with yeast. Don’t worry if your first attempt at mixing bread dough feels weird—that’s totally normal!
Q1. My dough felt too sticky to roll out after chilling. What went wrong?
If the dough is sticking everywhere, it usually means you either didn’t chill it long enough, or you added too much liquid initially. Don’t panic! Flour your surface generously, and use a bench scraper to help lift and move it. If it’s still impossible, let it sit on the counter for 15 minutes to warm up slightly, then try again. A cold dough resists shaping.
Q2. Can I skip the overnight chill and just bake it the same day?
Yes, you absolutely can! The recipe works if you bake it the same day. After kneading, let it rise in a warm spot for about an hour until doubled, then punch it down and proceed. However, the texture won’t be quite as tender, and the dough will be stickier to roll out. The overnight rest truly improves the final sweet bread.
Q3. I don’t have hazelnuts. Can I use different nuts or skip them entirely?
Go for it! Feel free to use walnuts, pecans, or almonds in the filling. If you have a serious nut allergy, just leave them out. You might want to add a tablespoon more of cocoa powder or some mini chocolate chips to the filling just to make sure you still have enough delicious stuff to spread around.
Q4. Why is my loaf not rising well during the final proof?
The final rise needs warmth! Make sure you put it in a spot away from drafts. If your kitchen is cold, try turning your oven on the lowest setting for two minutes, then turn it OFF. Place the covered babka in that slightly warm, turned-off oven for the 2-hour rise. That gentle heat will get that yeast going again!
Share Your Beautiful Babka Creations
I honestly can’t wait to see your gorgeous chocolate swirls! Snap a picture of your loaf and drop a comment below telling me how it turned out. Did you use walnuts or hazelnuts? I love hearing from you all! You can also follow along for more cozy recipes on Pinterest or Facebook.
Print
Amazing 3 Step Winter Chocolate Babka
- Total Time: 3 hours 15 minutes (assuming same-day bake and standard rise)
- Yield: 1 loaf
- Diet: Vegetarian
Description
Winter Chocolate Babka. This recipe guides you through making a rich, swirled chocolate bread perfect for cold weather. You will create a tender dough, layer it with a deep chocolate and nut filling, and finish it with a sweet syrup.
Ingredients
- 2 teaspoons active dry yeast
- Scant 1/2 cup (100g) whole or lowfat milk, very slightly warmed
- 1 teaspoon sugar
- 3 ounces (90g, 6 tablespoons) unsalted butter, at room temperature, cubed (for dough)
- 1 large egg, at room temperature
- 1/4 teaspoon kosher or sea salt
- 2 cups (280g) all-purpose flour
- 3 1/2 ounces (100g, 7 tablespoons) unsalted butter, cubed (for filling)
- 3/4 cup (150g) granulated sugar (for filling)
- 3 ounces (80g) bittersweet chocolate, coarsely chopped
- 5 tablespoons (40g) unsweetened cocoa powder, natural or Dutch-process
- 1 teaspoon ground cinnamon
- 1/2 cup (65g) toasted hazelnuts, walnuts, almonds or pecans, coarsely chopped
- optional: 1/2 cup (65g) crumbled brownie or chocolate wafer cookie bits
- 1/2 cup (100g) sugar (for syrup)
- 1/2 cup (125ml) water (for syrup)
- 1 tablespoon honey (for syrup)
Instructions
- Mix the yeast, warm milk, 1 teaspoon sugar, and 1/3 cup flour in a stand mixer bowl. Let it rest until bubbles appear, about 10 to 15 minutes.
- Attach the dough hook. Mix in the 3 ounces of butter on low speed, then add the egg and salt. Gradually add the remaining flour until incorporated.
- Knead on medium-high speed for about 5 minutes until the dough is smooth.
- Refrigerate the dough, covered, for 6 hours or overnight, or proceed directly if you prefer.
- Butter a 9-inch (23cm) loaf pan and line the bottom and sides with parchment paper, leaving an overhang.
- Make the filling: Melt the 3 1/2 ounces of butter in a saucepan. Stir in the sugar until dissolved. Remove from heat, add the chocolate, wait 1 minute, then stir until smooth.
- Stir the cocoa powder and cinnamon into the melted chocolate mixture. Set aside.
- On a floured surface, roll the dough into a 12 x 20-inch (30 x 50cm) rectangle. Rest briefly if the dough resists rolling.
- Spread the chocolate filling evenly over the dough, reaching the edges. Sprinkle the chopped nuts and cookie/brownie bits (if using) over the filling.
- Starting from a long side, roll the dough tightly into a 20-inch (50cm) log.
- Use a sharp knife to slice the log in half lengthwise, keeping the cut sides facing up.
- Overlap the two halves and twist them together, maintaining the cut sides facing up.
- Place the twisted dough into the prepared loaf pan, tucking the ends to fit.
- Let the babka rise in a warm spot for about 2 hours until puffy and nearly doubled.
- Prepare the syrup: Boil the 1/2 cup sugar, water, and honey for 4 minutes in a small saucepan, skimming foam. Remove from heat and let cool to room temperature.
- Fifteen minutes before baking, preheat your oven to 375ºF (190ºC).
- Bake on the middle rack for about 30 minutes. A skewer inserted into a doughy area (not filling) should come out clean.
- Remove the babka from the oven. Immediately spoon or brush the room-temperature syrup over the hot bread.
- Allow the babka to cool completely before removing it from the pan and slicing.
Notes
- You can mix this dough by hand; knead until smooth before the resting period.
- The dough benefits from an overnight rest, but you can roll it the same day if it is firm enough.
- Serve sliced. It keeps for up to 4 days at room temperature or can be frozen for up to 2 months if wrapped well.
- Prep Time: 45 minutes (plus rising/chilling time)
- Cook Time: 30 minutes
- Category: Bread/Pastry
- Method: Mixing, Kneading, Rolling, Twisting, Baking
- Cuisine: Jewish/Eastern European