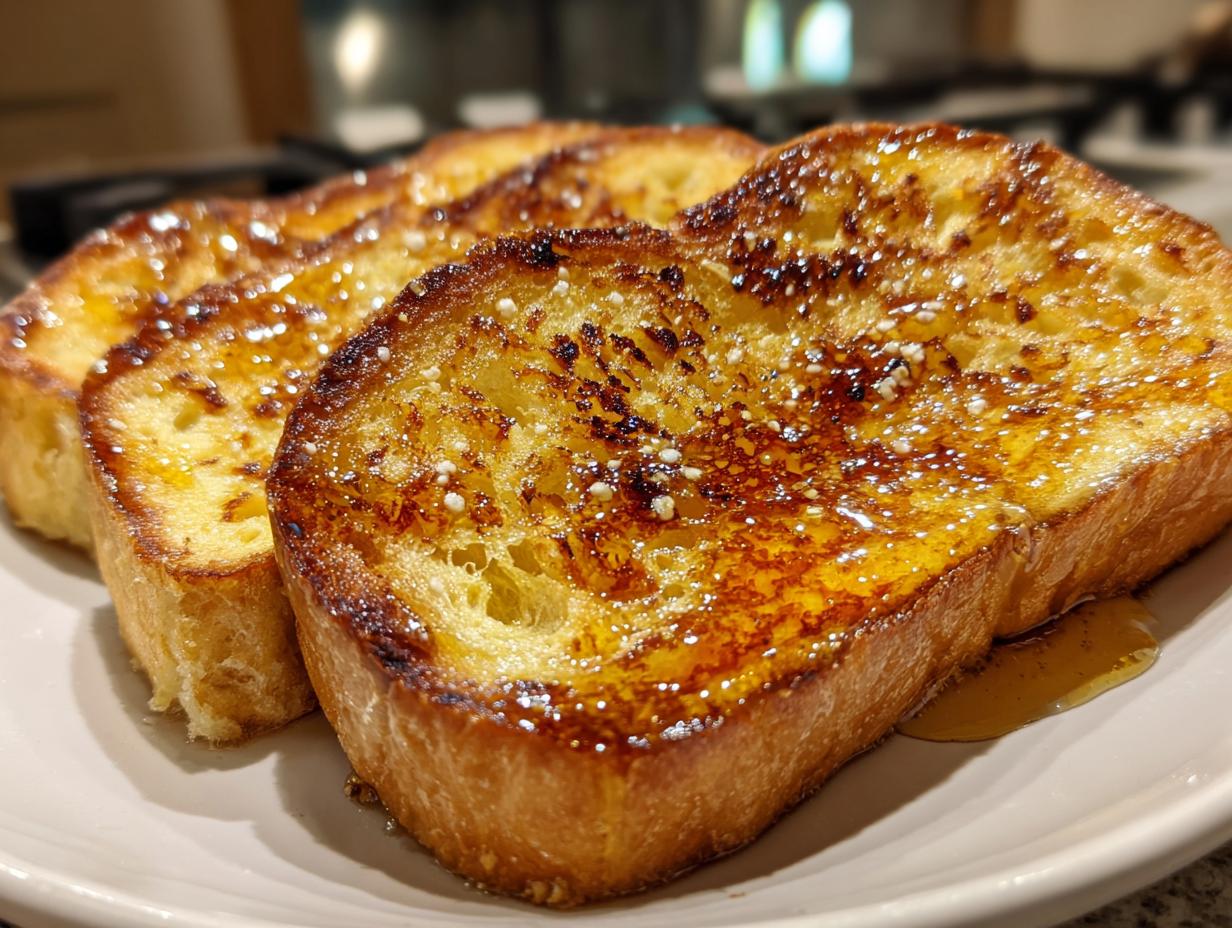
If you need a breakfast that feels wildly indulgent but takes less time than brewing a pot of coffee, you have come to the right place. Forget complicated baking projects; we are talking about the most glorious, soft, and slightly crisp toasted milk bread with honey you’ve ever made right on the stovetop. I swear, I burned so many slices trying to get this right—too much heat, not enough milk—but I finally nailed the sweet spot!
This recipe is my absolute go-to when I want a sweet breakfast that actually tastes like a treat. It’s vegetarian, uses maybe five ingredients, and truly sings when served warm. We’re aiming for that pillowy center that just melts in your mouth, contrasted with edges that have a whisper of golden crunch. Trust me, once you try my perfected stovetop method, you won’t look back. It’s just that easy to make incredible toasted milk bread with honey!

Why You Will Love This Toasted Milk Bread with Honey
Honestly, what’s not to love? This recipe is pure kitchen magic for busy mornings. You get that incredible, comforting flavor of toasted milk bread with honey in just about ten minutes total. It’s the definition of simple done right, meaning you don’t need any fancy equipment or weird ingredients to feel like you’ve made something special.
The texture is what really sells it for me. It’s not dry toast; it’s fluffy inside, warm, and just begging for that sweet drizzle. It’s the perfect little luxury to start any day.
Quick Preparation Time for Your Morning
Seriously, check the clock! We’re looking at four minutes of prep and six minutes of cooking. If you can make a cup of coffee, you can make this. It’s lightning fast. This means you can actually sit down and enjoy a proper, sweet breakfast instead of grabbing something rushed on your way out the door. It’s perfect for those days when you need a quick win.
Perfect Texture Every Time with This Toasted Milk Bread with Honey
This is where the stovetop technique really shines over a regular toaster. We’re soaking the bread just enough in milk to keep the inside incredibly soft and pillowy—think French toast texture, but simpler. Then, the butter in the skillet gives you those beautiful, lightly crisp edges. It’s that contrast between the warm, yielding interior and the gentle golden sear on the outside that makes this toasted milk bread with honey so addictive.
Essential Equipment for Making Toasted Milk Bread with Honey
You don’t need a huge arsenal of gadgets for this recipe; that’s part of the charm! Since this is a quick stovetop preparation, we only need a few basics to make the best toasted milk bread with honey. Keep these items ready, and you’ll be cooking in no time.
Stovetop Essentials
- A good quality nonstick skillet – this is key so you don’t lose any of that buttery goodness or tear your soft bread.
- A small plate for laying out the bread while you brush on the milk.
- A pastry brush or even the back of a spoon for evenly distributing the milk over the bread slices.
Simple Ingredients for Authentic Toasted Milk Bread with Honey
The beauty of making amazing toasted milk bread with honey is that you probably have everything you need right now. There are no complicated steps or specialty flours involved, just simple pantry staples treated right. I always lay my ingredients out first, just like I’m getting ready for a baking show. It keeps me organized and stops me from accidentally using salted butter!
Remember, the quality of the bread makes a huge difference here. We need something substantial to soak up that milk without falling apart. Here is exactly what I use to get that perfect sweet breakfast every time:
| Ingredient | Amount | Notes |
|---|---|---|
| Milk Bread Slices | 4 slices | Must be about 3/4 inch thick—don’t skimp on the thickness! |
| Whole Milk | 3 tablespoons | This is what makes the inside so fluffy. |
| Unsalted Butter | 2 tablespoons | Crucial for that golden, non-stick sear. |
| Honey | 2 tablespoons | For drizzling right at the end. |
| Salt | 1/8 teaspoon | Trust me on this one; it makes the honey pop! |
Step-by-Step Instructions for Perfect Toasted Milk Bread with Honey
Okay, this is where the magic happens, and I promise you, if you follow these timings, you’ll get the perfect rich, soft, and golden toasted milk bread with honey. Don’t rush the heating process—that’s my number one piece of advice for any stovetop toast recipe. We want warmth, not fire!
Preparing the Bread Slices
First thing’s first, get your four slices of thick milk bread laid out flat on a plate. We’re going to give them a little milk bath, but we aren’t soaking them like French toast. Take your three tablespoons of whole milk and, using your pastry brush, gently coat both sides of every slice. You want the bread damp, not dripping wet. It’s just enough liquid to steam the inside slightly while it cooks, which is how we achieve that wonderful soft center later on.
Achieving the Ideal Golden Sear on Your Toasted Milk Bread with Honey
Next, turn your attention to the stove. Set your nonstick skillet over medium-low heat. This is super important—if it’s too high, the outside will burn before the inside even warms up! Let the pan heat for about a minute. Now, drop in your two tablespoons of unsalted butter. Watch it melt and swirl around until it coats the bottom of the pan nicely. It should foam slightly but not immediately start turning brown.
Gently place your milk-brushed slices into the hot butter, making sure they aren’t overlapping. We are only cooking two at a time unless your pan is huge. Let those babies cook for a solid two to three minutes on the first side. You are looking for a beautiful, even golden-brown color—that’s the crisp exterior starting to form! Peek underneath after two minutes; if it’s pale, give it another minute.

Finishing the Cook and Applying the Sweet Topping
Once the first side is perfect, use a spatula to flip each slice carefully. Cook the second side for just about two minutes. Since the pan is already hot and the bread is already partially cooked, this side goes faster. You want it warmed through and soft, not necessarily as deeply browned as the first side.
Quickly remove the bread from the skillet and place it right onto your serving plates. Now for the best part of this toasted milk bread with honey: the drizzle! Take your two tablespoons of honey and drizzle it generously over the warm slices. The heat helps the honey spread out beautifully. Finally, take that tiny sprinkle of salt—the 1/8 teaspoon—and dust it lightly over the top. That little bit of salt is the secret weapon that makes the honey taste sweeter. Serve this immediately while it’s warm for the absolute best texture!
Tips for Success When Making Toasted Milk Bread with Honey
I’ve learned a few things the hard way when making this classic toasted milk bread with honey, and I want to save you the trouble! It’s a simple recipe, but those little details make the difference between good toast and *great* toast. Pay attention to the bread itself and, most importantly, the temperature control, and you’ll nail this sweet breakfast every single time.
Selecting the Right Bread Thickness
If you use standard, thin sandwich bread, I’m warning you now: it’s going to turn into a cracker before the inside even warms up. Milk bread is naturally soft, but it needs structure! I insist on slices that are at least 3/4 inch thick. That thickness gives you the necessary buffer zone. It allows the outside to crisp up nicely in the butter while the center stays wonderfully soft and steamy from the milk you brushed on earlier.
Controlling the Heat for Your Toasted Milk Bread with Honey
This is the biggest pitfall, honestly. If you crank the heat to medium or medium-high because you’re in a hurry, the butter will burn instantly, and you’ll end up with bitter, scorched edges and cold, raw centers. You absolutely must keep the heat at medium-low. This gentle warmth encourages the butter to sizzle softly, slowly browning the bread evenly while allowing the milk to soak in and warm everything through. Patience here pays off big time for your toasted milk bread with honey!
Storage and Reheating Instructions for Leftover Toasted Milk Bread with Honey
Look, this toasted milk bread with honey is genuinely best enjoyed the second it comes out of the skillet—the contrast between the crisp outside and the soft inside fades fast. If you happen to have leftovers (which is rare in my house!), you need to handle them carefully, especially the honey drizzle. Don’t store it with the honey already on it; that sugar will just make the bread soggy overnight.
If you must save it, let the slices cool completely first, then store them in an airtight container at room temperature. If you try to refrigerate it, it will definitely get tough! Reheating is the secret to bringing back some of that glory.
| Storage Duration | Reheating Method | Notes |
|---|---|---|
| Up to 1 Day | Toaster Oven or Skillet | Reheat gently to re-crisp the outside. |
| Longer than 1 Day | Discard | Texture loss is too significant for this recipe. |
Frequently Asked Questions About Toasted Milk Bread with Honey
I get so many questions when people first try this recipe because it seems too simple to be this good! Here are a few things I hear most often about making the best toasted milk bread with honey.
Can I use regular white bread instead of milk bread for this Toasted Milk Bread with Honey?
You certainly can try, but you won’t get the same amazing result! Milk bread is special because it has extra milk and sometimes egg, which gives it that incredible soft, almost cottony texture. Regular white bread will work in a pinch, but it tends to soak up the milk too fast and can get a little tough or soggy. For the best fluffy interior, stick to milk bread or a good quality Japanese shokupan if you can find it.
What is the best way to get the softest center in my honey toast?
It all comes down to two things we talked about: milk and heat! First, make sure your bread is thick—at least 3/4 inch. Second, and this is crucial for that soft center in your honey toast, keep your skillet on medium-low heat. You need slow, gentle warmth to steam the interior while the butter crisps the outside. If the heat is too high, you’ll burn the exterior long before the center gets warm and tender.
Final Thoughts on This Simple Sweet Breakfast
There you have it—the fastest, fluffiest, most satisfying sweet breakfast you can whip up before work, honestly! This toasted milk bread with honey recipe is proof that you don’t need complicated steps to achieve something truly delicious. I truly hope this becomes one of your new favorites. You can see more of our simple recipes on our Pinterest page.
Let me know down in the comments if you tried it and what you thought! Did you add anything extra? I always love hearing how you make the recipes your own. Don’t forget to leave a rating if this made your morning brighter! You can also follow our journey on Facebook.
Print
4 Amazing Toasted milk bread with honey secrets
- Total Time: 10 minutes
- Yield: 2 servings
- Diet: Vegetarian
Description
Toasted milk bread with honey that is soft fluffy and lightly crisp. An easy sweet breakfast made on the stovetop with simple ingredients.
Ingredients
- 4 slices milk bread about 3 4 inch thick
- 3 tablespoons whole milk
- 2 tablespoons unsalted butter
- 2 tablespoons honey
- 1 8 teaspoon salt
Instructions
- Lay the bread slices on a plate in a single layer.
- Brush the milk lightly over both sides of each slice.
- Heat a nonstick skillet over medium low heat.
- Add the butter and let it melt and coat the skillet.
- Place the bread slices in the skillet in a single layer.
- Cook for 2 to 3 minutes until the bottoms are lightly golden.
- Flip and cook for 2 minutes until warmed through and soft.
- Remove from the skillet and drizzle evenly with honey.
- Sprinkle lightly with salt and serve warm.
Notes
- Serve immediately for the best texture.
- Use thick cut bread for a softer center.
- Prep Time: 4 minutes
- Cook Time: 6 minutes
- Category: Breakfast
- Method: Stovetop
- Cuisine: American